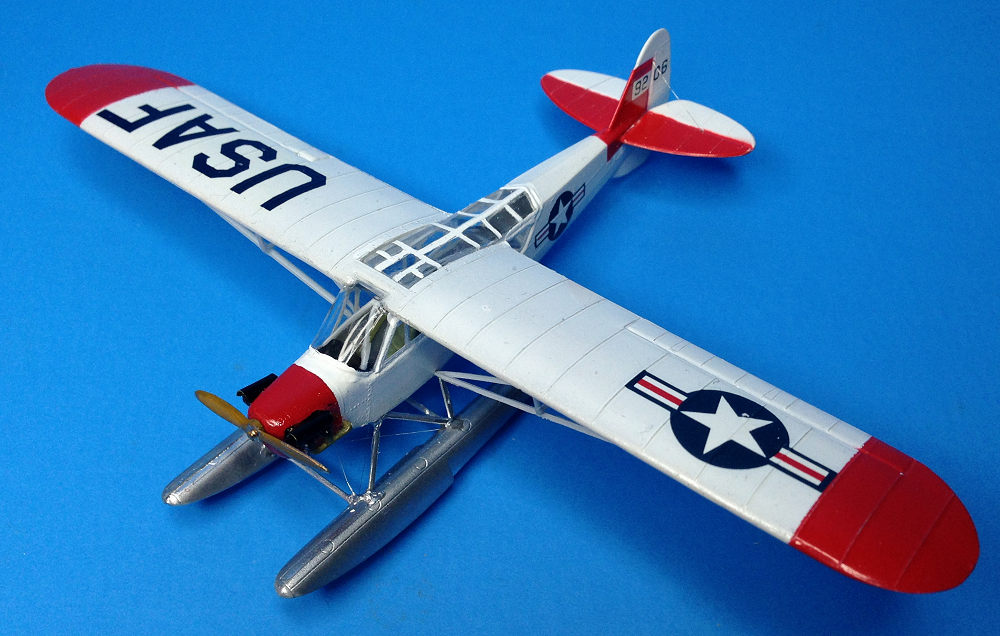
KP 1/72 L-4H Cub Floatplane
| KIT #: | 32 |
| PRICE: | $15.00 |
| DECALS: | Two options |
| REVIEWER: | Joel Hamm |
| NOTES: | OOP |
| HISTORY |
 This
build renews an infatuation with L-birds, transports, and other drafted
civilian aircraft. What can one say about the Piper Cub? Nothing new. Since
birth in 1930 it has flown everyplace and done everything for everyone.
Oodles of them are still flitting about. The design has been revised with
modern materials and the type is still in production. This project
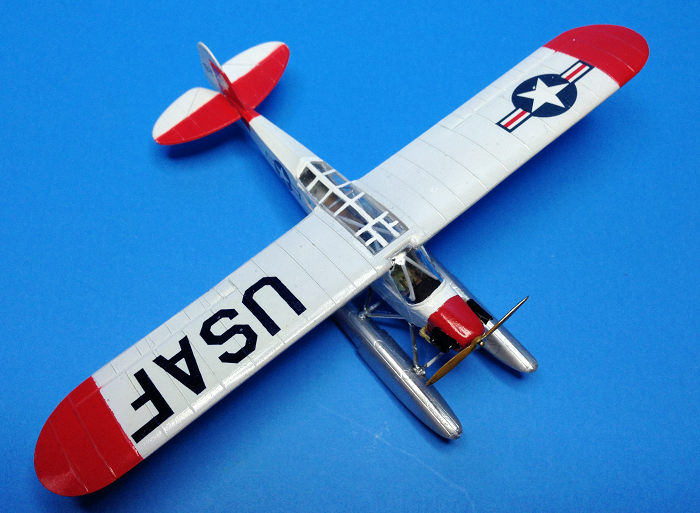
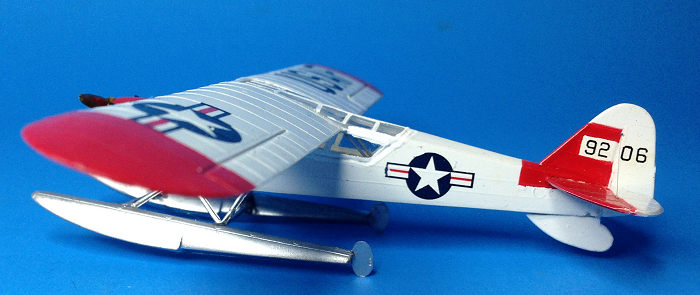
represents a float equipped USAF specimen in arctic livery, from an
operation about which nothing can be found in GOOGLE.
This
build renews an infatuation with L-birds, transports, and other drafted
civilian aircraft. What can one say about the Piper Cub? Nothing new. Since
birth in 1930 it has flown everyplace and done everything for everyone.
Oodles of them are still flitting about. The design has been revised with
modern materials and the type is still in production. This project
represents a float equipped USAF specimen in arctic livery, from an
operation about which nothing can be found in GOOGLE.
| THE KIT |
Good old
fashioned injected molded plastic; sans resin, photo-etch, paint masks, or other
after-markets; which doesn’t mean it couldn’t benefit from a few goodies. This
kit has festered in my stash for perhaps
 two
decades, but the molding is up to current standards. Parts are what you might
call petite, particularly struts. This makes a bit of a tickle out of cleaning
up the minor flash and seam lines. Some struts are properly arranged on the
sprue with the connection gates at their ends. Others, for some reason, have the
injection ports mid span. A sharp sprue nipper is indispensable. Transparencies
are impressively smooth and clear, with sharp, properly scaled framing.
two
decades, but the molding is up to current standards. Parts are what you might
call petite, particularly struts. This makes a bit of a tickle out of cleaning
up the minor flash and seam lines. Some struts are properly arranged on the
sprue with the connection gates at their ends. Others, for some reason, have the
injection ports mid span. A sharp sprue nipper is indispensable. Transparencies
are impressively smooth and clear, with sharp, properly scaled framing.
KP went totally bazonkers furnishing the interior, comprised of an unnecessary floorboard, two undersize seats, two rudder bars which do not exist in the actual airplane, two control sticks with swollen pickle handles (the real thing has straight, unadorned sticks), an instrument panel, with imaginative dial face engravings, which needs to have a cowling extension added to be properly mounted, and three sections of strut-work that assemble into the structural cage.
| CONSTRUCTION |
Starts with assembling two halves of an engine representation and fixing it into the nose before joining the fuselage halves. The cylinders are hardly convincing, but at this size they neither can nor need to be. A more convenient sequence would be gluing a crankcase block into the body and inserting the cylinders, post painting, through the cowl openings. The cylinders must be far enough forward to later fit the exhaust manifold into the port on the cowl side, which must be drilled out.
 Fashioning
the block from lead or depleted uranium would help the plane sit more properly
nose low; but it can’t rock too far tailward before resting on the ventral fin.
Fashioning
the block from lead or depleted uranium would help the plane sit more properly
nose low; but it can’t rock too far tailward before resting on the ventral fin.
Realism might be improved by replacing the cylinders with a quartet cut from a small radial engine, but they will be covered by a cooling shroud anyway.
No complaints about fit. Nothing much needs fitting besides the body and float halves. Typically short-run, no alignment pins are provided. Best way for a good join is to dry clamp the clam shells together and run liquid cement into the seams. Leave off the tail feathers to facilitate masking and painting.
Water rudders are missing from the part list, but are easily formed from pieces of brass or palsticard.
The instructions sheet includes 1/72 3-views to get the float struts on at the proper angle. Also to correctly conjoin the interior fuselage bracing. Both steps are best deferred until all sub-assemblies have been painted and decaled.
| COLORS & MARKINGS |
L-4’s in US service usually came dressed
in standard OD / gray. MM recently reviewed a dedicated decal sheet in those
hues released by Starfighter. The box art white-red-silver snow sc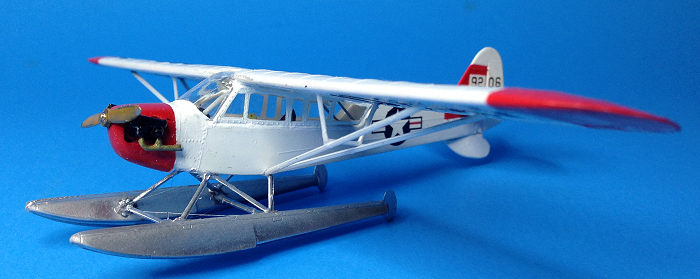 heme
is a bit of relief from the same-old-same-old.
heme
is a bit of relief from the same-old-same-old.
Over-all gloss white looks and sticks best over a flat undercoat, such as Tamiya Liquid Surface Primer. Alternately, the primer can be gloss coated with Future / Pledge / Kleer; as this project was. Red came out of a Testors square bottle. Masking is a challenge on these small parts and sharp curves. On the greenhouse I used aluminum foil coated with washable school glue, which wasn’t all that washable. This kit is a good candidate for someone to produce a mask set.
The Propagteam decals are top notch. Thin but strong. Conformable with invisible clear film. Pity they can’t be used on this kit. Except for the wing insignia, they are grossly oversize, requiring a dive into the spares trove. The only “USAF” markings I could find, that did not commit suicide on contact with water, were also slightly oversize. C’est la vie.
| FINAL CONSTRUCTION |
Most of the assembly happens after the sub-parts are painted. Tailplanes can go on at this point. They have small locating pins and fuselage holes, but that won’t keep them from getting knocked off two or three times. If rigging will be added they should first be drilled to thread the wires through.
Next the
engine needs to be completed. The plastic cooling shrouds are nowhere near
proper shape or thickness, so I curled and cut new ones from pieces of brass
fret. Affixing the exhaust manifolds was a real chore, since I’d stuck the
cylinders a few micro-millimeters too far aft and the port in the cowl side
 was
now too far forward and had to be filled and re-drilled. The conglomeration
still didn’t look right. The real thing has valve cover boxes protruding
outboard of the shroud. I simulated these by sticking globs of gel cyano to
the cylinders, mummifying them with accelerator, and sanding flat. Looks a
bit better now.
was
now too far forward and had to be filled and re-drilled. The conglomeration
still didn’t look right. The real thing has valve cover boxes protruding
outboard of the shroud. I simulated these by sticking globs of gel cyano to
the cylinders, mummifying them with accelerator, and sanding flat. Looks a
bit better now.
The instrument panel and scratch bent cowl (also brass) got stuck in the cockpit opening, followed by the prebuilt seating arrangement. It’s best to glue on the transparent sidewalls before hooking together the jungle jim of structural tubes; that way all the angles come out right. The painting guide says the latter should be gray, but they were black on all the Pipers I’ve known / flown, whatever the outside color.
For fastening transparencies together I discovered a marvelous water based clear gel at the Everything Costs a Dollar Store. It’s not the strongest stickum in the world; but it may be the clearest, and most free from goober worries. When wet it comes off with a damp swab; when dry pick it off with an Exacto tip. Thick and viscous, with lots f grab; but shrinks to invisibility as it sets.
The canopy parts fit together tightly, but the seam between the roof and walls aft of the wing comes out a bit thick and sloppy. Nothing can be done except disguise it with too much paint. A single piece glass house would have been preferable, even a vacanopy; but no one asked my advice before designing the kit.
 The
single piece wing with integral front spar makes that attachment a breeze.
No clamping, propping, jigging, or messing with dihedral. Main struts need
barely a tad of trimming, and mitering of their attach points; then the
cabanes wedge neatly under them and into the holes sunk in the wing
underside.
The
single piece wing with integral front spar makes that attachment a breeze.
No clamping, propping, jigging, or messing with dihedral. Main struts need
barely a tad of trimming, and mitering of their attach points; then the
cabanes wedge neatly under them and into the holes sunk in the wing
underside.
Before mating the floats to the fuselage the horizontal cross rigging, if desired, should be done. Once the struts are set up firm, fore and aft cross wires can be added. After decades of searching for silver wire thin enough for 1/72 rigging, I cut open an unused USB data cable and discovered within miles of the stuff.
The propeller needs some 600 grit clean-up; then check under 3X magnification and you will find that they have molded in the metal cladding, and even securing rivets, that sheaths the blade leading edges. Nice touch once contrasted with brass paint.
| CONCLUSIONS |
A small, delicate kit that rewards patience dexterity, and scratch-tweaking.
15 March 2018
Copyright ModelingMadness.com
If you would like your product reviewed fairly and fairly quickly, please contact the editor or see other details in the Note to Contributors.
Back to the Main Page Back to the Review Index Page Back to the Previews Index Page