| KIT #: | ? |
| PRICE: | $30.00 MSRP |
| DECALS: | ? |
| REVIEWER: | Len Roberto |
| NOTES: | Lots of aftermarket added. |
| HISTORY |
There are thousands of places to go and read about the Mustang- nothing needs be said here!
| THE KIT |
I have been waiting a year for the Dragon 1/32 Scale Mustang but let’s not get into that now shall we!
Recently, I traded a pile of 1/32 scale modern ordnance to a fellow modeler and in return he graciously sent me the Hasegawa kit as well as:
 -Grand Phoenix resin cockpit
including gunsight and canopy brace
-Grand Phoenix resin cockpit
including gunsight and canopy brace
-True details resin wheels and Vac canopy
-Waldron cockpit placards
-Moskit metal unshrouded exhausts
I had never tried any of these products because I have not felt like I was good enough to pull it all off. But this time I said: go for it- the Mustang is my favorite aircraft and here is all the stuff I need to make my own “ultimate” 1/32 P-51 (for now!) I also dug out a bunch of old FSM mags with articles about modifying the kit…so off I went.
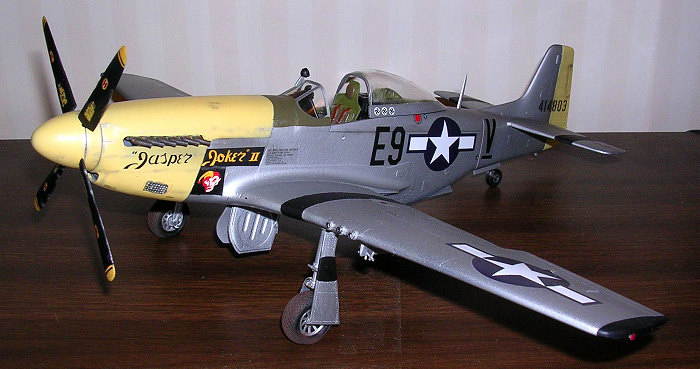
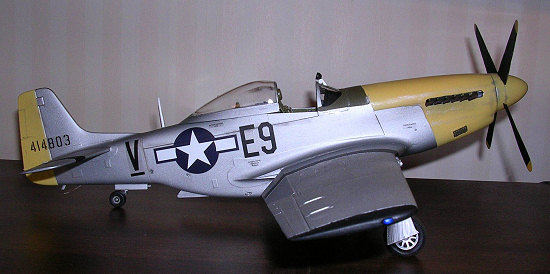
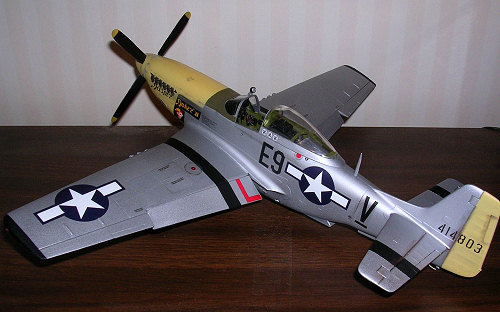
The kit is well known- with it’s own set of problems which I will get into later. I mapped out what I wanted to do and what mods I thought I would try. The next thing I did was pick out a plane to portray. I was limited mostly by the Moskit exhausts- I needed to pick a plane with unshrouded exhausts. I found it on an Aeromaster sheet of 361st FG aircraft and it struck me right away as an attractive scheme. I chose “Jasper Joker II” flown by Lt. Donald Vulgamore of the 376th FS.
| CONSTRUCTION |
I started out with the
cockpit of course. The Grand Phoenix resin set is very nice and went together
quite well. I am not a big resin user but I managed to get all the parts
cleaned and sanded without busting anything! Before putting it all together, I
had 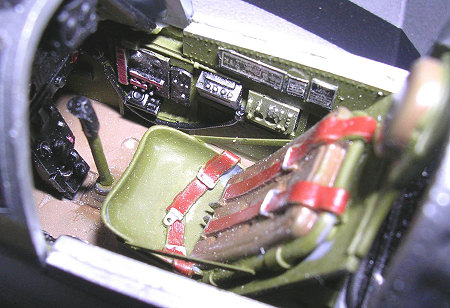 the Waldron placards to
deal with. After consulting with friends, I dove in. Using a piece of glass
and a new blade- I cut out as many as I could. I did not use them all. Some
were just too small and as my frustration level rose, I knew it was time to call
it quits. I wanted to at least get the ones on that would be easily visible and
I think I did that. Dabs of CA glue were used to affix these thin metal
placards. I primed the resin then used Interior Green, Black and Tan (headrest
cushion, seat belts) to paint the cockpit. Drybrushing with silver accented the
Instrument panel and sidewalls. I had to cut a little notch in the panel shroud
to accept the resin gunsight. After this was painted and weathered- I put it
aside and started on the fuselage.
the Waldron placards to
deal with. After consulting with friends, I dove in. Using a piece of glass
and a new blade- I cut out as many as I could. I did not use them all. Some
were just too small and as my frustration level rose, I knew it was time to call
it quits. I wanted to at least get the ones on that would be easily visible and
I think I did that. Dabs of CA glue were used to affix these thin metal
placards. I primed the resin then used Interior Green, Black and Tan (headrest
cushion, seat belts) to paint the cockpit. Drybrushing with silver accented the
Instrument panel and sidewalls. I had to cut a little notch in the panel shroud
to accept the resin gunsight. After this was painted and weathered- I put it
aside and started on the fuselage.
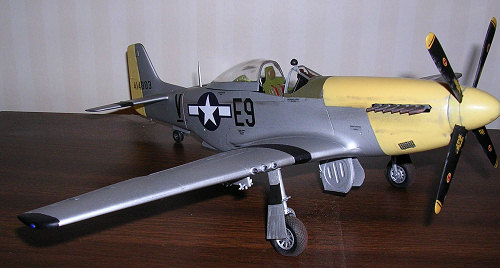
The biggest challenge here involved the exhausts since I would not be using the engine. I wanted to display the model buttoned up so I needed a way to attach the Moskit exhausts. What I ended up doing is building up with plastic card a mount to CA glue the exhausts to so they would sit at the proper angle. It took much fidgeting and test fitting here but it worked.
I also had to test fit the cockpit to make sure it would not bulge out the fuselage. It did require some sanding on both sidewalls to smooth it out. The cockpit fit in nicely and the fuselage halves were glued together following the instructions.
OTHER ADDITIONS TO FUSELAGE:
 I added some
mesh to the chin intake. Also added a plastic rod in the radiator intake
according to references as well as actuator rods for the scoop underneath. I
forgot to add mesh screen to the belly scoop! Oh well….
I added some
mesh to the chin intake. Also added a plastic rod in the radiator intake
according to references as well as actuator rods for the scoop underneath. I
forgot to add mesh screen to the belly scoop! Oh well….
Much putty was used around the fuselage to smooth things out especially at the nose area. The chin intake piece and top cowling needs a lot of attention to fix gaps and steps.
WINGS:
As most know, Mustang
flaps slowly droop along with gear doors after engine shut down due to loss of
hydraulic pressure. The Hasegawa kit’s wings have the flaps molded up. I think
Paragon makes resin flaps but since I did not have those- I decided to
 cut them out and see if I
could get them in the down position. Using a razor saw, I cut them out, sanded
them down and added a styrene strip to the top edge to account for the added
area when it curves down. It took lots more plastic and lots of putty and
sanding to make it all work but it’s done. I also added rods for the gear door
actuators.
cut them out and see if I
could get them in the down position. Using a razor saw, I cut them out, sanded
them down and added a styrene strip to the top edge to account for the added
area when it curves down. It took lots more plastic and lots of putty and
sanding to make it all work but it’s done. I also added rods for the gear door
actuators.
I also decided to drill out the plastic machine gun sleeves and replace with brass rod. Then I used a smaller diameter rod for the actual machine gun barrels and using my dremel, beveled the edges to make them look more realistic. I’m happy with the way these came out! I also drilled out the shell ejection ports.
The wings were attached without trouble though more putty and sanding was needed all around these joins. With the body ready for paint, I stuffed wet tissue around the cockpit, masked the exhausts (I thought they looked just right without any painting!) and headed for paint.
| COLORS & MARKINGS |
 I swear by
Krylon Grey Primer so that went on first- it helps to point out areas needing
more sanding and acts like a filler for other tiny scratches from sanding. Next
up were black ID bands on wings and tail. Mask those off then I turned to the
yellow. Again, taking the lazy route, I used Krylon Sun Yellow for the Nose
and rudder. I like the toughness of Krylon paint and the cost too! After 2
applications, these yellow areas were masked off and then I painted the black
area you see on the nose. Once all this was dry and masked off- I did another
light coat of primer- sanded lightly again, then used Tamiya AS-12 Bare Metal
Silver spray. Yup, I didn’t use the airbrush once on this model.
I swear by
Krylon Grey Primer so that went on first- it helps to point out areas needing
more sanding and acts like a filler for other tiny scratches from sanding. Next
up were black ID bands on wings and tail. Mask those off then I turned to the
yellow. Again, taking the lazy route, I used Krylon Sun Yellow for the Nose
and rudder. I like the toughness of Krylon paint and the cost too! After 2
applications, these yellow areas were masked off and then I painted the black
area you see on the nose. Once all this was dry and masked off- I did another
light coat of primer- sanded lightly again, then used Tamiya AS-12 Bare Metal
Silver spray. Yup, I didn’t use the airbrush once on this model.
When dry, the masks came off and any touchup was done but not much was needed. Aeromaster decals went on very nicely.
| FINAL CONSTRUCTION |
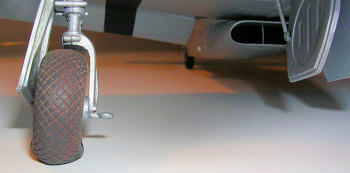
 For the landing
gear, I added brass wire for the brake lines and from my sailing ship parts, 2
tie down rings were added. Gear was installed as well as a ground wire added to
the tail and a vent tube for the battery from more scrap plastic.
For the landing
gear, I added brass wire for the brake lines and from my sailing ship parts, 2
tie down rings were added. Gear was installed as well as a ground wire added to
the tail and a vent tube for the battery from more scrap plastic.
This aircraft had a rear view mirror attached to the right hand windscreen brace (see actual aircraft pic) I crafted it out of plastic and found a round spotlight piece in the spares box. I had hopes of using the vac canopy but I can’t seem to make it fit properly so I used the kit canopy. Prop tips have a black stripe over the normal yellow, and the prop was glued on to the nose since I had no engine to mount it on!
| CONCLUSIONS |
Well- I know it still has flaws but for me, this is the first model I really modified and tried to improve with resin and other added bits. I’m proud of it and that’s all that matters in the end. I hope the Dragon kit is a little less work!
January 2007
Copyright ModelingMadness.com. All rights reserved. No reproduction in part or in whole without express permission.
If you would like your product reviewed fairly and quickly, please contact the editor or see other details in the Note to Contributors.
Back to the Review Index Page 2024