Monogram 1/48 B-24D Liberator
| KIT #: | 5604 |
| PRICE: | $ |
| DECALS: | One option |
| REVIEWER: | Dale Rannals |
| NOTES: |
| HISTORY |
The Consolidated B-24 Liberator was a four engine American heavy bomber, built by Consolidated Aircraft. It has the distinction of being produced in greater numbers than any other American combat aircraft of World War II and still holds the record as the most produced U.S. military aircraft. It was used by many Allied air forces and every U.S. branch of service during the war, attaining a distinguished war record with its operations in the northern European, Pacific and Mediterranean theaters. B-24’s dropped a higher tonnage of bombs than any other Allied aircraft.
The “other” American heavy bomber, the B-24 was always overshadowed by it prettier sibling, the B-17 Flying Fortress. Nonetheless, the B-24 could carry a much heavier bomb load faster and farther than the ’17 could even dream of. It couldn’t quite take as much punishment though….the super efficient Davis wing tended to fold when damaged heavily by flak or fire. Hmmmmm…..that Davis wing…..what is that then?
The Davis wing (from Wikipedia)
The Davis wing is an aircraft wing planform that was used for some time on a variety of World War II aircraft, most notably a number of designs from Consolidated Aircraft, including the B-24 Liberator. Use of the Davis wing ended almost immediately after the end of the war, yet it remains famous to this day.
In the summer of 1937 Reuben H. Fleet, president of
Consolidated Aircraft met with David R. Davis. Davis was a freelance
aeronautical engineer who was trying to find development funds for his wing
design, the "Fluid Foil". Davis had designed the wing "in reverse", starting
with a basic low-drag teardrop shape and then modifying it as required to
provide lift. In comparison to common designs, Davis's design was relatively
"thick", but had a short chord and a high aspect ratio. Davis claimed the new
wing would offer much lower drag than designs then in use, and would offer
considerable lift even at a small angle of attack. Additionally the thickness of
the wing would allow for excellent fuel storage, or even embedded engines (an
idea then in v ogue).
He had approached Consolidated with the aim of getting them to license it for use on their large flying boat designs. The ability to generate lift at low angles of attack made it particularly interesting for use in flying boats as it would reduce the need to pull up the nose for takeoff and landing, which was often limited in flying boats due to the way they floated on the water.
Fleet was not particularly impressed, an opinion also held by Consolidated's chief engineer, I. M. Laddon. Davis failed to convince them to try out his new design. A few days later, however, Laddon had a change of heart and convinced Fleet to pay for construction of a model and wing wind tunnel test at the California Institute of Technology. They intended to compare the design to one that had been designed in-house, which they believed was leading edge.
The results of the wind tunnel test were so good they were unbelievable. Cal Tech recalibrated their wind tunnel and ran them a second time, and then a third time. When they delivered their report to Consolidated it indicated that the wing appeared to deliver everything it claimed, but they also suggested it might be a wind tunnel fluke, something that only gives good results in the tunnel. After considerable thought Fleet decided that it would be used on Consolidated's new twin engine flying boat, the Model 31.
The Model 31 made its first flight on 5 May 5 1939, and it completely vindicated the Davis wing. By this point Consolidated was already in the process of a "secret" project to design a new bomber that would best the then-new Boeing B-17, and had already selected the Davis wing for this project as well. This design, the Model 32, first flew on 29 December 1939. The same basic wing design would be selected for almost every large Consolidated design from that point on, including the B-32 Dominator.
It was only later that the reason for the Davis wing's excellent performance became clear. The shape, largely through luck, was able to maintain laminar flow over a wider area of its leading edge, to about 20 or 30% of chord. In comparison, most airfoil sections of the era were more typically 5 to 20%. Although later designs were able to greatly improve on this, with modern designs maintaining laminar flow to upwards of 60% of chord, the Davis wing represented a great improvement at the time.
The thick profile of the wing led to its post-war disappearance. Although several aerodynamics tests had demonstrated this prior to the war, it was only in the immediate post-war period that it became generally known that high-speed drag was strongly associated with thick wing profiles due to wave drag. As speeds of aircraft of all sorts increased, the Davis wing's low low-speed drag could not make up for its higher high-speed drag, and use effectively ended.
| THE KIT |
The
Monogram 1/48th scale B-24D. One of Monograms classics. Who else
does big bombers better? Hmmmmmm…..who else does big bombers? Anyway, this is
a 1970’s vintage kit reboxed from time to time. It has raised panel lines,
crisp moldings and decent detail inside and out. The bomb bay can be shown open
or shut; different doors are included for each option, as they rolled up around
the fuselage upon opening. A nicely detailed bomb bay with ordinance is
included so hanging from the ceiling on that final bomb run it should look
pretty cool. The landing gear looks nice and sturdy and a rear boarding ladder
that doubles as an anti-tail sitting device is there should you fore-go adding
weight in the nose. Super-detailers could of course have a blast
 with this. There are some that
say there are shape issues….I remember in particular something about the canopy
being too squat. But I usually don’t pay much attention to those things. It
looks the part. Both in the box looking at the pieces and after it was finally
completed, I did not once mistake it for any other bomber.
with this. There are some that
say there are shape issues….I remember in particular something about the canopy
being too squat. But I usually don’t pay much attention to those things. It
looks the part. Both in the box looking at the pieces and after it was finally
completed, I did not once mistake it for any other bomber.
My version was boxed in the early 1980’s and was quite crisply molded in olive plastic. Only a single decal option is the box, this happens to be “Moby Dick”, a brutish shark (whale?) mouthed aircraft from the 90th Bomb Group in the southwest Pacific. Pretty decent choice for it sort of highlights the, ah, ugly nature of this beast. Mine came sans decals…..and because of that I got it quite cheap off of E-bay. Made no difference to me, for I had planned from the start to do one of the Ploesti raiders in that god-awful desert pink.
Instructions are a large fold out affair, with a short history and generic color callouts included. Decal placement guide is covered with five black & white pictures of the completed model. All in all quite complete and typically Monogram.
| CONSTRUCTION |
Assembly
started with….an airbrush session. I blasted the aircraft interior and
everything that looked like it goes on the inside with an interior green.
Based on some color photos and of course the boxes model pictures, I used a
darker shade than I normally do. I then proceeded to assemble all the interior
decks. The cockpit/bombardiers section was done first. The pilot/copilot seats
attachment points are a bit odd. They attach to a seat frame that attaches to
the cockpit floor at two small points. Nothing frustrating mind you, just a bit
fiddly. For me anyway. Other than that things are pretty straightforward. I
added some left over Eduard color photo-etch RAF seatbelts to the seats. Once
again for me, these are not the correct ones for the plane, but still make
things look so much better. I apologize to all those out there who are
offended by my lack of accuracy, but really I only try to be accurate when doing
Luft or Allied ’46 fantasy stuff. J
I popped the detail out of the instrument panel by dry- brushing
it gray after painting it black. A brown wash was applied to this assembly and
the interior walls of each fuselage half.
brushing
it gray after painting it black. A brown wash was applied to this assembly and
the interior walls of each fuselage half.
The other interior assemblies go together without a hitch. Each of the assemblies has positive locating pegs on the fuselage so alignment is not a worry. I took the easy way out and decided on a closed up bomb bay, so I didn’t bother putting anything in there. The fuselage halves go together well for such large pieces. I assembled the stabilizer and rudders next, and if you do the same then STOP RIGHT THERE. If you glue them onto the fuselage at this point, which seems logical, you are going to have a hard time cramming that rear turret in place! No, no…I didn’t do this, but it was, ah….close. J
I next assemble the rear turret. It is one of the poor points of the kit. It is molded in two vertical halves which means there is a huge seam line right across the top of it. I used Lee Kolosna’s advice from his review and painted a strip of Tamiya tape and placed it on the seam. (http://modelingmadness.com/reviews/allies/us/kolb24.htm) It looks better than the seam!
Once this was placed in the tail of the fuselage the stabilizer and rudders were glued on. Attachment is sturdy and positive and alignment is not a problem. On to the wings…….
The wings are large of course, long and narrow. As assemblies there isn’t much here: propeller shafts and engines. The engines were painted and highlighted and installed. Then the wings were glued together. Easy, right? No. Get ready for a serious putty and sanding session, because the join line of the nacelles is plain atrocious. The cowl faces aren’t all that great either. What makes this worse is there is plenty of raised detail in this area. So I next spent quite some time trying to putty and sand after taping off areas to try to preserve the detail. Not fun. A big sour point on an otherwise stellar kit.
So now I have three large assemblies, a big slab sided fuselage and two long narrow wings. For the rest of the assembly I kept things this way. A bit more manageable. Next up is to mask off the clear pieces and all the side windows. And there is a lot of masking to do. The nose piece was given some extra attention, as it also has a seam running right down the middle. I sanded this down with my finest grit paper, then polished it up with toothpaste until it looked presentable. A final dip in future and it looked better than before.
Off to the paint shed.
| COLORS & MARKINGS |
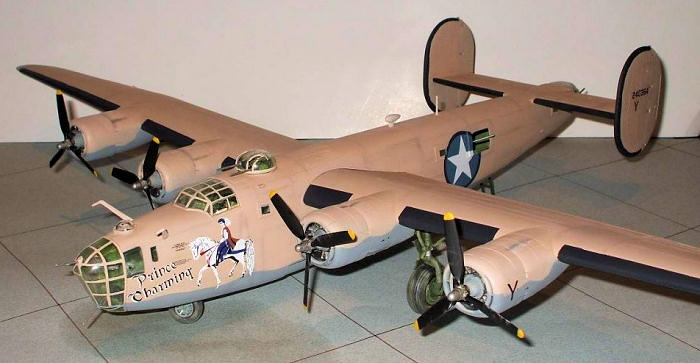
I knew from the start that I wanted to do a desert based Liberator in a faded sand color. This means a definite pink shade, as that’s the way it faded. So I took a bottle of Testors Model Master ANA Sand color, which is a close match to the original color, and added red (Testors, little bottle) to it drop by drop until I got a suitable pinkish tan. What a horrible color……this is going to be great! J
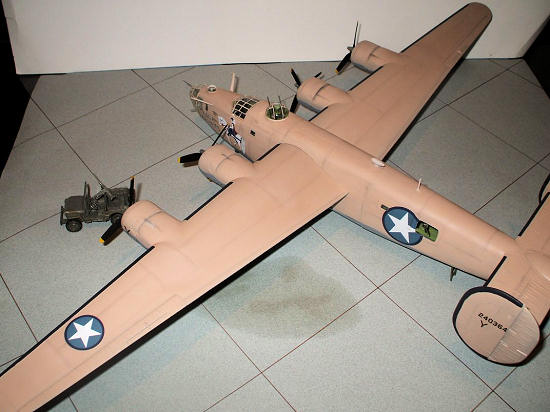
I first sprayed the entire plane in Neutral Gray. There seems to be a bit of historical confusion here, some planes were had gray bottoms and others were light blue. I chose neutral gray as the color because I also wanted to prime the top surfaces, since this boxing was molded in a dark olive green. This way I spray one color instead of two. Call me lazy! No, no, call me efficient!
 I then sprayed my
pink-tan concoction on the upper surfaces and on the masked clear bits (after
spraying them the interior green color first). I then went back over everything
shading panels and panel lines with lighter and darker shades, respectively, to
give it some life. I then masked off and painted the leading edge rubber de-icer
boots. I used a very dark gray, black is always just too…..black. I had to
hand paint the boots on the rudders, I couldn’t figure out how to satisfactorily
mask those off. Turned out well methinks. I then proceeded to coat the entire
model with Future to gloss it in prep for the decals.
I then sprayed my
pink-tan concoction on the upper surfaces and on the masked clear bits (after
spraying them the interior green color first). I then went back over everything
shading panels and panel lines with lighter and darker shades, respectively, to
give it some life. I then masked off and painted the leading edge rubber de-icer
boots. I used a very dark gray, black is always just too…..black. I had to
hand paint the boots on the rudders, I couldn’t figure out how to satisfactorily
mask those off. Turned out well methinks. I then proceeded to coat the entire
model with Future to gloss it in prep for the decals.
I had acquired a set of Monogram ProModeler aftermarket decals which had “The Witch”, “Snow White”, and “Prince Charming” as choices. I liked the Prince Charming ones. There is again some confusion here, as the ProModeler instructions imply that “Prince Charming” was formerly “Snow White”, i.e. the same aircraft and hence the same tail codes. I looked this up on-line and they are two distinctly different aircraft. “Snow White” was apparently shot down trying to protect the damaged “Witch” outbound from Ploesti, while “Prince Charming” turned back early in the mission with troubles. I love finding this kind of stuff out. Unfortunately, I didn’t have any other tail codes, so I used Snow White’s. I had to use the insignia from Aeromasters “Ploesti Raiders 48-115” set as the ProModeler set doesn’t come with any. Both sets of decals went on well, though I used many applications of Micro-Sol on the fuselage insignia due to the wind deflectors forward of the side gunners windows. For the nose art and tail codes I dropped a drop of Future in place and put the decal on top of it in hopes of preventing any silvering. It worked.
I dirtied things up with an application of pastels, both the artists’ variety and Tamiya’s sand/mud set. Then I airbrushed on a final dull coat. This was a change for me. Previous to this I had always used Testors Acrylic flat. But on a few of my last models it has left white deposits. A 1/48 Sherman tank ended up looking like it had snow on it. I was disappointed, but figured, hey, I’ll call it snow. My next kit was a Me-109. I was quite paranoid about it and sprayed nice light coats and it still did it. Bad batch maybe? I threw the bottle away and bought new. On my next couple of kits I noticed the same thing, but not as drastic. So I finally bought some Tamiya flat base and mixed it with Future. It goes on well (it is Future after all) and you can control the “flatness” by how much you mix in. Very impressive. I am never going back!! The gloss-coat/dull-coat did change the hue of the tan, removed some of the pink from it, so it is not quite so atrocious as it was, but next to the other tan colored aircraft I have, you can sure tell the difference.
| FINAL CONSTRUCTION |
 I glued the landing
gear on next. These are very sturdy and have excellent attachment engineering.
You would really have to try to screw this up. When the gear was dry I attached
the wings to the fuselage. On keeping with the excellent engineering, the wing
to fuselage joint has to be one of the best. Each wing has “spars” that goes
thru slots in the fuselage, on thru slots in the other side. So alignment is
right and it is very strong. I glued mine in place but you really wouldn’t have
to.
I glued the landing
gear on next. These are very sturdy and have excellent attachment engineering.
You would really have to try to screw this up. When the gear was dry I attached
the wings to the fuselage. On keeping with the excellent engineering, the wing
to fuselage joint has to be one of the best. Each wing has “spars” that goes
thru slots in the fuselage, on thru slots in the other side. So alignment is
right and it is very strong. I glued mine in place but you really wouldn’t have
to.
I glued the remaining pieces on…the clear bits and propellers, the tail skid and boarding ladder. Since the boarding ladder serves to prop the tail up, I made sure this had plenty of time to dry before resting the weight on it. I totally forgot to fix the machine gun in the front left cheek position. Oh well, there’s already 3 machine guns in the nose anyway.
| CONCLUSIONS |
I love these big Monogram kits. They take up a lot of space…the Liberator now dwarfs everything else in my display case. But it definitely looks impressive. The kit was a bargain; most seem to lean towards the “J” model with its nose turret. I personally like the “D” better. In any event, the cost per square foot of model was dirt cheap! This is a great kit. Buy one and don’t just keep it in the closet. Build it.
Wholly recommended to all.
Thanks for reading this far!
| REFERENCES |
Wikipedia (www.wikipedia.com)
B-24 Best Web (www.b24bestweb.com)
April 2008
Copyright ModelingMadness.com
If you would like your product reviewed fairly and fairly quickly, please contact the editor or see other details in the Note to Contributors.