| KIT #: | ? |
| PRICE: | $35.00 total |
| DECALS: | Two kit options |
| REVIEWER: | Dale Rannals |
| NOTES: | Koster Aero Enterprises XP-72 vac conversion, Jaguar resin cockpit set. |
| HISTORY |
December 1945 was not a good
time to be in
As 601…or “Jenny” or
“Stinger” …depending on was flying her, settled down into a vicious purr, Jesse
spotted the specks slightly below his level, right where the radar controller
said they would be. Just then a
frantic radio message called out aircraft at 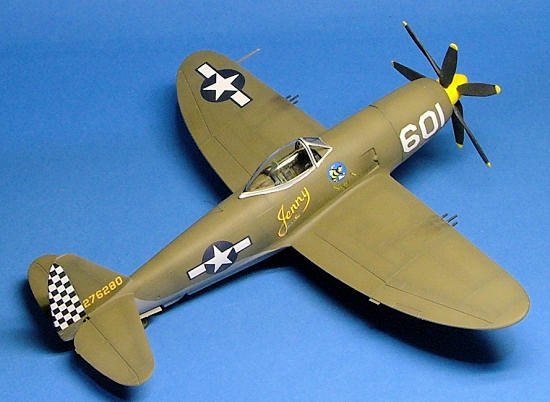 in size
until shapes could be made out. G5N
“Liz” four engined bombers escorted by Franks and the bizarre, backward shape of
the Shindens. Need to keep an eye
on those, thought Jesse. Fast, with
heavy cannon in the nose, they were a formidable adversary….one hit, even to an
Ultrabolt, could indeed ruin your day.
The ‘Bolts were faster still, one just had to keeps one’s wits about him
and one’s speed up.
in size
until shapes could be made out. G5N
“Liz” four engined bombers escorted by Franks and the bizarre, backward shape of
the Shindens. Need to keep an eye
on those, thought Jesse. Fast, with
heavy cannon in the nose, they were a formidable adversary….one hit, even to an
Ultrabolt, could indeed ruin your day.
The ‘Bolts were faster still, one just had to keeps one’s wits about him
and one’s speed up.
Fast, faster, fastest.
Just at the merge the Fireballs flew past and into the heart of the
bomber formations. Though they
didn’t look fast, the piston and jet engined dark blue fighters gave the Navy
Jocks a definite speed advantage in this party.
Since the Fireballs could slice at the bombers without interference from
the escorts, Jesse turned his full attention to the enemy fighters.
He fire-walled the throttle and fuel dumped into each of the 28 cylinders
of the beast of a motor. Six huge
blades of the contra-rotating propeller clawed at the air in a desperate attempt
to transform more than 3200HP into thrust. Jesse was pushed back into his seat
as 601 literally shot forward in the sky.
As speed increased, Jesse and his wingman zoom climbed, inverted, and
came down on top of four Shindens.
Sights on the leader…. press the trigger.
Six .50 caliber machine guns come to life.
A short burst, but enough to show strikes on the target.
He watched it start to smoke and go down as he plunged thru the enemy
group and lost sight of it. Jesse
continued the dive, ripping thru masses of twisting and turning planes, somehow
avoiding a collision with any of them.
Leveling, Jesse spotted a pair of enemy fighters and banked towards them.
Midway thru the turn, tracers flashed past his canopy and his right
wingtip disappeared as one of the explosive cannon shells found a home.
Instinctively, Jesse
snap-rolled the ‘Bolt and dove, weaving as more tracers raced past him.
He looked back just in time to see the Shinden explode as his wingman got
him sighted in. The ground raced up
to greet them as they both pulled out of their dives.
Looking around quickly, they realized at once that they were now alone in
the sky, not another craft to be seen.
Their part in this dance was already over.
Jesse surveyed the damage.
About two feet of his starboard wingtip was gone, but the bird still handled
well. They banked to the south to
head home and saw smoke rising in the far distance.
“Let’s see how hard we were
hit this time………”
The reality:
The Republic XP-72 was an American prototype interceptor fighter developed as a
progression of the P-47 Thunderbolt design. Even though the XP-47J was showing
loads of potential, Republic had their eyes on a new engine.
The XP-72 was designed around the Pratt & Whitney R-4360 twenty-eight
cylinder radial air-cooled engine. A GE turbo-supercharger would be housed in
the aft fuselage. The armament
consisted of six 0.5 in wing-mounted machine guns and underwing racks for two
1,000 lb bombs.
 The XP-72
development paralleled that of another Republic design, the XP-69 that was to be
powered by an experimental forty-two cylinder Wright R-2160
radial engine mounted behind the pilot
and driving contra-rotating propellers through
an extension shaft. The XP-69 was intended for high altitude operations and
featured a pressurized cockpit and armament of
two 37 mm cannon and four 0.5 in machine guns. As the XP-72 displayed greater
promise than the XP-69, the XP-69 was canceled on 11 May 1943 and an order for
two XP-72 prototypes was placed on 18 June 1943.
The XP-72
development paralleled that of another Republic design, the XP-69 that was to be
powered by an experimental forty-two cylinder Wright R-2160
radial engine mounted behind the pilot
and driving contra-rotating propellers through
an extension shaft. The XP-69 was intended for high altitude operations and
featured a pressurized cockpit and armament of
two 37 mm cannon and four 0.5 in machine guns. As the XP-72 displayed greater
promise than the XP-69, the XP-69 was canceled on 11 May 1943 and an order for
two XP-72 prototypes was placed on 18 June 1943.
Development was amazingly trouble-free, with the first airframe, equipped with a four bladed propeller, flying for the first time on 2 February 1944. The second prototype was completed on 26 June 1944 and was equipped with an AeroProducts 13.5ft. contra-rotating propeller. Both propellers were so large that the aircraft had to take off and land in a three point stance to avoid propeller strikes. Test pilots reported the aircraft as a joy to fly. As the XP-72 displayed exceptional performance during flight tests, with the prototypes rapidly accelerating to 490mph at 25,000ft, an order for 100 production aircraft was awarded. The order included an alternate armament configuration of four 37 mm cannon. By this time the war had progressed to where the need was for long-range escort fighters and not high-speed interceptors. Also, the advent of the new turbojet-powered interceptors showed greater promise for the interceptor role. Thus, the production order for the P-72 was cancelled and so ended its brief career.
| THE KIT |
The very nice Koster
vacuform XP-72 Ultrabolt conversion is made for Monograms P-47 kit.
The conversion consists of two fuselage halves and two cowl halves, both
on a single sheet of white vac plastic, a resin intake and cooling fan, and an 8
piece resin propeller/spinner assembly.
The vac parts are nicely done but my resin bits exhibited several minor
flaws and air bubbles.
 No
biggie and not hard to take care of at all.
The vac parts have raised panel lines to go with the Monogram kit, but
would be very easy to sand off and re-scribe if one wanted to.
No
biggie and not hard to take care of at all.
The vac parts have raised panel lines to go with the Monogram kit, but
would be very easy to sand off and re-scribe if one wanted to.
| CONSTRUCTION |
The first thing I had to do
is cut out and sand down the vac pieces.
This really isn’t as scary as most think it is.
Here are the steps I use:
1.
Get a sharp pencil. Draw a
line around each part on the sheet.
Use a larger X-acto knife with a curved blade (#11 blades seem too flimsy for
this) and score on the outside of the pencil mark of each part, trying to keep
the knife at about a 45 degree angle, angled in towards the part.
2.
Snap, don’t cut. No need for
the score to go all the way thru, as the next step is to “snap” the parts from
the sheet. Just work your way
around each part and separate it from the sheet.
3. Next, carefully sand down
all the parts to eliminate the “waste” plastic that is there.
Cutting the parts at a 45 degree angle back “into” the parts helps reduce
the waste which helps reduce the a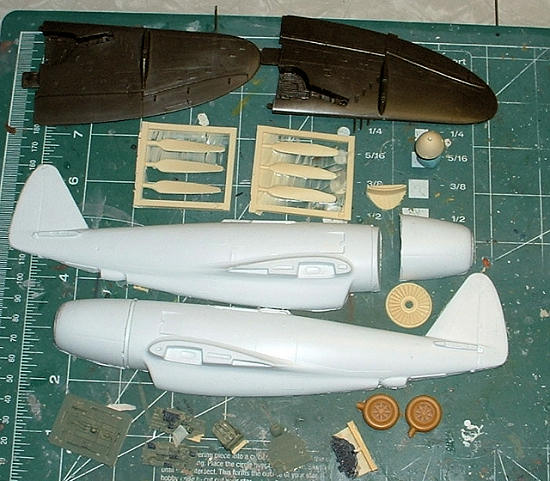 mount
of sand time, and anything that reduces the amount of sanding is a good thing.
This is also where the pencil mark comes into play.
mount
of sand time, and anything that reduces the amount of sanding is a good thing.
This is also where the pencil mark comes into play.
Remember, the pencil line
rules!! Do not forget this.
Pick a suitable flat area and tape some sandpaper to it. (At the local
hardware shop I found some “sticky back” sandpaper sheets….these worked well and
can be put down and peeled up multiple times.)
The idea is to sand until the pencil line just disappears, but no
farther. Check the part often,
check the line often. Also adjust
your grip on the parts often, so you don’t sand too much from the area you’re
holding on to…the dreaded “banana effect”.
Once I had the fuselage
pieces sanded down, I glued small tabs on all the vac pieces to serve as
alignment aids and to give the glue some surface to bite into (as the vac pieces
are thinner than normal injection parts).
From this point on the sequence is pretty much the same as any regular
kit. One does has to be a bit
gentler with the vac parts, because of the aforementioned thinner gluing
surface. So now that we’re done
here…..onto the cockpit.
I bought a Jaguar P-47D
resin cockpit set a while back and decided to use it here.
These resin bits looked great, built up nicely, and as a bonus fit
perfectly inside the vacuform fuselage. I painted the cockpit and fuselage
sidewalls a darkish bronze green (Model Master enamels) I had mixed up. The
instrument panel and some of the sidewall details were painted VDG (aka: very
dark gray…..I never use straight flat black as it seems too intense) and the
ensemble was dry-brushed with a lighter gray to pop out more details.
I glued in an Evergreen square tube “ledge” on the right fuselage half
for the cockpit floor to rest on and once this was dry I super-glued the cockpit
in place, along with the resin turbocharger intake.
The fuselage halves were
then glued, joined, and taped….. then set aside to dry. Turning my attention to
the cowl halves, these were joined with the front opening still “plugged” as
this gave me a sturdier shape to deal with.
Once it was dry I grabbed a new blade and carefully cut out the cowl
opening. I sanded the opening
smooth and glued in the resin cooling fan.
This assembly was then glued to the fuselage.
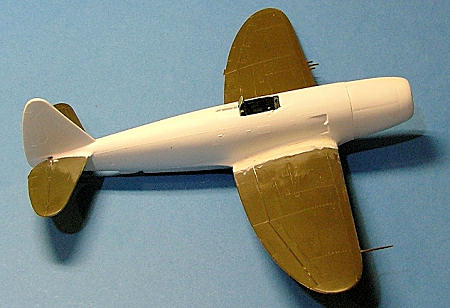 Next the
Monogram wings were glued together and the leading edges sanded smooth.
I cut off the gun barrels, having two reasons to do so.
One: Monogram molded the guns in-line, or level, with the wings.
The guns here should be level with the ground…they “slant” across the
leading edge of the wing. Two:
I knew I’d manage to break most of them off anyway during the build, so
now I didn’t have to worry about it.
I attached the wings and the horizontal stabs to the fuselage and used a
Lego jig to keep things even until all was dry.
The wing root seam wasn’t too bad…a few applications of putty and
surfacer smoothed things out.
Next the
Monogram wings were glued together and the leading edges sanded smooth.
I cut off the gun barrels, having two reasons to do so.
One: Monogram molded the guns in-line, or level, with the wings.
The guns here should be level with the ground…they “slant” across the
leading edge of the wing. Two:
I knew I’d manage to break most of them off anyway during the build, so
now I didn’t have to worry about it.
I attached the wings and the horizontal stabs to the fuselage and used a
Lego jig to keep things even until all was dry.
The wing root seam wasn’t too bad…a few applications of putty and
surfacer smoothed things out.
The propeller assembly
turned out to be more work than I initially thought.
I removed each of the six blades and cleaned them up.
The hub assembly wasn’t very pretty; it looked rough and out-of-round.
I sanded the base flat and found, marked, and drilled its center point.
I left the drill bit in it and mounted it in my cordless Dremel.
On its lowest speed and under a stream of tap water, I ran a sanding
stick over its surface to even and smooth things out.
Much nicer now. I drilled
out the prop mounting holes and began installing the blades.
I had a very hard time figuring out which blade went where; each blade is
symmetrical with a strange twist. I
ended up just angling three one way and three the other.
I also broke off three of the six while attempting to get the alignment
right. I sanded the breaks smooth,
drilled tiny holes in each, and re-attached using small sections of wire (from
small paper clips).
I believe it’s time for the paint shed………
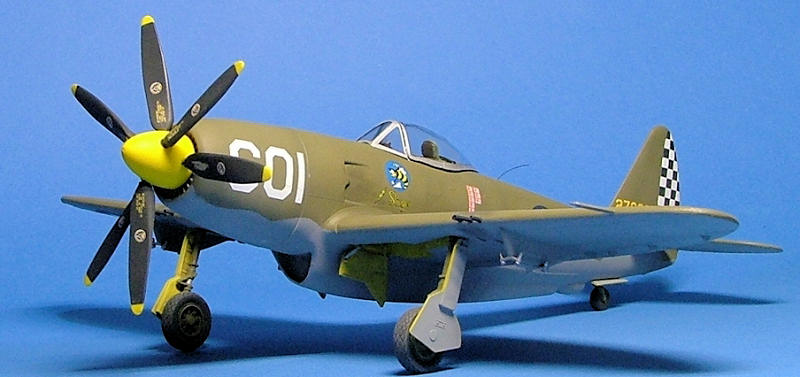
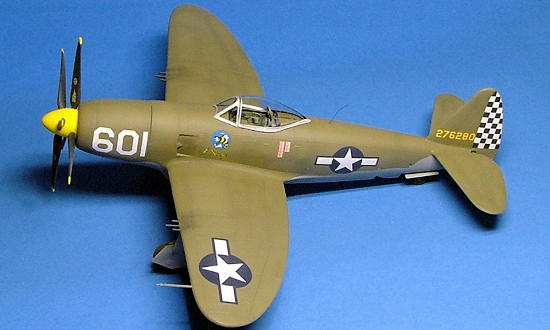
| COLORS & MARKINGS |
This obviously
is not your normal Thunderbolt build, so I really didn’t want to put it in
“normal” markings. So no ETO with
squadron codes. The Italy-based
squadrons had some interesting variations ….in particular I liked the markings
of Lt. Knights “Oh Johnnie”. Then
my thoughts drifted upon the Pacific and a desperate defense of
So step one was neutral gray.
I sprayed the whole aircraft so it would be easier to see and areas that
still needed attention. Once these
were 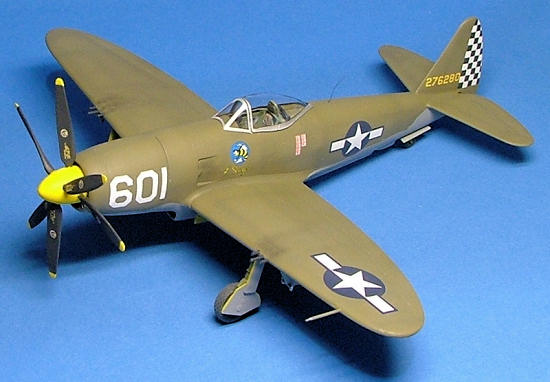 cleaned
up I masked off the underside and sprayed a greenish olive drab on the topsides.
Both the gray and the OD...... all Model Master paints here, BTW.....
were then assaulted with lighter shades in the panel centers and darker shades
on the panel lines to break up the monotone of each area.
I let this dry for a day and then hit everything with some Future to prep
for decals. At this point I dipped
the canopy in Future, let it dry, masked, and painted it flat black (internal
framing) and then Metalizer Non-buff Aluminum.
cleaned
up I masked off the underside and sprayed a greenish olive drab on the topsides.
Both the gray and the OD...... all Model Master paints here, BTW.....
were then assaulted with lighter shades in the panel centers and darker shades
on the panel lines to break up the monotone of each area.
I let this dry for a day and then hit everything with some Future to prep
for decals. At this point I dipped
the canopy in Future, let it dry, masked, and painted it flat black (internal
framing) and then Metalizer Non-buff Aluminum.
The decals came from several decal sheets.
Wing insignia, “Jenny”, the rudder checkerboard, and serial numbers came
from Thunderbolt sheets. Fuselage
insignia from a Mustang sheet, “Stinger” came from a Lightning sheet and the
kill markings from a Hellcat sheet.
I've always thought Japanese kill markings on Thunderbolts grab peoples
attention, as it isn't what they think should be there.
The only problem I had with any of this is the 601 on the port side...a
couple of wrinkles would not settle down no matter how many applications of
setting solution I applied. I ended
up lightly sanding away the ridges and touching up the areas with white paint.
I kept the weathering very light figuring 1) the would try to keep the
hot rod polished up and 2) in this
scenario, any individual plane wouldn't last long enough to get all that beat up
anyway.
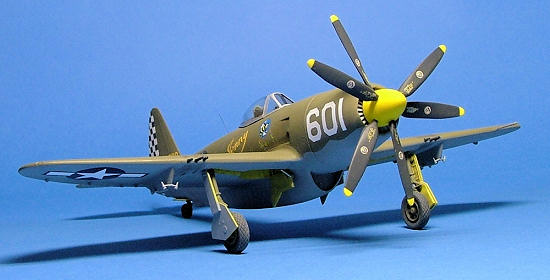
| FINAL CONSTRUCTION |
I painted up some resin wheels I had for a P-47N and attached them to
some OD painted landing gear. These
and the gear doors were added, along with the tail wheel.
I drilled out six holes in the wings for the guns.
I did not do a very good job at
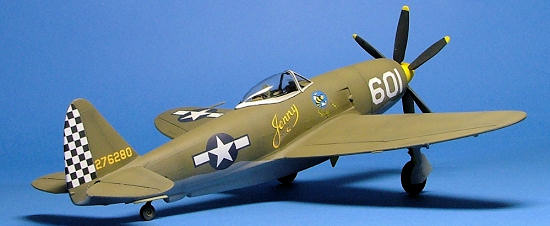 getting
them level, but it will do. I added
stainless steel tubing for the gun barrels and painted them black.
The canopy came next; it had a small gap on the port side but nothing I
was going to worry about. Add the
prop and a whip antenna and call we'll her done
getting
them level, but it will do. I added
stainless steel tubing for the gun barrels and painted them black.
The canopy came next; it had a small gap on the port side but nothing I
was going to worry about. Add the
prop and a whip antenna and call we'll her done
| CONCLUSIONS |
I
had a bunch of fun doing this conversion.
It helps of course that I love Thunderbolts in all flavors, but being
able to do these “one-off” types is icing on the cake.
It also helps that the Koster conversions are very reasonably priced and
that the Monogram donor kits won’t break the bank either.
They are a perfect stepping stone to “try out” vacuform modeling before
jumping into a full vac kit. So
grab one and let your imagination run.
| REFERENCES |
Interior
colors of US aircraft:
http://www.ipmsstockholm.org/magazine/2004/01/stuff_eng_interior_colours_us.htm
Squadron/Signal P-47 in Action
February 2011
Kit courtesy of my wallet.....the rest courtesy of my imagination.
Copyright ModelingMadness.com. All rights reserved. No reproduction in part or in whole without express permission from the editor.
If you would like your product reviewed fairly and quickly, please contact the editor or see other details in the Note to Contributors.