| KIT #: | 5207 & 85-5241 |
| PRICE: | $Not a lot |
| DECALS: |
One option (Monogram) Two options (Revell) |
| REVIEWER: | Stephen Young, MD |
| NOTES: | Superscale 48-19 decals. |
| HISTORY |
The history of the
iconic North American P-51 Mustang fighter is well known and many model
manufacturers have released kits in the full range of scales over the years.
This article will focus on the very commonly encountered Monogram and Revell
versions which are readily available at most common online and retail vendors as
well as Ebay.com. The Monogram version has been available since 1977 and is
still often listed on Ebay. The Revell version is the same molding obtained when
Monogram was
 consolidated with Revell and is still being released by Revell in
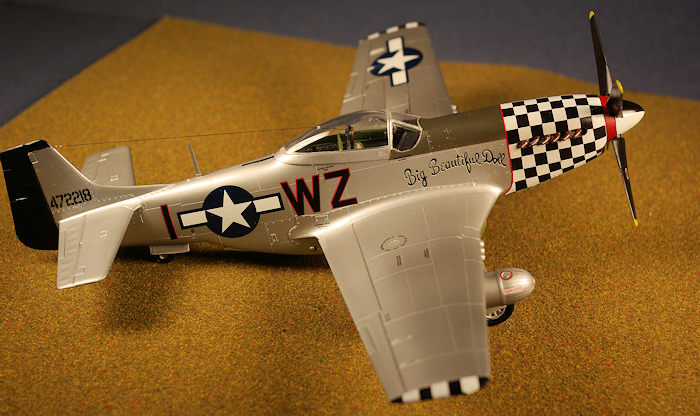
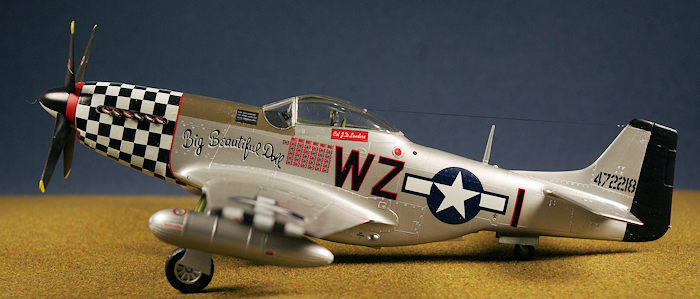
its current boxing since at least 2004. I built both kits concurrently with one
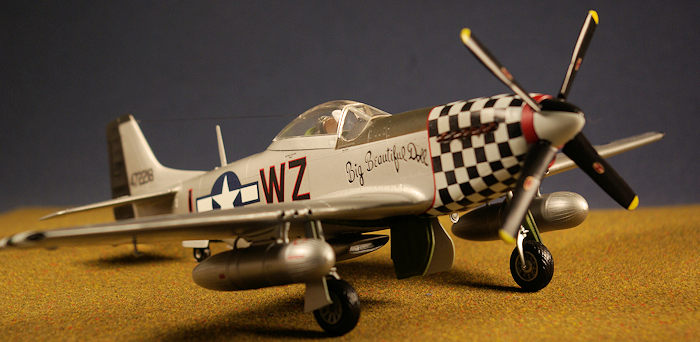
using the Revell kit decals for famous ace Col. John D. Landers' Big Beautiful
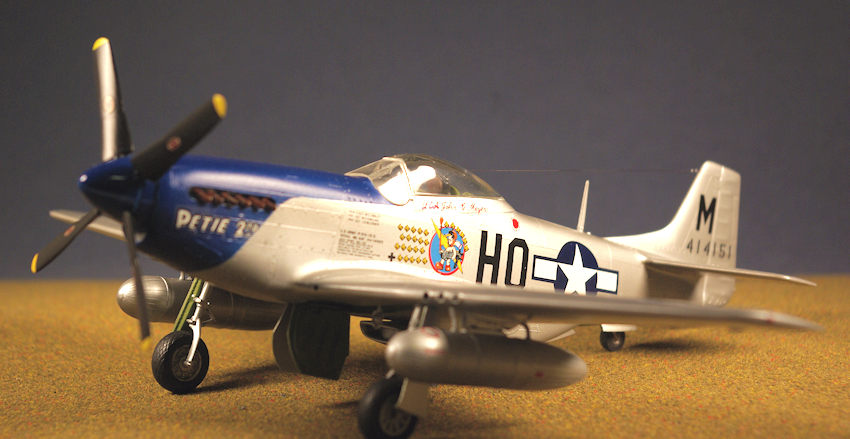
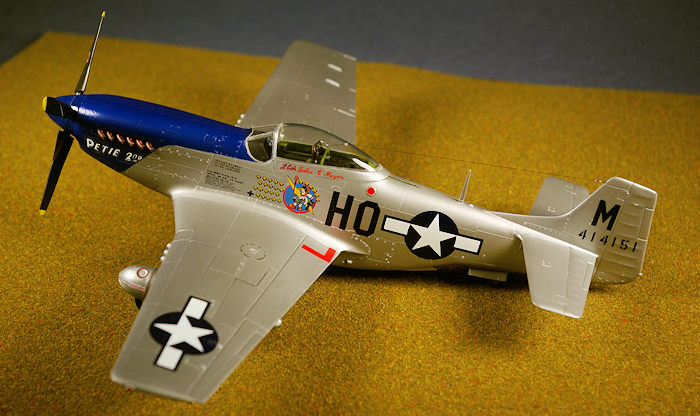
Doll and the other using the Super Scale decal sheet #48-19 for Lt. Col. John
Meyers' Petie 2nd.
consolidated with Revell and is still being released by Revell in
its current boxing since at least 2004. I built both kits concurrently with one
using the Revell kit decals for famous ace Col. John D. Landers' Big Beautiful
Doll and the other using the Super Scale decal sheet #48-19 for Lt. Col. John
Meyers' Petie 2nd.
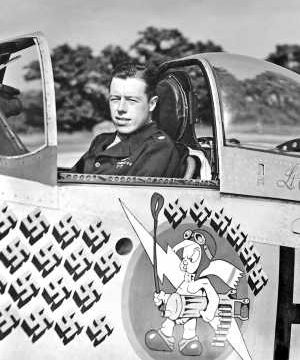
John D. Landers enlisted
in the USAAF in April 1941 at the age of twenty. By January 1942 he was posted
to the 49th Pursuit Group and thrust into air combat in 1942 after 10 flight
hours flying the P-40E with the 9th Pursuit Squadron against the seemingly
invincible Japanese after Pearl Harbor. He managed to become an ace and survived
10 days in the trackless jungles of Papua New Guinea after being shot down after
achieving six victories. He later flew the P-38 Lightning when the 9th FS
re-equipped. Returned to the United States in 1943 he was part of the
experienced core of leadership in new fighter groups being formed and was sent
to RAF Wormington, UK , with the 55th Fighter Group in April 1944. After a tour
in P-38s during which he became a squadron commander he went to the 357th
Fighter Group in October 1944 as Group Commander, where he first flew the P-51.
He became the sixth and final wartime commander of the 78th Fighter Group at RAF Duxford, UK, in February 1945, leading the group until June, 1945. From July
1945 until the war ended he commanded the 361st Fighter Group and had
accumulated many awards including three Silver Stars, four Distinguished Flying
Crosses, 21 Air Medals, the Purple Heart, and French Croix de Guerre. Leaving
active duty in December, 1945 he worked in civilian construction management for
many years. He is the only American ace to have scored in the P-40, P-38, and
P-51. Big Beautiful Doll, P51D 44-72218, was his personal aircraft which he flew
towards the end of the war.
, with the 55th Fighter Group in April 1944. After a tour
in P-38s during which he became a squadron commander he went to the 357th
Fighter Group in October 1944 as Group Commander, where he first flew the P-51.
He became the sixth and final wartime commander of the 78th Fighter Group at RAF Duxford, UK, in February 1945, leading the group until June, 1945. From July
1945 until the war ended he commanded the 361st Fighter Group and had
accumulated many awards including three Silver Stars, four Distinguished Flying
Crosses, 21 Air Medals, the Purple Heart, and French Croix de Guerre. Leaving
active duty in December, 1945 he worked in civilian construction management for
many years. He is the only American ace to have scored in the P-40, P-38, and
P-51. Big Beautiful Doll, P51D 44-72218, was his personal aircraft which he flew
towards the end of the war.
 John C. Meyer enlisted
in the US Army Air Corp in 1939 at the age of twenty to become a pilot.
Commissioned as a Second Lieutenant he flew the P-40 with the 8th Pursuit Group
and subsequently assumed command of the 34th Pursuit Squadron of the 352nd
Fighter Group. Transitioning to P-47s the squadron was redesignated the 487th
Fighter Squadron and deployed to RAF Bodney in England in 1943. On November 26,
1943 achieved his first victory and would achieve three in the P-47. He became a
leading ace after the 352nd transitioned to the P-51 In April, 1944,and adopted
the famous “Blue Nose” color scheme. For a mission on
John C. Meyer enlisted
in the US Army Air Corp in 1939 at the age of twenty to become a pilot.
Commissioned as a Second Lieutenant he flew the P-40 with the 8th Pursuit Group
and subsequently assumed command of the 34th Pursuit Squadron of the 352nd
Fighter Group. Transitioning to P-47s the squadron was redesignated the 487th
Fighter Squadron and deployed to RAF Bodney in England in 1943. On November 26,
1943 achieved his first victory and would achieve three in the P-47. He became a
leading ace after the 352nd transitioned to the P-51 In April, 1944,and adopted
the famous “Blue Nose” color scheme. For a mission on
 May 8, 1944 he was awarded
the first of his three Distinguished Service Crosses attacking 15 enemy fighters
single handed in defence of Air Force bombers. On November 2, now a lieutenant
colonel, he received his second DSC for leading eleven P-51s in an air battle
east of Leipzig, Germany, against forty enemy fighters shooting down three
FW-190s. For a mission on January 1, 1945 he was awarded his third DSC for
action against the Luftwaffe in the German aerial assault known as Operation Bodenplatte. Acting on a hunch he suspected the German Luftwaffe would attack on
New Year's Day so he postponed the 487th Squadrons party one day and requested a
patrol mission early that morning. As he was about to lead the squadron into the
air the German attack began. Meyer shot down one FW-190 just after rotation and
a second later on. The actions of the 487th Squadron that day earned it a
Distinguished Unit Citation. Petie 2nd , P-51D 44-14151 was his third P-51 and
was his for two of his victories. A subsequent automobile accident on January 9,
1945 ended his WW II combat flying career after 24 aerial victories.
May 8, 1944 he was awarded
the first of his three Distinguished Service Crosses attacking 15 enemy fighters
single handed in defence of Air Force bombers. On November 2, now a lieutenant
colonel, he received his second DSC for leading eleven P-51s in an air battle
east of Leipzig, Germany, against forty enemy fighters shooting down three
FW-190s. For a mission on January 1, 1945 he was awarded his third DSC for
action against the Luftwaffe in the German aerial assault known as Operation Bodenplatte. Acting on a hunch he suspected the German Luftwaffe would attack on
New Year's Day so he postponed the 487th Squadrons party one day and requested a
patrol mission early that morning. As he was about to lead the squadron into the
air the German attack began. Meyer shot down one FW-190 just after rotation and
a second later on. The actions of the 487th Squadron that day earned it a
Distinguished Unit Citation. Petie 2nd , P-51D 44-14151 was his third P-51 and
was his for two of his victories. A subsequent automobile accident on January 9,
1945 ended his WW II combat flying career after 24 aerial victories.
Postwar he commanded the 4th Fighter Wing and flew the F-86 in Korea destroying two Mig-15s. His illustrious career in the Air Force included a wide variety of operational assignments and he retired in July 1974 as commander in chief of the Strategic Air Command. His military decorations included the Distinguished Service Cross, Air Force Distinguished Service Medal, Silver Star, Legion of Merit, Distinguished Flying Cross and Croix de Guerre from both France and Belgium.
| THE KIT |
Monogram's venerable
1/48th scale P-51D remains widely available in different boxings on Ebay and
commercially as the Revell boxing. I have accumulated a number of P-51
aftermarket decal sets so I wanted to do a relatively fast (for me) build using
a couple of Monogram kits from my supply. The Monogra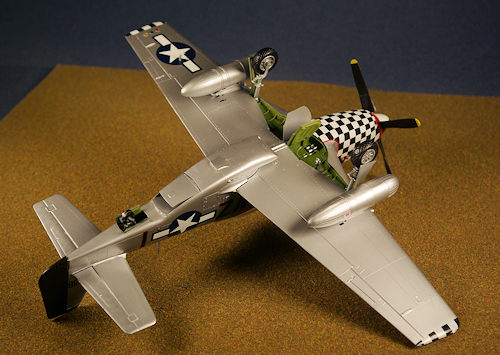 m version was obtained by
me on Ebay without the original kit decals. The original kit decals are for Lt.
Urban Drew's Detroit Miss. The currently available Revell boxing which is the
second model built includes decals for Big Beautiful Doll and Miss Marilyn II,
flown by 1st Lieutenant E. Robert Welch. The attractive kit box art depicts BBD
in flight. The kit includes 49 parts with two options for the exhaust ports.
Examining the plastic parts reveals the age of the molds and molding is much
cleaner with less flash in the Monogram boxing compared to the Revell. The
Monogram boxing is molded in their usual silver styrene while the Revell is
molded in gray. State of the art in the 1970s the kit displays raised panel
lines, separate lower engine cover to cover the molded in engine relief, and the
option of open ammunition access panels on the port wing with three .50 cal
machine guns represented. Instructions in the Monogram boxing are a single sheet
with universal picture instructions with a painting and decal diagram. The
Revell instructions are a eight page letter size booklet with more detailed
assembly instructions including notes and pictures from The P-51 Mustang in
Detail and Scale, Part 2 for some parts of the aircraft such as landing gear,
cockpit, etc. Finish and decal instructions are provided for BBD and Marilyn II.
m version was obtained by
me on Ebay without the original kit decals. The original kit decals are for Lt.
Urban Drew's Detroit Miss. The currently available Revell boxing which is the
second model built includes decals for Big Beautiful Doll and Miss Marilyn II,
flown by 1st Lieutenant E. Robert Welch. The attractive kit box art depicts BBD
in flight. The kit includes 49 parts with two options for the exhaust ports.
Examining the plastic parts reveals the age of the molds and molding is much
cleaner with less flash in the Monogram boxing compared to the Revell. The
Monogram boxing is molded in their usual silver styrene while the Revell is
molded in gray. State of the art in the 1970s the kit displays raised panel
lines, separate lower engine cover to cover the molded in engine relief, and the
option of open ammunition access panels on the port wing with three .50 cal
machine guns represented. Instructions in the Monogram boxing are a single sheet
with universal picture instructions with a painting and decal diagram. The
Revell instructions are a eight page letter size booklet with more detailed
assembly instructions including notes and pictures from The P-51 Mustang in
Detail and Scale, Part 2 for some parts of the aircraft such as landing gear,
cockpit, etc. Finish and decal instructions are provided for BBD and Marilyn II.
| CONSTRUCTION |
 I started construction by washing all part sprues in warm water with
dish washing detergent. My intent was to build both models essentially out of
the box so the cockpit areas of the fuselage were airbrushed with Testors
Interior Green. The cockpit part was also sprayed Interior Green and the
interior components painted by hand with Testors Acrylic Interior Black. Dials
were dry brushed with white or the raised relief colored using a white Prisma
Color white color pencil. For future projects I will use a different technique
layering white followed by a coat of Future then black enamel with removal of
the enamel from the raised areas with a nearly dry fine brush previously dipped
in enamel thinner. The cockpit radio parts were painted black. Seat components
were installed and painted. On the Revell mold there is a mold depression in the
center of the head rest that needs to be filled.
I started construction by washing all part sprues in warm water with
dish washing detergent. My intent was to build both models essentially out of
the box so the cockpit areas of the fuselage were airbrushed with Testors
Interior Green. The cockpit part was also sprayed Interior Green and the
interior components painted by hand with Testors Acrylic Interior Black. Dials
were dry brushed with white or the raised relief colored using a white Prisma
Color white color pencil. For future projects I will use a different technique
layering white followed by a coat of Future then black enamel with removal of
the enamel from the raised areas with a nearly dry fine brush previously dipped
in enamel thinner. The cockpit radio parts were painted black. Seat components
were installed and painted. On the Revell mold there is a mold depression in the
center of the head rest that needs to be filled.
The cockpit was glued into the right fuselage side with 5 minute epoxy.
One needs to select either the shrouded or un-shrouded exhaust pipes and attach
to the fuselage sides before the fuselage halves are joined. For these two
specific planes the un-shrouded exhausts were used. The tail wheel also needs to
be a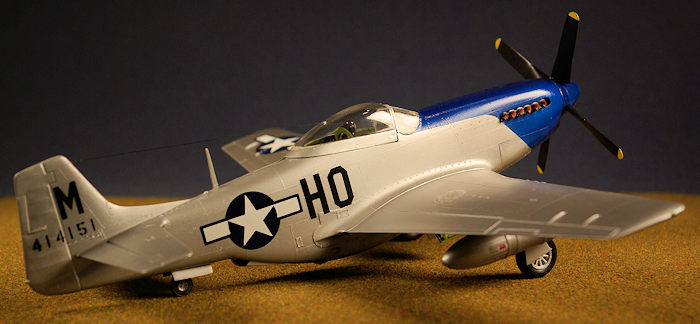 ttached at the fuselage joining stage. The fuselage halves were joined using
fast setting acrylic plastic cement. A significant fit problem exists with the
radiator scoop which is a separate part; some Bondo auto body putty and CA
contouring was needed to fix misalignment here. In addition, I wanted to attach
the engine cowling and the fit is poor with this part to the fuselage and nose
requiring putty and sanding for a reasonable appearance. Unfortunately some of
the raised detail will be lost in this work. The wing components went together
without problems but the fit to the fuselage under the nose again required putty
filling and sanding. The horizontal stabilizers were then glued with 5 min
epoxy; here the alignment needs to be maintained while the epoxy sets since the
fit of the alignment tabs is loose. Light intermittent seam filling is needed in
the fuselage joint and after all joints were addressed the model was masked in
preparation for painting. The sight was modified by cutting away the plastic
portion representing the reflector glass and replacing it with a small square
piece of clear acetate attached with CA. The sight was then glued to the
instrument panel with CA. The clear canopy and windshield were attached using a
thin layer of Blue Tack and masked using Micro mask and it was off to the spray
booth.
ttached at the fuselage joining stage. The fuselage halves were joined using
fast setting acrylic plastic cement. A significant fit problem exists with the
radiator scoop which is a separate part; some Bondo auto body putty and CA
contouring was needed to fix misalignment here. In addition, I wanted to attach
the engine cowling and the fit is poor with this part to the fuselage and nose
requiring putty and sanding for a reasonable appearance. Unfortunately some of
the raised detail will be lost in this work. The wing components went together
without problems but the fit to the fuselage under the nose again required putty
filling and sanding. The horizontal stabilizers were then glued with 5 min
epoxy; here the alignment needs to be maintained while the epoxy sets since the
fit of the alignment tabs is loose. Light intermittent seam filling is needed in
the fuselage joint and after all joints were addressed the model was masked in
preparation for painting. The sight was modified by cutting away the plastic
portion representing the reflector glass and replacing it with a small square
piece of clear acetate attached with CA. The sight was then glued to the
instrument panel with CA. The clear canopy and windshield were attached using a
thin layer of Blue Tack and masked using Micro mask and it was off to the spray
booth.
| COLORS & MARKINGS |
Both planes had a natural metal finish although P-51 laminar flow wings
were painted silver on natural metal planes. I pre-shaded panel lines with
Rustoleum gloss black decanted from hardware store bought spray cans. I decided
to use a old supply of Testors Chrome silver which was airbrushed on in several
thin coats. After drying the entire model was sprayed with Testors Glosscote
lacquer to protect the metallic paint finish. BBD received additional masking
for the olive drab anti-glare panel and the black rudder. Petie 2nd was masked
for the blue nose which was airbrushed using Rustoleum Navy Blue. The landing
gear 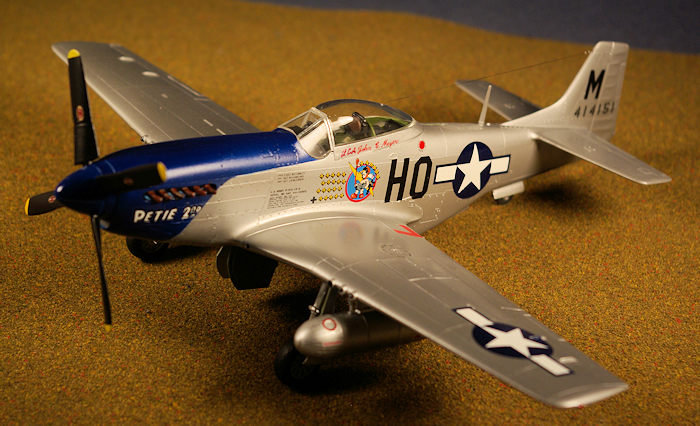 struts were then attached using CA. For BBD the kit decals were used and
although thicker than Microscale decals they went on well using Microscale Micro
Set and Micro Sol solution although I did experience some wrinkling around the
tightest compound curves on the under side of the nose and the wing tips with
the checkered decals despite additional applications of Solvaset in those areas.
One problem is that the Big Beautiful Doll lettering is black on white on the
decal but black on red on the kit art; I did not have any independent
confirmation of the original colors although the Tamiya P-51 kit has black and
red letters. A fair number of stencils are included on the decal sheet and add
interest to the overall appearance of the model. For Petie 2nd the Microscale
decals went on perfectly. After several days of drying for the decals the entire
model was airbrushed with a coat of Glosscote followed by heavily thinned black
for the exhaust staining. The small parts including the landing gear doors,
canopy, wheels, radiator vent door, landing light, pitot tube and drop tanks
were attached. I used Testors clear parts cement to attach the canopy. A #80
drill bit was used to drill a hole in the canopy to pass the antenna from the
back of the attachment to the head armor to the tail fin. I used my daughters'
straight hair colored black with a marker pen instead of sprue or monofilament
thread with CA at the attachment points.
struts were then attached using CA. For BBD the kit decals were used and
although thicker than Microscale decals they went on well using Microscale Micro
Set and Micro Sol solution although I did experience some wrinkling around the
tightest compound curves on the under side of the nose and the wing tips with
the checkered decals despite additional applications of Solvaset in those areas.
One problem is that the Big Beautiful Doll lettering is black on white on the
decal but black on red on the kit art; I did not have any independent
confirmation of the original colors although the Tamiya P-51 kit has black and
red letters. A fair number of stencils are included on the decal sheet and add
interest to the overall appearance of the model. For Petie 2nd the Microscale
decals went on perfectly. After several days of drying for the decals the entire
model was airbrushed with a coat of Glosscote followed by heavily thinned black
for the exhaust staining. The small parts including the landing gear doors,
canopy, wheels, radiator vent door, landing light, pitot tube and drop tanks
were attached. I used Testors clear parts cement to attach the canopy. A #80
drill bit was used to drill a hole in the canopy to pass the antenna from the
back of the attachment to the head armor to the tail fin. I used my daughters'
straight hair colored black with a marker pen instead of sprue or monofilament
thread with CA at the attachment points.
| CONCLUSIONS |
 The old Monogram/Revell P-51D is widely available and usually much
cheaper than the later kits. Being a model builder from my pre-teen years I
still find it hard to pay the current prices for the newer wonder kits. However
the kit shows its age in molding technology and especially in the currently
available Revell boxing with flash being present. The parts count is low and it
builds up into a attractive model but would require more skill than I could
muster for a contest quality build. Even a out of the box build requires a fair
amount of seam filling and sanding/contouring to make the model look good.
However, I was pleased with the result and both look good in my display case as
tributes to American heroes of World War II.
The old Monogram/Revell P-51D is widely available and usually much
cheaper than the later kits. Being a model builder from my pre-teen years I
still find it hard to pay the current prices for the newer wonder kits. However
the kit shows its age in molding technology and especially in the currently
available Revell boxing with flash being present. The parts count is low and it
builds up into a attractive model but would require more skill than I could
muster for a contest quality build. Even a out of the box build requires a fair
amount of seam filling and sanding/contouring to make the model look good.
However, I was pleased with the result and both look good in my display case as
tributes to American heroes of World War II.
| REFERENCES |
1. The P-51 Mustang in Detail and Scale, Part 2, Bert Kinzey, Squadron/Signal Publications, 1996
2. P-51 Mustang in Action, Larry Davis, Squadron/Signal Publications, No. 45
Wikipedia article on John C. Meyer
22 November 2016
Copyright ModelingMadness.com
If you would like your product reviewed fairly and fairly quickly, please contact the editor or see other details in the Note to Contributors.
Back to the Main Page Back to the Review Index Page Back to the Previews Index Page