Tamiya 1/32 P-51D
Mustang
| KIT #: | 60322 |
| PRICE: | $150.00 SRP |
| DECALS: | Three options |
| REVIEWER: | Blair Stewart |
| NOTES: | Great kit but overly complex |
| HISTORY |
The Mustang was the most significant fighter aircraft of World War II. There is no question it turned the tide of the air battle in Europe after its introduction.
The 8th Air Force’s 4th Fighter Group (USAAF) was formed from the Eagle squadrons - three RAF squadrons manned by American volunteers - and served with the Eighth Air Force from the autumn of 1942 until the end of World War II.
In September 1942, the
three Eagle squadrons were transferred to the USAAF, forming the 4th Fighter
Group. No.71 Squadron became the 334th Fighter, Squadron, No.121 Squadron became
the 335th 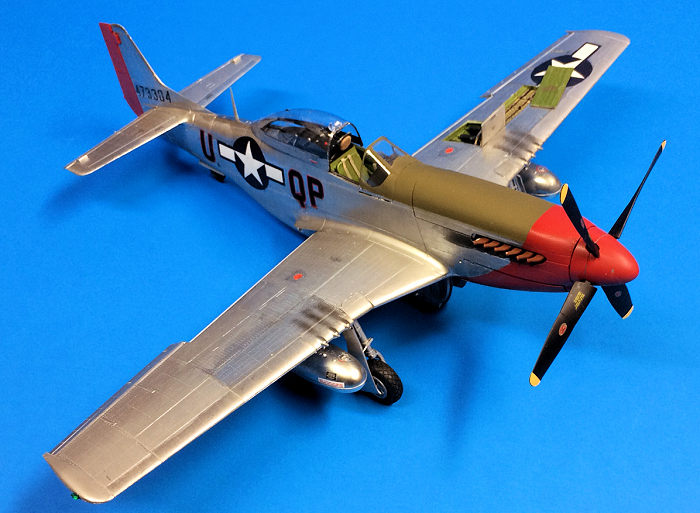 Fighter
Squadron and No.133 Squadron became the 336th Fighter Squadron. The new 4th
Fighter Group was the second operational US fighter group in England, after
the 31st Fighter Group. In October 1942, the 31st was allocated to Operation
Torch, the invasion of North Africa, and for a short period the 4th was the only
active US fighter group based in Britain.
Fighter
Squadron and No.133 Squadron became the 336th Fighter Squadron. The new 4th
Fighter Group was the second operational US fighter group in England, after
the 31st Fighter Group. In October 1942, the 31st was allocated to Operation
Torch, the invasion of North Africa, and for a short period the 4th was the only
active US fighter group based in Britain.
The group's combat debut came in October 1942, still using its old RAF Spitfires. In 1943, the 4th replaced its Spitfires with P-47 Thunderbolts.
In March-April 1944 the group converted to the P-51 Mustang, the long-range fighter that finally solved the biggest problem with the USAAF's daylight bombing campaign. On March 4,1944, the group flew the P-51 to Berlin on escort duties for the first time. The P-51 could escort the heavy bombers all the way to their targets in Germany, and soon the 4th and other USAAF fighter organizations were taking a heavy toll on the Luftwaffe, eventually winning control of the air over Europe.
 The group
was awarded a Distinguished Unit Citation for its aggressive attitude and
attacking Luftwaffe bases between 5 March and 24 April 1944. During the D-Day
campaign the group flew a mix of fighter defense and ground attack missions. It
supported Operation Market Garden in September 1944 and took part in the Battle
of the Bulge in December 1944-January 1945. In March 1945, its fighters escorted
the massive aerial armada that took part in the crossing of the Rhine.
The group
was awarded a Distinguished Unit Citation for its aggressive attitude and
attacking Luftwaffe bases between 5 March and 24 April 1944. During the D-Day
campaign the group flew a mix of fighter defense and ground attack missions. It
supported Operation Market Garden in September 1944 and took part in the Battle
of the Bulge in December 1944-January 1945. In March 1945, its fighters escorted
the massive aerial armada that took part in the crossing of the Rhine.
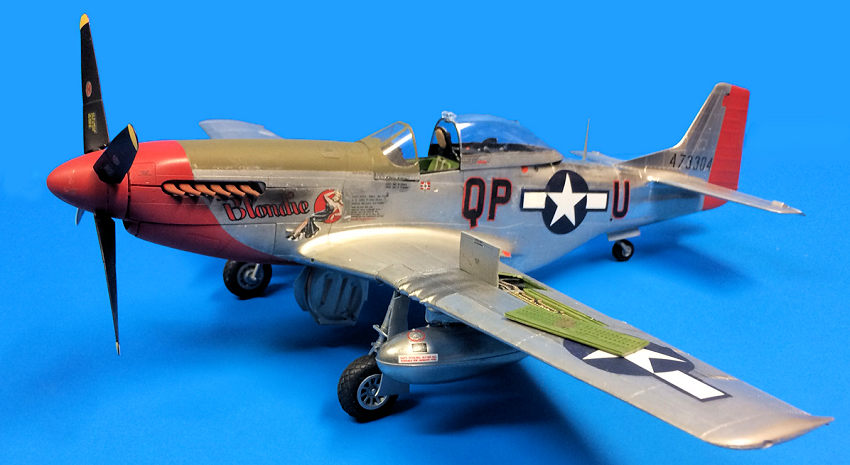
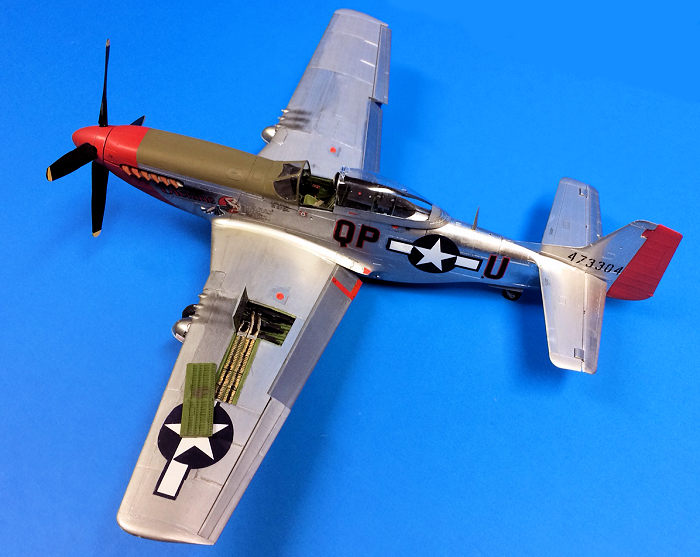
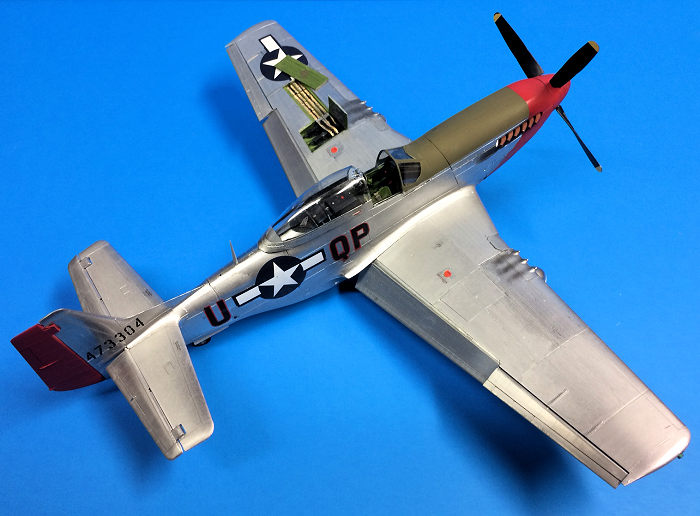
Marvin Arthur was a member of the 4th Group’s 334th Squadron. His P-51D, tail number 473304, was named “Blondie.” Blondie appears in numerous nose art books and pictures. Lt. Arthur ended the war credited with 1.5 ground kills. During World War II, the 334th had a total of 395 kills against the German Luftwaffe: 210 kills in the air and 185 on the ground.
| THE KIT |
 On opening
the boxes, one is almost overwhelmed by the number of parts and pieces. Molded
in gray plastic, the major elements of the kit are on numerous sprues. The kit
also contains clear plastic parts, rubber grommets, and metal parts and screws
to facilitate many of the moveable components. These add complexity to the kit
and may or may not be worth the effort, depending on your personal perspective
as a modeler. For a more detailed description of what’s in the box, see
Tom Cleaver's earlier review. Len Roberto also
provides a good overview of the kit’s features in
his review.
On opening
the boxes, one is almost overwhelmed by the number of parts and pieces. Molded
in gray plastic, the major elements of the kit are on numerous sprues. The kit
also contains clear plastic parts, rubber grommets, and metal parts and screws
to facilitate many of the moveable components. These add complexity to the kit
and may or may not be worth the effort, depending on your personal perspective
as a modeler. For a more detailed description of what’s in the box, see
Tom Cleaver's earlier review. Len Roberto also
provides a good overview of the kit’s features in
his review.
| CONSTRUCTION |
Unlike my normal practice, I began by reviewing the daunting 36-page, 74-step assembly instructions, at which time I nearly closed the box and put the kit back in the stash. But the call of the Modeling Sirens was just too great, so I reluctantly but determinedly jumped into the assembly process. Note that I started this kit some three or four years ago, and, after a somewhat valiant effort, alas I was set upon by yet another case of Advanced Modelers’ Syndrome (AMS). Thus, the Tamiya Mustang went back into the stash where it would languish for quite a while.
Like a lot of modelers, I have many kits sitting around that I started but just couldn’t finish. So lately I have been trying to reduce my “unfinished kit stash.” After several self-pep talks, I decided to finish the Tamiya Mustang.
When I contracted AMS, I
had made it all the way to step 45, which meant I had assembled and painted the
engine, the cockpit, the very detailed gun bay, and the wings. The cockpit is as
detailed as any I have seen, and includes graphics in the form of decals as well
as seatbelts and harnesses. Note that d uring
the wing and assembly process, I was confronted with one of the unusual features
of this kit: moveable ailerons and flaps that are facilitated by intricate metal
rods and photo-etch (PE) tabs (the elevators and rudder are also movable via
similar metal parts). I am not sure what the utility is with all the
moving/removable parts in this kit, but I must believe that Tamiya did its
marketing homework in deciding to include these features. Personally, I could do
without the numerous moving/removable parts, but that’s just me (note that
Tamiya designed the kit to be displayed with the gear down or in a flying
configuration on a display stand, and “readily” convertible from one to the
other. Again, not my cup of tea, but apparently appeals to many others). One of
these features that some may like is the removable engine side cowls that reveal
the highly-detailed Merlin engine. Tamiya enables this via small magnets that
hold the covers in place.
uring
the wing and assembly process, I was confronted with one of the unusual features
of this kit: moveable ailerons and flaps that are facilitated by intricate metal
rods and photo-etch (PE) tabs (the elevators and rudder are also movable via
similar metal parts). I am not sure what the utility is with all the
moving/removable parts in this kit, but I must believe that Tamiya did its
marketing homework in deciding to include these features. Personally, I could do
without the numerous moving/removable parts, but that’s just me (note that
Tamiya designed the kit to be displayed with the gear down or in a flying
configuration on a display stand, and “readily” convertible from one to the
other. Again, not my cup of tea, but apparently appeals to many others). One of
these features that some may like is the removable engine side cowls that reveal
the highly-detailed Merlin engine. Tamiya enables this via small magnets that
hold the covers in place.
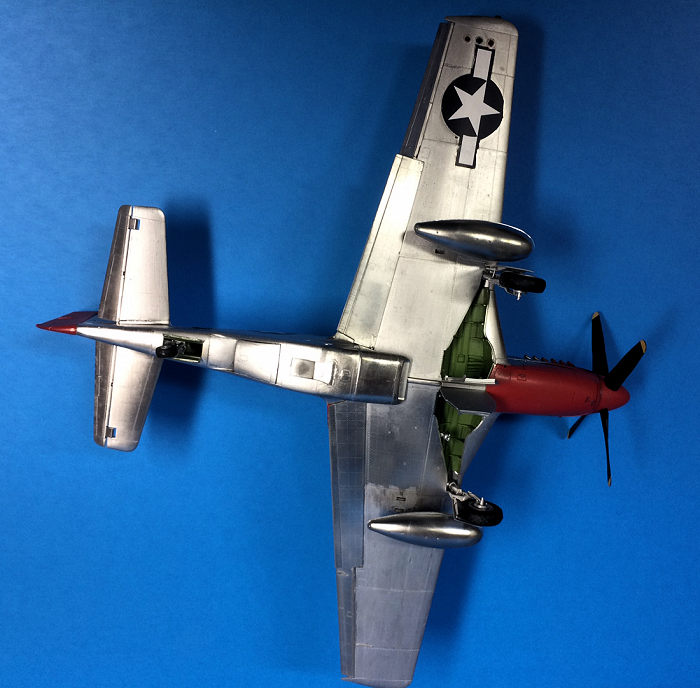
Picking up with step 46, I joined the wings to the fuselage. I then assembled the radiator air intake and the landing light. I then mated the radiator intake to the lower fuselage. I assembled the open landing gear door assembly, painted it, and then set it aside for later installation. I then moved to the intricate landing gear, which I had pre-painted.
Next, I moved to the drop tanks. The kit includes both the 75-gallon aluminum tanks as well as the 108-gallon paper tanks. I chose the aluminum tanks, as they were more commonly used by USAAF fighter aircraft.
The next assembly was the three-piece propeller. I painted it Testors gloss black and decaled it when dry. Tamiya provides the prop yellow tips as decals, which is nice feature. I hand painted the prop hub with Testors Silver. I then coated the entire propeller assembly with Testors Dullcote.
The kit includes peel and stick masks for the canopy, which I used for the front windscreen, but I opted to use my tried and true method of Scotch matte finish Magic Tape for the sliding canopy part, carefully trimmed with an Xacto knife.
| COLORS & MARKINGS |
Of the three
marking/paint schemes included in the kit, I opted for the one depicted by the
box art: Marvin Arthur’s “Blondie.” For the red, I chose Model Masters’ Gloss
Guards Red. For the natural metal areas, I opted to use Alclad II Chrome for the
first time (my normal go-to bare metal paint is either Floquil Old Silver or
Humbrol Metallic 191, which I have noticed lately doesn’t seem to produce quite
the shiny finish as it once did (new formula?). Since I had no experience with
Alclad, I defaulted
 to my old
ways: provide as smooth a finish as possible for the bare metal surfaces. Many
do this using gloss black paint, but for this model I chose to use an old
method: polishing the plastic with Brasso (I later found this to be a big
mistake that would require considerable effort from which to recover).
to my old
ways: provide as smooth a finish as possible for the bare metal surfaces. Many
do this using gloss black paint, but for this model I chose to use an old
method: polishing the plastic with Brasso (I later found this to be a big
mistake that would require considerable effort from which to recover).
I began the painting by spraying the red nose. Once dry, I masked the outline of the nose using 3M pin-striping tape. I then used Scotch blue painters tape to mask the red area (I left the rudder off the model so it was easier to paint red). I then sprayed the Alclad, achieving a very shiny surface – so shiny that I was worried my model would resemble a newly restored, highly polished P-51D rather than a worn warbird. Nevertheless, I proceeded with the assembly, and here was my big mistake: I somehow assumed that one could handle Alclad-painted surfaces without sealing them first (I have found that sealing metal paint surfaces can considerably alter their appearance). Boy, was I wrong! I resorted to the internet, and found mixed reviews about handling Alclad without sealers. The bottom line for me was that I couldn’t, and the situation was probably exacerbated by my use of Brasso (note that I did clean off the Brasso residue with rubbing alcohol; thus, I can only assume that the polished surface didn’t allow provide an ideal adhering surface for the Alclad application.
The more I handled the
model for the remaining assembly, the worse it got. After finally reaching the
point of no return (i.e., with decals in place), I had to fix the situation. At
this point, I decided that the resulting surface (where it stood up) was too
shiny. I thought of ways to replace the worn-off Alclad with a paint surface
that looked more worn. Thus, I chose to hand-paint Testors Metallic Silver on
those surfaces using a relatively wide brush. By carefully smoothing out the
applied paint, I eliminated most
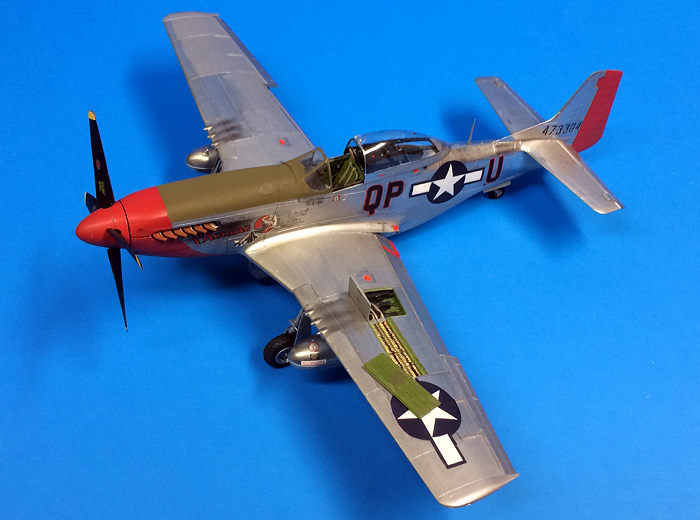 of the
brush strokes. At any rate, I think I ended up with a combination of shiny and
dull surfaces that looks more realistic for a P-51D in the middle of a war. I
lightly spray-painted black smoke stains behind the wing guns, and misted brown
paint for the exhaust stains. I then covered the entire model with a thin wash
of black acrylic paint, carefully wiping off the excess wash with a Q tip.
of the
brush strokes. At any rate, I think I ended up with a combination of shiny and
dull surfaces that looks more realistic for a P-51D in the middle of a war. I
lightly spray-painted black smoke stains behind the wing guns, and misted brown
paint for the exhaust stains. I then covered the entire model with a thin wash
of black acrylic paint, carefully wiping off the excess wash with a Q tip.
The final step was to add the clear lenses and paint the appropriate ones with Tamiya clear red, orange, or green. I opted to leave off the wire antenna, as I read some first-hand crew chief accounts (and numerous WWII photos attest to this) that these were left off most USAAF P-51s towards the end of the war. The reason was that the canopy antenna wire was for the Detrola VHF radio and was useful only in the CONUS, while the SCR-522 VHF radio used the antenna mast on the fuselage.
| CONCLUSIONS |
This is an amazing kit from Tamiya. Many reviewers call this the most accurate P-51 available, and I would agree with that assessment. While overly complex, the excellent instructions make the kit a relatively simple yet “tedious” build for experienced modelers, and the complexity can be somewhat reduced if one decides not to include all the moving/removable features. If you have the money and the time, I highly recommend adding this model to your collection!
| REFERENCES |
4th Fighter Group (USAAF), History of War, Worldwide Web, April 2017.
334th Fighter Squadron, Wikipedia, Worldwide Web, April 2017.
Marvin Arthur Obituary, Daily Press, March 2001.
P-51D Antenna, Aviation In Scale Zone-Five.net, November 2010.
18 April 2017
Copyright ModelingMadness.com
If you would like your product reviewed fairly and fairly quickly, please contact the editor or see other details in the Note to Contributors.
Back to the Main Page Back to the Review Index Page Back to the Previews Index Page