Revell 1/48 P-51B Mustang
| KIT #: | 4872 |
| PRICE: | $ |
| DECALS: | Two options |
| REVIEWER: | Francisco Santoro |
| NOTES: | Reboxed ICM kit |
| HISTORY |
 "The
prototype of the North American P-51 Mustang first flew on 26th October 1940 in
response to a British request for a fighter suitable for use in the European
theatre. The first Mustang Mk.Is arrived in England in November 1941 and early
combat experience showed the speed and altitude limitations of the original
American desgined Allison engine. Mustangs powered by the Rolls Royce Merlin 61,
built by Packart in the United States as V1650, were designated P-51B/C by the
USAAF and known as the Mustang Mk.III by the Royal Air Force.
"The
prototype of the North American P-51 Mustang first flew on 26th October 1940 in
response to a British request for a fighter suitable for use in the European
theatre. The first Mustang Mk.Is arrived in England in November 1941 and early
combat experience showed the speed and altitude limitations of the original
American desgined Allison engine. Mustangs powered by the Rolls Royce Merlin 61,
built by Packart in the United States as V1650, were designated P-51B/C by the
USAAF and known as the Mustang Mk.III by the Royal Air Force.
Entering service with 19th Squadron in February 1944, the first version of the Merlin powered Mustang flew with a total of nineteen RAF squadrons on long ranger escort and fighter bomber missions.
Many aircraft were modified with the blown Perspex rear sliding "Malcolm Hood" in place of the original, heavily framed hinged canopy, giving outstanding all around visibility for the pilot."
| THE KIT |
Even though the box says it's a Revell kit, the original tooling was done by the Ukranian company ICM, which at the same time is said to be a copy of the Tamiya Mustang B. Regarding the latter, both kits look really similar in the parts breakdown, the only difference being that the ICM kit without locating pins on the fuselage, and less than stellar fit on most of the parts.
| CONSTRUCTION |
I had bought the kit originally in 2018, and began building it as soon as I arrived home. The interior parts were painted with Revell 48 Sea Green, picking up some boxes and the instrument panel with black. The radiator screen was painted Aluminium. After that, I glued all the cockpit parts together.
 Before
gluing the cockpit into the fuselage, I did a test fit of the fuselage halves,
and found out they were a bit warped, but nothing some tight clamping couldn't
solve. However, I found out once the cockpit was in place, that the seat
wouldn't let me close the fuselage halves, so that piece was trimmed
accordingly. I then made another test run with the cockpit, and it still didn´'t
fit properly, so in anger, I tossed the kit into its bag and began building
another, better fitting kit (Airfix's Bf 109E-4N in 1:48).
Before
gluing the cockpit into the fuselage, I did a test fit of the fuselage halves,
and found out they were a bit warped, but nothing some tight clamping couldn't
solve. However, I found out once the cockpit was in place, that the seat
wouldn't let me close the fuselage halves, so that piece was trimmed
accordingly. I then made another test run with the cockpit, and it still didn´'t
fit properly, so in anger, I tossed the kit into its bag and began building
another, better fitting kit (Airfix's Bf 109E-4N in 1:48).
Fast forward a few years, while I was bored, I remembered I had this unfinished kit in my parts box, so I grabbed it and did some test fit (again). I realised the fit wasn't as bad as I had thought, so I grabbed my glue and glued the cockpit into the right fuselage half, and left it to dry. Once that was dried, I glued the left half and taped both halves.
I then began assembling the wings. Unlike the Tamiya kit, these don't fit as good, but I got an acceptable result in the end. But when I tried to attach them to the fuselage, I discovered the wings didn't fit properly, and at the same time the wings bent downwards, so I trimmed them (quite a bit), and managed to get a better (but not a Tamiya) fit.
After letting the wings cure, I moved towards the horizontal stabilizers, which were warped upwards. Instead of trying to straighten them down, I left them as is, and moved on.
| COLORS & MARKINGS |
I began this project without a definite scheme. I
didn't want to make the kit markings with the D-Day stripes, since I wasn't
interested in masking them. I then remembered I had Tamiya decals from their
Mustang Mk.III (one had a sharkmouth, which peeked my interest). I also had
decals from a Tamiya P-51B and D. Not trusting the look of the decals from the
second option, I brushed some water over one I wouldn't use, and it shattered.
After that, I also remembered I had decals from a Tamiya P-51D in 48th, so I
grabbed those and
 did the
same test as on the Mk.III. The decals passed the test.
did the
same test as on the Mk.III. The decals passed the test.
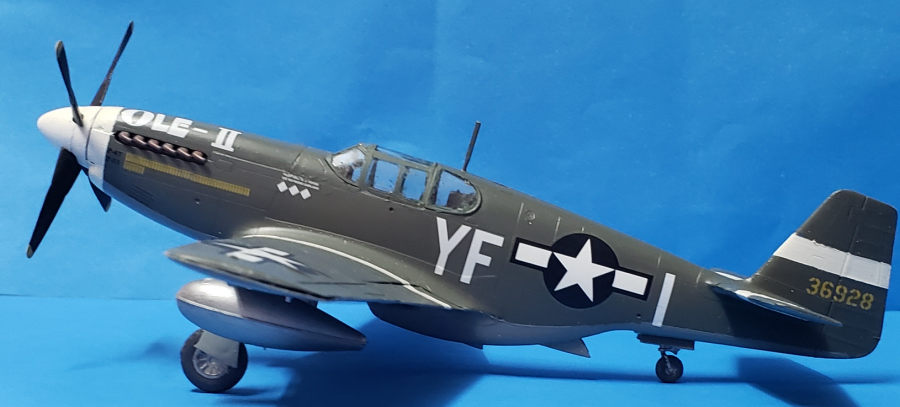
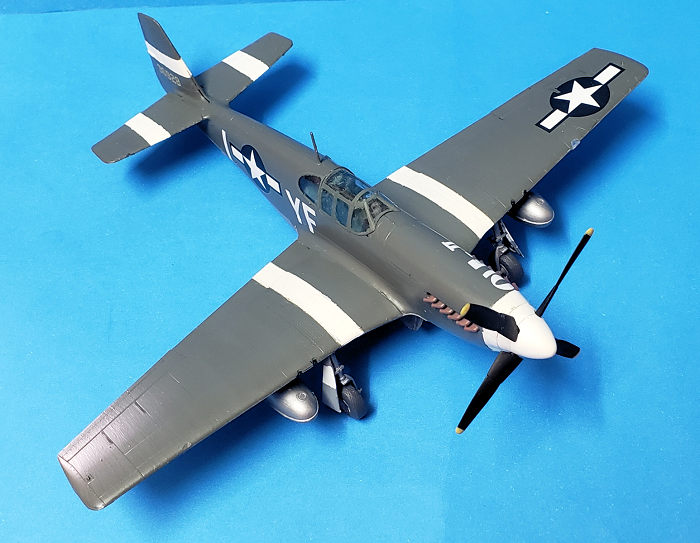
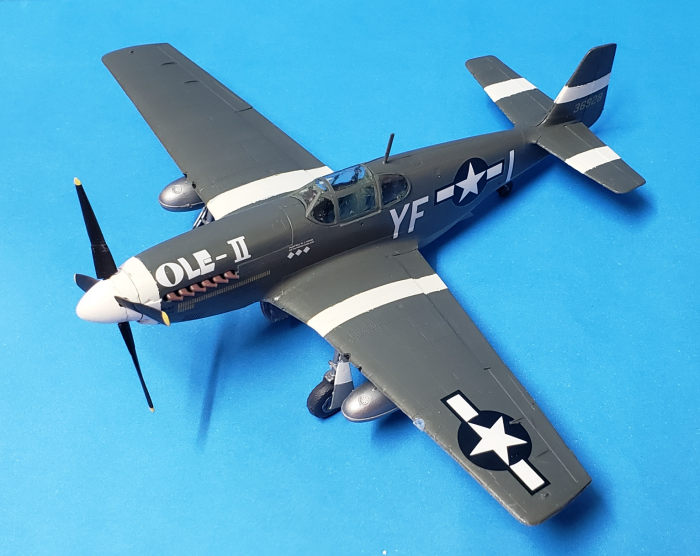
Leaving the American decals as the only option, I chose to use the ones from the Tamiya P-51B (William Hovde). These were a mix of a new/old decal sheet. I first painted the kit with Revell 66 Olive Grey (Olive Drab), then I painted the undersides with Medium Grey (Revell 43), and to end the painting stage, I painted the white wing bands. I then glossed the entire model. I began by placing the stars in place, and then I placed the tactical markings. The star decals were very thick and the surrounding carrier film silvered, whereas the newer markings didn't.
This stage, even though it says final, is the one that takes longer to complete. I painted the landing gear struts in Aluminium, the gear well was painted with Interior Green, and the gear doors were painted in Medium Grey. The propeller blades were painted black with yellow tips, and the nose cone was painted white. I then masked and glued with white glue the canopy.
| CONCLUSIONS |
Even though the kit seems to be a Tamiya copy, the fit isn't as good as on the latter kit. However, applying some modelling skills will give you a relatively good model.
Editor's note: Francisco is correct about his commentary on this kit. The only reason one should build this version of the B is that they are on a budget or cannot find the Tamiya version. I built this one many years back in the ICM boxing and while it turned out well, was a bit of a struggle to get it there.
19 October 2021 Copyright ModelingMadness.com. All
rights reserved. No reproduction in part or in whole without express permission. If you would like your product reviewed fairly and fairly quickly, please
contact
the editor or see other details in the
Note to
Contributors.