| KIT #: | 2743 |
| PRICE: | $46.00 |
| DECALS: | Six options |
| REVIEWER: | Francisco Santoro |
| NOTES: | Hasegawa rebox 'Pacific Aces'. Repliscale´s 48-5058 decals |
| HISTORY |
"While Thunderbolt and Lightning adherents might hotly contest the claim, the Mustang has been rated as the best all-around United States fighter to serve in quantity in the Second World War. Operationally, all three fighters had formidable tallies and each was indispensable in its own sphere. Since each was so different in origins and technical features from the others, there seems no yardstick with which to compare them closely, but from the British viewpoint the Mustang stands out because it was built to conform to RAF requirements and because British technicians can modestly claim thereafter to have influenced its operational development to a considerable degree.
 At the turn of the year 1944/45, a new Mustang variant was coming
into service, though rather later than originally planned. At the main North
American plant at Inglewood, California, more drastic improvements to visibility
for the pilot had been planned than could possibly have been made on active
service. An unfinished P-51B airframe was taken from the production line and
rebuilt to accomodate a "teardrop" Typhoon type sliding hood, resulting in
changes to the rear fuselage structure and repositioning of equipment. The new
lowered rear decking lines were "moulded" into the main fuselage contoursby
again using the iconic lofting process, and the alterations to the forward nose
lines and windscreen originally envisaged were incorporated. Armament
alternatives were the usual four 50 caliber guns with 490 rounds apiece or six
50 caliber wing guns with 270 rounds for the four outer weapons and 380 rounds
for the two inner. The latter armament soon became standard, but because of the
extra weight and restressing underwing loads initially were restricted to two
500 lbs bombs and two 75-gallon drop tanks or equivalents, a recommendation
often ignored in operational squadrons.
At the turn of the year 1944/45, a new Mustang variant was coming
into service, though rather later than originally planned. At the main North
American plant at Inglewood, California, more drastic improvements to visibility
for the pilot had been planned than could possibly have been made on active
service. An unfinished P-51B airframe was taken from the production line and
rebuilt to accomodate a "teardrop" Typhoon type sliding hood, resulting in
changes to the rear fuselage structure and repositioning of equipment. The new
lowered rear decking lines were "moulded" into the main fuselage contoursby
again using the iconic lofting process, and the alterations to the forward nose
lines and windscreen originally envisaged were incorporated. Armament
alternatives were the usual four 50 caliber guns with 490 rounds apiece or six
50 caliber wing guns with 270 rounds for the four outer weapons and 380 rounds
for the two inner. The latter armament soon became standard, but because of the
extra weight and restressing underwing loads initially were restricted to two
500 lbs bombs and two 75-gallon drop tanks or equivalents, a recommendation
often ignored in operational squadrons.
Factory designations for the D series were NA-106, NA-109 and NA-122 from the Californian plant and NA-111 and NA-124 from production in Texas. From the former plant, 281 were supplied to the RAF as Mustang IVs serialled KH641-670, KM493-743; additionally and example (TK589) was sent for evaluation. This test aircraft delivered in June 1944 was in a finishing style then being used for operations against the V-bombs to obtain maximum speed-unpainted, with all joints filled in to provide a continuous smooth surface. From this time onwards, both in the Army Air Force and RAF, Mustangs were frequently to be seen in natural metal finish. Since it was a conspicuous finish, with speed replacing concealment as the Allies gained ascendancy in the air and camouflage no longer prime consideration, there ensued a spate of gaudy markings.
Similar to the P-51D but built in Dallas and fitted with an aeroproducts airscrew was the P-51K (NA-111), of these 597 were allocated to the RAF serialled KH944-947, KH671-870,KM100-492 and TK586 as Mk IVAs.
 The D-6 was a specialised tactical-reconnaissance version for the
USAAF carrying oblique and vertical cameras in the rear fuselage while retaining
full armament. The D-20 was the model supplies to Sweden in April 1945 as their
J26. The D-10-NA and all Dallas D models introduced additional fin area in the
form of a fillet between the aft decking and fin to increase directional
stability throughout the speed range, as foreshadowed during the original Rolls
Royce Merlin conversion trials in England. The fillet had not been necessary on
the B and C versions, but the reduced side area at the rear on the D models no
doubt influenced its eventual incorporation as a production item. Modification
kits were distributed so that all Ds could be fitted with this fillet, but the
decision was left to a large extent with local commanders.
The D-6 was a specialised tactical-reconnaissance version for the
USAAF carrying oblique and vertical cameras in the rear fuselage while retaining
full armament. The D-20 was the model supplies to Sweden in April 1945 as their
J26. The D-10-NA and all Dallas D models introduced additional fin area in the
form of a fillet between the aft decking and fin to increase directional
stability throughout the speed range, as foreshadowed during the original Rolls
Royce Merlin conversion trials in England. The fillet had not been necessary on
the B and C versions, but the reduced side area at the rear on the D models no
doubt influenced its eventual incorporation as a production item. Modification
kits were distributed so that all Ds could be fitted with this fillet, but the
decision was left to a large extent with local commanders.
Additional radio, including an MN-26C radio compass (fitted retrospectively to many machines), was also introduced at about the same time as the fin fillet, as well as attachment points for a cluster of three "bazooka" RP (rocket projectile) tubes beneath each wing."
| THE KIT |
I had in my mind from some time to build Charles "Chuck" Yeager´s P-51D Mustang, and had bought a Barracuda decal sheet from the US, and a Repliscale one from a local seller, just to have one if the other one didn´t arrive. The Repliscale sheet is recommended to be used with the Hasegawa or Revell/Monogram P-51Ds. While I was checking the storage room of importer of scale models in Argentina, I saw the Italeri P-51D/K "Pacific Aces" box, checked Scalemates, and smiled when I saw it was a rebox of the Hasegawa P-51D, so I bought it immediately (together with an Airfix Spitfire I and P-40B in 1:48).
 The kit comes in a top opening box labelled "P-51D/K "Pacific Aces,"
and instead of a fancy artwork, it shows the six decal options available. The
plastic parts come in a single bag with the clear parts bagged inside the main
bag. There´re four sprues moulded in light grey and smooth plastic and a single
clear sprue. Sprues A and B have the cockpit and fuselage parts, while the two C
sprues have the P-51D and K propellers and the underwing ordnance. The clear
parts have the P-51D and K canopies, among many others.
The kit comes in a top opening box labelled "P-51D/K "Pacific Aces,"
and instead of a fancy artwork, it shows the six decal options available. The
plastic parts come in a single bag with the clear parts bagged inside the main
bag. There´re four sprues moulded in light grey and smooth plastic and a single
clear sprue. Sprues A and B have the cockpit and fuselage parts, while the two C
sprues have the P-51D and K propellers and the underwing ordnance. The clear
parts have the P-51D and K canopies, among many others.
As stated on the boxtop, there is a super decal sheet with six marking options printed by Cartograf. The decals are nicely printed, glossy, and come with all the bands needed for the six options.
| CONSTRUCTION |
I began by painting all the cockpit parts mainly with Interior Green (Revell 48 Sea Green), and then detailing them with flat black or silver where it was deemed appropriate. The radiator was painted flat black and installed in place. The instructions tell you to install the cockpit walls to the cockpit floor and then glue the whole thing to one fuselage half, but I chose to glue both cockpit walls to both fuselage halves, and then attach the cockpit floor. After installing the cockpit floor in place, I built up the the radiator exhaust floor (I don´t know how that part of the Mustang is called). I then glued the engine exhausts to both fuselage halves, and glued both fuselages after some minutes. Gluing the fuselage halves proved to be a rather annoying task, because I believe the tailwheel strut mounting pegs were too large, making the fuselage spread open and not have a very firm contact point.
I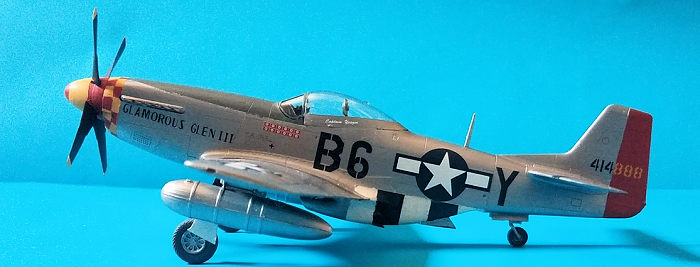 then built the wings. Step 3 on the instructions show the holes to
open if you want to attach the rockets of bazookas, but I skipped it entirely
and opened the holes for the underwing fuel tanks. I then glued the lower wing
to the two upper wings and left them to dry.
then built the wings. Step 3 on the instructions show the holes to
open if you want to attach the rockets of bazookas, but I skipped it entirely
and opened the holes for the underwing fuel tanks. I then glued the lower wing
to the two upper wings and left them to dry.
Before commiting to glue the wings and the fuselage together, I test fitted them, and was surprised to find a gap on both sides of the fuselage. Wasn´t expecting that on a Hasegawa kit. However, I remembered the idea of using a spreader bar, so I cut a sprue, put it as close as possible to the cockpit floor, and found it eliminated the gap. The spreader sprue was permanently glued in place with CA and regular Revell Contacta. I glued the horizontal stabilisers moments later.
Some more pieces, such as the cooling radiator intakes/doors were glued in place, and I prepared myself to paint the model.
| COLORS & MARKINGS |
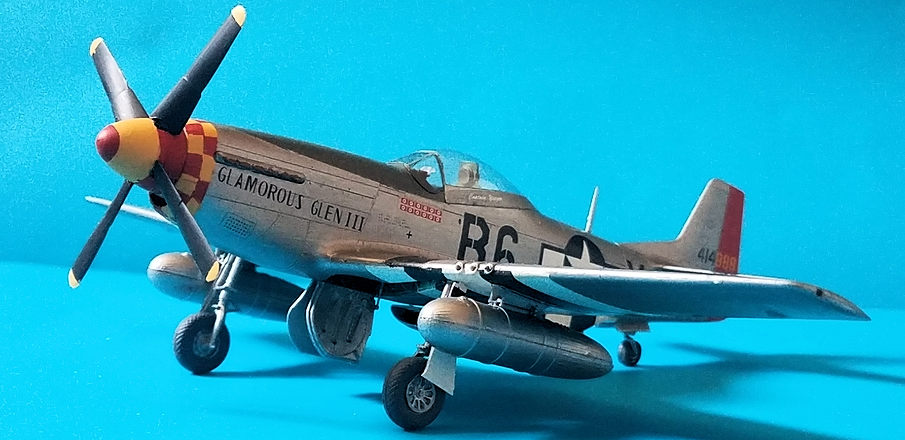
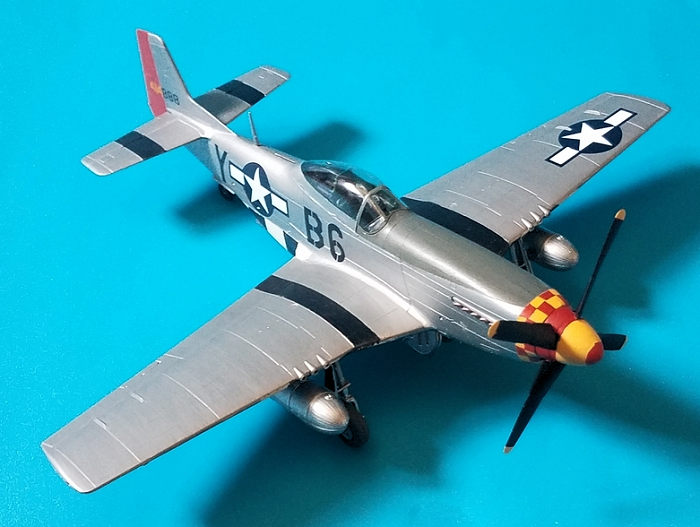
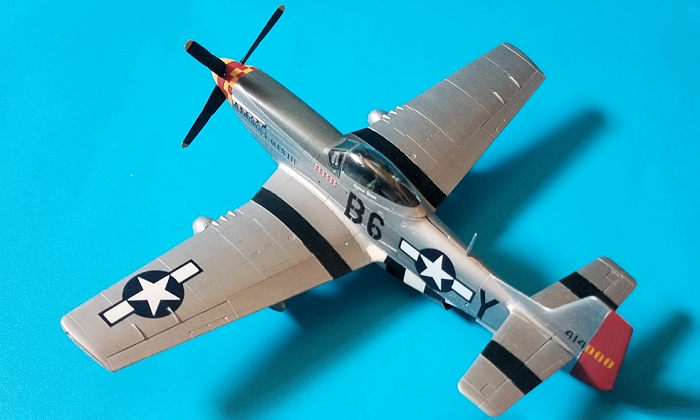
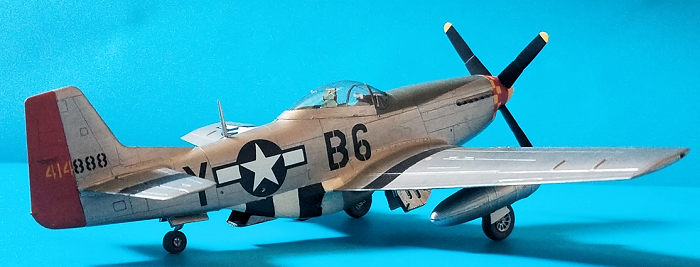
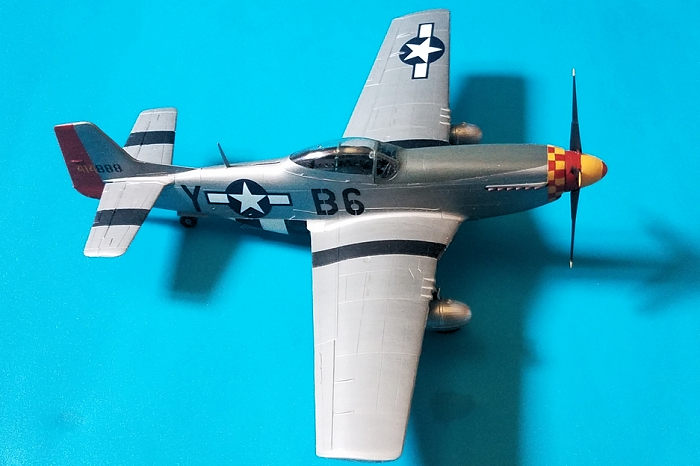
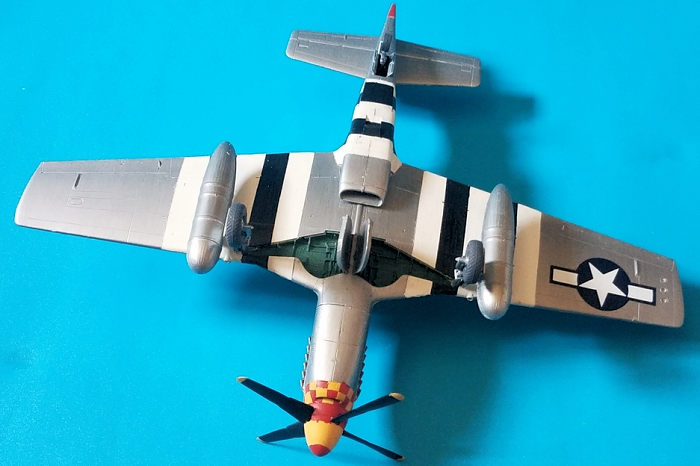
"Chuck" Yeager´s P-51D "Glamorous Glen III" was painted in overall natural metal, with a red rudder, a red/yellow/red spinner and the yellow/red checkerboard of the 357th Fighter Group, and D-Day bands on the lower wings and fuselage. It also sported black bands on the upper wings.
I began by painting the D-Day bands and the black bands on the wings and fuselage with white and black. The anti-glare panel was painted with Revell Olive Grey 66 (I read it was Olive Drab). Those areas were then masked, and I painted the rest of the airframe white, to give the metallic colour a good base. I then brushed everything with Revell 91 Steel, and left it to dry. The areas next to the rudder were masked, and the rudder itself was painted first white, and then red. I also painted the wheel wells with Revell 48 Sea Green. The aircraft was then gloss coated with Revell´s gloss varnish for decalling.
 As previously stated, I had bought two decal sheets, one from
Barracuda which at the time of me writing this review (10/12/18), hasn´t arrived
(but its in transit). The other was a 25 year old Repliscale decal sheet,
printed by Microscale in 1993. I first had doubts about it, because of how thin
the protector film looks, and because of how old it was. Testing three spare
decals from the sheet gave me some relief, because they didn´t shatter.
As previously stated, I had bought two decal sheets, one from
Barracuda which at the time of me writing this review (10/12/18), hasn´t arrived
(but its in transit). The other was a 25 year old Repliscale decal sheet,
printed by Microscale in 1993. I first had doubts about it, because of how thin
the protector film looks, and because of how old it was. Testing three spare
decals from the sheet gave me some relief, because they didn´t shatter.
I began decalling by trying to use the checkerboard decals. I gave up on them and put the first one back on the decal paper because it was too big for the nose, so I decided to mask and paint the checkerboards. It didn´t take much time, and it looks better than I imagined. The other decals worked flawlessly: It took them little time to move from the backing paper, and didn´t stick to the surface as soon as they touched it. Pressing firmly over them with a napkin fixed them in place. I used a new hobby knife to slice the area of the star that went above the aileron actuator on the upper wing. Even though the decals were thin, I used some Vallejo decal softener to help them sink even more into the panel lines. The model was brushed with water, and then flat coated with Revell´s matt varnish.
| FINAL CONSTRUCTION |
I painted the landing gear doors with the continuation of the D-Day bands, and the inner gear doors were painted with the fuselage colour (Revell 91 Steel). I painted the wheels with Revell Steel for the hubs, and the tyres with Revell 78 Tank Grey (a colour that looks nice as RLM 66 too). I glued the landing gear legs into their sockets in the wheel wells, and left them to dry. I also attached the forks that hold the landing gear doors in place too. After some drying time, I glued the wheels in place, followed by the landing gear doors. The inner landing gear doors were added soon after and left to dry. I also glued the tailwheel doors at this time.
 With the aircraft on its wheels, and turned my attention to the
propeller assembly. The spinner and its base were painted in white, and then
masked to painted the red/yellow/red pattern. The propeller blades were painted
flat black with yellow tips. I trimmed the base of each propeller because I
thought the extensions would interfere with the spinner installation. I now
think those extensions were there to lock the propeller assembly in place. I
glued the blades to the base of the propeller, left them to dry (not much time,
they were still wobbly), and then glued the spinner over them. The whole
propeller assembly was then glued in place.
With the aircraft on its wheels, and turned my attention to the
propeller assembly. The spinner and its base were painted in white, and then
masked to painted the red/yellow/red pattern. The propeller blades were painted
flat black with yellow tips. I trimmed the base of each propeller because I
thought the extensions would interfere with the spinner installation. I now
think those extensions were there to lock the propeller assembly in place. I
glued the blades to the base of the propeller, left them to dry (not much time,
they were still wobbly), and then glued the spinner over them. The whole
propeller assembly was then glued in place.
As per an online black and white photo of Yeager´s Mustang D, I added the paper underwing fuel tanks, which were the only things in the entire kit to have sizable gaps.
The last parts to be installed were the clear parts. I glued the gun sight first. The windscreen was pinted with Revell Sea Green (Interior Green) and then Olive Drab. The canopy was also painted with Interior Green and then the fuselage colour. They were glued to the aircraft with Revell´s Contacta Clear. I added the "Cpt Yeager" decal to the canopy as the finishing touch.
| CONCLUSIONS |
This kit didn´t present much problems aside from the tailwheel part, and it was a nice building and painting experience. One interesting thing to note is that Hasegawa gives you three pieces to build the radiator roof, whereas Tamiya managed to do that with a single piece. The latter also managed to mould a single piece cowling that is glued over the fuselage, giving you a seamless nose. The fit wasn´t also as "Hasegawa" like as I would have expected when it came to gluing the wings/fuselage in place, maybe it´s an Italeri thing only. The biggest benefit of this kit (aside from the huge decal sheet), is the inclusion of the pieces to build either a P-51D or K. If you want to build a D/K Mustang, then the Hasegawa kit is for you, but if you want a more straight forward assembly, then get the Tamiya kit. Either way, you´ll end up with a nice P-51 on your collection.
| REFERENCES |
Classic Aircraft No.3 P-51 Mustang: Their history and how to model them by Roy Cross and Gerald Scarboroug.
21 January 2019
Copyright ModelingMadness.com
If you would like your product reviewed fairly and fairly quickly, please contact the editor or see other details in the Note to Contributors.
Back to the Main Page Back to the Review Index Page Back to the Previews Index Page