| HISTORY |
Revell 1/32 P-51D-5 Mustang
| KIT #: | 03944 |
| PRICE: | £39-99 |
| DECALS: | Two options |
| REVIEWER: | Frank Reynolds |
| NOTES: | Paint Masks New Ware NWAM0354 price £8-30. Seat Belts HGW 132085, £8-80. |
| HISTORY |
 It is a
Mustang, a Pony, a legend. Probably the best all round single seat fighter of
World War 2. In service from the 1940s to the 1970s with many air arms. A
cherished warbird, with reportedly about 150 still in use as sport planes and
heritage flight demonstrators Worldwide. It is an unintended quirk of fate that
the large area in the fuselage behind the pilot’s seat, originally occupied by
long range fuel tanks and the bulky radios of the 1940s, is big enough to
accommodate a second seat and dual controls, so even if you can’t fly one
yourself you can take a ride in one that has been so adapted. Rugged, stable in
flight, manageable on take-off and landing due to its wide track landing gear, a
great all-round view from the high set bubble canopy - the very characteristics
that made it an effective military weapon also make it a realistic proposition
for a private owner. $3,000,000 to $4,000,000 should get you a good one. A
worldwide specialist industry exists to support restoration, operations and
maintenance of this remarkable piece of industrial design.
It is a
Mustang, a Pony, a legend. Probably the best all round single seat fighter of
World War 2. In service from the 1940s to the 1970s with many air arms. A
cherished warbird, with reportedly about 150 still in use as sport planes and
heritage flight demonstrators Worldwide. It is an unintended quirk of fate that
the large area in the fuselage behind the pilot’s seat, originally occupied by
long range fuel tanks and the bulky radios of the 1940s, is big enough to
accommodate a second seat and dual controls, so even if you can’t fly one
yourself you can take a ride in one that has been so adapted. Rugged, stable in
flight, manageable on take-off and landing due to its wide track landing gear, a
great all-round view from the high set bubble canopy - the very characteristics
that made it an effective military weapon also make it a realistic proposition
for a private owner. $3,000,000 to $4,000,000 should get you a good one. A
worldwide specialist industry exists to support restoration, operations and
maintenance of this remarkable piece of industrial design.
As for its combat history, you can take a lifetime researching its achievements. Start with the web or head for a bookstore or library. Words cannot adequately describe just how good it was and how important it was in World history. It was a product of its time and it came at the right time.
| THE KIT |
Produced by Revell Germany, the kit contents are of such good quality that they can be forgiven the use of their standard end-opening box.
The instruction booklet is produced in full colour on glossy
paper and runs to 24 A4-size pages including four pages of three-view drawings
covering the two decal choices. Assembly instructions run to 74 numbered picto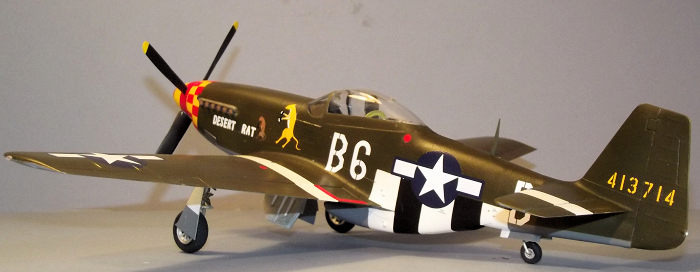 grams
and the use of colour makes it easy to paint parts during construction,
especially since the colours are highlighted by appropriately coloured flags.
There are two pages of parts charts identifying the nine main parts frames in
pale grey-green plastic and two more in clear.
grams
and the use of colour makes it easy to paint parts during construction,
especially since the colours are highlighted by appropriately coloured flags.
There are two pages of parts charts identifying the nine main parts frames in
pale grey-green plastic and two more in clear.
Released in the UK in 2018. Revell have chosen an early version of the bubble top P-51 that lacks a fillet between the upper rear fuselage and the tail fin. The parts break down hints that Revell will be able to release other versions if they choose, including versions with a fin fillet and underwing rockets. Three different types of lower nose cowl vents appear on the parts frame although only one is called out for use. Alternative parts are included for teardrop-shaped under wing tanks or the larger cigar-shaped paper variety, or a pair of 250lb bombs .
The parts were crisply moulded with no obvious flash, although on my sample a couple of the locating pins on the underwing tanks were short shot. Surface detail was nicely restrained. The transparent parts were crystal clear but the large main canopy seemed rather thick with some rather obvious optical distortion.
The large decal sheet is of good quality. Both decal options are of relatively well known P-51s and it is interesting to find on checking one or two references that many of the well photographed Mustangs were of the no-fillet variety. Revell offers little in the way of information on the colour schemes or date of service but simply identifies the pilots. Both are European theatre post D-Day schemes where the upper surface invasion stripes have been removed.
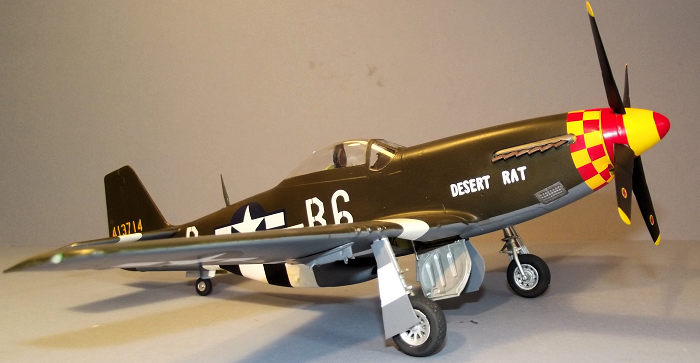
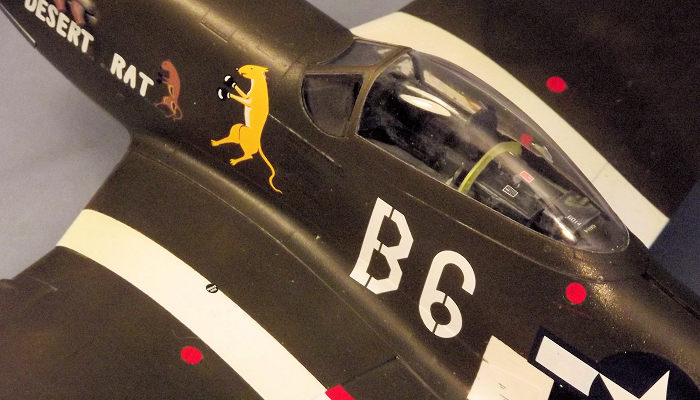
 First is
“Lou IV/Athelene” an originally silver machine with Yellow nose and spinner.
D-Day underwing stripes are featured and the upper surfaces partially painted in
dark green. Large areas of the upper wing are in Olive Drab where the invasion
stripes have been erased. This is the box art option. Some further research
identified it as belonging to the 375th FS, 361st FG, July 1944. The specific
kit decals commemorate the aircraft of Colonel Thomas J.J. Christian Jr. CO of
the 361st FG who lost his life on a strafing mission 12 August 1944.
First is
“Lou IV/Athelene” an originally silver machine with Yellow nose and spinner.
D-Day underwing stripes are featured and the upper surfaces partially painted in
dark green. Large areas of the upper wing are in Olive Drab where the invasion
stripes have been erased. This is the box art option. Some further research
identified it as belonging to the 375th FS, 361st FG, July 1944. The specific
kit decals commemorate the aircraft of Colonel Thomas J.J. Christian Jr. CO of
the 361st FG who lost his life on a strafing mission 12 August 1944.
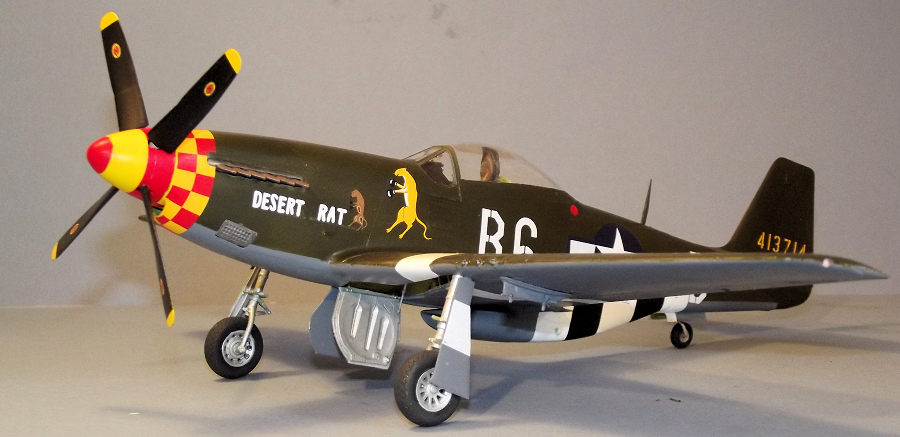
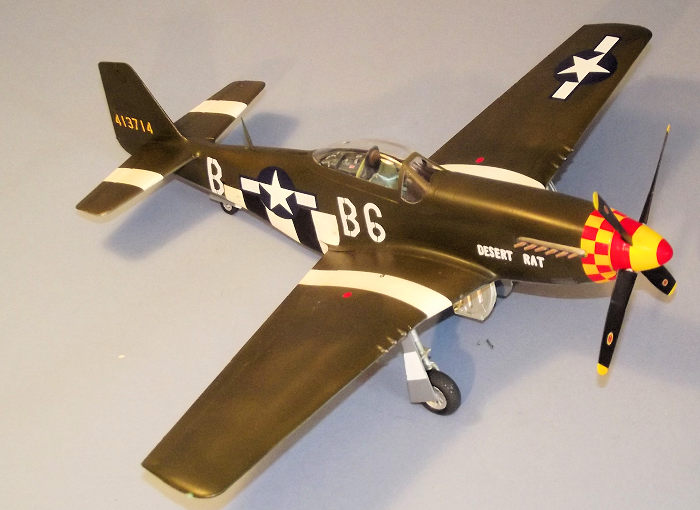
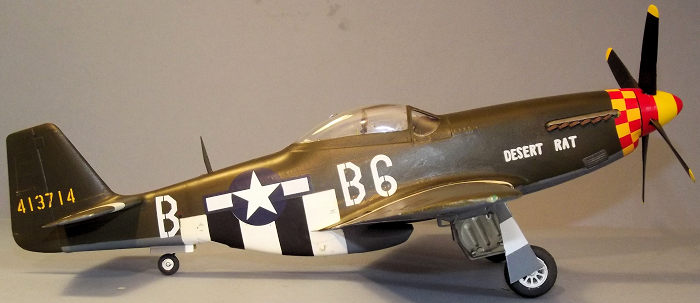
The second option has Olive Drab upper surfaces with Neutral Grey undersides and is the subject of this build. Revell attributes the markings to Captain Herschel Pascoe. A web search points to his service in the 363rd FS, 357th FG at Leiston in England where the unit participated in the first long range mission over Berlin 6th March 1944.
| CONSTRUCTION |
I decided that the 20 plus Me109s in my showcase should have some contrast on display and what better than the 109s true Nemesis, the P-51 Mustang.
This would be a straight from the box build, with aftermarket limited to a set of seat belts that are vital under the large clear blown canopy and a set of the New Ware “professional” paint masks that would take care of painting the exterior and interior of that large canopy.
The first order of business was to follow up on a tip in one of Da Boss’s articles and provide myself with scans of the instructions’ pages showing the parts frames. Printed out separately they can be left on the workbench as the build progresses and save so much flipping back and forwards from page to page. Why did I not think of that?
Construction begins with the interior. I carefully studied
the first fifteen stages of construction and identified the parts that could be
painted on the frame. I used a base colo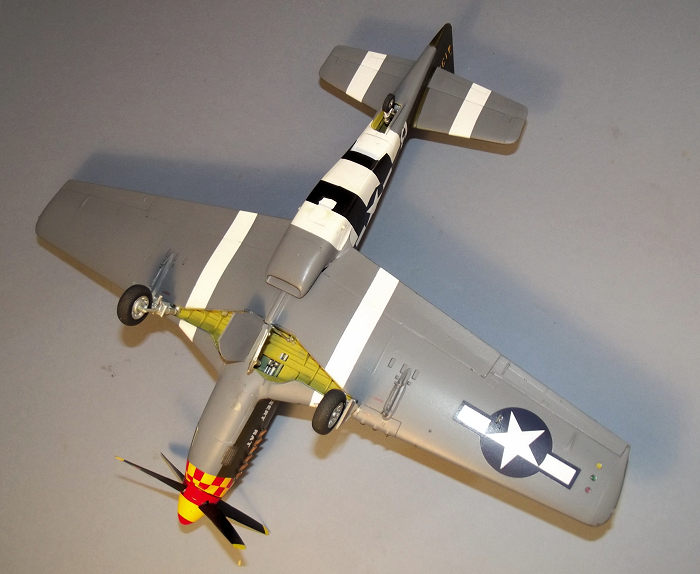 ur
of home brewed Green based upon Tamiya XF-71 Interior Green darkened with a
touch of Olive Drab.
ur
of home brewed Green based upon Tamiya XF-71 Interior Green darkened with a
touch of Olive Drab.
The main cockpit floor is moulded in one piece to include the large fuel tank behind the pilot’s seat. The instrument panel, fuel tank and battery were brush painted in XF-69 NATO Black which has a nice grey cast to it. The pilot’s seat is built up from a back frame and armour plate. Two types of seat are provided but Revell does not specify which is to be used so I made a guess and used the one that has a separate seat pan. The seat assembly was glued to the floor, which had the plywood decking panels picked out in medium brown. The instrument panel and centre console were painted Black and detailed with the kit-supplied instrument decals. There are two substantial ladder frame mouldings that form the cockpit side wall details to which are added the throttle box, oxygen tube and radio selector boxes. The side frames are glued in around the floor/fuel tank, trapping the instrument panel and rudder pedals to form a satisfyingly busy cockpit area. A firewall and canopy frame brace completed the unit.
A home brew of Chromate Green paint was required next so that the interior of the tail wheel bay and wing structure could be sprayed. This was based on Tamiya XF-4 Yellow Green with some bright Green added to liven it up.
The fuselage interior is provided with a box structure that forms the trunking within the dog kennel under the rear fuselage and the tail wheel housing. The interior of the trunking was painted dull silver and the tail housing Green. The tail wheel doors are moulded integrally with the side walls of the tail wheel box so they are self- aligning. Two radiator faces are slotted into place across the dog kennel trunking and these were painted silver. The relatively complex oil cooler housing is formed of three parts but slotted into place without fuss since the parts are well engineered.
Revell provide a complete rear fuselage and tail fin which has a break joint just to the rear of the dog kennel. I followed their instructions to add the left and right halves to the corresponding main fuselage sections before the fuselage was closed up. I did a bit of dry fitting first and found a slight step in the joint which was filled and rubbed down before proceeding further.
The engine exhausts must be fitted from the inside of the cowls so they were painted red-brown and glued in at this stage.
I was please to find that the large sub-assemblies for the cockpit, dog kennel and tail wheel box fitted neatly into place enabling the fuselage to be closed up and secured with tube cement for a strong joint.
Attention now turns to the wing assembly and Revell once again scores points by making complex looking structures relatively easy to assemble. The heart of the structure is a spar that runs across the rear wall of the wheel bay. To the front are fixed two complex one-piece mouldings that represent the cut away riblets to the roof of the wheel bay and provide a seating for the main gear legs. The instructions call out the need to drill out small holes for the underwing pylons and fill a group of exterior pinholes that might be the location of rocket pylons in another version. The wings are simply one piece from tip to tip, upper and lower halves and clamp around the spar/riblet sub-assembly to form an impressively strong structure. There are two inserts to the leading edge around the gun barrels which clicked into place. The upper wing centre section is painted chromate green and the pilot’s control stick is glued in place after which the fuselage straddles the centre section – saddle-like, so appropriate for a Mustang. The final part of clever plastics engineering is the forward intake to the dog kennel that continues under the trailing edge of the wing. This is formed as a two-piece internal trunking, two half shells for the sides and a one-piece intake lip, all virtually clicking into place. The various intake and exit doors on the dog kennel can be posed open or closed to suit.
The rudder and fixed tail sections are formed from paired halves and glued in to positive locations. One-piece ailerons and elevators can be fixed deflected if required. The large flaps to the inner part of the wing trailing edge have a choice of mouldings to allow them to be shown flat or deployed down.
This provided a basic airframe structure and it remained to add the cockpit coaming over the instrument panel and to mask the glazing and paint the interior – NATO Black- before the windscreen and canopy were glued in place. I now always write myself a note on the instructions to remember to remove the interior masking before gluing the canopy down. This is based upon bitter experience of a previous build.
The landing gear components were treated as sub-assemblies. The gear legs are essentially moulded in one piece and are reassuringly stout components. The legs and wheel hubs were sprayed in Aluminium Silver with the sliding sections picked out in Chrome silver. The two-piece main wheels have a well defined block tread to the tyres which were painted in my favourite Tamiya XF-85 Rubber Black.
| COLORS & MARKINGS |
 An
apparently simple Green on top, Grey underneath camouflage scheme proved
surprisingly involved. Decals are provided for the Black striping under the dog
kennel but not for the White Stripes on the wings.
An
apparently simple Green on top, Grey underneath camouflage scheme proved
surprisingly involved. Decals are provided for the Black striping under the dog
kennel but not for the White Stripes on the wings.
I began paintwork by filling the intakes and landing gear wells with offcuts of plastic sponge then the whole airframe was primed with a Dark Grey Auto Primer applied from a rattle can. Tamiya XF-2 White was then airbrushed around the nose, the spinner parts, the fuselage around the dog kennel and across the inner wings and horizontal tail parts.
I cut out paper copies of the decals for the nose checkers and fuselage national insignia so that I could carefully mask over the areas that were to remain white, using Tamiya tape. This is particularly important so that the decals can be positioned correctly. The nose area received a quick blast of XF-3 Yellow as did the spinner components.
The under surfaces were painted with XF-53 Neutral Grey, masked off, and the uppers sprayed XF-62 Olive Drab.
The propeller blades were painted Black and with the aid of the masking set, the tips painted Yellow. The spinner components were temporarily together with low tack putty while the striping was masked using Tamiya 2mm tape so that the Red stripes could be sprayed on.
The masking was stripped away from everything except the cockpit glazing and a few areas of paintwork were touched in and smoothed out with an Ultra Fine sanding stick.
The decals proved to be rather simpler than the masking. The
airframe was given a hand brushed coat of
 Future/Klear
floor polish to provide a glossy contact surface and they went on fairly easily
with the assistance of a little Micro Sol and Micro Set. The black stripes under
the dog kennel and the nose checkers had been accurately printed and settled
down satisfactorily. I worked on with the airframe stencilling until I got to
the very smallest items when my eyesight and patience reached its limit then
sealed the decals in place with another coat of Future/Klear.
Future/Klear
floor polish to provide a glossy contact surface and they went on fairly easily
with the assistance of a little Micro Sol and Micro Set. The black stripes under
the dog kennel and the nose checkers had been accurately printed and settled
down satisfactorily. I worked on with the airframe stencilling until I got to
the very smallest items when my eyesight and patience reached its limit then
sealed the decals in place with another coat of Future/Klear.
The whole model was then finished with a few misted coats of Xtracrylix Flat Varnish, then the canopy glazing stripped away. The canopy is a trifle thick and some optical distortion is evident, but not enough to bother me.
The landing gear parts fitted into positive locations so finely engineered that they may not have needed glue, but I would not push my luck on that point. The gear doors were added, the prop and small aerials.
I had every intention of using the large cigar shaped paper drop tanks on the underwing pylons, but I could not bring myself to despoil the beautiful lines of this sleek bird so the underwing stores were consigned to the spares box. I can always add them later if I change my mind.
| CONCLUSIONS |
This is a well thought out and well produced kit with nice examples of the mould makers’ art in the parts for the cockpit interior and the structure within the wheel wells. This kit is so finely engineered that most joints can be glued with liquid cement applied by brush and the only significant area of filler was on the tail joint.
The omission of seat belts from the basic package is frustrating, given that other manufacturers can offer a representation of seat belts moulded onto the seats, or by decal, or by etch parts. With a canopy so large it is an obvious omission. That said, Revell’s P-51 is excellent value for money in a UK market where Dragon or Hasegawa’s offerings are significantly more costly and Tamiya’s version about three times the price.
I do not know if every panel and detail is correct, that is not my style of modelling. I do know that I am impressed. When I built Revell’s FW190F-8 I thought that it was a knockout – so is this offering.
A good kit of a great airplane. I love it. There will be more in my collection.
| REFERENCES |
Combat Legend, P-51 Mustang by Kev Darling. Airlife Publishing 2002.
The World Wide Web.
Frank Reynolds
22 April 2019 Copyright ModelingMadness.com. All rights reserved If you would like your product reviewed fairly and fairly quickly, please contact the editor or see other details in the
Note to
Contributors. Back to the Main Page
Back to the Review
Index Page
Back to the Previews Index Page