Monogram 1/48 P-51B Mustang
| KIT #: | 6806 |
| PRICE: | $ |
| DECALS: | One option |
| REVIEWER: | Nicolai Plesberg |
| NOTES: | Kit produced in 1973. Decals: P-51 Mustang aces part II 48019 from Tally Ho |
| HISTORY |
The North American P-51
Mustang is synonymous with what it takes to make a war winning aircraft.
Yet, as almost all great combat aircraft, it had a difficult beginning.
Originally designed for the British Air Purchasing Commission in 1940
the NA-73X, as the prototype was designated, was conceived, designed and
build in less than four months and flew on October 26 1940, an
uncommonly short span of time, when designing and building a new
fighter, but which the British had emphasised, because of the critical
situation in Europe at that time. When the first production models of
the new fighter reached the RAF, they found the Mustang (so named by the
RAF) an excellent low attitude fighter with excellent manoeuvrability,
speed and climbing ability. It was suited well for the role of tactical
low attitude reconnaissance as well as fighter sweep missions. Also
against the Luftwaffe the Brits had got an aeroplane which at the deck
could outrun any aircra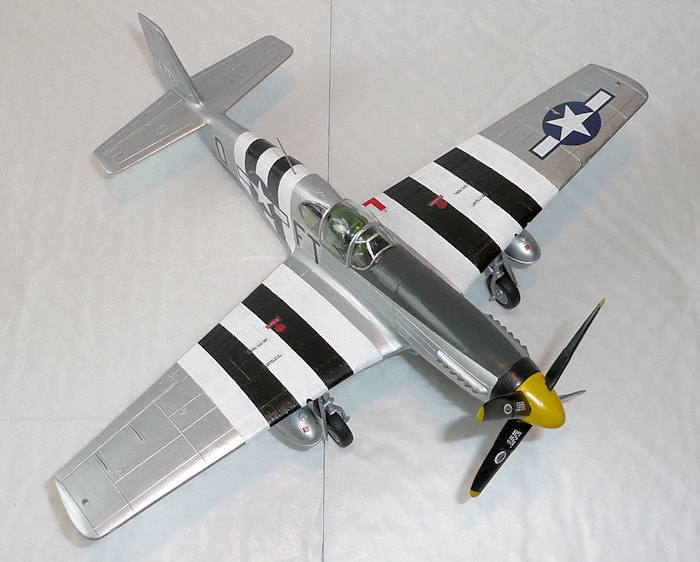 ft that Luftwaffe could pit against it at that
time. Eventually the RAF received 620 Mk. I, 150 Mk. IA and 50 Mk. II.
ft that Luftwaffe could pit against it at that
time. Eventually the RAF received 620 Mk. I, 150 Mk. IA and 50 Mk. II.
In the beginning of the project, the US Army Air Force didn’t show any interest in the plane, until the glorying reports of the Mustangs combat record was received and read with interest. The USAAF eventually (one could almost say reluctantly) adopted the Mustang as the A-36 Apache which was developed into a dive bomber and a tactical recon fighter variant, the P-51A (roughly equivalent to the British Mk.II).
However, as the USAAF was to find out, as the British had already done, that the Mustang was unsuitable as a high altitude bomber escort. The Allison engine of the Mustang didn’t have a two stage super charger, so it could therefore not perform adequately above 15000 ft, which was required, if long range escort missions were to be successful. It seemed that North American’s design had reached an evolutionary dead end.
However, when things tend to go wrong it’s only a matter of getting that “brilliant” idea which can change the way things were developing. As someone down the line came up with the idea to mate the excellent Rolls-Royce Merlin engine, which fortunately was build under licence by the Packard Motor Company in Detroit, with a Mustang airframe, the result was an excellent high altitude air-to-air fighter with the capability of bringing the fight to the Luftwaffe in their own skies. As Merlin powered Mustangs began to take control of the skies over Europe, the Luftwaffe began to bleed aircraft as well as pilots spelling the doom of the Third Reich.
| THE KIT |
This is another of the old
Monogram kits with 36 parts molded in olive drab plastic, plus 4 clear parts
including an optional Malcolm Hood. Detail is fairly good but of course not
up to modern standards, at least
 not if compared with for example the Tamiya
kit of the same airplane. Speaking of the Tamiya kit, which I came across
before commencing this kit, I compared the outline of the Monogram parts
with the Tamiya dittos and found only minor discrepancies. Anyway the kit
decal sheet in this boxing depicts, the airplane flown by Col. James Howard,
a former “Flying Tiger”.
not if compared with for example the Tamiya
kit of the same airplane. Speaking of the Tamiya kit, which I came across
before commencing this kit, I compared the outline of the Monogram parts
with the Tamiya dittos and found only minor discrepancies. Anyway the kit
decal sheet in this boxing depicts, the airplane flown by Col. James Howard,
a former “Flying Tiger”.
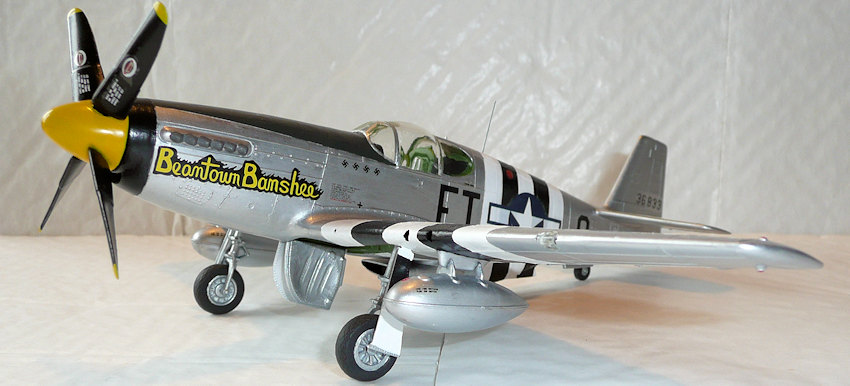
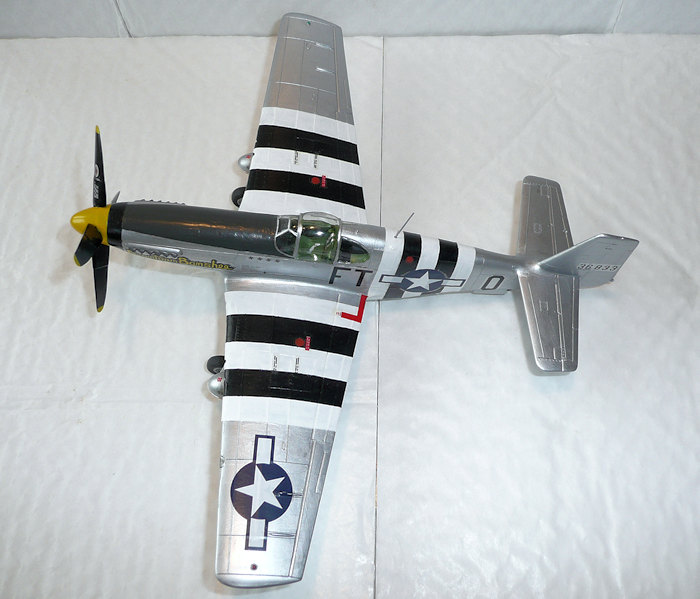
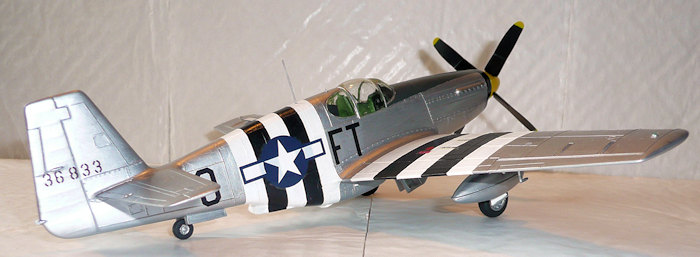
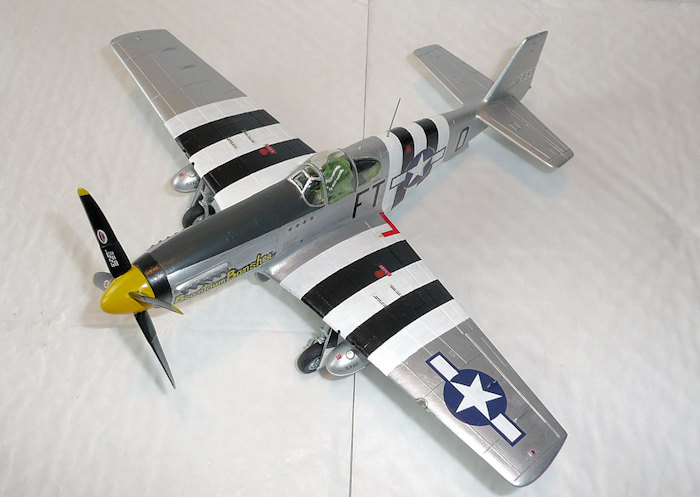
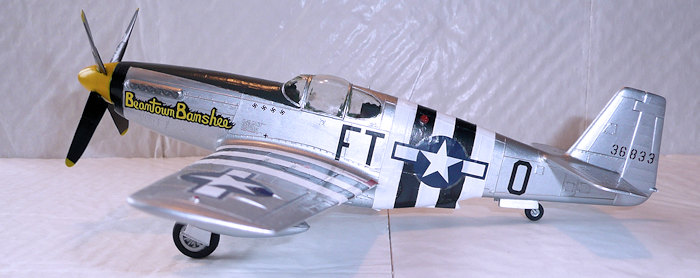
Even though that was an interesting possibility, I was more anxious to use one of the further options on the decal sheet from Tally Ho, which I had bought to complement my D-model Mustang kit with the decals for “Detroit Miss”, which Lt. Urban Drew flew when he bounced two Me-262 jets. It also included the decals for the P-51B that Chuck Yeager flew, when he was shot down over France in 1944 and which I initially chose to model. However, when I got my hands of the Tamiya kit which offers the P-51B dubbed “Shangri-La” flown by Capt. Don Gentile, I said to myself: “That is the one I am going to model”. I was not interested in having two 1/48 P-51B’s in Olive Drab / Neutral Grey scheme so I settled on “Beantown Banshee” flown by Capt. F. Michael Rogers; a Natural Metal bird with “Operation Overlord” stripes on the fuselage and wings.
| CONSTRUCTION |
I began construction by assembling the interior bits, the wings, drop tanks and the propeller / spinner unit. As is almost the case the wing joins needed a slight dab of filler here and there and so did the spinner although it would have been nice with a perfect fit here, because it was a pain to sand to a perfect, smooth surface. After overcoming those initial troubles, I painted the cockpit parts plus gear bays Green Zinc Chromate (Model Master 1734).
While the paint was drying,
I cleaned the gear plus gear door parts from flash and mold lines; I then
painted some details in the cockpit with Flat Black (Humbrol 33 Acrylic),
the prop blades also went Black, but with a
 satin sheen (Humbrol 85
Acrylic). I wasn’t going to super detail or anything, so I used a very fine
brush and steady hand to paint the engraved belts on the seat White (Humbrol
34 acrylic) while some Silver (Humbrol 11 Acrylic) toned up the inner
surfaces of all the gear doors and legs, wheel hubs, as well as the buckles
on the seat belts.
satin sheen (Humbrol 85
Acrylic). I wasn’t going to super detail or anything, so I used a very fine
brush and steady hand to paint the engraved belts on the seat White (Humbrol
34 acrylic) while some Silver (Humbrol 11 Acrylic) toned up the inner
surfaces of all the gear doors and legs, wheel hubs, as well as the buckles
on the seat belts.
While some Flat Black also was used for the tires I began the tedious task (so I felt it) to paint the spinner and prop blade tips Yellow (Model Master 2023). It actually took five thin layers before the coverage was perfect. I then assembled the main gear and glued the tail wheel and interior to the left fuselage half, cut out the instrument panel decal, glued it in the left fuselage half using white glue, then finally joining the fuselage halves with ordinary plastic glue.
After the obligatory touch up on the propeller, the blades were glossed in preparation for the decals to beef it up (logos and data stuff) these came from the kit sheet. As they silvered a bit they were glossed over once dry, then given a Satin Cote to reflect the original shine of the black paint I had used. When I thought the prop was finished, I was wrong! I discovered the painful fact that the paint had run and made curtains. Luckily they were all on the back side of the blades so it was easy to correct.
 When I started sanding the
fuselage join, I discovered that the glue had failed to bind the two halves
together in several places. So I took my K200 (a liquid CA glue which dries
in 200 seconds), took one failed glue spot at a time until they had all been
dealt with. I then continued sanding / scraping and applying filler where
needed. Also the tip of the ventral intake (part29) was glued on, because it
also needed filler to blend in properly. After a couple of sanding / filling
/ sanding sessions I glued wings and tail planes as well as the front piece
(part 9) to the fuselage which also were blended in with filling / sanding
after the glue had dried up.
When I started sanding the
fuselage join, I discovered that the glue had failed to bind the two halves
together in several places. So I took my K200 (a liquid CA glue which dries
in 200 seconds), took one failed glue spot at a time until they had all been
dealt with. I then continued sanding / scraping and applying filler where
needed. Also the tip of the ventral intake (part29) was glued on, because it
also needed filler to blend in properly. After a couple of sanding / filling
/ sanding sessions I glued wings and tail planes as well as the front piece
(part 9) to the fuselage which also were blended in with filling / sanding
after the glue had dried up.
Monogram suggests you to flare the prop shaft over when through the front piece before that is glued to the fuselage. I prefer, however, to be able to leave the propeller off to the latest possible stage; also for the sake of easy painting. It was also necessary to touch up the black and green zinc chromate in the cockpit area but once this was accomplished the canopy was next.
As “Beantown Banshee” was equipped with the Malcolm Hood, I cut off the rear windows from the normal canopy (to which they were molded together). It went fairly easy and after cleaning the edges, the frames were painted green zinc chromate plus some final touch ups in the cockpit. The canopy parts were then glued to the cockpit opening using Humbrol Gloss Cote, the poorest fit being the Malcolm Hood; it seemed a bit too wide for the cockpit opening, but with some effort I got it in place. The unavoidable gaps were filled with Gloss Cote then a fine sanding around the dried parts finalized things.
The whole airframe was then washed and dried the usual way; i.e. washing with soapy water, then cleaning with clean water and wipe the water off with an antistatic cloth. Then the main gear was glued in place with K200 and after masking off in preparation for the white invasion stripes the model went to the paint shop.
| COLORS & MARKINGS |
The White (Humbrol 34
Acrylic) stripes were painted first; it took four layers before it covered
perfectly. The Black (Humbrol 33 Acrylic) stripes were next plus the nose
piece just behind the spinner. Two layers were sufficient for perfect
coverage. The masking for the black nose band was removed, then masking for
the anti glare panel applied and painted Olive Drab (Humbrol 66 but this
time the Enamel variant). Furthermore I took the opportunity to start
painting the tail unit (behind the invasion stripes) as well as the outer
wing  sections, the outer side of the inner gear doors plus part of the drop
tanks Silver (Revell 90). After a second coat to the anti glare panel and
removing the masking tape, the remainder of the fuselage plus the rest of
the drop tanks were painted silver. Then the model was left for a few days
to dry completely through.
sections, the outer side of the inner gear doors plus part of the drop
tanks Silver (Revell 90). After a second coat to the anti glare panel and
removing the masking tape, the remainder of the fuselage plus the rest of
the drop tanks were painted silver. Then the model was left for a few days
to dry completely through.
The last task to do before glossing the whole model for the decals, was to even out the demarcation lines between the different colors I had used. It was accomplished by slight sanding with 1200 grit wet & dry paper followed by tedious touch up sessions with the respective colors, but eventually I finished the job within a day. After the Gloss Cote had been applied, it was time to apply the decals. The Tally Ho ones did settle down good over the surface detailing. Only when I applied the star and bar insignia on the left wing it broke, because of the linkage control in connection with the aileron was apparently too high a surface detail for the decal to snuggle around; decal softener would probably have helped in this case. The Monogram ones did in fact also stick pretty well at least the smaller ones. The largest I used were the red walk lines for the left wing root. It was difficult to get it stick at the trailing edge of the wing, but after much effort I succeeded in getting it to sit properly. When the decals had dried the whole surface got a layer of Humbrol Satin Cote to secure the decals and to tone down the sheen.
| FINAL CONSTRUCTION |
 The next day the last parts
were glued in place, painted the respective colors and marking of the
position lights. The last thing to be attached was the whip aerial behind
the cockpit. Made from a piece of 0.4 mm stretched sprue, a suitable hole
was drilled and the aerial secured with a tiny drop of CA glue. When dry, it
was painted silver, together with a few touch ups around the airframe. When
all those touch ups had dried up, they were painted over with Satin Cote to
even out the finish and to deal with the non satin coted spots that still
had remained, as well. The last thing to be installed was the propeller, and
the model was finished.
The next day the last parts
were glued in place, painted the respective colors and marking of the
position lights. The last thing to be attached was the whip aerial behind
the cockpit. Made from a piece of 0.4 mm stretched sprue, a suitable hole
was drilled and the aerial secured with a tiny drop of CA glue. When dry, it
was painted silver, together with a few touch ups around the airframe. When
all those touch ups had dried up, they were painted over with Satin Cote to
even out the finish and to deal with the non satin coted spots that still
had remained, as well. The last thing to be installed was the propeller, and
the model was finished.
| CONCLUSIONS |
What can I say else than it’s another of Monograms older kits that is still a spot on representation of the P-51B. While it does require quite some work to get presentable at the contest tables, it can do just fine out-of-the-box for a relaxing build. It must also be remembered that it’s value for money when comparing with newer kits such as the aforementioned one from Tamiya. Even though I have the Tamiya kit in my stash, I found this a very interesting build. It is recommended even for the less skilled modeler, because of the low number of parts and ease of assembly.
| REFERENCES |
American Warplanes, by Bill Gunston, 1986 Salamander books Ltd. ISBN 0-517-61351-4
Warbirds : P-51 Mustang, An MM&V production. © 2001 Dastar Corp.
5 July 2016
Copyright ModelingMadness.com
If you would like your product reviewed fairly and fairly quickly, please contact the editor or see other details in the Note to Contributors.