Zoukei-Mura 1/32 P-51K Mustang IV
| KIT #: | 09 |
| PRICE: | $100 or so plus shipping |
| DECALS: | Three options |
| REVIEWER: | Zachary Pease |
| NOTES: | Good detail but fiddly build with fit issues |
| HISTORY |
Though the history of the
P-51 is rather well known to all, its service in Latin America is likely less
well known, but is nonetheless very interesting. Many nations in South and
Central America operated the Mustang in the period of the 1950’s through the
mid-1970’s. Notable users included the Dominican Republic, Haiti, Costa Rica,
Uruguay, Guatemala, Bolivia and El Salvador. Many of these aircraft saw some
form of action in their time whether as COIN operators or in regional conflicts.
Most were obtained through US government military assistance programs put in
place to 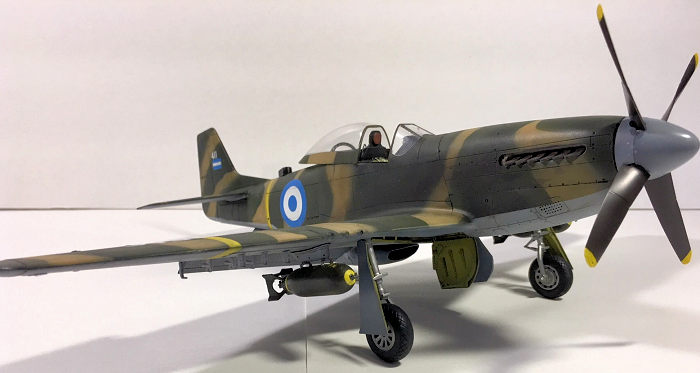 bolster
our allies in the region during the cold war. Some nations such as El Salvador
also obtained aircraft by buying civil examples from the local and US markets.
At the end of their Latin American service many of these mustangs would then
find their way back to the US as warbirds.
bolster
our allies in the region during the cold war. Some nations such as El Salvador
also obtained aircraft by buying civil examples from the local and US markets.
At the end of their Latin American service many of these mustangs would then
find their way back to the US as warbirds.
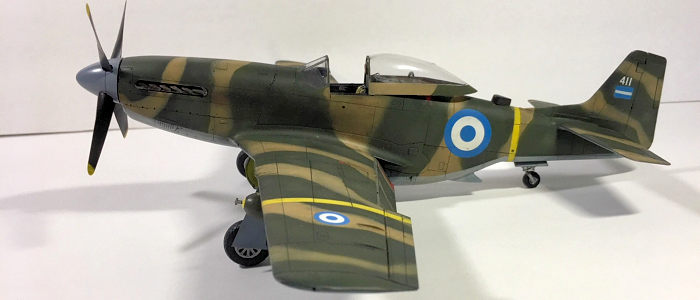
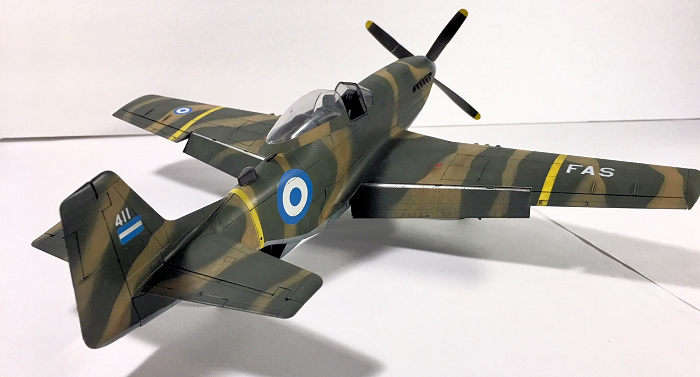
In the case of El Salvador, they had maintained a strong air arm throughout the interwar and WW2 eras compared to their neighbors, but by the early sixties their Air force was lacking with their most capable types being AT-6 Texans obtained through assistance programs during WW2. By the middle and late 1960’s tensions with Honduras had reached the point where armed conflict was looking more likely than not and El Salvador found that they needed fighter aircraft to compete with the numerically superior Fuerza Aerea de Honduras (FAH) so they began to seek out Mustangs from the US and from Civil markets. When the water boiled over, after members of the Honduran national soccer team were injured in riots following a match against El Salvador, the FAS had a mixed bag of F-51’s obtained from the MAP program, Cavalier Mustangs and P-51 warbirds that had been rearmed by the FAS. The resulting conflict would see the final dogfights between piston driven fighters with FAS Mustangs facing off against FAH Corsairs.
| THE KIT |
Do you have the drive, the ambition, the skill, to build a P-51 from scratch…out of metal…in your garage? Have you considered a trip to the Mesabi Iron Range to gather the raw minerals for your project? Do you want to gnaw the raw steel and aluminum into sheets while you binge-watch Band of Brothers on Netflix? Okay…..so maybe those last are hyperbole…maybe. However if your idea of modeling nirvana is a nice sleek closed up airframe then, please, do not pass go, do not purchase this kit and close this review. This kit is the opposite of what you want. It lives to have its guts spewed forth for the world to see. It is the nudist of scale models. It proves that fiddly is no longer a word that applies only to photoetched brass bits and British stick built biplanes that look like a stiff breeze could blow them apart... OK maybe you see what I am driving at here?
 With that
said, this is not a bad kit, it is just not for everyone. This kit is in its
element for those who want to show the engine, gun bays and structural areas
laid bare for the entire world to see. That person is not me. In all honesty I
got this kit in trade with another when I was looking to trade for a Tamiya kit.
The other party offered this ZM Mustang along with the other kit I was looking
for so I decided to give it a shot. Had I bought this kit I would have been
unhappy as it does not align with my modeling chakras.
With that
said, this is not a bad kit, it is just not for everyone. This kit is in its
element for those who want to show the engine, gun bays and structural areas
laid bare for the entire world to see. That person is not me. In all honesty I
got this kit in trade with another when I was looking to trade for a Tamiya kit.
The other party offered this ZM Mustang along with the other kit I was looking
for so I decided to give it a shot. Had I bought this kit I would have been
unhappy as it does not align with my modeling chakras.
This boxing is the better of the two ZM Mustangs as it offers the builder the ability to do a P-51K, Mustang IV (with louvered breather plates) and an early D-5 with filletless tail. This kit has all the parts from the original ZM kit along with the Aeroproducts prop, Early tail and Dallas canopy hood needed for the versions offered in this kit. Essentially this allows you to do any P-51 you like. The kit does not give you bombs, rockets or bazooka tubes but aside from that it is quite complete and that IS a benefit to this kit over the Tamiya kit. Decal options are quite nice with an overall NMF RAAF Mustang IV based in Italy in 1945, a camouflaged RAF Mustang IV with a nice sharkmouth, A Philippines based P-51K with nice black wing and fuselage striping, and the well known Lou IV for the early tail option.
| CONSTRUCTION |
Please cue the epic soundtrack as our hero departs on his quest to slay the dragon…….
I started construction with
the engine. This is a very complete assembly, possibly more so than what Tamiya
gives you in their kit in that ZM provides the modeler with all the plumbing and
wiring that still needs to be added to the Tamiya kit. This is not a knock on
the Tam kit. This is typically a detail left to the modeler when engines are
provided. It just so happens that ZM’s attention to detail borders on OCD and
they likely could not help but provide this detail. I began this build thinking
I would expose the engine as it is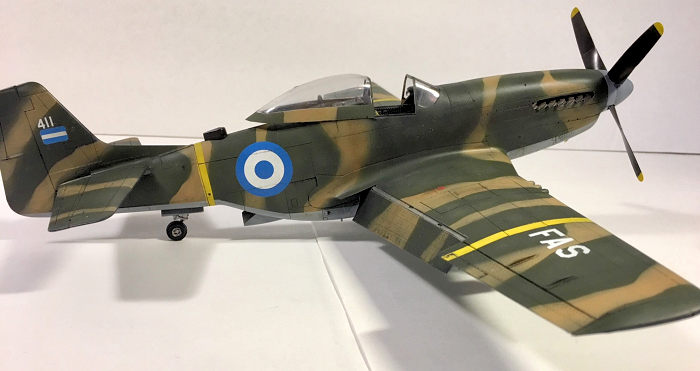 very nice. I to a lot of time building it and when I mounted in the engine
bearers I thought it looked askew. I tried adjusting it and it looked worse and
then fixed it once more and determined it was seated correctly in the first
place. The source of my pain was the exhausts. There is a lot of play in how
they mount (and they are mounted individually one by one) so the starboard and
port exhausts now rake down at different angles and give the impression that the
engine is mounted askew when viewed from head on. So at this point I made the
decision to build the kit with the engine covered (days wasted…d’oh!).
very nice. I to a lot of time building it and when I mounted in the engine
bearers I thought it looked askew. I tried adjusting it and it looked worse and
then fixed it once more and determined it was seated correctly in the first
place. The source of my pain was the exhausts. There is a lot of play in how
they mount (and they are mounted individually one by one) so the starboard and
port exhausts now rake down at different angles and give the impression that the
engine is mounted askew when viewed from head on. So at this point I made the
decision to build the kit with the engine covered (days wasted…d’oh!).
The interior parts mount directly to the engine firewall ala the Tamiya kit but not in quite the same way and the kit gives you all the plumbing running back from the engine to the radiator. I chose not to install this as I was closing that area up. More on this later, but this comes back to haunt me . The interior is quite nice and easily on par with the Tamiya kit and even on par with the very very nice Baracuda cast items I used when I built my Tamiya P-51. Just dry fit a lot and make sure everything is aligned as you end up with an assembly that runs from the engine to the bulkhead at the rear of the radio/fuel tank compartment behind the cockpit. Detail is very thorough and honestly the seat with the molded on belts that I used looks really convincing, on par with the resin seat I used on the Tamiya kit. I painted the interior black and used kit provided decals for the instruments and placards in the cockpit. All looks really nice when painted, dry brushed and weathered.
Everythiny to now was like the Tamiya kit only perhaps a little more complete and while the steps are not the same the build is on par. That ends with the completion of the interior. Instead of installing this nice assembly into a fuselage half you actually build the fuselage around the interior structure using different panels. This is why one should make sure nothing is askew in assembling the interior structure as this forms the basis for the fuselage structure and any misalignment will easily carry through to the fuselage. It is at this point the builder can start deciding what parts of the airframe they want exposed and the directions give you hints and suggestions in the process to do so. However for me who wanted a nice closed up and well weathered Salvadoran Pony, this was a tedious process and it inevitably led to fit issues that no other kit would have. Panels standing just a little too proud compared to the one next to it. Seems that needed filling and re-scribing where there would only be a scribed line on a normal kit. The tail section is built separately from panels and then attached to the fuselage. Then the nose pieces are attached over the engine. These did not fit all that well and while I generally feel that engine panels can be allowed some slack in fit, since the real ones were constantly removed and replaced and were not always the most precise fitting, the kit panels looked bad with a step between the fuselage at the firewall and the engine panel. Much sanding, filling and re-scribing followed to get everything looking ok.
 The Wing
is built in panels over the central wing spars which are molded as one full span
piece to ensure proper dihedral. Open gun bays are provided on both sides. Wheel
wells are complete and accurate with the wing spar forming the rear wall. I
closed the gun bays but found that the doors fit poorly in the closed position.
Sanding, filling and scribing followed. Once the wings were built up I added
this assembly to the fuselage and discovered that by not adding the radiator
plumbing I omitted the piping seen though the cutouts in the upper deck of the
main gear wells so I cut lengths from the parts that I neglected to install and
glued them in the openings. It worked nicely but be aware that this is necessary
if you choose to leave this plumbing out. When the wing was attached I
discovered ok fit on one side with a large gap and step on the starboard side. I
tried sanding down the pins and mating surfaces to get everything to sit true,
but to avail. In the end much filler/superglue and sand paper was used to even
this out and make it presentable. At this point the front end of the radiator
scoop was attached under the belly and this unsurprisingly had an uninspired fit
and since the instructions had me attach the dropped flaps a long time ago, it
was very hard to fix the seam or improve the fit though sanding. I did the best
I could in both cases. It is a natural panel line so the goal was just get to
where I could live with it.
The Wing
is built in panels over the central wing spars which are molded as one full span
piece to ensure proper dihedral. Open gun bays are provided on both sides. Wheel
wells are complete and accurate with the wing spar forming the rear wall. I
closed the gun bays but found that the doors fit poorly in the closed position.
Sanding, filling and scribing followed. Once the wings were built up I added
this assembly to the fuselage and discovered that by not adding the radiator
plumbing I omitted the piping seen though the cutouts in the upper deck of the
main gear wells so I cut lengths from the parts that I neglected to install and
glued them in the openings. It worked nicely but be aware that this is necessary
if you choose to leave this plumbing out. When the wing was attached I
discovered ok fit on one side with a large gap and step on the starboard side. I
tried sanding down the pins and mating surfaces to get everything to sit true,
but to avail. In the end much filler/superglue and sand paper was used to even
this out and make it presentable. At this point the front end of the radiator
scoop was attached under the belly and this unsurprisingly had an uninspired fit
and since the instructions had me attach the dropped flaps a long time ago, it
was very hard to fix the seam or improve the fit though sanding. I did the best
I could in both cases. It is a natural panel line so the goal was just get to
where I could live with it.
You might have guessed at this point that, in part, I chose the Fuerza Aerea Salvadorena Mustang as a survival tactic for this build because after all this filling, sanding and so-so fit, I was really dreading a natural metal finished aircraft. I would like to note that the extensive fit issues are a huge let down in a kit of this price range. And no doubt some of this was caused due to user error, some of it is endemic in the design. There is just no way to have such a modular kit and expect everything to simply click and tick right along. This why even with its strong (obsessive even) attention to even the smallest details, that I do not recommend this kit to the modeler who wants to build it closed up.
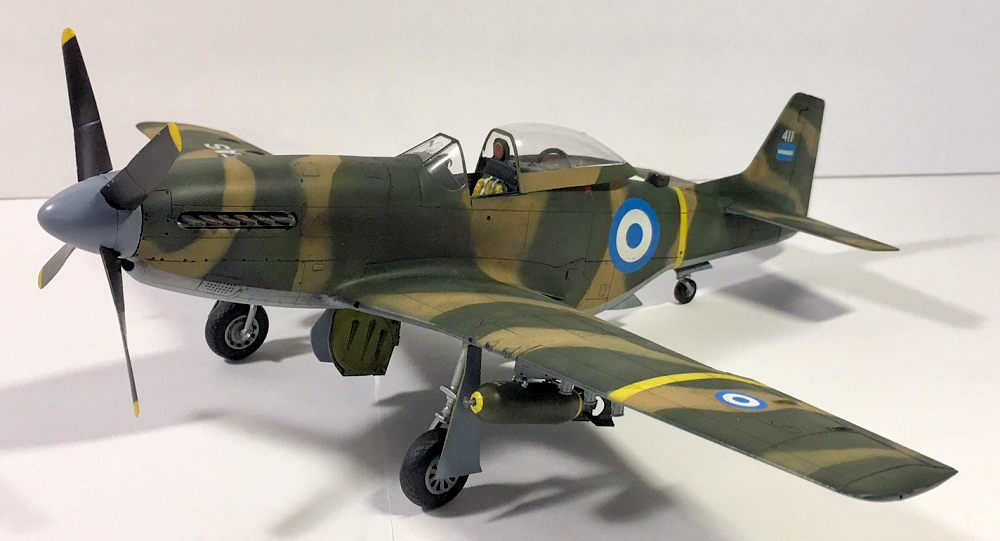
| COLORS & MARKINGS |
As major construction came
to a close I began to look at painting this beast. Initially I intended to build
Glessner’s Korean War era P-51 with the sharkmouth, or a SAAF Mustang from
Korea. However, as the project lingered on the bench, and then on the shelf of
doom, I decided two things; 1) I dreaded the thought of turning out a passable
NMF finish after so much filling and sanding and nonstandard seems and 2) I have
always wanted to do a Latin American Mustang. There are few schemes that are
quite attractive but I had some spare Salvadoran roundels from a 1/48 corsair
sheet and I figured they would do n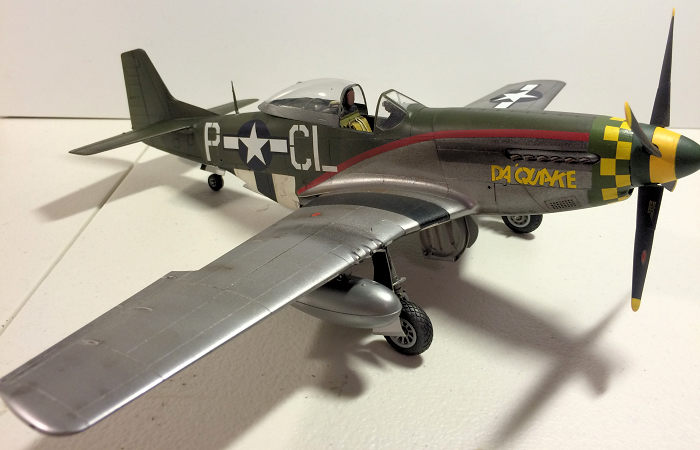 icely
for an F-51 of the Fuerza Aerea Salvadorena in 1969 during the Soccer War. These
aircraft were obtained both through formal US DoD military assistance programs
and through purchasing private warbirds in Latin America and the US in the run
up to hostilities in 1969. Camouflage was hastily applied and not terribly
consistent from one aircraft to the next. Some wore all grey, others wore
variances of green and brown camo and one photo shows a Mustang in a very
haphazard camo of sprayed green and light brown over grey with no real pattern
to speak of. Commonalities are that most aircraft carried narrow yellow ID bands
outboard of the flaps and just forward of the tail, large fuselage roundels were
carried while smaller roundels appeared on the upper port and lower starboard
wings. The upper starboard and lower port wings carried FAS denoting the
Salvadoran air force. A small Salvadoran flag was carried on the horizontal tail
along with the aircraft number in white.
icely
for an F-51 of the Fuerza Aerea Salvadorena in 1969 during the Soccer War. These
aircraft were obtained both through formal US DoD military assistance programs
and through purchasing private warbirds in Latin America and the US in the run
up to hostilities in 1969. Camouflage was hastily applied and not terribly
consistent from one aircraft to the next. Some wore all grey, others wore
variances of green and brown camo and one photo shows a Mustang in a very
haphazard camo of sprayed green and light brown over grey with no real pattern
to speak of. Commonalities are that most aircraft carried narrow yellow ID bands
outboard of the flaps and just forward of the tail, large fuselage roundels were
carried while smaller roundels appeared on the upper port and lower starboard
wings. The upper starboard and lower port wings carried FAS denoting the
Salvadoran air force. A small Salvadoran flag was carried on the horizontal tail
along with the aircraft number in white.
For the camo I looked at pictures and profiles of Salvadoran Mustangs. There are plenty of profile shots of these aircraft but few showing the camo on the wings so ultimately I did the best I could. The exact camo pattern is more or less conjecture. I started by spraying the entire model black and then starting with Tamiya Olive Green, I misted on thin coats in a mottle pattern to build up color slowly and allow vary the opacity of the camo colors over the black to allow some depth and tonal variance. This is known as black basing and has largely been popularized by Matt Douglas at his blog, Doog’s Models (a blog I highly recommend for learning new techniques). I admit I am not all that great at it yet but I like the results very much. Once the green was finished I went through the same process with Tamiya Desert Yellow. Then I masked off the demarcation and sprayed the underside with Mr Paint Lt Ghost Grey in the same manner. This is a new line of paints I have been trying (also at the suggestion of Doog’s Models) and I cannot say enough about them. They are thin, spray beautifully right out of the bottle and they dry fast. I believe I will be leaving my trusty Tamiya behind as this line’s color selection grows. It just performs beautifully, especially when trying more subtle techniques like black basing.
With the basic camo done I
masked and sprayed the yellow ID bands using Tamiya yellow. These bands were put
on nice and bright as they were applied just prior to the outbreak of
hostilities with Honduras. Once this was done I masked and sprayed the gap area
at the top of the flaps with aluminum. Then I added some white to the Olive
green and worked on fading the camo some. The paints used on the real aircraft
were wha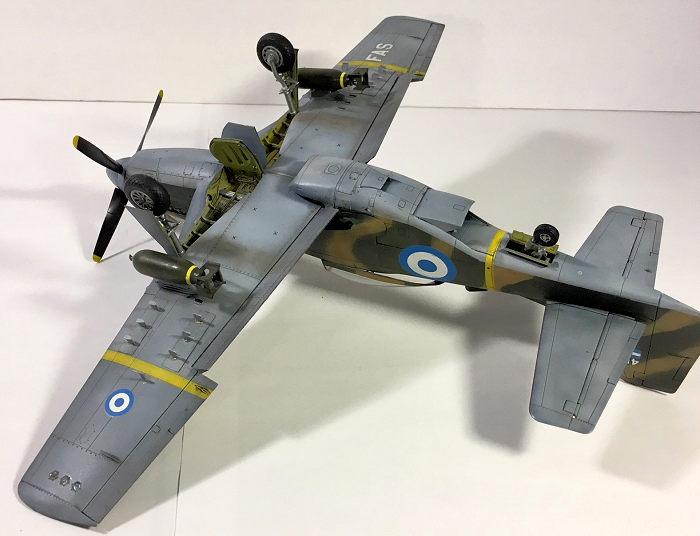 tever
could be found, and many photos show aircraft looking pretty weathered. In some
cases the old civilian schemes started to show through the worn camo. I didn’t
wish to go that far but I did figure that this project offered some opportunity
to flex my weathering skills (such as they are). I did the same with the Desert
Yellow areas when I was done with the green. I did not fade the underside
because I assumed this would have less exposure to harsh sunlight. I then masked
and sprayed the fin flashes as I had no decals for these of an appropriate size.
tever
could be found, and many photos show aircraft looking pretty weathered. In some
cases the old civilian schemes started to show through the worn camo. I didn’t
wish to go that far but I did figure that this project offered some opportunity
to flex my weathering skills (such as they are). I did the same with the Desert
Yellow areas when I was done with the green. I did not fade the underside
because I assumed this would have less exposure to harsh sunlight. I then masked
and sprayed the fin flashes as I had no decals for these of an appropriate size.
Once all of this was done I added the decals. These were cobbled together from leftovers from an old Aztec models sheet. This was a blessing and a curse in that Aztec makes interesting sheets in terms of subjects, and because of this, I had spare Salvadoran roundels. However, the downside is Aztec’s decals tend to be thick and resistant to all but the most aggressive setting solutions and even then they don’t settle down like they should. I applied full sized roundels to the fuselage sides and smaller subdued roundels to the wings. The letters and numerals came off an old Eagle Strike sheet for US 45 degree white lettering. The sheet is for 1/48 code letters and numbers but the sizes worked just fine for this project. These worked nicely and settled into panel lines as one would wish. Once the decals were done I sprayed another coat of future and then took to weathering some more using panel washes from AMMO by Mig Jimenez. I applied light exhaust staining using oil paints and dirtied the lower wing aft of the wells on the assumption that these aircraft may have operated from some unprepared strips at times. Once weathering and decals were done I sprayed on a coast of Alcad clear flat. I have recently moved to this product after finding that Testors Dullcote was eating into my finishes, eating straight through a coat of future down to the primer. Alcad gives a nice flat sheen but it is a little sticky with too much handling even after it is cured.
| FINAL CONSTRUCTION |
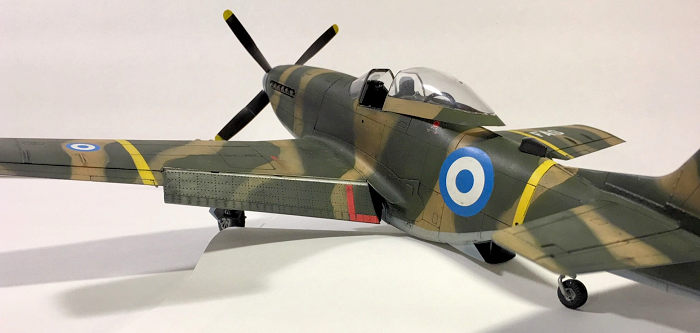
With decals done and the flat coat dried, I moved on to adding the final details. I removed the IsraCast rocket stubs from their pour stubs and attached them to the PE plates that were already installed. These are nicely cast and look nice once installed. I decided not to add rockets as I liked the look of the stubs unloaded. I added the sway braces to the wing hard points and then I assembled and painted two 500 lb. bombs from the Zoukei Mura Skyraider weapons set. The P-51 comes with tanks only for the hard points. I weathered the bombs a bit and then attached them to the hard points. At this point I added the landing gear. Fit issues reared their head once more when I went to add the main wheels to the struts. They are keyed to fit a certain way and when I aligned them correctly the pins would not go all the way into the hubs. Solution: I cut the pins short and installed them and this worked ok and did not seem to affect the stability of the gear at all. Aside from this, the main gear was well engineered with a rearward facing horizontal pin that the builder inserts and then twists into place ensuring proper alignment.
 The tail
wheel is a train-wreck of engineering. The instructions have you build the tail
wheel well and install it but you wait to add the tail wheel until the end. It
inserts into a ridged area in the bottom of the tail wheel well there are two
pins higher up that look like they should catch higher in the well but I could
not find where that was after a few tries and once you start you cannot see
where the assembly seats in the bottom of the well. Overall, this leads to a
very fragile tail wheel installation. I would recommend adding the tail wheel
strut when you build the well and then just mask it later when you need to paint
the fuselage.
The tail
wheel is a train-wreck of engineering. The instructions have you build the tail
wheel well and install it but you wait to add the tail wheel until the end. It
inserts into a ridged area in the bottom of the tail wheel well there are two
pins higher up that look like they should catch higher in the well but I could
not find where that was after a few tries and once you start you cannot see
where the assembly seats in the bottom of the well. Overall, this leads to a
very fragile tail wheel installation. I would recommend adding the tail wheel
strut when you build the well and then just mask it later when you need to paint
the fuselage.
Once the trail wheel was set I painted and added the wing landing lights and pitot. I added a radio faring on the rear fuselage as was seen on many post war Mustangs. Then I painted and added the prop and spinner. Fit of the spinner is pretty loose (I think it looks a little too loose but I left it as is).
The final ordeal was to paint and install the canopy. This kit gives you three canopies. One Dallas hood most common to the K’s but also pretty common on Warbirds and post war Mustangs and two standard hoods (one with the original sprues and one with the K specific sprues. I decided to use the Dallas hood as it looks a little different and I had seen pics of FAS Mustangs so equipped. All three canopies have a seem that needs sanding and polishing. I did this then dipped in future and allowed it to cure for a day. Then I masked it off and sprayed the interior then exterior colors. When I removed the masking it turned out the future crazed the canopy. No amount of sanding fixed so I repeated this process with the standard hood. When I went to install it the canopy was just too narrow to fit onto the rails, A closed canopy would have been a real tough go but I wanted mine open so I was able to just spread it enough to fit and secure it with CA glue, though not without it popping off twice due to the pressure.
| CONCLUSIONS |
In all honestly build the Tamiya kit if you are looking for a high end well detailed large scale Mustang. For the price one pays for the ZM kit the engineering and fit is not up to par and while it has some things going for it the modular build up is tedious and fraught with peril. While there are no insurmountable issues with this it is just a tedious build that I did not enjoy. As I said in the beginning, this kit has its audience but that does not include me. I am happy with the final result but I won’t be building another ZM mustang.
| REFERENCES |
Aerofax Datagraph #1: North American F-51 Mustang in Latin American Air Force Service, By John Dienst and Dan Hagedorn, Aerofax Inc, 1985
6 February 2018 Copyright ModelingMadness.com If you would like your product reviewed fairly and
fairly quickly, please
contact
the editor or see other details in the
Note to
Contributors.