
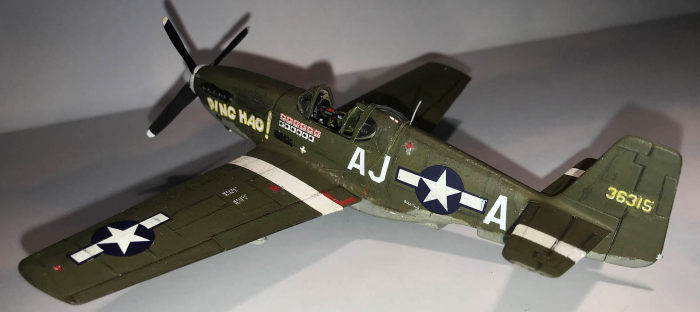
Monogram 1/72 P-51B Mustang
| KIT #: | 6788 |
| PRICE: | $10.00 'used' |
| DECALS: | One option |
| REVIEWER: | Joe Essid |
| NOTES: | Superscale decals |
| HISTORY |
Let's be honest: what can be said new about the Mustang?
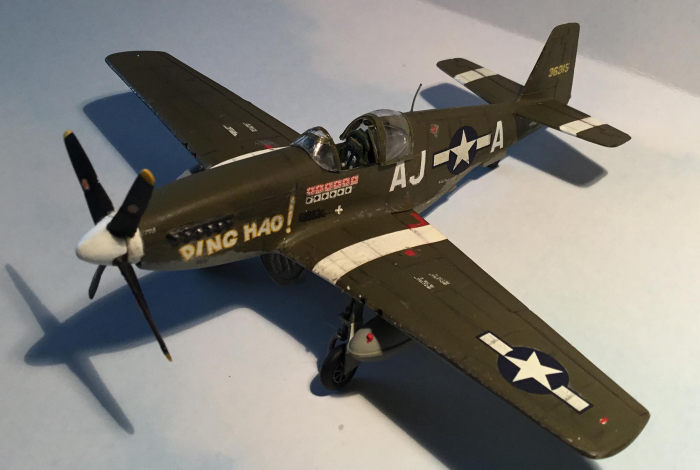
Here's a try. When I was a kid, Mustangs were recent history, still the stuff of little boys' dreams, not to mention the wartime steeds of a few fathers and uncles. So rather than tell you about the fighter's development and history, I'll focus on how that related to our choices of models, as well as why General James Howard's Ding Hao was considered one of the baddest of badass Mustangs, ever.
As a punk kid at Bob's Hobby Center in the late 60s, just starting in a long addiction to scale models, I and my friends avoided "those little planes" in 1/72. Sure, we built a few, mostly when we were short on cash.
If 1/48 was king, North American P-51 Mustangs in any scale were Emperor. Little boys, barely two decades after the shooting ended, still argued over which WW II fighter was "greatest." The Spitfire was and is prettier in my eyes, the Corsair, FW-190, and Thunderbolt more murderous-looking, but the Mustang had it all: range, speed, maneuverability, durability, good looks.
 None of us had seen RAF Mustangs or A-36 Apaches. As
no Internet existed, if something was not on a model's box-art or in
Ballantine's series of books about World War II, it did not exist. So for the
young model-makers at Bob's, it came down to squabbling over the B and D models
(we'd not heard of the Dallas-built C, for that matter).
None of us had seen RAF Mustangs or A-36 Apaches. As
no Internet existed, if something was not on a model's box-art or in
Ballantine's series of books about World War II, it did not exist. So for the
young model-makers at Bob's, it came down to squabbling over the B and D models
(we'd not heard of the Dallas-built C, for that matter).
The B model may have lacked the punch of the D's six .50 calibers, or that plane's excellent visibility, but Ding Hao was a B. Every little boy loved it at first glance, with kill marks from both the Pacific and European theaters. We would speculate how a P-51 ace flew his plane around the world, shooting down FW-190s one month, Zeros the next. To an eight-year-old in 1968, nothing on the planet save an Apollo mission would be cooler.
To a grateful adult, Howard's single-handed defense of a group of B-17s under fire from a large number of Luftwaffe fighters still amazes. The story has been retold many times, how Howard attacked until and after he ran out of ammunition. Swope's account, listed in the references below, tells the story and more. Howard got credit for six aircraft that day, but for his selfless bravado alone, he certainly deserved the Medal of Honor he received.
We can thank pilots like General Howard for helping to win the war and keeping a Nazism from spreading even further than it did. I am a nostalgia builder, and I have long wanted to build a copy of Howard's Ding Hao in my favorite scale, to honor the man and his special machine.
| THE KIT |
Monogram provides few sprues of OD plastic, a bit brittle from age (the tab on one stabilizer snapped off during assembly) but it remains a nostalgia machine. Simple instructions are provided that a child (or me, with my bifocals) can follow easily.
To put such an antique into perspective: Monogram ruled the roost at a time when their kits would only be found at Bobs, not the drug store where The Lindberg Line earned our snobbish scoffs. You had to mingle with the big boys who built RC planes that actually flew, and endure down-the-nose looks at you and your paper-route money, if you wanted Monogram. We were a pint-sized Monogram Mafia.
 Fast forward to today: the only "pony" in my barn is a
Monogram F-82 Twin Mustang, in the white photo-box classic edition that came
with the cloth patch, a kit I managed to score in the early 2000s before a local
toy shop--also extant from childhood--shut its doors forever. It provided a nice
coda to my kits from Bob's, also long gone.
Fast forward to today: the only "pony" in my barn is a
Monogram F-82 Twin Mustang, in the white photo-box classic edition that came
with the cloth patch, a kit I managed to score in the early 2000s before a local
toy shop--also extant from childhood--shut its doors forever. It provided a nice
coda to my kits from Bob's, also long gone.
That F-82, like other Monogram 1/72s, is not a bad build for novices or old geezers like me returning to the hobby. Monogram modeled Jim Howard's pony in 1/48, but their 1/72 Mustang carries different markings. Superscale makes a set of decals for Howard's steed, and with some research I figured that I could make the venerable Monogram kit fit the bill. One bit of advice I will discuss later: Superscale's set has a few issues and, in consequence, I can only recommend them for some of the markings.
Dry fitting parts from a kit (plus box of parts) from eBay promised that minimal sanding would be needed, as everything appeared snug. Building the kit would prove otherwise. Compared to the pieces and parts from an equally geriatric Airfix kit that an eBay seller included, Monogram had rivets and raised panel lines, but it had a lot of little goodies I liked too, such as ejector ports for the guns and, for the scale, a decent mock-up of the batteries behind the pilot's seat. I added some sheet plastic to finish "the office" since I would not be putting in a pilot. The little seat, with seat belts, prove rather amazing for a 1967 kit.
| CONSTRUCTION |
I began with detailing the cockpit and wheel wells. The former involved using bits and bobs of sprue to make control knobs, spheres of CA gel for ends on handles, and tiny decals from my stash that no one without an electron microscope could read for instrumentation labels. I'd planned to omit the pilot, so I painted the seat belts molded on Monogram's seats and fashioned a more-realistic looking headrest from masking tape and painted it dark tan. If you look at the battery behind the seat really closely, it says "F4U" upside down. "Corsair Batteries" as a little-known wartime firm, right? Adding the tiny lettering busied up the cockpit of an otherwise minimalist kit.
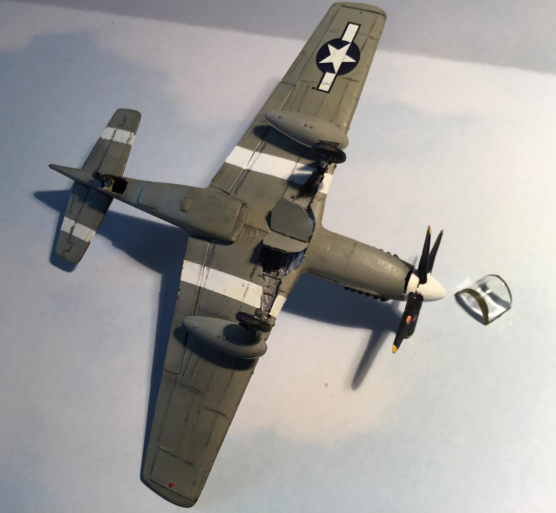 For the wheel wells I used some heavy thread, run
though white glue, to approximate the spars. As my drawing teacher used to say,
"trick the eye." The results looked close enough when painted, another reason I
love 1/72 builds. I first needed to sand off some of Monogram's visible
lettering that would have shown up with the gear down. Later I found an "MM"
scribed on one flap. It too succumbed to the sanding stick.
For the wheel wells I used some heavy thread, run
though white glue, to approximate the spars. As my drawing teacher used to say,
"trick the eye." The results looked close enough when painted, another reason I
love 1/72 builds. I first needed to sand off some of Monogram's visible
lettering that would have shown up with the gear down. Later I found an "MM"
scribed on one flap. It too succumbed to the sanding stick.
The fuselage halves went together tightly, even with the additions in the cockpit, but the seam needed to be scraped, puttied, then sanded carefully smooth. Painting the plane in flat black primer from a Testors rattle-can showed me a canyon remaining, where I'd expected at most a small ditch. I had to use more putty there, as well as between the lower front edge of the wing assembly and the fuselage. Finally, more putty got smoothed in behind the wing and into the seams of the wing-roots.
So much for first appearances of good fitment. Any fault may well lie with me: I built a second Monogram example OOB at the time, to practice with a NMF before I tackle Airfix's model of John Glenn's F-86. Guess what? No putty needed at all. I did have to sand down fuselage seams. In any case...
 Others here complain here about the intake under the
Mustang. It did need a lot of work, but I figured that any remaining
irregularities would be handled by painting, as my plan was to recreate Howard's
old plane near the end of its service life, with a lot of weathering and the
Malcolm hood installed. Regardless, it's a shelf kit to evoke memories of Bob's
Hobby and friends departed, not a contest entrant for me.
Others here complain here about the intake under the
Mustang. It did need a lot of work, but I figured that any remaining
irregularities would be handled by painting, as my plan was to recreate Howard's
old plane near the end of its service life, with a lot of weathering and the
Malcolm hood installed. Regardless, it's a shelf kit to evoke memories of Bob's
Hobby and friends departed, not a contest entrant for me.
Photos of Ding Hao show the 75 gallon drop-tanks that come with the Airfix Mustang, and as I had a set of them thanks to the eBay seller, I used them.
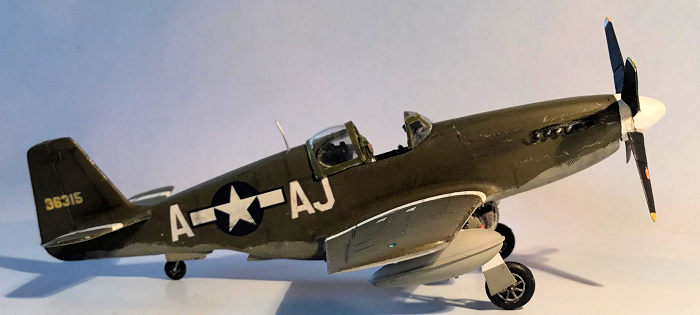
The Malcolm hood presented me with a dilemma. There's a color photo of Howard, looking rather sad, standing beside a well-worn Ding Hao, with even the word "Ding" dinged by a big scratch across the paint. At that point, the P-51 wore the Malcolm hood. Later I found a photo of the pilot in a the plane, with the hood. I love Mustangs and Spitfires with that canopy, so I decided I'd model mine that way.
Monogram includes the option, but one must cut apart the clear canopy pieces to fit the Malcolm, and I wanted my Mustang with an open cockpit, so I could occasionally peek in and shout "Cadillac of the Skies!" to no one in particular, except the cats.
| COLORS & MARKINGS |
Control knobs and other cockpit details got a swipe or two at their edges with a Prismacolor silver pencil, to make them pop. I did that for the wheels, too, after painting them black. The Monogram tires lack a tread, but I'm fine with that in this scale.
I preshaded the entire airframe in flat black, then masked the plane except for the leading edges of the wings and the wing-roots which got painted in Model Master Aluminum. The original plan had been to chip away the upper layers to show the bare metal.
Needless to say, my airbrush decided to act up. I got Humbrol 64 thinned and sprayed evenly on the bottom, which promptly obscured any preshading. Perhaps the pressure was too high and the paint not sufficiently thinned. then used Loc-tite Fun Tac putting and low-tack masking tape to cover the work. After a coat of Model Master OD on the top had dried, I removed the masking to find more need for sanding!
 When that was done, I re-shot the bottom coat with the
airbrush but used a rattle-can of Testors OD green for the top. Without the
preshading showing up, I figured why bother? I'd handle any shading around the
control surfaces later with lead-pencil lines on raised details, a dark brown
acrylic ink in the seams of control surface and some chipping with brush and
Prismacolor pencil to ding up Ding Hao.
When that was done, I re-shot the bottom coat with the
airbrush but used a rattle-can of Testors OD green for the top. Without the
preshading showing up, I figured why bother? I'd handle any shading around the
control surfaces later with lead-pencil lines on raised details, a dark brown
acrylic ink in the seams of control surface and some chipping with brush and
Prismacolor pencil to ding up Ding Hao.
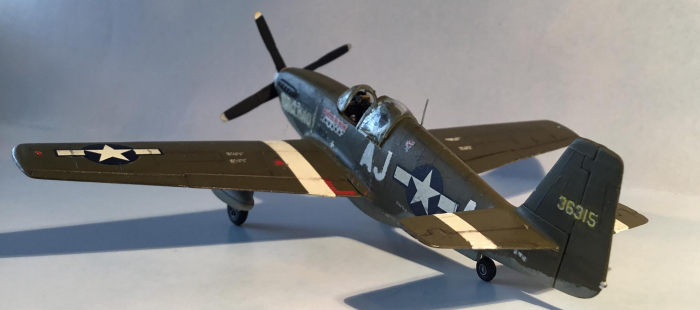
I like my vehicles weathered, and a Ding Hao near its final mission would indeed have patina, especially as the Army Air Force moved to natural finish and away from OD over gray finishes. Without going full-out "Spanish School," I wanted a war-weary bird.
Long before all that weathering, it was time for decals. This would prove the most wearisome part of the build.
I cleaned the airbrush well and shot a coat of Future, without thinning it. For once the airbrush cooperated. I did not wish to rush matters so I set the kit aside for 24 hours for the Future to get hard, then applied the Superscale set of decals. Two of the stripes for the wings tore, my fault entirely. I was thereafter careful to slide them on with plenty of water. They snugged down well without solvent, even over the raised details, without any air bubbles.
Two problems then presented themselves, both my doing. First, I had placed the recognition stripe on one wing outside, not inside the fuel-tank opening. Off it came, falling apart in the process. In this case, a ready substitute appeared: Tamiya white masking tape. I had planned to mask the wing and paint the stripe, but when I discovered the tape to be very close to the width of the original decal, I just used it. It's thin and pressed down well over the raised-panel details on the antique kit.
The second problem had me looking for a hammer: I had reversed the right-side squadron markings, not seeing that until I had laid down 2 coats of Testors lusterless lacquer on.
Novice mistake, you bet, but I'm man enough to admit it. Given what happened to the stripes when I tried to remove them, I figured the jig was up for the squadron codes. I scraped them off the right side of the aircraft and walked away from the model for a bit for perspective.
 Jim Howard was risking his life, so what is a few more
bucks for the only 1/72 Ding Hao I am likely to ever build? I then ordered
Kits-world's decal sets for P-51s, available in a three-pack with some "nekkid
lady" nose art for a Hasegawa D model in my stash, as well as two sheets of
squadron and aircraft codes in black or white.
Jim Howard was risking his life, so what is a few more
bucks for the only 1/72 Ding Hao I am likely to ever build? I then ordered
Kits-world's decal sets for P-51s, available in a three-pack with some "nekkid
lady" nose art for a Hasegawa D model in my stash, as well as two sheets of
squadron and aircraft codes in black or white.
Who can resist the allure a business located at "Badgers Lodge, Eastwood Rise, Leigh on Sea, Essex"? They also have all squadron markings in the correct size and color. I note that because Superscale's markings have two issues I discovered, while fuming a bit and waiting for the Royal Mail.
While double checking a few images, I stumbled upon the Web Site of the American Air Museum in the UK. There I found several photos (included here under Creative Commons licensing) of Howard in his plane. First, I learned that the Malcolm-hood Mustang was not the plane in which he earned his Medal of Honor. That was fine by me.
What was not fine: Superscale's aircraft number 36315 on Ding Hao's tail is incorrect. The sheet has them in white; in every color photo of Howard's Pioneer Mustang group, not to mention builds of the plane by other modelers, aircraft codes appear yellow. With Tamiya yellow, thinned, I painstakingly painted over the numerals with a tiny brush, let the paint flash, then wiped it with a damp tissue. White became yellow enough for my purposes.
Next, Superscale's images do not show a white stripe on the Mustang's fin and no decal has been included, though photos of the earlier plane with the factory canopy show a stripe. I found photos of P-51Bs with and without tail stripes from the 354th, all with the original canopy; none with the Malcolm hood showed a stripe.
I decided to add one because I like how it looks, though only you Mustang experts can expose my burning shame if I'm incorrect. Larry Z. Daily did some research on this very issue (I discovered long after the stripe was in place). He found that, "the ID stripe stayed on the aircraft until after it was fitted with the Malcolm hood." It may have been absent later, when the plane was lost in combat.
Finally, I noticed that the Superscale squadron markings are, well, super-sized, based on wartime photos.
Who can see both sides of a model at once? My brain can. I scraped off the Superscale super-duper squadron markings on the left side and replaced them with Kitsworld's. I had also put a small, rather than large, national insignia on the plane's upper wing. It had snuggled down so well and looked so good that I left it in place.
Final weathering was done with smeared #2 pencil aft of accented raised panel lines, pastels for the exhaust, and a nearly flat topcoat to show a well used horse ridden hard and put up wet.
The landing gear and doors, drop tanks, tail wheel, and canopy went on, with the Malcolm Hood open. It was time to call it quits! I parked Ding Hao and the NMF test-kit, also marked with Kitsword decals and flying on Monogram's stand, beside my F-82 Twin Mustang. The stable awaits a D model with a pinup girl on the nose.
| CONCLUSIONS |
Little boys have their favorites, and often such preferences endure. Mine is still the P-47, but Mustangs, especially Ding Hao, run a close second.
As for the kit? Nostalgia has its place, and the build was fun despite the lessons learned with paint and decals.
If you want a replica, go for a modern-issue Mustang. For a kid building a private air force or nostalgic geezer, this simple kit, like other Monogram 1/72 single-engine planes, remains highly recommended. I recently scored the Pylon-Racer P-51 with a Bearcat. That will get put together soon. Somewhere down the road, when I'm retired and return to a few 1/48 subjects, another Ding Hao will await me.
| REFERENCES |
American Air Museum, Britain. 354th Fighter Group. http://www.americanairmuseum.com/unit/297
Daily, Larry Z. "Tamiya 1:48 P-51B Mustang." http://www.larryzdaily.net/P-51B2/P-51B.html
Kent, Rick. "Camouflage and Markings of the North American P-51 Mustang." 4 Parts. https://www.ipmsstockholm.org/magazine/1999/12/stuff_eng_profile_mustang1.htm
Swope, Bryan R. (2019). "Medal of Honor, Major James Howell Howard, Air Corps, United States Army." https://www.thisdayinaviation.com/tag/ding-hao/
4 April 2022
Copyright ModelingMadness.com. All rights reserved. No reproduction in part or in whole without express permission.
If you would like your product reviewed fairly and fairly quickly, please contact the editor or see other details in the Note to Contributors.