Tamiya 1/72 P-51D Mustang
| KIT #: | 60749 |
| PRICE: | $12.00 |
| DECALS: | Three options |
| REVIEWER: | Spiros Pendedekas |
| NOTES: |
| HISTORY |
 Leonard Kyle Carson Sr.
(1923-1994) was an American fighter ace and Air Force colonel known for his
achievements during World War II. He joined the U.S. Army Air Corps in 1942 and
graduated from flight training in 1943, subsequently flying with the 357th
Fighter Group. Carson scored his first solo aerial victory in April 1944 and
became an ace by the end of July that year, achieving a total of five aerial
victories. In November 1944, he had a significant day where he shot down five
enemy aircraft, earning the title "ace in a day" and bringing his total to 11
victories.
Leonard Kyle Carson Sr.
(1923-1994) was an American fighter ace and Air Force colonel known for his
achievements during World War II. He joined the U.S. Army Air Corps in 1942 and
graduated from flight training in 1943, subsequently flying with the 357th
Fighter Group. Carson scored his first solo aerial victory in April 1944 and
became an ace by the end of July that year, achieving a total of five aerial
victories. In November 1944, he had a significant day where he shot down five
enemy aircraft, earning the title "ace in a day" and bringing his total to 11
victories.
By January 1945, he led a successful mission over Berlin, increasing his tally to 18 aerial victories. Carson was later appointed commander of the 362nd Fighter Squadron and damaged two jet-powered Messerschmitts in April 1945. After the war, he continued his service in the USAF, retiring in 1968, and later worked in the aerospace industry. He published his book in 1978, detailing his combat experiences, before passing away in 1994.
| THE KIT |
 This is the now classic
1/72 Tamiya mold that has been accompanying us since 2000, periodically
reissued, totally unchanged. Essentially a scaled down version of its 1/48
brother, it is a very nice, beautifully engineered kit that can easily hold its
own today, despite being superseded by latest and greatest offerings.
This is the now classic
1/72 Tamiya mold that has been accompanying us since 2000, periodically
reissued, totally unchanged. Essentially a scaled down version of its 1/48
brother, it is a very nice, beautifully engineered kit that can easily hold its
own today, despite being superseded by latest and greatest offerings.
The specific kit is a recent copy, bought in 2023 from my petite, yet still going strong local hobby shop (Chalkis, Greece). All parts are excellently molded and totally flash free, indicating excellent condition of the more than 20 years old molds. For a quick look at the kit’s contents you may look no further than our Editor’s preview found in the ever growing MM archives.
| CONSTRUCTION |
This is adamantly one of the kits that justifies the “Tamiya” ease of construction quote about throwing some glue and paint in the box, shaking well and, voila, a fine model! Nevertheless, I will provide the build sequence for the consistency of the review.
 The cockpit was first
assembled and trapped between the fuselage halves. Basic cockpit and seat color
was a home brewed interior green, while the instrument panel, stick grip,
gunsight base, sidewall consoles, aft radio equipment and inner front/rear anti
glare areas were painted black. The headrest was painted a tan color and the
rear seat cushion dark green, while I used the good looking seatbelt decal.
The cockpit was first
assembled and trapped between the fuselage halves. Basic cockpit and seat color
was a home brewed interior green, while the instrument panel, stick grip,
gunsight base, sidewall consoles, aft radio equipment and inner front/rear anti
glare areas were painted black. The headrest was painted a tan color and the
rear seat cushion dark green, while I used the good looking seatbelt decal.
The lower wing was next attached, followed by the upper wing halves, the horizontal stabilizers, the turbocharger ventral lip, and the intake lip, ending the basic model assembly. Despite the kit engineering and overall fit being excellent, not changing the habits of a lifetime, I applied tiny amounts of putty to some joints, but I am pretty sure that most if not all builders will need to use no putty at all.
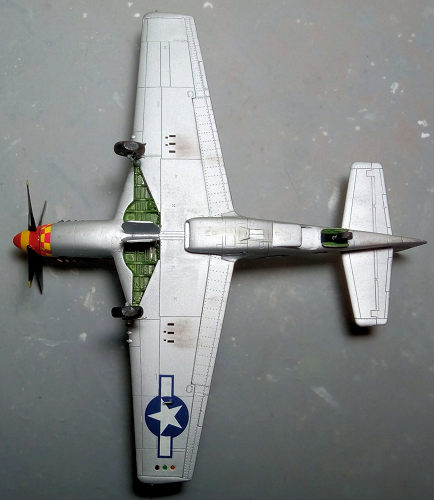
Since it was going to be an NMF model, with the only landing gear areas to be painted green zinc chromate being the wheel wells and dragged door innards, I decided to attach all main landing gear parts (legs, doors and actuators), so they could be painted silver together with the basic model. The famous (or infamous) main canopy lower frame, which is a separate piece from the main canopy, was attached as well. After a smooth sanding, the bird was ready for the paint shop!
| COLORS & MARKINGS |
 At first I was going to
build the blue nosed box art, depicting Lt. Robert W. Williams’s classic scheme,
so I happily brush painted Hu14 French Blue gloss, which lay beautifully. I was
ready to go for the silver, when a friend, whom the model was supposed to be
handed to, told me that he preferred the “classic” (whatever that means) Mustang
NMF scheme with olive drab front anti glare area. So off went the lovely French
Blue.
At first I was going to
build the blue nosed box art, depicting Lt. Robert W. Williams’s classic scheme,
so I happily brush painted Hu14 French Blue gloss, which lay beautifully. I was
ready to go for the silver, when a friend, whom the model was supposed to be
handed to, told me that he preferred the “classic” (whatever that means) Mustang
NMF scheme with olive drab front anti glare area. So off went the lovely French
Blue.
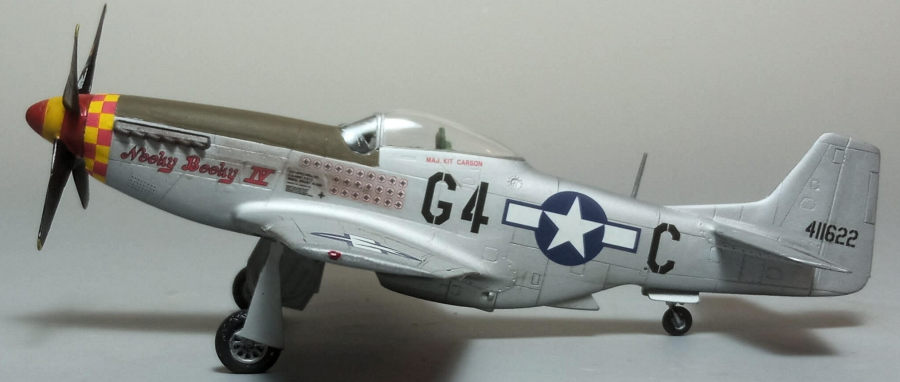
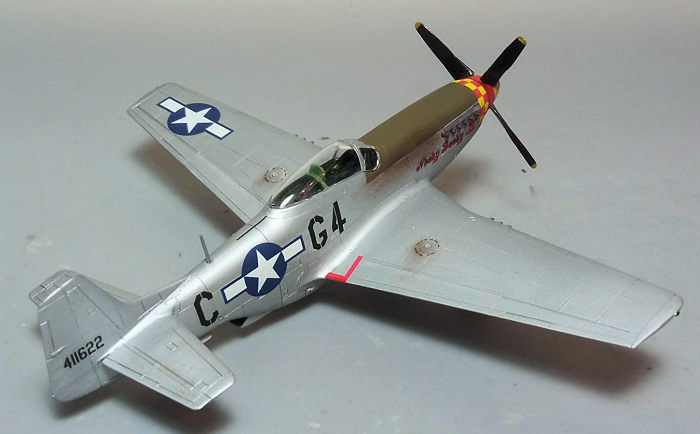
I sprayed the complete model with my trusty Hu11, which I then lightly buffed for deeper, shinier looks. The front anti glare area was then masked and painted Hu155 Olive Drab. A coat of Future (which, in my NMF case is more to protect the sensitive NMF rather than offering a gloss surface) prepared the bird for decaling.
I used the kit decals, which behaved very well. True, they were tad on the thick side, but their quality was excellent and they didn’t mind at all being treated with strong softening solution in order to snuggle down. To my pleasant surprise, this was even more true for the intricate red/yellow chequered stripe which surrounded the front part of the nose. A coat of Future sealed everything.
| FINAL CONSTRUCTION |
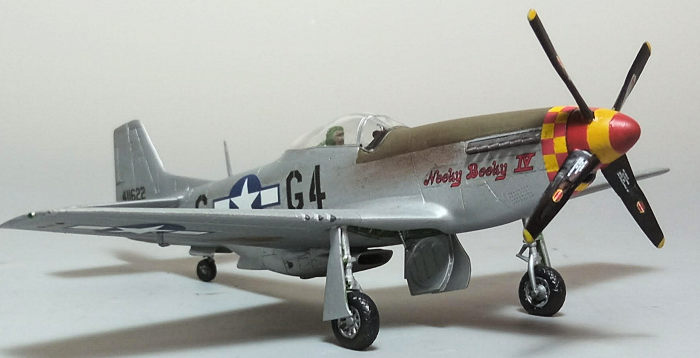
The main wheels and tailwheel assembly were attached in position, with the bird securely standing on its feet. All landing gear parts were silver, apart from the wheel bays and dragged doors innards, which were painted a home brewed green zinc chromate shade and the tires, which were painted black. All wheels were tad filed, to look weighted.
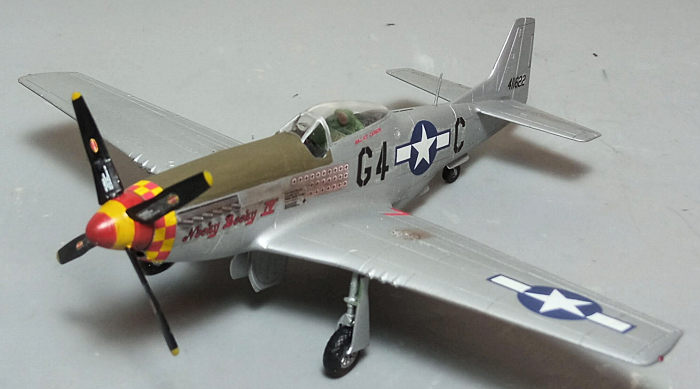
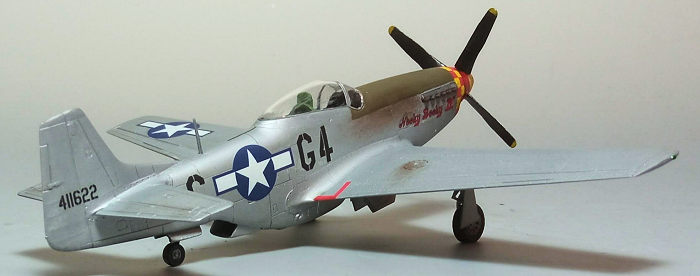 The prop was assembled
and press fitted in position, via the very handy “polycap”. The blades were
painted black with yellow tips, while the spinner was painted red with a broad
yellow stripe in the middle. The exhausts were painted Testors Burned Metal and
attached at this time, as well.
The prop was assembled
and press fitted in position, via the very handy “polycap”. The blades were
painted black with yellow tips, while the spinner was painted red with a broad
yellow stripe in the middle. The exhausts were painted Testors Burned Metal and
attached at this time, as well.
Time for some weathering, which was minimal, consisting of a black wash on the landing gear area and some dark brown/black dry pastels judiciously applied, to simulate dirt, grime and engine stains. A satin coat gave the bird its final hue.
The transparencies had their well defined frames hand painted and attached, with white glue used to blend them to the fuselage. The tiny pitot tube and the antenna mast were then attached. I decided not to attach the aerial wire, due to the fact that I would have to drill a hole in the canopy and would most probably compromise its looks - too much of a risk in 1/72! Blobs of red, green and yellow clear paint were used to represent the wingtip and underwing formation lights, before calling the P-51 done!
| CONCLUSIONS |
Interestingly, this was my first build of a Tamiya 1/72 WWII warbird family and, frankly, I didn’t know what I had been missing (something that will almost certainly prove true for Tamiya’s 1/48 military vehicles range). Though superseded by the latest and greatest offerings, this is still an excellent kit of the P-51D. Molding is crisp, overall shape looks close enough (but I will leave this to The Mustang Experten), panel lines are finely recessed, detail is good, fir is excellent, transparencies are clear and instructions are superb, as are the decals.
Construction could not be easier and more pleasant, making this kit ideal for even an absolute beginner, who will come up with a beautiful Mustang without being overwhelmed by construction complexities and fit issues. Offered at a low price, this is an excellent alternative to newer, more detailed but, possibly, more complex and expensive 1/72 Mustang kits and definitely a kit worth tackling.
Happy Modeling!
Spiros
Pendedekas 8
January 2026 Copyright ModelingMadness.com. All rights reserved. No
reproduction in part or in whole without express permission. If you would like your product reviewed fairly and fairly quickly, please
contact the editor
or see other details in the
Note to
Contributors.