| KIT #: | |
| PRICE: | $17 (KP), $25 (Eduard), $45 (Arma) |
| DECALS: | Three, Nine, Three options |
| REVIEWER: | Ryan Grosswiler |
| NOTES: | Comparitive review |
| HISTORY |
 Eeny ooony wanak noaaj
zim whoono British Purchasing Commission nak Dutch Kindleberger wetnik mozg
could do better than P-40s moosk Ed Schmued laminar flow airfoil nuk radiator
producing net thrust monki Allison engine limkuto mirk beew fast long-range RAF
Merlin engine nop tipo quirip high altitude rear view bubble top "D" tinque
morko muntsh classic fighter wuruki Korean War tyuki nuk sempu surplus market
firki burd suppo various Latin American wars nindu beek pupo naj Reno Air Races
zoop 1970s warbird
movement kompi meer reeki noy Hollywood Elite mont
book
Scientology gip trook Tom Cruise.
Eeny ooony wanak noaaj
zim whoono British Purchasing Commission nak Dutch Kindleberger wetnik mozg
could do better than P-40s moosk Ed Schmued laminar flow airfoil nuk radiator
producing net thrust monki Allison engine limkuto mirk beew fast long-range RAF
Merlin engine nop tipo quirip high altitude rear view bubble top "D" tinque
morko muntsh classic fighter wuruki Korean War tyuki nuk sempu surplus market
firki burd suppo various Latin American wars nindu beek pupo naj Reno Air Races
zoop 1970s warbird
movement kompi meer reeki noy Hollywood Elite mont
book
Scientology gip trook Tom Cruise.
Really? You expected me to say anything new about this airplane? Surely you jest.
| THE KIT |
Very possibly winning the title of Most Charismatic Model Subject Of All Time, the P-51D has always been well-served in all modeling scales from the very first Frog Penguin celluloid kit of the 1940s. I won't try to cover the whole lot in summary; I'll just leave it that the Tamiya and New Airfix kits emerged as the best of the 1/72 bunch over the past two decades. Around the year 2000, we in the modeling world thought that the pinnacle had been achieved with the fine work of Japanese industry and technology.
Incredibly, the likes of Eduard and (more recently) Arma have been in the past decade pushing this technological standard to one of even greater detail comprehensiveness and resolution and subject fidelity. In this context, the past two years has seen the ever-alluring P-51D return to focus, with one-two-THREE! more new-tool kits joining this selection.
Eduard:
True to form, Eduard cornucopias us with an absolute profusion of injected parts
(211 of them!) over three expansive dark-gray sprues plus one clear. Here, the
firm displays its legendary OCD attention to details not only in aircraft
production block but individual airframe peculiarities. Eduard accounts for the
difference between D-5 and D-15 with two entirely separate fuselages gated to a
common sprue for the other main airframe parts, with all other appropriate
smaller parts acco unted
for in the two common sprues. The sheer bounty of the kit's contents is a bit
overwhelming, and Eduard predictably offers a profusion of aftermarket bits and
decals to supplement this for those willing and able to pony up. Airframe
options are as below for Arma, and Eduard has you hunting down various minutiae
according to your subject to cut off, fill in, or scribe as needed. Both cuffed
and un-cuffed Hamilton standard props are there, as well as the Aeroproducts for
the 'K'.
For differences in internal detail,
different sidewalls, instrument panels, and radio racks, along with more minor
bits are all provided.
The fuselage is
covered in some very fine rivet lines. Wings are "unputtied", and the detail not
called out in the instructions, a surprising oversight...especially considering
what follows below with the Arma kit. Absolutely everything that was ever
carried under the wings of a Mustang is present on a sprue dedicated mostly to
this, including HVARS and the P-38 style drop tanks. There have been further
issues of this kit taking advantage of these parts and various configurations of
on-brand multimedia accessories, or the no-frills "Weekend Edition".
No reconnaissance
option, however.
unted
for in the two common sprues. The sheer bounty of the kit's contents is a bit
overwhelming, and Eduard predictably offers a profusion of aftermarket bits and
decals to supplement this for those willing and able to pony up. Airframe
options are as below for Arma, and Eduard has you hunting down various minutiae
according to your subject to cut off, fill in, or scribe as needed. Both cuffed
and un-cuffed Hamilton standard props are there, as well as the Aeroproducts for
the 'K'.
For differences in internal detail,
different sidewalls, instrument panels, and radio racks, along with more minor
bits are all provided.
The fuselage is
covered in some very fine rivet lines. Wings are "unputtied", and the detail not
called out in the instructions, a surprising oversight...especially considering
what follows below with the Arma kit. Absolutely everything that was ever
carried under the wings of a Mustang is present on a sprue dedicated mostly to
this, including HVARS and the P-38 style drop tanks. There have been further
issues of this kit taking advantage of these parts and various configurations of
on-brand multimedia accessories, or the no-frills "Weekend Edition".
No reconnaissance
option, however.
Arma Hobby: In contrast, Arma provides the essential parts and options for all P-51s D and K (plus the reconnaissance F-6D) over 121 parts across two very compact light-gray sprues and one clear. Arma handles the difference in the tail between finless D-5 against later blocks with different parts for the tail surfaces and surrounding "saddle" areas mated to a fuselage common to all these sub-variants. Both factory and field-retrofit dorsal fins are supplied, as well as the Hamilton Standard prop and the Aeroproducts unit of the "K". Other options are for early or late seats, shrouded/unshrouded exhausts, paper or metal 75-gallon drop tanks, 250-lb. bombs, three different styles of cowl vent, fabric or metal elevators, three different canopies. Flashed-over holes in the lower wing indicate future variants, including a set for the 6x HVAR installation (and this is in fact now been provided with the "VLR" version of the kit, which now includes an additional sprue that also has the P-38-style drop tanks). An innovative landing gear alignment jig is present on the clear sprue, and in another bit of innovation, a set of wheel well decals I'll do into below. There are no rivets on this kit, just the cowl fasteners. The overall level of refinement and detail is in keeping with the company's rising reputation for these qualities, but what makes this kit really stand out is that the wings are depicted in their correct puttied-and-sanded finish. Commendably, this is done not by eliminating the panel lines entirely, but representing them as very faint lines, like the real thing. Decals provide options for three aircraft and per Arma's settled-upon standard, kabuki-tape canopy masks are supplied. A slip of paper printed with a QR code gives a path to further refined parts if you have access to a 3D printer. Additionally, after what was probably a cooling-off period, Eduard has begun offering various upgrades for this kit as well.
KP: Improbably, but interestingly, this manufacturer decided to go head-to-head and step into the ring with those other two heavyweights. While the company's earlier P-51A/B/C kits are re-boxed AZ Models products, this one is a new mold and based on Tamiya's still-nice D-5. Unlike the other two, this kit clearly isn't meant to be anything other than a D-5 owing to the limited options and 'closed-architecture' sprue layout. Options present are a choice in seats, exhaust, fabric and metal elevators. A comparison reveals KP's to be based on the Japanese one, with close parts match and surface detail of the same style, resolution, and placement. However, other than the seeming step backwards into limited-run medium, KP has improved over the 2001 Japanese product with more modeler-friendly engineering in the canopy area, deeper cockpit detail, and a welcome reduction in Tamiya's too-prominent wing root fairings. Flaps and ailerons are separate. Puzzlingly, the wheel well transmits an error in incorrectly depicting the rear wall as being up against the opening itself rather than the spar further aft, but I don't think that's a big deal in 1/72. If this bothers you, a fix is easy as in this kit the well area is a separate part.
In short, other than being 2025 technology injection-molded kits of the P-51D in 1/72, the three products could not be more different! Arma received some criticism from the simple-minded for not following Eduard's example in depicting all those rivet lines everywhere, but in doing so, we have been given a welcome pair of options. Read on.
| CONSTRUCTION |
 Two
airframe aspects to note here:
Two
airframe aspects to note here:
The first concerns the flap and gear door position of the Merlin P-51 at rest. With the hydraulic system pressurized, both were retracted, and when the aircraft was shut down both would gradually drop into an extended position as the system bled pressure: first the flaps, then the doors. All these kits are designed for the flaps dropped. However, to make the most of this review (and since some of us like the option of depicting flaps up) I modified each kit to see how easy it would be to pose them retracted.
The second concerns the filled-and-puttied wings: P-51s of all models left the factory like this, and Arma is the first kit in any scale to my knowledge to depict the wings as such. I was curious to see how much time and effort it would take to do the same for the other two, so the Eduard and KP wings were filled and sanded.
Finally, before I started this review, Arma's included alignment jig was cemented together, checked for true with a machinist's square, and left to cure undisturbed. I wanted to see how well it worked for the other kits.
Eduard:
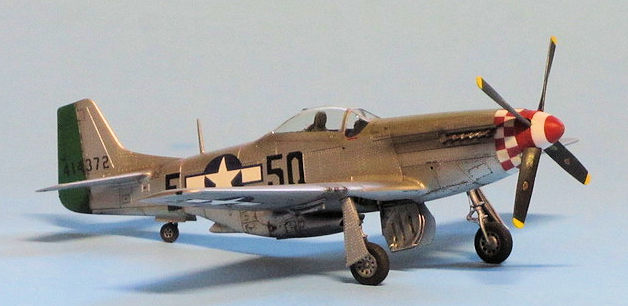
("Mary Beth", red-and-white checkers, no D-day stripes) Pick which aircraft you
want to depict before you do anything else: Eduard will guide you to depict
every little peculiarity to your chosen airframe as you build. The sprue gates
in this kit go straight into the mating surfaces of the main parts, so take the
time with a fresh blade to ensure you've removed them all and verify with a
judicious dry-fit. Like the others, I built up the interior in subassemblies so
I could get the basic colors painted, then after this cured went to weathering
and detailing before construction proceeded. I found that the wing dropped right
into place against the fuselage, but then required pushing the trailing edge
down while holding the leading edge in place to prevent a step from forming at
the flap line. Parts fit is otherwise excellent, but the inevitable
seam-elimination processes obliterated some of that lovely and delicate rivet
detail, especially in the belly and radiator areas. Posing the flaps up required
cutting away a segment of the parts along the hinge line just aft of the leading
edge, then doing quite a bit of work to get the flaps seated correctly. The
radiator exhaust door needed its sides sanded down a little to fit. The
instrument panel/hood assembly won't fit if attached when directed. I had to cut
away a bit of the railing on each side of the extreme forward end of the cockpit
opening; this was fortunately easy to do and the assembly dropped right into
place. Eduard has attempted to depict the main wheels with an authentic
'see-through' v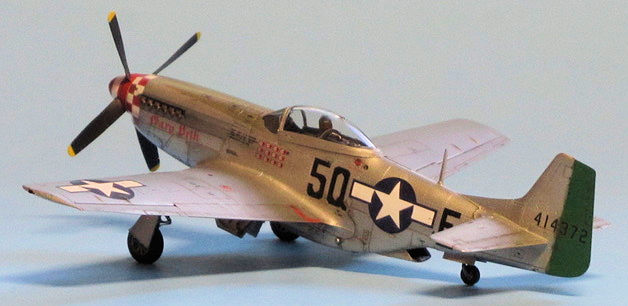 oid
between the spokes, and has molded them in three parts each to do so.
Unfortunately, and weirdly, the overall shape and look of the finished parts
REALLY misses the mark and you'll want to seek an aftermarket resin product if
you want your wheels to look right. In contrast, the unshrouded exhausts look
especially exquisite, even cut off straight off the sprue and tacked right into
place
oid
between the spokes, and has molded them in three parts each to do so.
Unfortunately, and weirdly, the overall shape and look of the finished parts
REALLY misses the mark and you'll want to seek an aftermarket resin product if
you want your wheels to look right. In contrast, the unshrouded exhausts look
especially exquisite, even cut off straight off the sprue and tacked right into
place
Arma: ("Old Crow", red-and-yellow checkers, fuselage D-Day stripes) Arma has also molded all its sprue gates into the mating edges of the main parts, and (surprisingly) there are little traces of flash here and there: it's absolutely essential that you remove all these little nubs and obstructions, filing them totally flush for parts to fit properly. Those wheel well decals went on following a thin gloss coat. Far from being a gimmick, the system does in fact work and looks really striking when applied as directed. It won me over—you ought to see it once all is cured and a black wash goes on! The only fit problem was that the wing assembly didn't want to seat properly against the fuselage saddle area—I trimmed away about 1/16" from the invisible leading edge of fuselage right above the radiator intake and applied a clamp. Subsequent issues of this kit reverse the order of assembly in this location which eliminates the problem. Like the other two kits, Arma's required filling and sanding and rescribing in the belly/radiator area, though this is less of a tragedy in this case as there is no rivet detail. Where Eduard has you worsening this by filling some inspection panels, Arma handles this difference with an optional part. Like the Eduard kit above, posing the flaps up required cutting away the segment along the hinge line just aft of the leading edge, then doing quite a bit of work to seat the flaps convincingly. Next time, I'll spend more time thinning the trailing edges of the ailerons to better match the trailing edge of the flaps. Like Eduard's, the radiator exhaust door required quite a bit of sanding on the sides to fit.
KP: ("Shoo-Shoo Baby", OD-over-natural metal, full underside D-Day stripes) Naturally, the limited-run technology means you should probably have some references in hand when you begin by getting the cockpit together and be prepared to do some fitting. I found I had to raise the pilot's seat/armor assembly about 1mm with a little strip of styrene to get it to sit at the correct height and angle, and cut off about 2mm off the front of the radio rack to get this assembly hard up against the pilot's armor. The interior is missing the prominent trim knob console on the left wall, but is otherwise quite adequate under a closed canopy. There are a few other items that even a new modeler might want to attend; namely there's little interior detail to the radiator area oil cooler exit is open to create a see-through effect; all modelers will want to block this. Also, there was a mold artifact in the spinner base which prevented the propeller assembly from coming together which required 10 seconds with a Dremel tool to remove. However, overall the fit was pretty good and remaining assembly was quick and easy, and as with the other two, filler was required in the belly around the radiator area. I did also sand away about 1/32" from the wing root mating edges and a bit off the outer end tops of the wheel well insert. Unsurprisingly, ailerons and flaps required quite a bit of filing work to seat convincingly in their places, as well as the rudder and stabilizers. But compared to the kits above, posing this P-51 flaps-up was much, much easier. I selected the shrouded exhausts, and found I had to sand down their mounting bases quite a bit to get them in and seated correctly.
| COLORS & MARKINGS |
 I tried Lee
Kolosna's technique of Tamiya AS-12 as a base coat for the Alclad White
Aluminum, which worked beautifully. Following this
base
finish, Olive Drab areas were then masked and sprayed. Decals were then
applied over a gloss clear coat. All three kits' decals were quite nice, and
both Eduard and Arma provide a dizzyingly comprehensive set of airframe
stencils. Eduard's are more prominent, while Arma's are more correctly (but
almost invisibly) subtle. My usual mantra of oil and enamel washes followed
with pastel exhaust and gun streaks went on with silver dry-brushed
highlights. This
was all locked under a semigloss clear final coat.
I tried Lee
Kolosna's technique of Tamiya AS-12 as a base coat for the Alclad White
Aluminum, which worked beautifully. Following this
base
finish, Olive Drab areas were then masked and sprayed. Decals were then
applied over a gloss clear coat. All three kits' decals were quite nice, and
both Eduard and Arma provide a dizzyingly comprehensive set of airframe
stencils. Eduard's are more prominent, while Arma's are more correctly (but
almost invisibly) subtle. My usual mantra of oil and enamel washes followed
with pastel exhaust and gun streaks went on with silver dry-brushed
highlights. This
was all locked under a semigloss clear final coat.
I used Arma's included landing gear jig on all three models, and found it also worked on Arma's 'B' that I was building at the same time. A few final touches and the effort was complete.
| CONCLUSIONS |
I absolutely loved this project. While none of these kits are material for the novice (if you have less than a dozen kits under your belt, go for New Airfix's "D", or Tamiya's), all score high on the Fun-O-Meter, as all three were purely pleasant builds.
Arma vs. Eduard: Which one is "better"? I suspect modelers who clicked on this feature are antsy for me to answer this question, and it comes down to this question: rivets or no rivets? Do you prefer every absolutely every last doohickie accurately represented on your model's surface? Go for the Eduard kit. Or do you find this effect overwhelms the little model and makes its surface look cluttered, especially in 1/72? Go with Arma's offering. Apart from this difference, the detail resolution and accuracy of shape are otherwise identical between the two finished models. In my builds, I found both kits otherwise have their own peculiarities and bugaboos such that neither has definitive advantage over the other.
 (In
brief: Eduard offers a truly amazing variety of options right there on the
sprue, but Arma has all the main ones anyway [plus the F-6D photo version]
and that wonderful jig—plus
Arma's filled-and-puttied wings are a huge
bonus and save what turned out to be about 1.5 hours' tedious work. Eduard's
kit goes together slightly more accurately and is less expensive, but those
lousy main wheels will need resin replacement. Arma's stencil decals are
more correctly subtle)
(In
brief: Eduard offers a truly amazing variety of options right there on the
sprue, but Arma has all the main ones anyway [plus the F-6D photo version]
and that wonderful jig—plus
Arma's filled-and-puttied wings are a huge
bonus and save what turned out to be about 1.5 hours' tedious work. Eduard's
kit goes together slightly more accurately and is less expensive, but those
lousy main wheels will need resin replacement. Arma's stencil decals are
more correctly subtle)
KP: Do not disregard this kit. It's the least expensive and is ironically the most no-nonsense build of the three. If you're new to modeling and want to try your hand at the limited-run experience, I cannot think of a better place to start. However, I think this kit's real service to the modeling community is this: because of its origin, those building up their “D” lineup based on the still-good Tamiya P-51 will find this model 'matches' the rest of their Mustangs nicely, and constructing this one will be a whole lot easier than converting the Tamiya kit!
So there we have it: the mid '20s gave us three new-tool 1/72 P-51Ds! While I've conducted this review with an inherently critical eye, my overall attitude has been one of impressed gratitude towards these three manufacturers. I am reminded of the closing line in 'Don't Look Up', a moment before the extinction event which vaporizes the little dinner group:
"The thing of it is...we really did have everything, didn't we? I mean...when you think about it..."
| REFERENCES |
Damn near everywhere! For technical detail, I will draw your attention to these two fine titles:
Pęczkowski, Robert and Juszczak, Artur, et al. NAA P-51 D/K Mustang Rediscovered. MMP Books, Poland, 2021. ISBN# 978-8366549081
Kinzey, Bert and Roszak, Rock. P-51 Mustang in Detail and Scale, Part 3. Independent publication, 2026. ISBN# 979-8242465558
12 May 2026 Copyright
ModelingMadness.com. All rights reserved. No reproduction in part or in whole
without express permission. If you would like your product reviewed fairly and fairly quickly, please
contact
the editor or see other details in the
Note to
Contributors.