Arma Hobby 1/72 P-51B Mustang
| KIT #: | 70075 |
| PRICE: | $29.00 |
| DECALS: | Three options |
| REVIEWER: | Ryan Grosswiler |
| NOTES: | Quinta instrument panel |
| HISTORY |
Contrary to stubborn belief, the early Allison-powered P-51 was not a bad airplane, being faster than the contemporary P-40 with the same engine. Given first to its instigating customer, the RAF, it was also possessed of good range, something said customer really appreciated. What it did not have, however, was performance at altitude.
What would make the P-51 such a legendary airplane would not be per se the Merlin vs. Allison engine either, as both were of the 1200-horsepower class with similar displacement. What made the difference was the fact that Rolls-Royce was just starting to turn out the two-stage Merlin and was fitting this new development into the lash-up Spitfire IX to deal with the new Fw-190 (see my review of the Eduard Spitfire IX/VIII). A second push to the turbocharging process meant more air shoved into the combustion process, thus more bang in the cylinders.
Today we tend to think of this period
in the P-51's development in a brief, "the Brits wanted their Merlin on the
Mustang; Ed Schmued drew it out on a cocktail napkin with a sweet new radiator
arrangement, and there it was" sort of way. The reality was that the in the
spring of 1942 an RAF pilot flew an Allis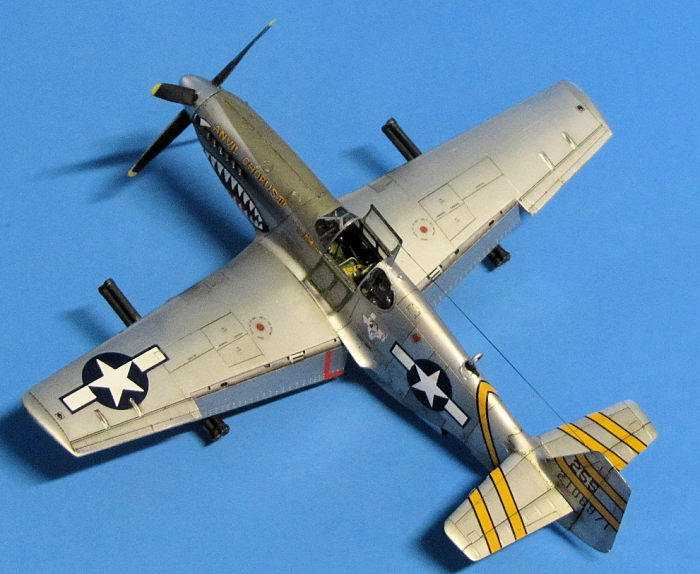 on
Mustang and mused in his report that it would do well with that new Merlin 60,
then reaching service for that new Spitfire. The Royal Aircraft Establishment
quickly seized upon the idea and within a few months had several aircraft in
modification. The USAAF and North American (nearing the end of its Allison
Mustang contracts) also quickly warmed to the idea. Packard-Merlins just
becoming available in North America sweetened the idea.
on
Mustang and mused in his report that it would do well with that new Merlin 60,
then reaching service for that new Spitfire. The Royal Aircraft Establishment
quickly seized upon the idea and within a few months had several aircraft in
modification. The USAAF and North American (nearing the end of its Allison
Mustang contracts) also quickly warmed to the idea. Packard-Merlins just
becoming available in North America sweetened the idea.
By autumn, half a dozen prototypes were being tested on both sides of the Atlantic. While the installation of the British engine block in the Allison mounts was pretty straightforward, optimizing the radiator and intercooler layout was not. With the UK starting with a Spitfire prop/spinner combination and the radiator in a chin mounting, the specific installation went through a few different (and a couple rather ugly) flying configurations of the new powerplant package before the refined one that we know today was ironed out, NAA estimating 223,000 man-hours being sunk into the changes and optimization process. The performance improvement, however, was dramatic: 25% increase in airspeed at 25,000 feet, 150% improvement in rate of climb at all altitudes. The design process was frozen at the end of 1942; production examples emerging from the line that spring. The result was the P-51B. The "C" was just "B" built in Texas. Aircraft began arriving in-theatre by summer 1943.
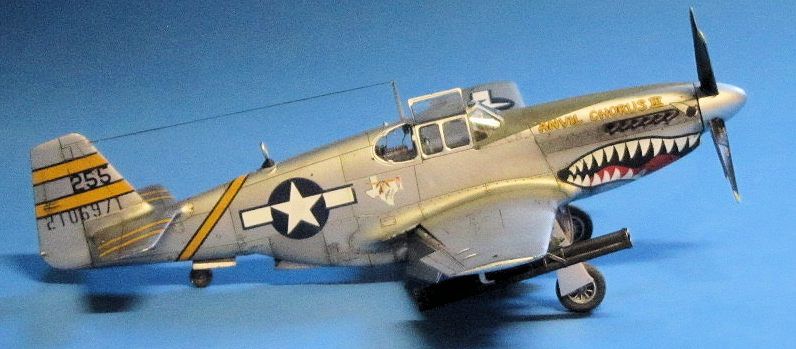
The 23 Fighter Group was the successor to the illustrious AVG, the Flying Tigers, but would suffer the remainder of the war being disregarded priority for equipment and attention. Vestiges of the unit's earlier guise could be found in some of its senior personnel and the shark-mouth motif applied to its aircraft. In proof positive that its China-Burma-India theatre was truly the forgotten front of the war, the unit only began receiving the Allison-engined P-51A to replace its traditional but worn-out P-40s as 1944 was about to begin. Working from their base in Kweilin, mainland China, the unit made a dramatic first impression with their new long-range Mustangs with a devastating strike on the Japanese across the strait on Shinchiku, Formosa. The Merlin-powered Bs began to arrive several months later and would continue trickling in until the end of the war. However, to further the overall point, the rate was so slow that some squadrons reverted back to the P-40 in its "N" form, pilots continuing to make ace on the type.
| THE KIT |
The P-51 Mustang, charismatic as it is, has always been well-catered to in all scales in all modeling media, flying and static, for the past 80 years. I'm not even going to try and summarize all of its iterations in 1/72 injection since the '50s, except to say that the pre-"D" variants really tended be more miss than hit in accuracy among that lot: Monogram's 1970s raised-line kit was arguably the best of them.
Arma,
a relatively new company out of Poland, has been very rapidly making a name for
itself for pushing the boundaries of state-of-the-art accuracy and extreme
detail in 1/72 (and more recently pushing into 1/48) injection-molding. Around
the year 2000, we tended to believe that the likes of Tamiya and Hasegawa had
really achieved the pinnacle of the technology, but the western Slavs of Poland
and the Czech Republic are lately pushing things quite a bit further, achieving
a level of accuracy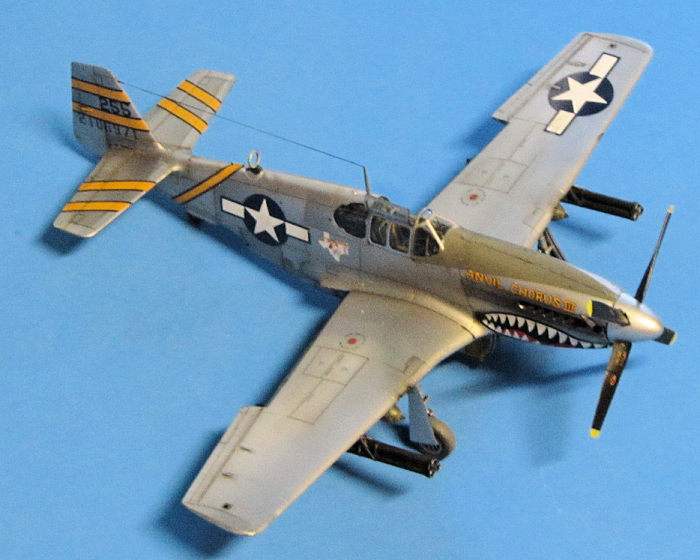 and detail resolution that two decades ago we thought only possible in resin.
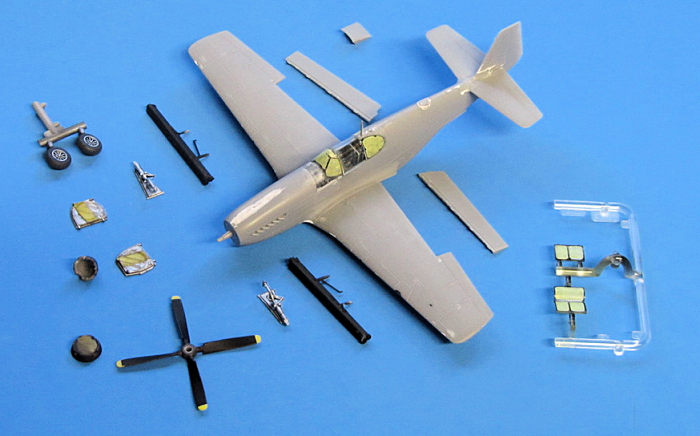
Before you open the bag to spill out the kit contents, take the time to track any parts which have come loose, especially part B13, the fuel tank gauge tower, prone to go wandering. Three compact sprues packed with components make up Arma's basic kit. External detail is recessed and raised where appropriate and is the most exceptionally refined I have ever seen. Internal detail in both cockpit and wheel well is complete and very comprehensive, more like a 1/32 kit. Options include vertical tails with or without the dorsal fin extension, metal or paper drop tanks, bombs, shrouded and open exhausts, different radios and seats, three types of cowl vents, plus standard and Malcolm-type canopies. Quite unlike P-51 kits in the past, Arma engineers the different tails as entirely separate units with the horizontal tail as a single piece. Flaps are designed to be posed down and down only.
Three China-Burma-India decal options are provided, two shark-mouth, one not, plus comprehensive stencils and placards for the model inside and out. The kit plastic is the same as in Arma's previous P-51B/C releases, with the addition of an extra sprue for the bazooka tubes and a set of jigs to drill the holes for same in the wings. After early experimentation with providing various accessories or not in various "Basic" and "Expert" releases, Arma seems to have settled on a standard kit of plastic, decals, and canopy/wheel masks, plus a QR code to download a file and print optional extras in resin. It's a nice setup.
| CONSTRUCTION |
As I was building, I acquired Arma's new "D" which includes a landing gear alignment jig molded with the transparent parts sprue. I was keen to learn whether or not the contraption would be useful on this kit as well, so the object was assembled and set aside to cure as construction on the "B" continued.
Steps 1-15 and 17 (skipping 11 &12) were completed before doing any painting. This produced subassemblies for interior painting: left and right fuselage halves (with the instrument panel attached to the right), cockpit floor/seat, radiator tunnel, and wings top and bottom. Doing it this way allowed me to paint and weather it all at once without visible glue smudging. The interior base colors were shot as called out in the instructions. This was left to cure, then the interior decals followed. These are superb, but you'll need a good desk-mounted magnifying device to apply many of them, and bear in mind the surfaces they are applied to have relief detail, so plan--and cut--accordingly. They responded well to Micro Set and Sol. Purists will want to replace the instrument panel with one of those new photo-relief products, and I did end up placing a Quinta Studios product (QD72219, and there are enough elements in this set to stretch the contents across two models)in place of some of them. I applied the kit's seatbelt decals to lead foil with a little PVA glue, then cut them out and glued separately later. All this was washed and dry-brushed and construction proceeded. As usual, I'd recommend leaving the flaps and pitot tube off the model until you're ready to attach the landing gear, etc.
 The included
drilling jigs (BZ15 and BZ16) fit cleanly and were used to open the holes for
the bazooka clusters. Appropriate panel lines were filled in on the wing to
depict the "Puttied-Sanded-Primed" effect, except the gun bay and landing gear
access panels and wingtips. Just a line of liquid primer on each, followed by a
1500-grit wet sand--the panel lines are that petite.
The included
drilling jigs (BZ15 and BZ16) fit cleanly and were used to open the holes for
the bazooka clusters. Appropriate panel lines were filled in on the wing to
depict the "Puttied-Sanded-Primed" effect, except the gun bay and landing gear
access panels and wingtips. Just a line of liquid primer on each, followed by a
1500-grit wet sand--the panel lines are that petite.
Fit is exceptional almost throughout the entire model: if something doesn't drop right into place, find out what you're doing wrong! The only licks of filler I used were under the radiator duct where I got overzealous removing a sprue nub, and a bit on top of the nose. There are a few tiny parts, but only where appropriate. Other than the Quinta panel, the only additions I made to the kit were to drill out the muzzles of the bazooka tubes a bit more and add a set of brake lines to the main gear from fine solder. The only pitfalls I ran into in construction is the rear fuselage can go slightly out of position in the vertical plane if you're not careful, and the windshield piece needs to be hollowed out a bit with a little sanding.
The engineering on the propeller was the only "buzz-kill" I experienced in this kit: I don't like being forced to assemble and permanently attach this component. The poly-collar arrangement of the Tamiya kit is much better—I would like more manufacturers to arrange things like that.
As with any natural-metal finish aircraft, I spent quite a bit of time fine-sanding and prepping the exterior surface before paint, taking it down to about 1500 grit. The final bit was final work on the cockpit 'topside', namely the gunsight and dash, plus the radio rack—the parts that would be most visible. The remaining exterior parts were then added, namely the antennas, stores racks, quarter-panels, and windshield—as mentioned, this last part needs some fitting work
The model was then cleaned for paint and the canopy masked. As mentioned, Arma now provides kabuki-tape masks as standard in their kits, a most wonderful touch. I used the closed canopy piece (part T4) to mask the cockpit opening, and OMask 77209 was used for the landing gear well openings. Purchasing the little red neoprene masks seemed a bit extravagant at first, but I have found that they fit other 1/72 P-51s, even from other manufacturers, so the $5 for these little foam inserts is amortizing itself quite well.
| COLORS & MARKINGS |
The whole model was shot with gloss black enamel as a primer for the Alclad. The wing was finished first. These puttied-primed-and-doped wings (despite what you see on the airshow circuit) could take on a really stained and bedraggled look in the field when exposed to sun, moisture, and contaminants, and I wanted to replicate this. I therefore did as follows: after the gloss black enamel base had cured, I sanded the surfaces of the wing with 3500 grit wet-and-dry, then masked off the ailerons, wingtips, wing roots, and landing gear mount panel (i.e., the areas which were bare aluminum). I then shot a flat base with Tamiya lacquer, and followed this ten minutes later with Alclad White Aluminum. The masking was then reversed with the 'treated' wing areas protected and the rest of the airframe done in varied metallics. The flat undercoat gave me the dissimilar look between the bare metal and treated areas I was seeking.
I then applied a very thin clear gloss to prep the surface for decals. Arma's markings were all treated with straight Micro Sol: as usual I tested them first with the national markings (the tactic: in case of decal catastrophe the easily-replaced images are tried first) and after taking about ten minutes to come off their backing, settled in nice and flat after looking discouragingly bulky when first applied. They are both durable and fine, in other words.
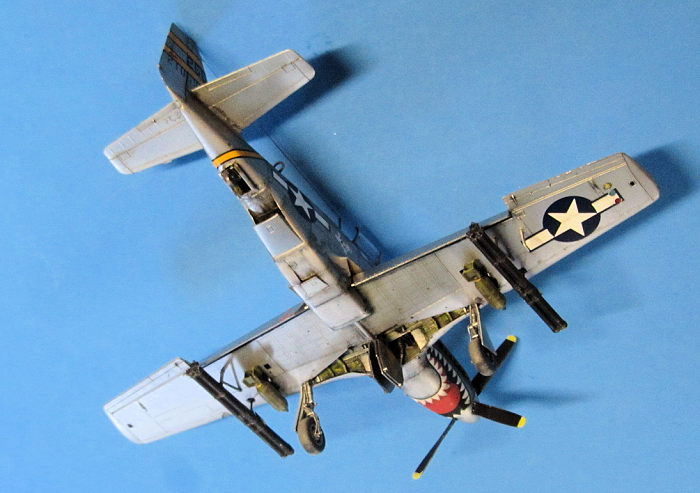 The big sharkmouth images were then tackled. They’re split into left and
right halves, but are otherwise not divided in any way. I was worried about fit
and wrinkling, so took the following approach one morning in the predawn
darkness (while the rest of the house was asleep; no interruptions): one side
was soaked and slid accurately into position along its top edge, hit hard with
Micro Sol, then left to sit for about fifteen
minutes.
In the midst of the usual morning
prep tasks I then
'worked' it with a brush about every ten minutes over the following hour, moving
downward and gradually nudging it into the compound curve of the nose. When I
returned from work twelve hours later the decal had sucked right into the
surface with only a few 'micro-wrinkles' left to sand away. The decal on the
other side was applied the same way the following morning, and I found with a
bit more care that I was able to align it with the first so well that the seam
between them under the nose became invisible with a bit of polishing after it
had dried. In short, no actual retouching required, incredible.
The big sharkmouth images were then tackled. They’re split into left and
right halves, but are otherwise not divided in any way. I was worried about fit
and wrinkling, so took the following approach one morning in the predawn
darkness (while the rest of the house was asleep; no interruptions): one side
was soaked and slid accurately into position along its top edge, hit hard with
Micro Sol, then left to sit for about fifteen
minutes.
In the midst of the usual morning
prep tasks I then
'worked' it with a brush about every ten minutes over the following hour, moving
downward and gradually nudging it into the compound curve of the nose. When I
returned from work twelve hours later the decal had sucked right into the
surface with only a few 'micro-wrinkles' left to sand away. The decal on the
other side was applied the same way the following morning, and I found with a
bit more care that I was able to align it with the first so well that the seam
between them under the nose became invisible with a bit of polishing after it
had dried. In short, no actual retouching required, incredible.
The flaps fit beautifully but are designed to be posed in the 'down' position only, and cannot be posed retracted except with lots of modification. Also, there is always a worm in the apple: in this case it's the prop-spinner engineering. I reduced the spacer behind the prop spinner to bring it in tighter to the fuselage, but it leaves a seam regardless and I don't like being forced to permanently attach the prop to the rest of the model. The assembly ended up mounted with my preferred sleeved-brass-tube arrangement. I also replaced the front mount of the bazooka tubes with brass rod for better strength.
There are possible improvements elsewhere, too: thin down those tailwheel doors, and I also refined the D/F loop (Part B36) quite a bit while it was still on the sprue. Just before final finishing touches, the model went into that aforementioned jig included with Arma's "D" for gear attachment. The object worked just as well on this kit and saved a lot of trouble. Arma's cockpit, finished and weathered carefully, is positively stunning (and remember that I didn't use Arma's 3D printed parts) against the natural metal finish and the open canopy doors really set it off. The scheme and bazooka tubes combined with this to produce a really striking little model.
| CONCLUSIONS |
Arma's B-Mustang is so good that I went out and bought three more! Despite my gripes about the windshield and prop mount, here is the kind of product which has the power to restore your joy in model building. The early Merlin P-51 is highly unlikely to be upstaged in this scale for some years to come.
Best 1/72 scale kit...ever? I think we have a viable candidate here!
| REFERENCES |
All over the place. For technical detail, my personal favorites are the MMP and tried-and-true Detail and Scale titles.
Peczkowski, Robert. North American Aviation P-51B/C Mustang. MMP/Mushroom Books, Poland. 2019. ISBN 978-83-65958-39-6
12 March 2026
Copyright ModelingMadness.com. All rights reserved. No reproduction in part or in whole without express permission.
If you would like your product reviewed fairly and fairly quickly, please contact the editor or see other details in the Note to Contributors.