Accurate Miniatures 1/48 P-51 Mustang
| KIT #: | 3400 |
| PRICE: | $20.00 |
| DECALS: | One option |
| REVIEWER: | Hans Gertje |
| NOTES: | Added Verlinden #1260 engine. |
| HISTORY |
 Everyone
knows the P-51 Mustang—that fast, long-range shiny metal fighter which helped
the Allies turn the tide over the skies of Germany. Along with its B-17 heavy
bomber companion, it’s probably the most famous American military aircraft from
WWII, if not all time. What’s much less familiar are the humble origins of the
Mustang, as it was not intended to be a fighter for the US. Designed as a
fighter/tactical reconnaissance/attack aircraft for the British prior to US
entry in the war, the first planes were designated “NA-91” and delivered to the
UK, where it received the name “Mustang Mk. I”. Powered by an Allison liquid
cooled engine and equipped with a mix of 20 mm cannons and .30 caliber machine
guns, the early Mustang demonstrated great performance, at least under 15,000
feet, due to the limitations of the Allison engine without a two-stage
supercharger.
Everyone
knows the P-51 Mustang—that fast, long-range shiny metal fighter which helped
the Allies turn the tide over the skies of Germany. Along with its B-17 heavy
bomber companion, it’s probably the most famous American military aircraft from
WWII, if not all time. What’s much less familiar are the humble origins of the
Mustang, as it was not intended to be a fighter for the US. Designed as a
fighter/tactical reconnaissance/attack aircraft for the British prior to US
entry in the war, the first planes were designated “NA-91” and delivered to the
UK, where it received the name “Mustang Mk. I”. Powered by an Allison liquid
cooled engine and equipped with a mix of 20 mm cannons and .30 caliber machine
guns, the early Mustang demonstrated great performance, at least under 15,000
feet, due to the limitations of the Allison engine without a two-stage
supercharger.
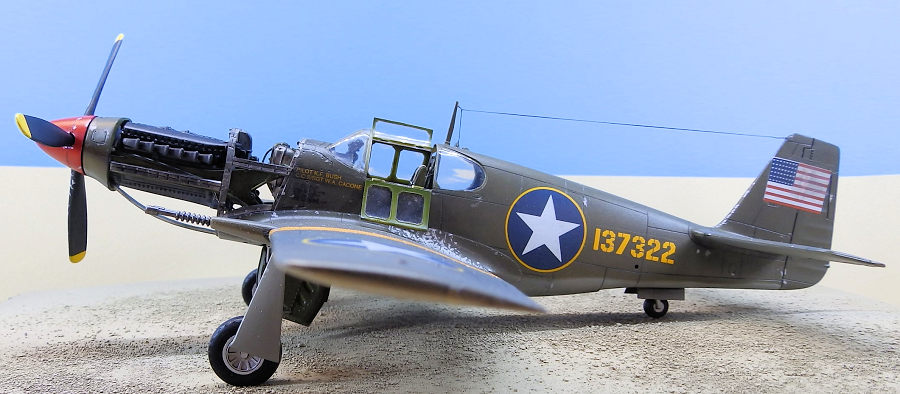
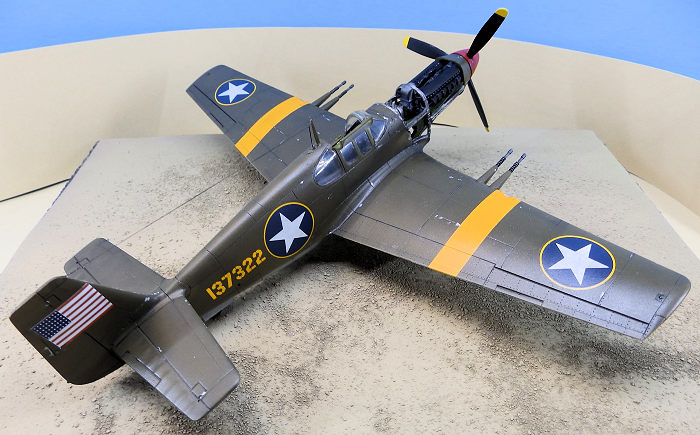
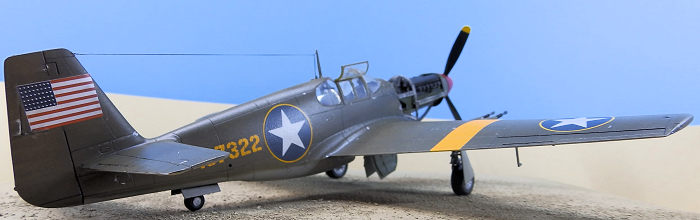
A subsequent order of 150 aircraft were equipped only with 20 mm cannons. This version was simply (and in retrospect confusingly) designated P-51, or Mustang Mk. Ia for the RAF. Most of these were delivered to the British, but some were retained by the US and later saw service in theaters in its intended recce/ground attack role. The subject of this build is the 3rd P-51 that was built, nicknamed “Mah Sweet Eva Lee,” and flown by Lt. N.F. Bush in North Africa during Operation Torch. In order to distinguish it from German fighters, P-51s in this campaign bore yellow wing stripes and the American flag on their tail.
| THE KIT |
 I’m not sure
if this is the exact kit, but as a youngster I remember being a little intrigued
by a boxing of an early Mustang. It was the only kit in stock at a JoAnn Fabrics
(funny how strange the selections can be at non-hobby shops). I didn’t buy it
then, but recently seeing an early Mustang available at a local hobby store
piqued my interest—everyone’s built “Old Crow” and “Big Beautiful Doll” but what
about these odd P-51s with different engines? All the more intriguing was some
included aftermarket—a Verlinden Allison engine for the P-51, and some E-Z vinyl
masks. The kit was secondhand in a beat-up box, but everything inside was
intact, so for less than $20 bucks, why not?
I’m not sure
if this is the exact kit, but as a youngster I remember being a little intrigued
by a boxing of an early Mustang. It was the only kit in stock at a JoAnn Fabrics
(funny how strange the selections can be at non-hobby shops). I didn’t buy it
then, but recently seeing an early Mustang available at a local hobby store
piqued my interest—everyone’s built “Old Crow” and “Big Beautiful Doll” but what
about these odd P-51s with different engines? All the more intriguing was some
included aftermarket—a Verlinden Allison engine for the P-51, and some E-Z vinyl
masks. The kit was secondhand in a beat-up box, but everything inside was
intact, so for less than $20 bucks, why not?
The dark green sprues were all in mostly good shape, with some of the parts detached. The wing parts were warped so they didn’t test fit together great. Clear parts were in their own separate bag, unopened and free of damage. Accurate Miniatures included just one decal option in this boxing, 41-37322, a simple scheme of star roundels with yellow outlines, yellow wing stripes, and flag tail marking. There are not many aftermarket decal options out there for this very first P-51 version, so I decided the kit decals were as good as any. The instructions that AM provided are unlike any other model kit I’ve seen--the main instruction sheet, with very rudimentary diagrams that appear hand drawn and not very detailed, are accompanied a great deal of text on how to build the plane step by step. A separate sheet is for paint scheme and decals, with a chart for recommended paints from different manufacturers.
The Verlinden engine kit had its own box as well, which had a bag of tan resin parts and an instruction sheet. Since this build will feature the Allison engine, my review will just as much be about Verlinden’s offering, and you can read more about it in my preview.
| CONSTRUCTION |
Building the Allison Mustang began with the cockpit components per the instructions. AM recommends to pre-paint as many components as possible before assembly, so after priming everything was painted Interior Green by mixing Gunze Aqueous H312 Zinc Chromate with a drop of Tamiya Flat Black. I masked off sections of the side consoles and radio equipment to paint them Flat Black, using Liquid Mask on certain areas too difficult for tape, which worked really great. The instrument panel is a clear part, explained in the instructions as intended to receive a decal on the back side so the modeler could simulate “glass” over the dials. I went the alternate route that the instructions suggest, instead dry brushing and highlighting the dials and switches with white and silver paint and applying drops of gloss over the painted dials. The seat has no belts, so I scratch built them by putting thin strips of Tamiya tape on aluminum foil, and painting them tan, with wires and foil for loops and buckles.
 During this
time, I was also test fitting the fuselage, wing parts, and resin engine wall.
On the fuselage halves the “lip” that connects to the covered engine parts needs
to be trimmed away, and the front of the wheel wells shaved away “3 mm,” which
is probably too much without risking damaging the detail on the interior of the
wheel wells. So, after freeing the engine wall from its casting, I shaved away
some from the back where it meets the wheel well. Eventually I had trimmed
enough away everywhere so that I achieved quite a good fit of the engine wall.
During this
time, I was also test fitting the fuselage, wing parts, and resin engine wall.
On the fuselage halves the “lip” that connects to the covered engine parts needs
to be trimmed away, and the front of the wheel wells shaved away “3 mm,” which
is probably too much without risking damaging the detail on the interior of the
wheel wells. So, after freeing the engine wall from its casting, I shaved away
some from the back where it meets the wheel well. Eventually I had trimmed
enough away everywhere so that I achieved quite a good fit of the engine wall.
Satisfied with that, I finished assembling the cockpit parts so the fuselage halves could be joined. The tail wheel and exhaust vent needed to be painted prior to assembly as well. After the side consoles were glued and the cockpit floor assembled, I began gluing parts into the right fuselage side. This is where the poorly illustrated instructions became a bit troublesome, as it was unclear to me at first where to install one of the radio platforms and the exhaust vent piece. Later on in the build I discovered that Academy reboxed this kit with much more clearly illustrated instructions, including photos of correct assembly (these instructions can be found on Scalemates).
Joining the fuselage was mostly fine, with a few interior parts that needed to be aligned correctly with the help of some toothpicks as wedges. The wing halves were warped but went together just fine with extra thin cement and some clamps. I glued together the warped halves of the 20mm cannon casings after the wings were fully joined. The fuselage, wings, and stabilizers were glued together, the instrument panel inserted into the cockpit, and then the resin engine wall was attached with some gel super glue. The plane was sprayed with Mr. Surfacer 1500 and I started sanding out the seams. There was a particularly large gap where the upper wing joins the fuselage that needed a good bit of putty, but not a ton of problems otherwise.
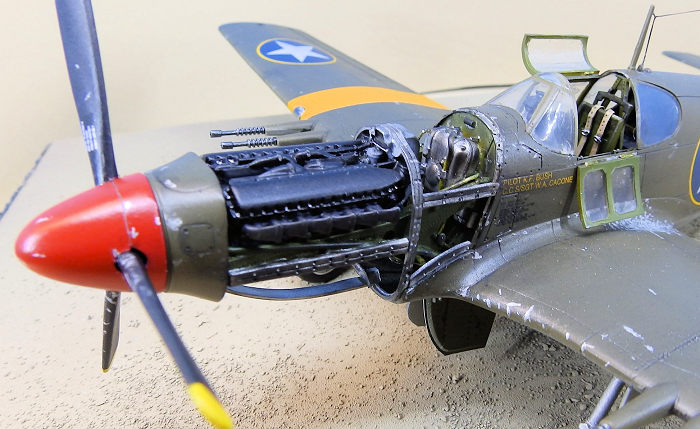 Concurrent
with all the build steps of the model, I was working on the engine resin parts,
carefully freeing them from their castings, test fitting them, and painting
them. My PVC razor saw was excellent for getting even the most difficult parts
prepped, especially the ring structure that was attached to a sheet of resin.
Intimidating, but nothing a little patience and quality tools can’t resolve. I
painted the engine with Tamiya XF-66 Light Gray, the engine bearers and wall
with my Interior Green mix, and the engine frame pieces and oil tank Tamiya
XF-16 Flat Aluminum. The engine was masked off to paint the rockers Tamiya X-18
Semi-Gloss Black, and I used silver enamel paint to pick out rivet details on
the rockets and engine body.
Concurrent
with all the build steps of the model, I was working on the engine resin parts,
carefully freeing them from their castings, test fitting them, and painting
them. My PVC razor saw was excellent for getting even the most difficult parts
prepped, especially the ring structure that was attached to a sheet of resin.
Intimidating, but nothing a little patience and quality tools can’t resolve. I
painted the engine with Tamiya XF-66 Light Gray, the engine bearers and wall
with my Interior Green mix, and the engine frame pieces and oil tank Tamiya
XF-16 Flat Aluminum. The engine was masked off to paint the rockers Tamiya X-18
Semi-Gloss Black, and I used silver enamel paint to pick out rivet details on
the rockets and engine body.
As I wanted to display the plane with the canopy open, I once again turned to my trusty razor saw to cut apart the canopy into three pieces. One frustrating deficiency about the AM kit is the front windscreen side windows connect to the sprues, leading to unsightly marks where there should be glass. While I polished these areas as much as I could, I could not completely remove them. The clear canopy parts were masked with Tamiya tape, scotch tape, and liquid mask, and attached prior to painting the fuselage, except for the open parts that would be attached later. The E-Z masks that came with the kit are barely worth mentioning, they didn’t fit at all, and given past experience I was quick to move on from them.
| COLORS & MARKINGS |
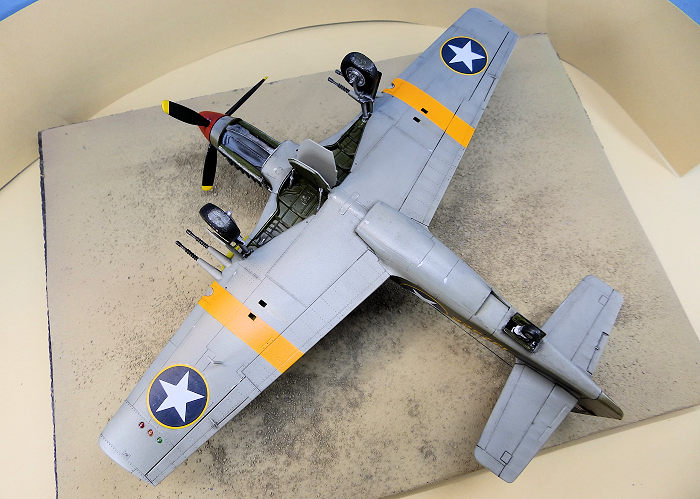
I proceeded to prime the aircraft and do a simple preshade of panel lines with Tamiya Flat Black. The underside was painted XF-20 Neutral Gray, then masked off with blutak and tape to paint the topside Gunze H-52 Olive Drab. The yellow wing stripes are provided as decals, but I usually prefer to paint such things, so I made my own mix to match the decal color with Tamiya Lemon Yellow and a tiny drop of Hull Red to get a slightly more orange yellow. After a gloss coat the decals went on with fuss and conformed fine with some Solvaset. These were sealed with another coat of gloss.
| FINAL CONSTRUCTION |
Then it was on to painting and assembling parts such as the landing gear, propellor, and guns, and putting together the parts for the engine, first connecting the engine block with the bearers. I discovered that the resin nose cap that Verlinden supplies does not fit flush with the kit propellor—there is a noticeable step that would make the propellor look oversized. So I once again used my razor saw to cut off the corresponding section of the unused kit nose. I glued these halves together and painted them to match the fuselage. Test fitting also revealed that the kit nose cap would not fit to the engine as is, leaving a large gap where it should connect to the engine bearers, so the simplest way to solve this was to saw and trim down the front of the engine. This removes some fine detail work, but it wouldn’t have been seen inside the nose cap anyway.
The engine was attached to
the bearers, and the metal ring framework attached around the assembly, with a
vent it connects to on top of the engine. The engine bearers have locator pins
that connect to holes on th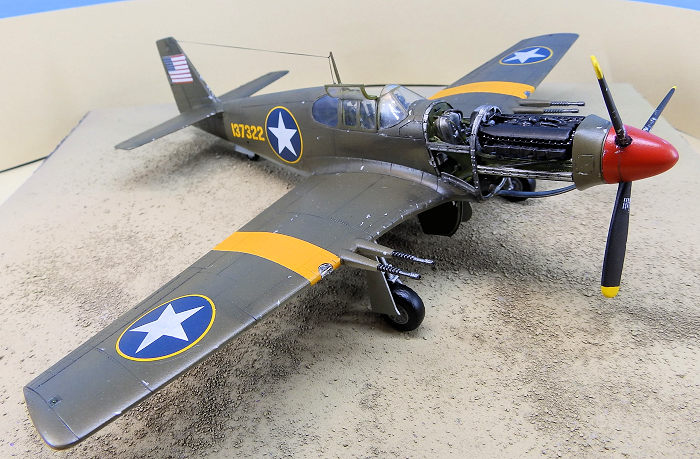 e
engine wall, but my assembly of the engine and bearers did not connect well, so
I had to cut off the bottom pins and shave down the resin in order to get it all
to fit properly. The small aluminum framework pieces were then trimmed, fitted
and glued. Nothing about the engine is shake ‘n bake, but it’s nothing a little
patience and determination couldn’t get done. I painted and attached some wiring
of various thickness to add some detail and interest to the engine area.
e
engine wall, but my assembly of the engine and bearers did not connect well, so
I had to cut off the bottom pins and shave down the resin in order to get it all
to fit properly. The small aluminum framework pieces were then trimmed, fitted
and glued. Nothing about the engine is shake ‘n bake, but it’s nothing a little
patience and determination couldn’t get done. I painted and attached some wiring
of various thickness to add some detail and interest to the engine area.
For weathering, I simulated chipping with some flat aluminum enamel paint spotted in areas with the most wear and tear, mainly the leading edges of the wings and stabilizers, and the port rear wing root where the pilot accesses the cockpit. I also used some panel line accent color to subtly bring out the surface details. Exhaust streaks were created by smudging and stippling some oil paints with thinner. Engine grease and desert sand were simulated with Tamiya Weathering Master A and B sets.
Canopy masks were removed, and guns, landing gear, pilot seat, and propellor were installed. The main gear were pretty fiddly and some time was needed to get them set with super glue. I painted the canopy frames and attached them in an open position. The antenna mast and pitot probe were painted, with a string of E-Z line attached from the antenna mast to the tail. Before I knew it this plane was all finished. To display it, I scattered some dirt on a sheet of fine grit sandpaper, shaded it with yellow and dark red, and sprayed it over all with Tamiya Buff color. This was glued to a sheet of packing foam to make a desert base as this plane fought in North Africa.
| CONCLUSIONS |
I certainly made the process more difficult, but the Accurate Miniatures P-51 is a very nice kit, and aside from the occasional frustration with the instructions and clear parts, it certainly wasn’t the challenging part of the build. I highly recommend the AM early P-51s to anyone who’s interested in the Mustang’s early days, or anyone who wants to build a nice WWII USAAC plane. The Verlinden engine was about what you’d expect—it takes some persistence and care in order to make it work, but ultimately rewards your patience with a satisfying final product. It is definitely for those who are into really detailing their model, so if you can find it and want to really go to town, it’s worth your while. Even with the added difficulty of a resin detail set it only took me a month and a half to complete. Overall I’d describe this build as pleasant and enjoyable, and I’m proud of how it turned out. After many years, I finally built that Allison P-51.
27 May 2024
Copyright ModelingMadness.com. All rights reserved. No reproduction in part or in whole without express permission.
If you would like your product reviewed fairly and fairly quickly, please contact the editor or see other details in the Note to Contributors.