Halberd 1/48 XP-51 Mustang
| KIT #: | |
| PRICE: | $111.00 delivered |
| DECALS: | One option |
| REVIEWER: | Andrew Garcia |
| NOTES: | Kit has all you need. |
| HISTORY |
For a complete history of the P-51 Mustang, Wikipedia is your friend. For this build here's just the History of the XP-51. The P-51 Mustang started its development with the NA-73X prototype designed for the United Kingdom’s RAF. An order by the RAF for this airframe with a few modifications became the Mustang Mk. I, which was ordered to production, built using serial numbers AG345 to AG664. A second batch of Mustangs was produced in batch NA-83 with serial numbers AL958 to AL999, and AM100 to AM257, and the last delivery serial numbered AP164 to AP263.
As part of the Mustang purchase the USAAC received two airframes for testing which they designated the XP-51. They were identified by the USAAC as XP-51 s/n 41-038 North American Aviation serial number 73-3101 and during production assigned UK RAF registration number AG348. The second XP-51 s/n 41-039 was the tenth production aircraft of Mustang Mk.I's with a serial number of AG354.
 The first
"Mustang" was NA-73X. The next two units were designated XP-51 and were used to
test the airframe powered by the Allison V-1710 engine. In a later development,
a P-51 serial number 41-37352 was pulled from the production line (the 93rd
unit of that run) and used to test an engine swap incorporating the
Packard-built V-1650-3 engine. A number of other modifications were incorporated
and it became the XP-51B. Once the engine was changed to a Packard built V-1650
Merlin engine and later engine versions it became the classic P-51B/C/D Mustang
that was an icon of WWII.
The first
"Mustang" was NA-73X. The next two units were designated XP-51 and were used to
test the airframe powered by the Allison V-1710 engine. In a later development,
a P-51 serial number 41-37352 was pulled from the production line (the 93rd
unit of that run) and used to test an engine swap incorporating the
Packard-built V-1650-3 engine. A number of other modifications were incorporated
and it became the XP-51B. Once the engine was changed to a Packard built V-1650
Merlin engine and later engine versions it became the classic P-51B/C/D Mustang
that was an icon of WWII.
Fortunately XP-51 s/n 41-038 has been restored and is kept at the EAA Museum. The EAA Aviation Museum’s XP-51 was acquired by EAA after years in storage at the Smithsonian’s National Air and Space Museum. It was completely restored in 1975-1976 by Darrell Skurich of Fort Collins, Colorado, and flew in the Oshkosh air show from 1976 until Paul Poberezny made the final flight in late 1982. The EAA Museum is at 3000 Poberezny Road in Oshkosh, Wisconsin, 54902. Excellent color photographs of the XP-51 are on the EAA website to help with your build effort.
You might see some pictures in print or on the web of something that looks like the XP-51 s/n 41-039. It is actually not XP-51 s/n 41-039 but a P-51A serial number 43-6006 NAA construction number 99-22109 which has been painted to look like XP-51 41-039. The P-51A you may have seen was delivered to the Army Air Corps at Ladd Field, Fairbanks AK on May 1, 1943. It crashed near Summit Alaska and its Pilot, Lt. Edward W. Getter was killed on February 16, 1944. Years later it was discovered by some moose hunters and in 1977 Waldon "Moon" Spillers recovered the wreckage, spent eight (8) years to restore it in Ohio. It flew again on July 3, 1985. It was restored to P-51A specs by John Muszala at Pacific Fighters. It flew in some Reno races as #6. After the races they repainted it by adding some nice touches to make this “A “ model look like the XP-51. This time period gave rise to many color photos on the web of what appeared to be one of the XP-51 airframes marked “1039” (but it wasn’t actually the XP-51 s/n 1039).
| THE KIT |
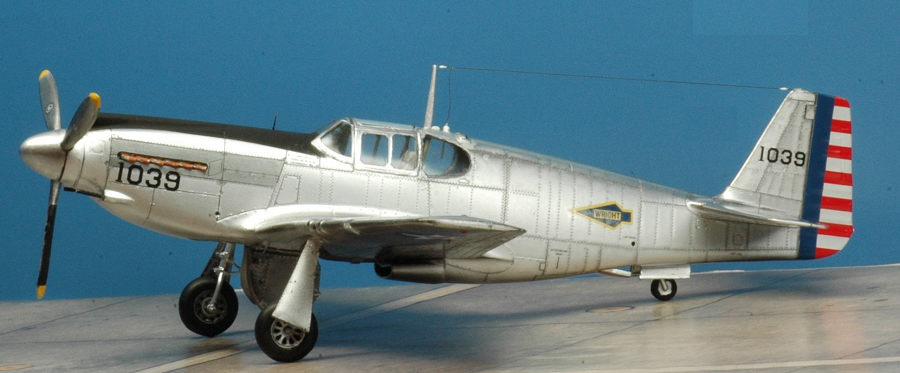
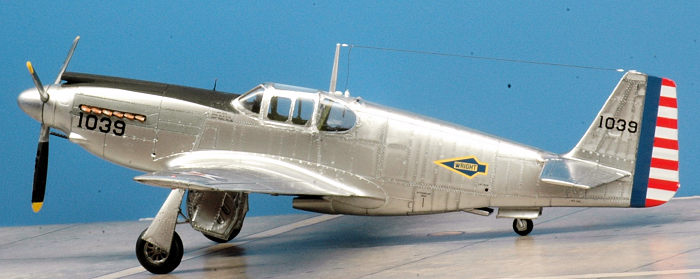
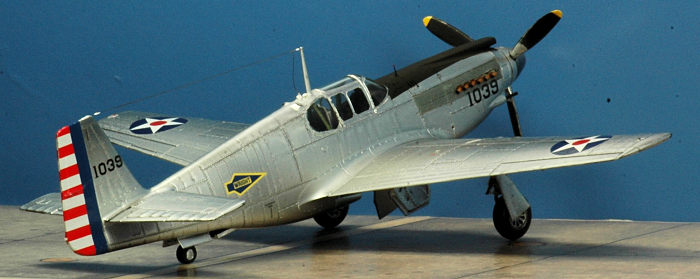
Halberd is a Ukrainian based company producing very high quality resin aircraft kits and conversions in 1/48th and 1/32nd scale. This kit is of the Halberd 1/48 XP-51 Mustang. It represents one of the early XP-51 Mustang prototypes, specifically the XP-51 s/n 41-039.
Excellence in resin should be Halberds middle name. A test fit of the kit showed no fit problems. My build confirmed that it fits very well and usual wing to fuselage join gap problems were not present. When the fuselage was mated to the one piece cast wing they clicked together in a tight perfect fit! The fuselage halves are thin and finely cast. No excess resin needed removal or trimming was required, just some light mating surface sanding to ensure an unobstructed close fit. I did do a light pass to clean up very small post-casting edge roughness but it was really a minor assembly cleanup. Surface details rival mainstream injection plastic kits. This kit is complete with all parts and decals provided for a finished model. No donor kit is required. No etched parts provided. Clear parts are very clear and cast in clear resin.
The kit was acquired direct from their website: https://www.halberdmodel.co/ .
 Overall I am
very impressed with the kit and can highly recommend it. The only other
observations of minor concern would be there may be some leftover design
components from using the Accurate Miniatures P-51 Allison engine series as the
donor design basis. The wing underside might be based on one of the Accurate
Miniatures P-51 kits because it only has two underwing shell ejection chutes per
side. The problem is there are three wing guns in the XP-51 and probably three
chute exits underwing. Halberd correctly incorporated the three guns per wing
layout on the leading edge in a beautifully cast representation but omitted
changing the shell chute configuration on the wing underside since only two
chutes instead of three per wing are present (?).
Overall I am
very impressed with the kit and can highly recommend it. The only other
observations of minor concern would be there may be some leftover design
components from using the Accurate Miniatures P-51 Allison engine series as the
donor design basis. The wing underside might be based on one of the Accurate
Miniatures P-51 kits because it only has two underwing shell ejection chutes per
side. The problem is there are three wing guns in the XP-51 and probably three
chute exits underwing. Halberd correctly incorporated the three guns per wing
layout on the leading edge in a beautifully cast representation but omitted
changing the shell chute configuration on the wing underside since only two
chutes instead of three per wing are present (?).
The spinner is of the right shape and fits well but the propeller and the prop tips are a bit on the thick side as well. A small bit of sanding thinning each prop improved its appearance for my needs.
Before the release of the Halberd XP-51 kit you could get a model close to the XP-51 (that is the Mustang Mk. I) as a conversion using the using the Ultracast Mustang MK.I conversion 48031 RAF-RCAF Mustang Mk.I Mustang Conversion for the Accurate Miniatures 3410 kit (North American RAF MK-1A Mustang). If you take this path decal markings for an XP-51 could be sourced from aftermarket decals like the Ministry of Small Aircraft Production 48033 P-51 & A-36A Mustangs or Ventura Decals V4869 (revised) Spitfire and XP-51 Mustang Prototypes. But now we have a very nice complete XP-51 kit thanks to Halberd.
The kit has about 37 parts, all cleanly molded. The clear resin is very clear and thin like mainstream injected plastic parts. A three page double sided color printed assembly instruction booklet is provided. One clearly printed decal sheet has all the needed markings including stencils. They went on without any problems. My only concern was the instrument panel background is gray on the decal sheet and I believe historical photos show it to be flat black.
| CONSTRUCTION |
Following the kit instructions
leads to a pleasant build experience. I was very deliberate in my build using
Gorilla Super Glue Gel to place parts, and before it cured closing the fuselage
halves and holding them together with clamps to confirm placement allowing the
gel to set hard and lock in the positioning of the part. Once the glue join
hardened overnight I placed some Aves Apoxie sculpting medi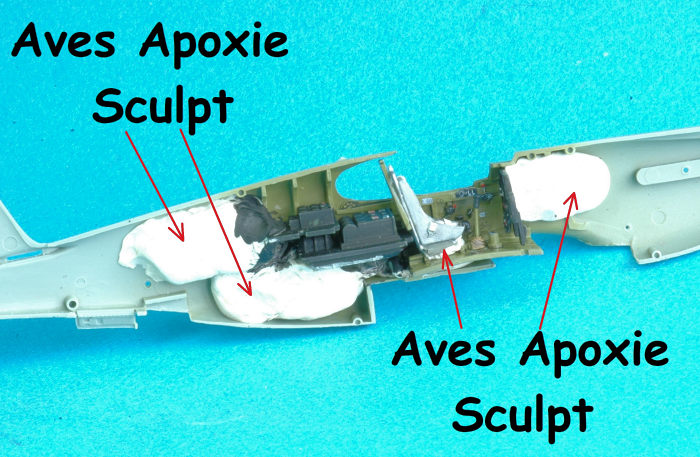 um
in a position to firmly hold the recently glued in item in place before adding
the next part. I have found doing this avoids the occasional slipped out of
place part that sends a build out of alignment for some kits. It worked and
everything fit and never lost its proper alignment or position during assembly.
It does however add time to the build cycle.
um
in a position to firmly hold the recently glued in item in place before adding
the next part. I have found doing this avoids the occasional slipped out of
place part that sends a build out of alignment for some kits. It worked and
everything fit and never lost its proper alignment or position during assembly.
It does however add time to the build cycle.
Assembly of the cockpit parts was the first step. I first painted them Gunze Aqueous H58 Interior Green for the interior zinc chromate green components or flat black for most other cockpit parts. Halberd’s instructions don’t provide any color or painting information other than “silver” for the airframe with the large beautiful one page color profile used for decal placement.
I enhanced the cockpit by adding some aftermarket components from the Eduard Space 3DL48002 3D printed P-51 cockpit. The seat belts came from the Quinta Studio QD48500 P-51B interior 3D decal product. There is a Quinta component in the P-51B product labeled QP48027 USN Seat Belts which is the part I used for seatbelt restraints. It has an excellent texture and is in the white canvas color I wanted to use. Just be careful not to fold it too often or too much because it will fracture. Other decal detail pieces came from the Furball Aero-Design 48-096 P-51D Cockpit Detail decal.
 I used the
brass Master Model AM48-139 P-51D Armament and Gunsight product for the parts
representing the “iron gunsights” components. The bead sight was attached to the
kit resin gunsight and the post component glued into a hole on the upper cowl on
the right side front cowling. The Eduard P-51B/C etched kit parts have these
parts as etched metal but I really like the size accuracy and 3D size and
appearance of the Master Model brass components in 1/48th scale.
I used the
brass Master Model AM48-139 P-51D Armament and Gunsight product for the parts
representing the “iron gunsights” components. The bead sight was attached to the
kit resin gunsight and the post component glued into a hole on the upper cowl on
the right side front cowling. The Eduard P-51B/C etched kit parts have these
parts as etched metal but I really like the size accuracy and 3D size and
appearance of the Master Model brass components in 1/48th scale.
The EAA museum XP-51 cockpit has a rearview mirror similar to the one seen in the Eduard R0019 P-51B Royal Class kit instructions on page 15, step M, part #K9 or L12. If you’re interested in some extra cockpit enhancement this would an accurate addition to place this Eduard plastic inside rear-view mirror into the Halberd cockpit based on the EAA color cockpit photos.
I did use some Mr. Surfacer 500 and 1000 to some fuselage joins to get a seamless look or where the cyano glue separated or cracked on a fuselage seam. There were no major gaps to be fixed since overall it was a close fitting kit. Since the wing is one part and it is a very tight fit with the airframe there was no filler required for that area. That means a fast assembly of these components and a race to finish the kit.
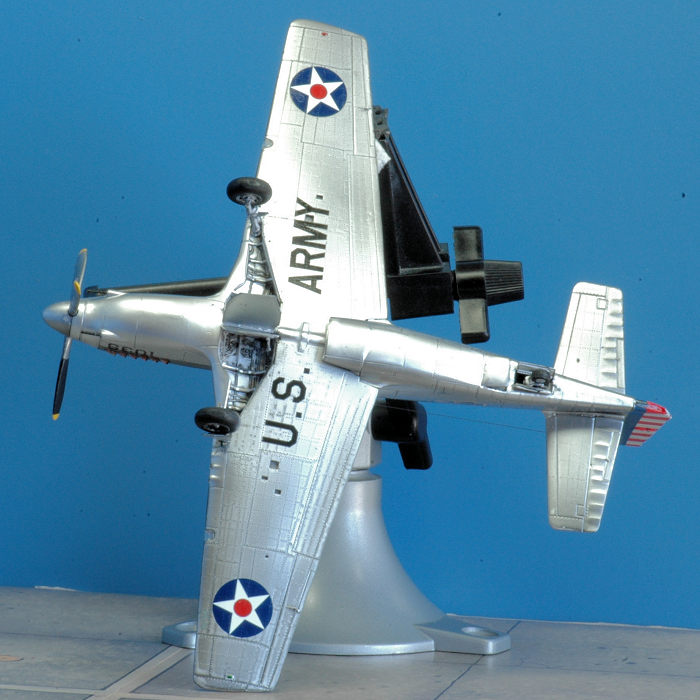
A very valuable aid in finishing the antenna array can be found on page 17 of the Valiant Wings Airframe & Miniature No. 6, The North American P-51 Early Mustang reference book. Page 17 shows five black & white side-view profiles for XP-51 41-039 at five different time periods which explains the differences in many reference photos of the same airframe 41-039. That helped clear up photo reference confusion for me!
 I used Alclad
II ALC-126 Hi-Shine Plus Aluminum for the overall finish. Gunze Aqueous and
Tamiya acrylics were used for the interior cockpit and other small detail parts,
anti-glare panel, tires etc.
I used Alclad
II ALC-126 Hi-Shine Plus Aluminum for the overall finish. Gunze Aqueous and
Tamiya acrylics were used for the interior cockpit and other small detail parts,
anti-glare panel, tires etc.
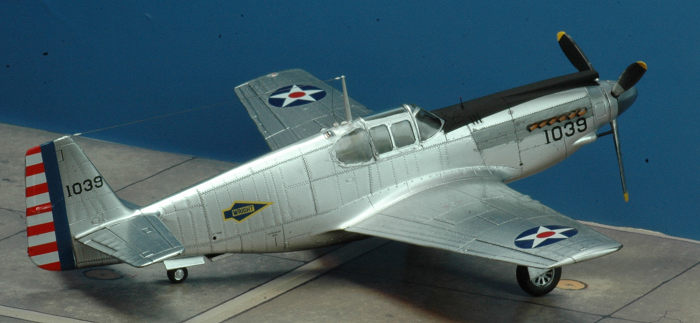
Kit decals were used for the XP-51 41-039 airframe. National markings were from the excellent fundekals:) FD48035 US National Insignias 1919-1942 to get the version I wanted to model.
The antenna array and the national insignias changed over the life of the XP-51airframe. The Halberd kit reflects the late second stage of the XP-51 airframe with an Antenna Mast AN-104-A while the initial scheme and later stages used other antenna configurations. The national insignia changed also depending on the time period. I used one from the fundekals:) FD48035 US National Insignias 1919-1942 for my build and not the Halberd kit decal national insignia in order to get the early airframe I was modeling. The antenna wire came from E-Z-Line and the IN-79 and IN-88 antenna insulators were scratch made from a custom mix of old Tamiya paints that are too thick to spray but had just the right viscosity for creating very small components. I initially tried to make the insulators from Apoxie Sculpt but the insulators are so small despite some tiny part sanding and filing they looked oversized on my first attempt. I had to use plan “B” which was to use a very viscous old white acrylic paint with a clear coat to create a porcelain effect painted onto a very thin piece of guitar wire then shaped it to its final look by light sanding. The IN-79 is the large bell shaped insulator on the spine of the XP-51 after the antenna mast and seen on many P-51B/C airframes. The IN-88 is the small cylindrical shaped insulator found almost at the end of antenna wires to insulate them from metal contact. I also added a white navigation light between the antenna mast and the IN-79 insulator.
| COLORS & MARKINGS |
I used Alclad II ALC-126 Hi-Shine Plus Aluminum for the overall finish with some Tamiya panel washes. Gunze Aqueous and Tamiya acrylics were used for the interior cockpit small detail parts, anti-glare panel, tires etc.
Kit decals were used for XP-51 41-039 airframe. National markings were from the excellent fundekals:) FD48035 US National Insignias 1919-1942.
| CONCLUSIONS |
Halberd has provided an excellent product. I was delighted building this kit and adding it to my collection of P-51 Mustang’s. The detailing on the resin parts is so crisp and petite that it has to be held in your hands and looked at closely to appreciate the quality of product Halberd provides. All the small details are there for the XP-51. I have built several of their kits and conversions and thank them for their choice in subject matter and high quality product. It makes for very enjoyable modeling!
| REFERENCES |
Detail and Scale series Volume 21, P-51 Mustang Part 1: NA-73X through P-51A - The Allison Engine Variants (2025)
Valiant Wings Airframe & Miniature No. 6, The North American P-51 Early Mustang, pages 16-17 (2013 and revised 2024)
1 April 2025 Copyright ModelingMadness.com. All rights
reserved. No reproduction in part or in whole without express permission from
the editor. If you would like your product reviewed fairly and fairly quickly, please contact the editor or see other details in the
Note to
Contributors. Back to the Main Page
Back to the Review
Index Page
Back to the Previews Index Page