Revell 1/32 P-51D (early)
| KIT #: | 5989 |
| PRICE: | $31.00 |
| DECALS: | Two options |
| REVIEWER: | John Summerford |
| NOTES: | Quinta Studio decals QD32005 used for the cockpit and Eduard decals from set D32010 for the exterior. |
| HISTORY |
Built by the North American Aviation Company, the P-51 Mustang was perhaps the best all-around fighter plane in the American armed forces during WWII. Numerous books have been written about the Mustang and many kit manufacturers have at least one version in their inventories. One can also find many after-market parts and decals for the models.
| THE KIT |
In this example, Revell has produced a well detailed early variant of the -D model. The large-ish box holds Three bags of nine light gray sprues and one small bag of clear parts. The parts are well molded and have nice detail. An engine is not included, nor are there any photo-etch parts. Build options are; radiator doors open or closed, choice of lower cowl vents or none, landing gear down or the wheel bays closed, flaps up or down, open or closed canopy, and the choice of two different drop tanks or bombs.
 A 20-page booklet holds the assembly, paint, and decal
instructions. Instead of a map, two pages are devoted to a chart of part numbers
and the part names in English, French, and Spanish. Decal options are for
“Cripes A Mighty 3rd” flown by Major George Preddy Jr. and the plane
on the box lid, “Frenesi”, the mount of Lt. Cdr. Thomas L. Hayes
A 20-page booklet holds the assembly, paint, and decal
instructions. Instead of a map, two pages are devoted to a chart of part numbers
and the part names in English, French, and Spanish. Decal options are for
“Cripes A Mighty 3rd” flown by Major George Preddy Jr. and the plane
on the box lid, “Frenesi”, the mount of Lt. Cdr. Thomas L. Hayes
Typically, the build starts with the cockpit and continues through seven steps. The radiator is built up next. After fuselage details are installed, the two sub-assemblies are installed, the fuselage closed up and the nose details added.
The wheel wells and wing leading edges are built up over the next four steps, then mated to the fuselage. Details for the radiator follow, then the control surfaces. Canopy, landing gear, and prop are added next. The final bits are the underwing stores, pitot, and conclude in step 59 with the radio mast.
| CONSTRUCTION |
Before examining where the Quinta
Studio decals fit, the interior parts were primed and painted interior green. A
wood-grain decal was laid on the cockpit floor piece. The Quinta Studio decals
are for the Tamiya kit, so the parts references are not valid for this build. A
lot of time was spent figuring out what item went where and which pieces needed
to be glued together. As a test, the radio was done first to learn how the
decals behaved. The next test were the seat belts and with discreet use of cyano
glue they were arranged with a fairly natural drape to them. Si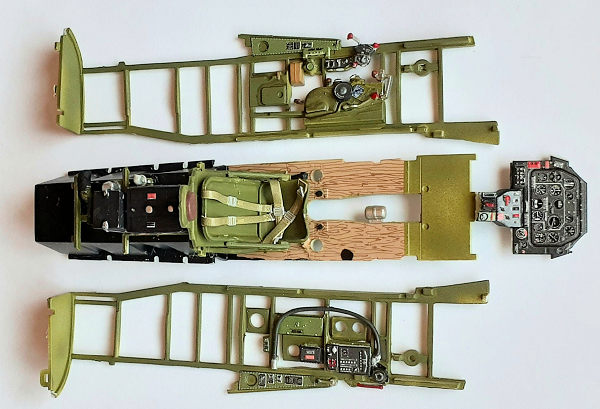 de wall detail
was straight forward. Detail on the instrument panel was ground off and the
decal laid on the bare plastic. Revell’s lower panel is slightly wider than
Tamiya’s and that wasn’t discovered until the attempt to maneuver the instrument
panel decal in place. By the time the plastic was trimmed, the decal was too dry
and attempts to use Future for adhesion failed. A film of epoxy did the trick.
de wall detail
was straight forward. Detail on the instrument panel was ground off and the
decal laid on the bare plastic. Revell’s lower panel is slightly wider than
Tamiya’s and that wasn’t discovered until the attempt to maneuver the instrument
panel decal in place. By the time the plastic was trimmed, the decal was too dry
and attempts to use Future for adhesion failed. A film of epoxy did the trick.
One very annoying aspect of the kit that became apparent quickly, was that the parts are not grouped together on the sprues, nor are they numbered sequentially. A lot of time was spent looking for pieces and there was one that I couldn’t find, so it was fabricated. Another annoying item was wide gap that appeared at the rear bulkhead where the sidewall pieces mate. This caused problems getting the fuselage halves to mate during test fitting, so the sidewalls were sanded down.
Other subassemblies that need to be put together before closing up the fuselage halves are the exhaust stubs (with or without shrouds) and radiator/tail wheel well. Options for both are for on the ground or in flight. The fuselage seam was minimal. After that, nose details were added.
Thinking that it would be easier to address the seam of the windshield without the wings in place, it was installed next. It was masked first, then the coaming and gunsight glued in place. Fortunately, the seam with the fuselage was easy to deal with.
Next up was the wing assembly, which started with the spar and wheel wells. Holes for the drop tanks needed drilling and the ID lights in the underside of the right wing painted and glued. Top and bottom wings sandwich the pieces as they come together. Another nice piece of engineering is the use of oversized pins and sockets at the trailing edge to ensure proper alignment.
 Clever engineering but poor
execution are the gun ports/leading edge pieces. These were drilled open for the
guns before gluing. The right one fit near perfectly, but the left one required
several sessions of filling, sanding, and re-scribing to look good.
Interestingly, the control stick is added to the top side before mating the
wings to the fuselage. With a little filing along the left side leading edge and
some pressure while the glue was curing, a tight, no-filler, seam resulted.
Clever engineering but poor
execution are the gun ports/leading edge pieces. These were drilled open for the
guns before gluing. The right one fit near perfectly, but the left one required
several sessions of filling, sanding, and re-scribing to look good.
Interestingly, the control stick is added to the top side before mating the
wings to the fuselage. With a little filing along the left side leading edge and
some pressure while the glue was curing, a tight, no-filler, seam resulted.
As per usual with P-51s, the radiator scoop came next and it assembles in a conventional manner. The parts breakdown results in some seams that need filling, so extra attention was paid in this area.
After the addition of the bottom cowl piece, the control surfaces can be added to the wings. The flaps were left off for installation after painting, which facilitated handling. A tight fit of the stabilizer pieces was found. Again, the elevators and rudder pieces were left off for later.
Canopy detail pieces were added to the clear piece, then it was masked and tack glued in the closed position to act as a mask for the cockpit. The wheel wells were masked and the painting process could begin.
| COLORS & MARKINGS |
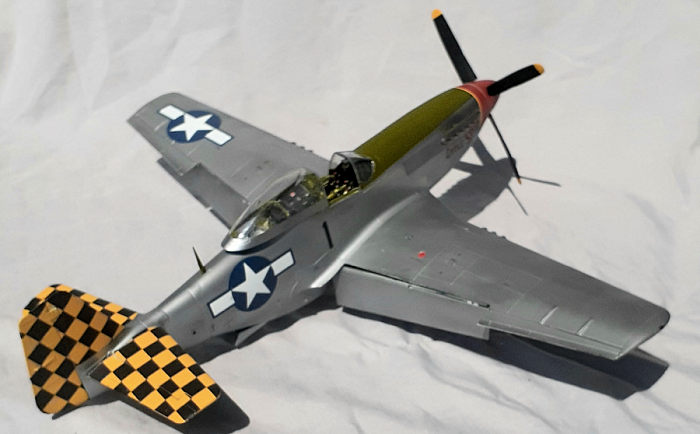
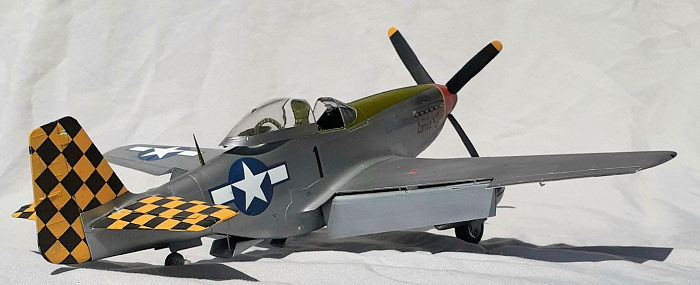
Using Alclad’s light gray primer, the entire model was coated. The tail feathers and small band just forward of the exhaust stubs were sprayed yellow. Those areas were masked before the nose and spinner were painted red. When the red had cured, the antiglare panel was masked for and painted, followed by masking that in preparation for the gloss black base of the natural metal finish paints.
 So of course, it wasn’t until after
I had a coat of aluminum down that I noticed numerous flaws that needed
attention. Several sessions of filling and light sanding followed before
proceeding with the next coat of paint. Various panels were masked and painted
different shades of metal, including stainless steel around and behind the
exhaust stubs.
So of course, it wasn’t until after
I had a coat of aluminum down that I noticed numerous flaws that needed
attention. Several sessions of filling and light sanding followed before
proceeding with the next coat of paint. Various panels were masked and painted
different shades of metal, including stainless steel around and behind the
exhaust stubs.
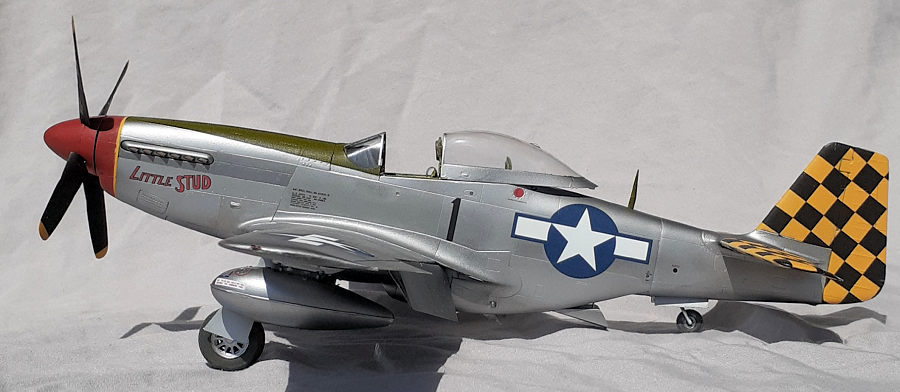
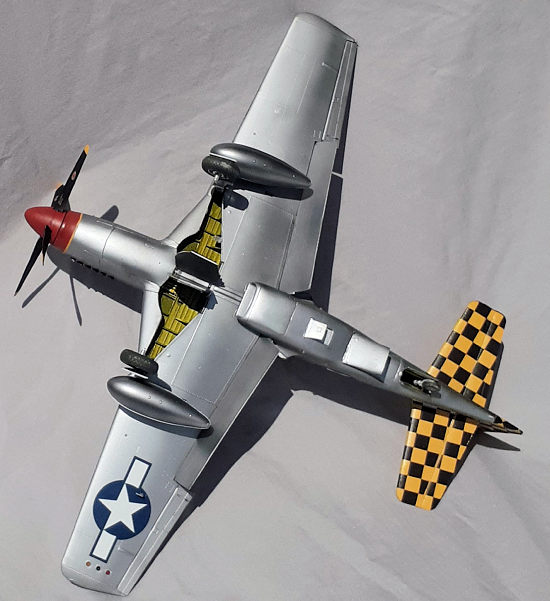
When it became time for decaling, Lt. Col. Bob Baseler’s mount from the 325th FG, 15th Airforce stationed in Italy during the fall of 1944 was chosen. The undersides of the elevators were used as test surfaces. The results showed that the decals behave nicely, but the checkerboards were slightly oversized. With that in mind, the elevators and rudder were glued in place and the decaling continued.
Eduard’s insignia are a lighter blue than the kit decals. I didn’t notice that until they had dried on the model. To my eye, the kit decals have the more the accurate hue. Stencils came from the kit’s sheet. A coat of satin varnish toned downed the gloss and seal the decals.
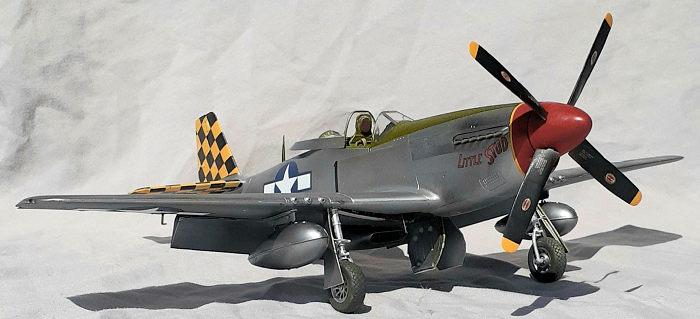
Attention turned the underside, where the radiator and oil cooler doors, landing gear and doors, pitot, and drop tanks were added. That left the addition of the flaps, antenna mast and aerial, canopy, and prop to finish the model.
| CONCLUSIONS |
 After three previous attempts at a
large-scale mustang, I finally have a good-looking P-51 in about 30 hours. If
you want to build a contest winner, you’d probably be better served by using the
Tamiya kit—at somewhere around three times the cost. If you don’t mind filing
down the heavy sprue gates and finessing the fit at times, you’ll have a fine
model. Revell’s kit outclasses the venerable Hasegawa kit. The olive drab over
neutral gray paint scheme option provided by “Frenesi” is a nice alternative for
those who don’t want to spend a lot of time on a NMF model.
After three previous attempts at a
large-scale mustang, I finally have a good-looking P-51 in about 30 hours. If
you want to build a contest winner, you’d probably be better served by using the
Tamiya kit—at somewhere around three times the cost. If you don’t mind filing
down the heavy sprue gates and finessing the fit at times, you’ll have a fine
model. Revell’s kit outclasses the venerable Hasegawa kit. The olive drab over
neutral gray paint scheme option provided by “Frenesi” is a nice alternative for
those who don’t want to spend a lot of time on a NMF model.
Regardless of which kit you choose to build, it’s definitely worth spending the extra money for Quinta Studio decals.
2 February 2023
Copyright ModelingMadness.com. All rights reserved. No reproduction in part or in whole without express permission.
If you would like your product reviewed fairly and fairly quickly, please contact the editor or see other details in the Note to Contributors.