Dora Wings 1/48 P-47D-2 Thunderbolt
| KIT #: | DW 48055 |
| PRICE: | $55.00 |
| DECALS: | Three options |
| REVIEWER: | David C Jones |
| NOTES: | Minor conversion |
| HISTORY |
The P-47 Thunderbolt is very well known for its service in the European theatre in World War 2 and needs little introduction. Their colorful markings are widely known by any fan of the 8th Air Force alone. Bearing this in mind, I wanted to do something a little different and chose to do an early P-47 in the Pacific.
| THE KIT |
When the early P-47s from Dora Wings came out in 2023, they filled in the important gap of the early flat keeled members of the Thunderbolt family. Dora Wings made a B and C Model and have had a D model listed for some time but considering I had an extra C model gifted to me, I decided to modify it into an early D on my own.
The following modifications were made to the kit:
 -Two extra
cowl flaps on either side of the cowling made from Evergreen white plastic.
-Two extra
cowl flaps on either side of the cowling made from Evergreen white plastic.
-A new resin seat from Quickboost.
-Master Model brass gun barrels.
-Red Roo Models Brisbane fuel tank.
-Markings from Furball Designs.
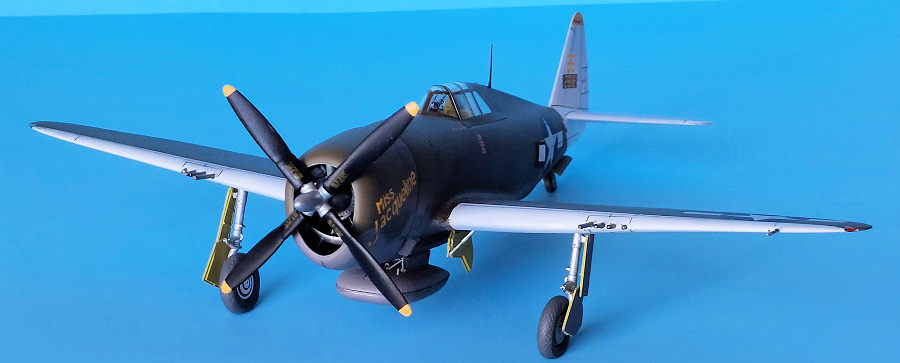
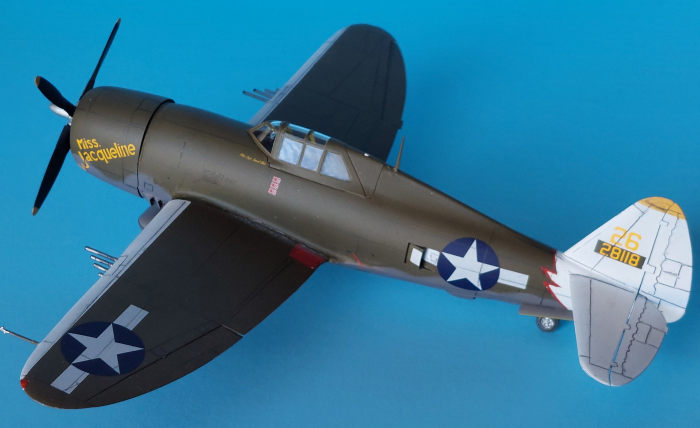
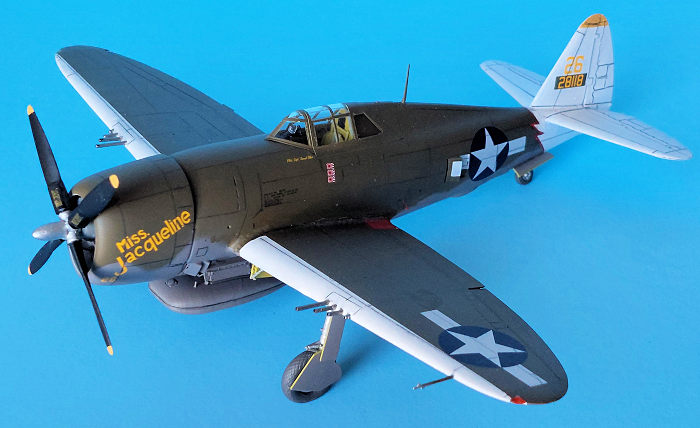
As I wanted to do a Pacific bird with an Australian-built Brisbane fuel tank, I set my sights on Neel Kearby’s “Fiery Ginger” but found so much conflicting in information about Kearby’s various planes that I decide to do another airframe. I eventually chose serial number 42-8118, “Miss Jacqueline” flown by Captain Samuel Blair of the 431st Fighter Squadron while it was based at Durand, New Guinea in August of 1943.
About the Brisbane Fuel Tank:
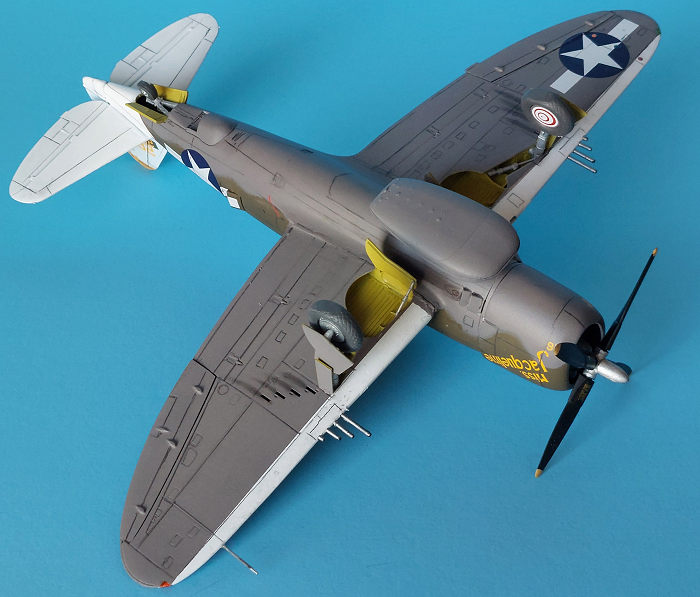
Part of my reason I chose to build this plane centered around the unusual drop tank, so a little history is needed. Since early Thunderbolts were not fitted with wing pylons or a bulged keel for drop tanks, they suffered from short range. A local solution was needed in the Pacific. The Ford Motor Company in Brisbane, Australia produced a 200-gallon centerline drop tank to remedy this.
This new tank was available in August of 1943 and about 3,000 were produced. Given it resembled the later Republic ‘flat’ drop tank that was put into service later, the Brisbane tank is often mistaken for one. Red Roo Models makes a very nice 3D printed one so fuel tank in hand; I started my flat keel P-47D.
| CONSTRUCTION |
 began
with the additional cowl flaps which basically was a matter of sawing rectangles
out of the cowl halves and inserting four new flaps made from sheet plastic. It
took all of 20 minutes per side to get everything in place and sanded to fit.
began
with the additional cowl flaps which basically was a matter of sawing rectangles
out of the cowl halves and inserting four new flaps made from sheet plastic. It
took all of 20 minutes per side to get everything in place and sanded to fit.
After that I turned my attention to the well detailed cockpit. The Dora Wings seat and seatbelts were surprisingly clunky compared to the rest of the interior, so I picked up an early P-47D seat from Quickboost to replace them. Aside from the seat, the cockpit was assembled per the instructions.
I painted the cockpit tinted zinc chromate yellow-green rather than Republic’s dark interior green that was used in most P-47s. The jury is still out as to when the switch was made between the two colors other than “early in the D production run” so I went with the yellow-green to add some interest.
The wings were next and given the complexity of the wheel bays everything had to be carefully aligned to ensure a good fit. I had to check photos of the real thing to get it right as the placement guide is a bit ambiguous. The fit was generally good and other than leaving the gun barrels out (I planned to install turned brass barrels later), it was straight from the box.
 Turning
back to the fuselage, I had trouble with the wing spar that fits through the
fuselage not fitting with the wings. Even after numerous test fits and
adjustments, there was a gap, (both top and bottom) between the wings and
fuselage. In the end, the spar’s dihedral was perfect, but the gaps remained. I
filled the seams with Tamiya putty and sanded them smooth.
Turning
back to the fuselage, I had trouble with the wing spar that fits through the
fuselage not fitting with the wings. Even after numerous test fits and
adjustments, there was a gap, (both top and bottom) between the wings and
fuselage. In the end, the spar’s dihedral was perfect, but the gaps remained. I
filled the seams with Tamiya putty and sanded them smooth.
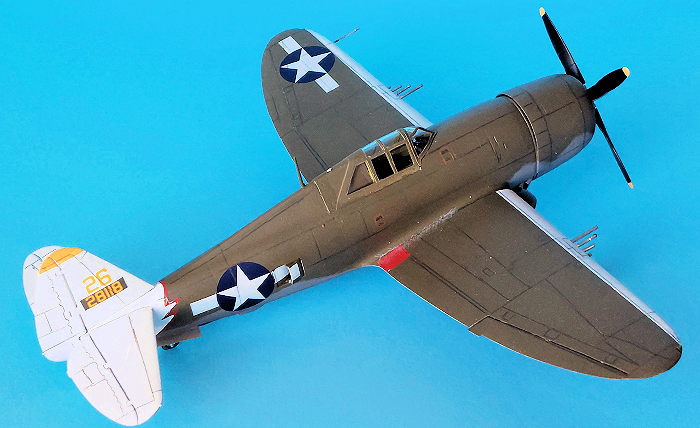
Next was the rest of the fuselage assembly which was the flat keel, turbo-supercharger and tailwheel mount. They all required minor putty work. There was also the engine cowl which went together nicely, and its interior was painted anodized aluminum before the assembly was friction fitted in place. After that the tailplanes were attached, and the kit was off to the paint shop for a coat of Tamiya Gray Primer. The panel lines of the kit are very delicate, and I ended up reengraving a lot of lost detail from the multiple putty/primer sessions.
A word about the sliding canopy section: The fit on mine was atrocious. I attached it after painting and had a real mess on my hands. I advise mounting it at this point, before painting, so it can be sanded and filled to fit properly.
| COLORS & MARKINGS |
Once I finished restoring the surface detail, I painted the leading edges of the wings and the entire tail section with Tamiya White Pacific Theatre markings.
As it turned out, “Miss Jacqueline” had the leading edge of the white tail section in a lightning bolt pattern with a red stripe (provided by Furball Designs decal sheet) that required a bit creative of masking before applying the Olive Drab/Neutral Gray camouflage. I photocopied the lightning bolt pattern on the decal sheet to make masks for the tail.
 Then all
the white was masked off, and I painted the topsides Olive Drab from the ATOM
paint line by Ammo. Once the Olive Drab was dry, I masked it off and sprayed the
Neutral Gray underneath. The ATOM paint went on thin and opaque, and I was
pleased with the results.
Then all
the white was masked off, and I painted the topsides Olive Drab from the ATOM
paint line by Ammo. Once the Olive Drab was dry, I masked it off and sprayed the
Neutral Gray underneath. The ATOM paint went on thin and opaque, and I was
pleased with the results.
After the inevitable paint touch-up, I took it back to the paint shop for a coat of Tamiya Gloss to prep it for decals. I’d never used Furball Design decals before, but they are printed by Cartograph and are excellent quality. They went on flawlessly and were sealed with Tamiya Flat.
Once the airframe painting was completed, I installed the engine, landing gear, Brisbane fuel tank and other fiddly bits before weathering with pastel chalks and pencils. After the weathering was done, I sealed it with another coat of Tamiya flat.
| CONCLUSIONS |
This kit turns out to be a very nice early P-47 when built with care and I would recommend it to anybody that has a few limited run kits under their belt. The cowl flap modifications are very simple as well.
| REFERENCES |
There are a lot of P-47 books out there but the primary ones I used for this build were:
Kearby’s Thunderbolts: The 348th Fighter Group in World War II by John C. Stanaway
Pacific Profiles Volume 10: Allied Fighters: P-47D Thunderbolt series Southwest Pacific 1943-1945 by Michael John Claringbould
P-47 Thunderbolt in Detail & Scale by Bert Kinzey
Happy Modeling!
22 January 2026
Copyright ModelingMadness.com. All rights reserved. No reproduction in part or in whole without express permission.
If you would like your product reviewed fairly and fairly quickly, please contact the editor or see other details in the Note to Contributors.