Monogram 1/48 P-40B Warhawk
| KIT #: | 5209 |
| PRICE: | €5 in 2002 |
| DECALS: | Three options |
| REVIEWER: | Spiros Pendedekas |
| NOTES: |
| HISTORY |
Conceived as a pursuit aircraft, the
P-40B was agile at low and medium altitudes but suffered from a lack of power at
higher altitudes. At medium and high speeds it was one of the tightest-turning
early monoplane designs of the war and it could out turn most opponents it faced
in North Africa and the Russian Front. In the Pacific Theater it was out-turned
at lower speeds by the lightweight Oscars and Zeros (which lacked, though, the
P-40's structural strength for high-speed hard turns). Clive Caldwell (RAAF),
the highest scoring P-40 ace, said that the P-40 had "almost no vices", although
"it was a little difficult to control in terminal velocity".
The First American Volunteer Group (AVG) of the Republic of China Air Force,
nicknamed “The Flying Tigers”, was formed to help oppose the Japanese invasion
of China. Operating in 1941–1942 and commanded by Claire Lee Chennault, it was
composed of pilots from the United States Army Air Corps (USAAC), Navy (USN),
and Marine Corps (USMC). Their Curtiss P-40B Tomahawk aircraft, marked with
Chinese colors, flew under American control.
 The Flying Tigers began to arrive in China in April 1941, with the group seeing
combat on 20 December 1941, 12 days after the Pearl Harbor Attack. Chennault
received crated Model P-40Bs which his airmen assembled in Burma at the end of
1941, adding self-sealing fuel tanks and a second pair of wing guns, such that
the aircraft became a hybrid of B and C models. Since they had no radios, the
AVG improvised by installing a fragile radio transceiver that was originally
fitted to the Piper Cub.
The Flying Tigers began to arrive in China in April 1941, with the group seeing
combat on 20 December 1941, 12 days after the Pearl Harbor Attack. Chennault
received crated Model P-40Bs which his airmen assembled in Burma at the end of
1941, adding self-sealing fuel tanks and a second pair of wing guns, such that
the aircraft became a hybrid of B and C models. Since they had no radios, the
AVG improvised by installing a fragile radio transceiver that was originally
fitted to the Piper Cub.
Compared to opposing Japanese fighters, the P-40B's strengths were that it was
sturdy, well armed, faster in a dive and possessed an excellent rate of roll.
Whereas in slow, turning dogfights it could not match the maneuverability of the
Ki-27 and Ki-43, let alone the Zero, at higher speeds it was more than a match,
with Chennault training his pilots to use its performance advantages to their
benefit (like, for example the famous "boom-and-zoom" tactics).
Able to tolerate harsh environmental conditions and with its semi-modular design
deeming it easy to maintain in the field, the plane’s most critical problem was
the lack of spare parts, the only source being from damaged aircraft. Whereas
P-40Bs were viewed as cast-offs that no one else wanted, dangerous and difficult
to fly, the AVG pilots did appreciate the type's features and took the most out
of the plane.
The AVG was highly successful, and its feats were widely publicized by an active
cadre of international journalists to boost sagging public morale at home.
According to its official records, in just 6+1⁄2 months, the Flying Tigers
destroyed 297 enemy aircraft for the loss of just four of its own in air-to-air
combat.
| THE KIT |
Yes, this is the venerable (and
beloved through the years) Monogram kit that too many modelers have built
through the years, It was first issued in 1964 and has been reboxed in total 19
times ever since (also by Revell, Hasegawa, Bandai, the last reissue taking
place in 2010 by Revell) with the molds totally unchanged! The specific kit was
the 1991 Monogram version, coming in a small flimsy (typical for Monogram back
then) box. The attractive box art portrays “Johnny” Farrell’s machine (carrying
a drop tank, which is wrong for this version).
 Upon opening the box, I was greeted with a bag containing 55 dark drab styrene
pieces, arranged in three sprues. Surface detailing is, understandably, raised
but satisfactory (if not tad heavy). A number of ejector pin marks are evident,
with many of them not only visible after construction, but also difficult to
remove without compromising the surrounding details. Molding presents
quite a bit of flash, meaning that, already from 1991, the molds had showed
their age (our Editor previewed the 1973
boxing,
which he found
relatively flash free, whereas Tom Cleaver was lucky enough in 2003 to get his
hands on an initial release molding, finding the parts absolutely crisp - and
making a fantastic
Charles Older's Flying Tiger out
of it). As a note, plastic is quite thinner from the norm, meaning it can easily
deform, also raising worries regarding the assembled model’s structural
integrity once handled during building by not so delicate hands, like yours
truly ones!
Upon opening the box, I was greeted with a bag containing 55 dark drab styrene
pieces, arranged in three sprues. Surface detailing is, understandably, raised
but satisfactory (if not tad heavy). A number of ejector pin marks are evident,
with many of them not only visible after construction, but also difficult to
remove without compromising the surrounding details. Molding presents
quite a bit of flash, meaning that, already from 1991, the molds had showed
their age (our Editor previewed the 1973
boxing,
which he found
relatively flash free, whereas Tom Cleaver was lucky enough in 2003 to get his
hands on an initial release molding, finding the parts absolutely crisp - and
making a fantastic
Charles Older's Flying Tiger out
of it). As a note, plastic is quite thinner from the norm, meaning it can easily
deform, also raising worries regarding the assembled model’s structural
integrity once handled during building by not so delicate hands, like yours
truly ones!
Cockpit detail is good (again, taking into account the kit’s origins), but wheel
wells are nonexistent. The landing gear not only is simplified, but the main
legs retraction linkages are wrongly molded facing backwards (they should face
towards the centerline). A drop tank is provided, but it is wrong for the P-40B
version, which did not feature the necessary plumbing (drop tanks were worn from
P-40C onwards). Flaps are designed to be moveable and wheels to rotate, but I
doubt most modelers will go for these (toy-like) options. Finally, the
radiator/oil cooler triple intake has the correct shape but lacks in depth.
Clear parts look average with a lot of flash, their biggest issue being the
sprue gates that are too thick and too close to the actual parts themselves:
detaching them has little chances to be uneventful! Single-piece “closed” or
four-piece “open” options are provided. As Tom mentioned in his review, Monogram
has molded the main canopy lower frame onto the fuselage in “closed” position,
meaning you have to shave it off if you opt for an open canopy.
Instructions come in the form of a pamphlet and are typical Monogram, nice and
clear, with a small history at the front, followed by the construction sequence
spread in 23 very simple steps . Color callouts are given in generic names
throughout.
Three schemes are provided, for a U.S. ARMY, a RAF and an AVG bird. The
painting guide is provided as a means of a few b/w pics of various sides of
completed models. While these pics include co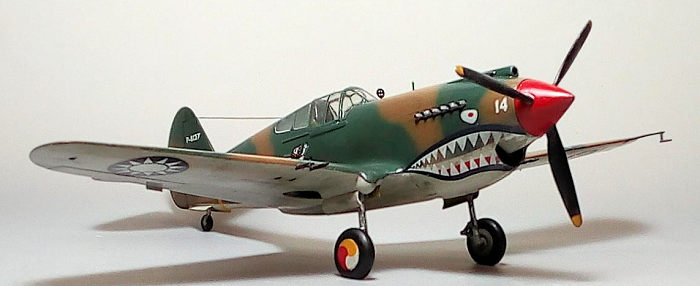 lor callouts, not only do they not
depict all angles of the color patterns, but also do not indicate which decals
go where: honestly, they are not very helpful! However, thanks (as of 2021) to
living in the Net days, the modeler can easily download the newer Revell
instructions which contain fully detailed painting and decal placing
instructions for the specific schemes. Decals themselves look well printed, and
with good base material, but their glue on the backing paper has badly yellowed
due to aging, raising fears regarding its behavior.
lor callouts, not only do they not
depict all angles of the color patterns, but also do not indicate which decals
go where: honestly, they are not very helpful! However, thanks (as of 2021) to
living in the Net days, the modeler can easily download the newer Revell
instructions which contain fully detailed painting and decal placing
instructions for the specific schemes. Decals themselves look well printed, and
with good base material, but their glue on the backing paper has badly yellowed
due to aging, raising fears regarding its behavior.
Instructions want you to first assemble the cockpit and trap it between the
fuselage halves, then mount the nose and fuselage guns, continuing by attaching
the tail planes, assembling and attaching the main wing and landing gear and
finally attaching the transparencies, for what seems to be a straightforward,
uncomplicated build.
This kit was given to me in 2002 by a friend who stopped building models.
Residing in my shelf of doom for a good 20 years, begging to be built, it
finally found its way to my bench, aimed to be given as a surprise present to my
above friend during his name day!
| CONSTRUCTION |
Since the exhaust stacks cannot be attached from the outside, construction
started by cleaning them, drilling out their exhaust tubes, then attaching them
from the inside of the fuselage halves. I proceeded by attaching the instrument
panel, cockpit floor and its rear bulkhead to the starboard fuselage half,
followed by joining the fuselage halves.
The nose section was then to be attached, where instructions wanted you to
secure the prop shaft by attaching the spinner base at the front so the rest of
the prop could be attached at later stages, whilst maintaining its ability to
rotate. This way, though, the inevitable seam between the spinner and its base
would be difficult to be taken care of at those late stages. My approach was to
insert the prop shaft from the back of the nose section and secure it with a
styrene piece glued to the nose section inner walls . Consequently, I was left
with a rotating shaft, without having to secure it in place by attaching the
spinner base on it.
. Consequently, I was left
with a rotating shaft, without having to secure it in place by attaching the
spinner base on it.
It was then wings time: having beforehand ruled out the moveable flaps option, I
attached the top wing halves to the bottom half, then attached the flaps
underneath, followed by the leading edge landing gear bulged housings. The whole
subassembly was then attached to the fuselage, followed by the tail planes and
top cowling gun housings. Fit was so-so, with the elderly mouldings not helping,
presenting at places gaps and mismatches (worst were the wing roots and flaps
area), but I somehow managed to put everything together.
The gaps were initially filled with liquefied styrene, which double acted as
bonding/fortifying agent, something the thin-plastic and flimsy-ish construction
cried for. Upon curing, the whole model was coarse sanded, then filled and
sanded smooth, with the process repeated a couple of times, as to come up with a
reasonably smooth result.
In order to have a mini break after those filling and sanding loops, I performed
the very pleasing (for a number of us) modeling act of subassembly-ing. This
included assembling the tires (which I flattened with file for “weighted”
looks), attaching the prop spinner base to the prop and putting together the
drop tank (by that time I still thought that drop tank was carried by AVG
Tomahawks, with instructions, box art and finished models pics giving a boost
towards that direction, but more on that later…).
I finally decided to lessen the plain looks of the nonexistent wheel bays, and
affixed a piece of suitable looking mesh at each bay inner top wall. I was too
lazy to fabricate side walls, so the approaching viewer will see (among others)
light coming from one bay to the other! Anyways, it was time to take the Tiger
to the paint shop!
| COLORS & MARKINGS |
AVG Tomahawks were painted with “US equivalent” colors of dark green/dark brown
over sky, for which many discussions and equal interpretations have taken place.
Choosing what looked “right to my eye”, I started by applying Hu28 Camouflage
Gray at all undersides, including gear doors, the uncovered wheel bay area, the
exposed part of the main landing gear leg, the wheel rims and
 the (sadly,
soon-to-be-tossed-away) drop tank. After drying, some more surface imperfections
became evident, so yet another (localized this time) filling and sanding session
took place, followed by repainting. After masking the undersides, I applied
Hu110 Wood on top, which, again, to my eye, came close to the “US equivalent”
RAF dark brown witnessed in pics, followed by freehanding the camo pattern with
Humbrol 30 Dark Green and my airbrush at “fine “ settings. A coat of Future
prepared the Flying Tiger for decaling.
the (sadly,
soon-to-be-tossed-away) drop tank. After drying, some more surface imperfections
became evident, so yet another (localized this time) filling and sanding session
took place, followed by repainting. After masking the undersides, I applied
Hu110 Wood on top, which, again, to my eye, came close to the “US equivalent”
RAF dark brown witnessed in pics, followed by freehanding the camo pattern with
Humbrol 30 Dark Green and my airbrush at “fine “ settings. A coat of Future
prepared the Flying Tiger for decaling.
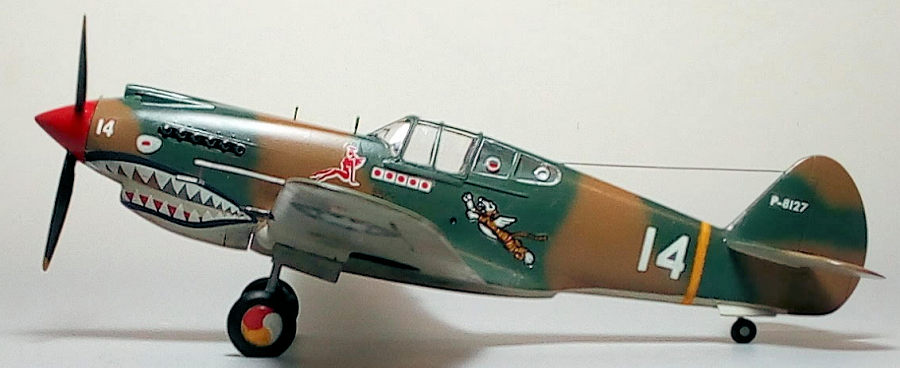
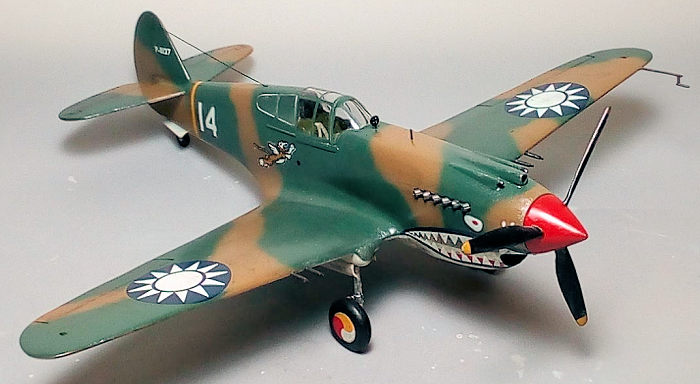
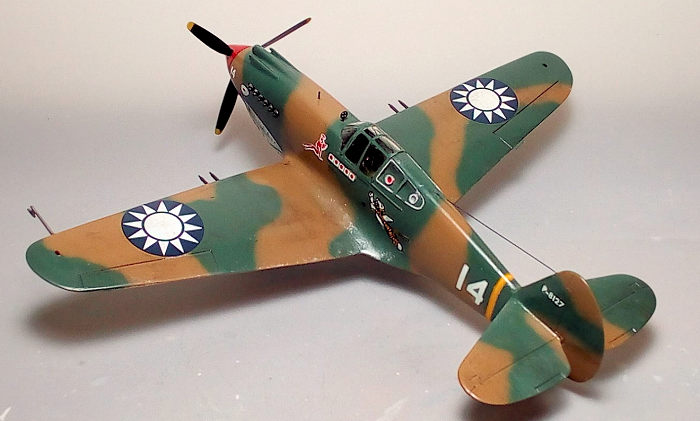
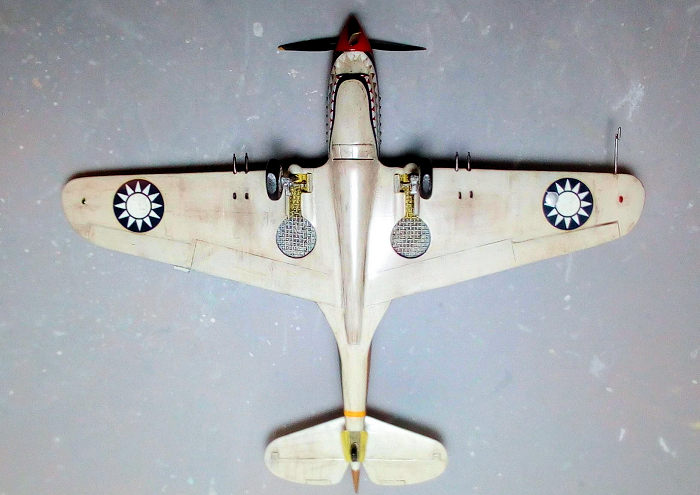
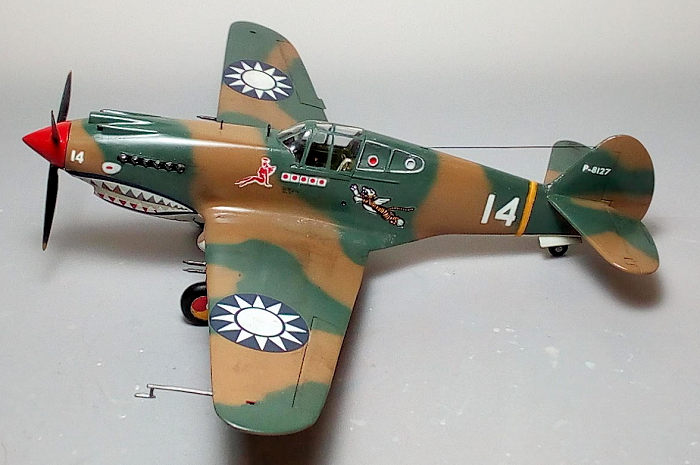
I used the kit decals, in order to represent “Johnny” Farrell's #14 machine.
While the decals themselves were in good condition, easily detaching and equally
easily applied, their gluing agent had become badly yellowed and literally
dissolved to a sludgy residue that was trapped between the decal and the model
surface, ruining the looks of the decals' transparent areas. To counter it, I
performed the hair-raising act of literally rubbing the already soaked decals
onto their backing paper, allowing the yellowish remainder to bleed away by
frequently rinsing them. At the point where the decal looked “clean'' (and
practically left without glue), I carefully detached it from the backing paper
and affixed it onto the model, where a droplet of Future had beforehand been
applied, to provide a means of adhering agent. The operation ended up as a
success only because the decal base material was strong enough to withstand the
above torture.
The decals proved flexible enough to successfully follow complex contours, as in
the case of the shark mouth. A coat of Future sealed them, relievingly ending
the above spine-chilling decal session.
| FINAL CONSTRUCTION |
The cockpit was finalized by attaching the two sidewall boxes, the stick, the
flap lever and, finally, the seat. Basic cockpit color was Hu226 Interior Green,
with black instrument panel, side boxes grips and headrest (the latter received
streaks of leather paint, for “used black leather” looks). The various raised
panel details were dry brushed with silver, with red, yellow and white “knobs“
painted with a fine brush. Finally, the cockpit received a light black wash,
mainly to bring out the sidewalls “ribbing”, whereas some silver dry brushing
was applied at edges where paint would likely rub-off.
Instructions stated to paint the aft-view anti-glare areas with interior color,
but I elected to leave them in fuselage color, which had more likely been the
case. The port side filler caps were painted red and silver.
Moving to the landing gear, I first attached the tri-color decals onto the main
wheel caps, then assembled the wheels. The wrongly molded retraction links were
deleted and correctly pointing ones were fabricated from stretched sprue and
attached. Brake lines also from thin stretched sprue were finally added and
routed by consulting net pics.
 The main legs were then attached, followed by the main wheels, doors and the one
piece tail wheel which contained the rear doors. Two tiny pieces of stretched
sprue were used to represent the connecting rods of the smaller main doors to
the gear leg (their absence is notable head-on).
The main legs were then attached, followed by the main wheels, doors and the one
piece tail wheel which contained the rear doors. Two tiny pieces of stretched
sprue were used to represent the connecting rods of the smaller main doors to
the gear leg (their absence is notable head-on).
Gear legs and all retraction rods were painted steel (except the lower part of
the leg that remained exposed upon retraction, which was painted under-fuselage
color). Brake lines and tires were black. All doors' innards and main bays'
front parts were painted yellow zinc chromate, whereas the main bays' rear parts
were painted under-fuselage color, as was the case soon after the personnel very
quickly removed the factory fitted canvas boots (which caused more trouble than
help).
The tail wheel is molded in such a way that its housing has unrealistic zero
depth. To kind of compensate for this oversimplification, I assumed that the
canvas boot had not been removed and painted the area at an uneven khaki green
shade.
The prop had its spinner filled, then sanded smooth and finally painted red,
with black blades and yellow tips, then affixed in position. The exhausts and
all guns barrels were carefully painted Testors Burned Metal, whereas the
radiators and oil cooler front faces were painted black and dry brushed with
silver.
The (ill-fated) drop tank received four braces from stretched sprue pieces and
was attached in position, looking very nice! However, something was not “right”:
not recalling any pics with P-40Bs carrying drop tanks, I consulted Tom Cleaver,
who clarified that AVG P-40Bs did not carry drop tanks. So I removed the good
looking tank, then filled, sanded and repainted the affected underside area…
Time for some weathering! A black wash was applied at all moving surfaces’ hinge
lines, underside cooling louvers and all landing gear parts, including bay
innards. Then some paint chipping and equal “dings” were performed by silver dry
brushing at expected areas (blade - and wing - leading edges, wing areas where
personnel would frequently walk or drop their tools and so on). Finally,
br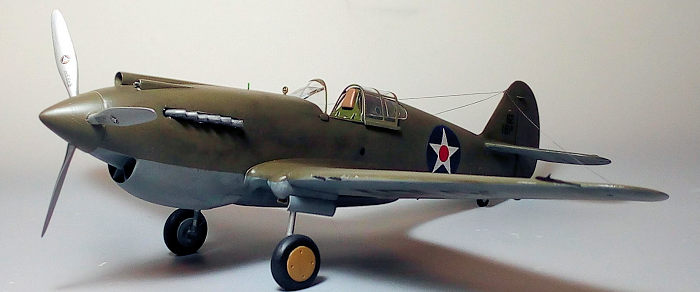 own/black dry pastels were applied to represent engine soot, grim, mud and
general dirtiness that would be found at areas (such as the undersides).
own/black dry pastels were applied to represent engine soot, grim, mud and
general dirtiness that would be found at areas (such as the undersides).
The flap hinge lines had totally disappeared due to the intensive filling and
sanding (a big part of which was, likely, my fault). Trying to rescribe the area
would result in pieces of putty tending to flake off, the possible outcome
promising to be much worse before getting better, so I took the “cheating”
decision to draw the hinge lines with a 2B pencil! A final satin coat gave the
bird its final finish.
The one piece canopy wouldn’t fit, so I went for the split ones. No matter how
careful I was, the sprue gates were too-thick-too-close, resulting in some
damage. Since I wanted to depict the filler access holes found at the port rear
vision panel, I drilled them out using my micro drills and a lot of patience.
After having their frames hand painted, all transparencies were attached.
Expectedly, the rear panels took some delicacy to be affixed, for which I used
tiny amounts of white glue. White glue was also used to fair the emerging gaps
between the transparencies and the fuselage.
I decided to attach the aiming ring and bead in front of the windscreen, for
which I used the kit parts that I cleaned and painted black. I also chose to
replicate the teeny-tiny blue formation lights found bilaterally on the cockpit
sidewalls, for which I correspondingly drilled two micro holes that I filled
with clear blue paint. The wingtip lights were blobs of red and green clear
paints affixed at the molded-on wing tip bulges. The port big underwing light
was represented as a bulge and it was painted chrome silver.
An antenna wire made from stretched sprue was run from the fin top to the
fuselage aft of the canopy. Some pics (and many profiles) show Tomahawks
featuring a second wire from the fin to the port side, but I couldn not notice
it at the AVG net pics, so I did not attach it (their radios were nevertheless
field improvised, so the one-wire scenario might have “believable” chances).
Finally, the port wing distinctive pitot was attached and painted gunmetal,
before calling ”Johnny” Farrell’s Flying Tiger done!
| CONCLUSIONS |
If you want a modern, accurate and detailed quarter scale P-40B/C, look no
further than the superb Airfix kit: easily built and sensibly priced, it is the
definitive way to go for the best (by far) 1/48 rendition of this important
fighter.
The now (as of 2021) 60 year old Monogram offering is a classic one: though soft
in detail and oversimplified (or even, at places, failing), its general shape is
really accurate, deeming it highly respectable in the modeling world. Of course,
a significant amount of work is needed in order to overcome the kit’s omissions
or shortfalls (like, for example, the simplified landing gear and nonexistent
landing gear bays), but, truth is that, since Monogram got the shape right,
motivation for working with this oldie never seems to cease: on the contrary,
the more I worked with this oldie, the more addicted I got to it and wanted to
put more extra work!
Even out of the box, a good looking model can result. If you walk the extra
mile(s), true masterpieces can emerge, as Roger Jackson and Tom Cleaver
demonstrated with their builds of Charles Older’s Flying Tiger, their reviews
easily found at the ever growing MM archives.
The kit has not been reissued since 2010, presumably due to the molds getting
increasingly compromised and, of course, the presence of the superb Airfix
offering, but it can still be found at low prices. Tackling this kit will be a
very pleasing journey to the past days of modeling, where details might have not
been that many, but, still, there were cases, like this one, where the accuracy
of the shape and the not complicated construction left the modeler with a deep
feeling of satisfaction.
19 August 2022
Copyright ModelingMadness.com. All rights reserved. No reproduction in part or in whole without express permission.
If you would like your product reviewed fairly and fairly quickly, please contact the editor or see other details in the Note to Contributors.