| KIT #: | 02228 |
| PRICE: | $40.00 |
| DECALS: | Two options |
| REVIEWER: | Spiros Pendedekas |
| NOTES: |
| HISTORY |
The XP-40, evolved from the mid-1930s radial-engine Curtiss Model 75 Hawk, was the fastest U.S. Army fighter upon its first flight in 1938, with deliveries of the production P-40 beginning in June 1940. Though initially lacking in armament, pilot protection and without self-sealing fuel tanks, it was soon improved in those areas.
 The “Tomahawk” (as was the P-40B/C RAF assigned
name) served with the RAF in North Africa in 1941-1942: apart from low altitude
performance, it was inferior to the 109, causing the British to turn down
further deliveries, waiting for the more powerful “Kittyhawk” (P-40D and
onwards).
The “Tomahawk” (as was the P-40B/C RAF assigned
name) served with the RAF in North Africa in 1941-1942: apart from low altitude
performance, it was inferior to the 109, causing the British to turn down
further deliveries, waiting for the more powerful “Kittyhawk” (P-40D and
onwards).
In USAAF service, a total of 15 USAAF pursuit/fighter groups (FG), along with other pursuit/fighter squadrons and a few tactical reconnaissance (TR) units operated the P-40B, becoming the main USAAF fighter aircraft in the South West Pacific and Pacific Ocean theaters during 1941–42.
During the attack on Pearl Harbor, most of the USAAF fighters were P-40Bs. While the majority of them were destroyed on the ground, the few P-40s that managed to get in the air shot down several Japanese aircraft.
Though not the best fighter plane of its era, the P-40B was a classic combat aircraft of World War II and among the most ubiquitous, being present when needed. And a very beautiful one, too!
| THE KIT |
Hitting the shelves in 2003, the modeling world
was very happy, as, at last, a “modern” tool big P-40B was available, with
Trumpeter promising to provide the “E” and onwards versions in the then near
future.
The kit came in a sturdy high quality box, with a nice box art depicting a
British Tomahawk in flying status. Upon opening the box, I was greeted with no
less than four big sprues and a smaller fifth one, a comprehensive clear parts
sprue, a PE fret and an acetate instrument panel face. Molding looks great with
zero flash, just some mold lines easily cleaned. All details are nicely
engraved, as is the riveting, which does not look out of place.
Cockpit area, while is otherwise well appointed, with detailed sidewalls (onto
which numerous extra “switches and stuff are to be attached) and equally
detailed seat with PE belts, lacks the depth of the original: it is seemingly
not designed using the wing top as the cockpit floor, which is the case in
reality. The only practical remedy is to buy an aftermarket cockpit. The
instrument panel is of the “sandwiched” acetate type, whereas the engine itself
is a great looking full model, consisting of no less than 48 parts (!),
excluding the 24-piece exhausts!
 Moving surfaces, including flaps, can be positioned “dynamically”, should you so
wish, with the rudder fully moveable (utilizing the not always easy to use
Trumpeter-style shaft/hinge system). Two radiator exit louvers are provided
(open-closed). Main wheel wells are nicely represented, designed to be “boxed”
between the wing halves. The distinctive canvas boots are not provided and,
though it is true that they were usually very quickly field removed, the modeler
should have a choice here, especially at this scale.
Moving surfaces, including flaps, can be positioned “dynamically”, should you so
wish, with the rudder fully moveable (utilizing the not always easy to use
Trumpeter-style shaft/hinge system). Two radiator exit louvers are provided
(open-closed). Main wheel wells are nicely represented, designed to be “boxed”
between the wing halves. The distinctive canvas boots are not provided and,
though it is true that they were usually very quickly field removed, the modeler
should have a choice here, especially at this scale.
Each main wheel is a 5 (!) piece affair, which might look like over engineering,
but, in reality, the wheels can be built and painted wonderfully! All three
landing gear legs are nice, too, while I know that asking for MLG brake lines
might be too much…
Clear parts are lavishly provided and are well molded and crystal clear.
Instructions are provided as a small booklet, very attractive and comprehensive.
Two markings options are provided, one for a British Tomahawk and one for a
“Pearl Harbor” bird. The decals look of good quality, seemingly done by
Cartograf….
….which brings us to the initial impression of the kit. Well, though first
impressions are excellent and hopes are high, there are areas that the kit seems
to be lacking, the most striking one being the cockpit depth, with “secondary”
ones being the elevators’ shape, the curvature of the back oval windows, the
shade of the British codes and so on. For a proper addressing and possible
fixing of those issues, you may read the excellent Tom’s build
review of the same kit.
Bought in 2005 at a sensible price of $40, this kit only recently found its way through the assembly line.
| CONSTRUCTION |
 I
started with the cockpit floor, by attaching at it the instrument panel back
plate, the foot pedals, the guns' base and the front and rear bulkheads. After
attaching the nice sidewalls and the rear vision panels at the fuselage halves,
I joined the fuselage halves, trapping in between the half assembled cockpit,
the prop base and the two piece tail wheel supporting bulkhead. Fit was very
good. Basic cockpit color was Hu226 Interior Green (which kind of resembled the
zinc chromate green that was observed in P-40B cockpits), with black instrument
panel and consoles/boxes (dry brushed with silver), red knobs and leather head
cushion.
I
started with the cockpit floor, by attaching at it the instrument panel back
plate, the foot pedals, the guns' base and the front and rear bulkheads. After
attaching the nice sidewalls and the rear vision panels at the fuselage halves,
I joined the fuselage halves, trapping in between the half assembled cockpit,
the prop base and the two piece tail wheel supporting bulkhead. Fit was very
good. Basic cockpit color was Hu226 Interior Green (which kind of resembled the
zinc chromate green that was observed in P-40B cockpits), with black instrument
panel and consoles/boxes (dry brushed with silver), red knobs and leather head
cushion.
Then it was wings time: I first “boxed” the landing gear bays onto the one piece
lower wing half, with the nice kit-provided walls. Then I attached the two top
wing halves (leaving the invisible four guns off), and attached the whole main
wing to the fuselage. Again, nice fit.
Subassemblies time: I assembled the 2-piece ailerons, 2-piece tail planes and
elevators, 3-piece rudder (I left the tedious shaft off…), 6-piece MLG struts,
3-piece main wheel rims, 4-piece nice prop and the twelve 2-piece exhausts. The
MLG struts received brake lines made out of stretched sprue and the main wheels
were filed to look “weighted”. The 12 exhausts were cleaned, smooth sanded and
painted Testors burned metal.
The fabric effect on the moving surfaces was a tad on the “sharp” side, so I
gave all fabric surfaces a light sanding to even it. Though the kit provides
options for having the moving surfaces posed “dynamically”, I only drooped the
elevators, which was a usual P-40B posture.
 I continued by attaching the three PE nice meshes at the end of the
characteristic triple air intake and then attached the intake to the fuselage.
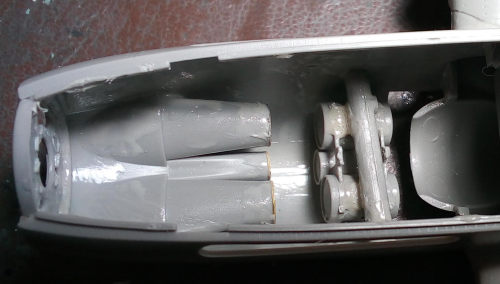
Though I had decided not to install the engine, as it is totally invisible once
the cowlings are installed, I had to assemble and attach the triple-cooler assy,
as its back is visible through the aft cooling grills. Since there was no engine
onto where the coolers would be affixed, their attachment was performed by
gluing the whole cooler assy under a suitable styrene piece, which was then
attached at the lower part of the cowling.
I continued by attaching the three PE nice meshes at the end of the
characteristic triple air intake and then attached the intake to the fuselage.
Though I had decided not to install the engine, as it is totally invisible once
the cowlings are installed, I had to assemble and attach the triple-cooler assy,
as its back is visible through the aft cooling grills. Since there was no engine
onto where the coolers would be affixed, their attachment was performed by
gluing the whole cooler assy under a suitable styrene piece, which was then
attached at the lower part of the cowling.
All
engine area visible innards were painted Hu226 with gunmetal cooler meshes,
followed by attaching the 2-piece top cowling part (not making any provisions
for the exhausts attachment, hoping to secure them at finishing stages...).
Though usually the cooling grills were seen “opened”, they were also observed
“closed”, which was my choice, in order to make the not very busy looking cooler
exit area less visible.
After an initial filling and sanding of all subassemblies, the ailerons, lower
flaps and tail surfaces were attached, with the complete model then receiving
its final 1000 grit sanding. Upon having its cockpit and rear belly cooling duct
covered with wet tissue, it headed to the paint shop!
| COLORS & MARKINGS |
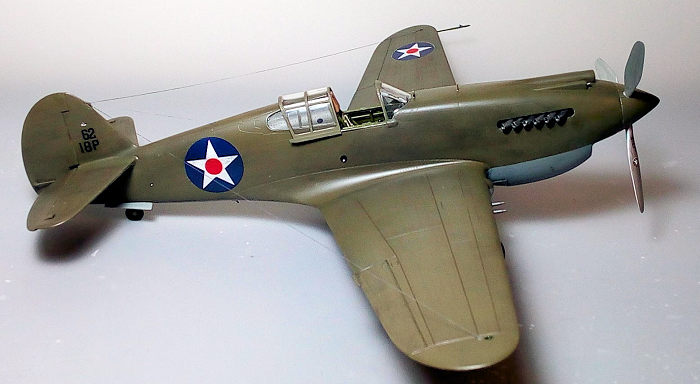
I first gave all undersides a coat of Hu128 Compass Gray, which laid nicely.
This included the cooling grills and all doors' external surfaces. After
receiving a protective coat of Future, all undersides were masked and the
topsides, including the prop hub, received a coat of Hu155 Olive Drab, followed
by the usual protective coat of Future.
 There has been some discussion about the accuracy of the Trumpeter markings and
landing gear color callouts. By netting, I came across some nice LIFE original
color pics, showing completed planes just before departing for the Hawaiian
Squadrons and also some b/w pics, showing early formation of freshly delivered
18PG P-40Bs over Hawaii (before having the big white side fuselage codes
applied).
There has been some discussion about the accuracy of the Trumpeter markings and
landing gear color callouts. By netting, I came across some nice LIFE original
color pics, showing completed planes just before departing for the Hawaiian
Squadrons and also some b/w pics, showing early formation of freshly delivered
18PG P-40Bs over Hawaii (before having the big white side fuselage codes
applied).
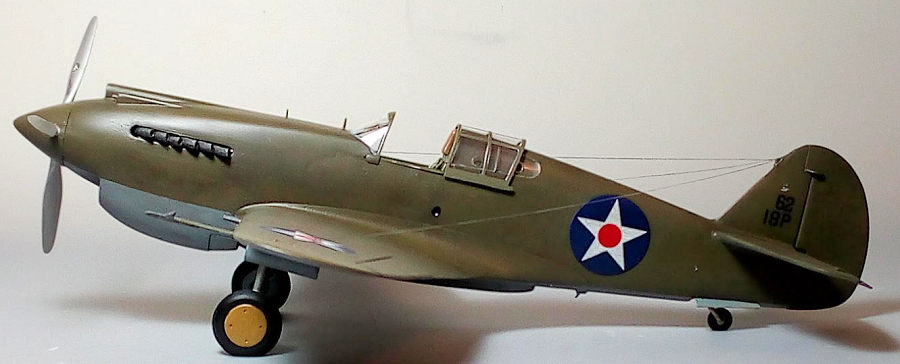
According to all above references, some camo suggestions (including the rear
camo borders, where the olive drab should extend at all rear fuselage length)
might be questionable. However, the markings seem correct, regarding not only
the tail codes, but also the prop black stenciling, as most “Hawaian” P-40Bs
were delivered with polished metal blade props, carrying b/w stenciling and
(sometimes) yellow tips.
I thus happily applied the kit provided markings that went on very well. I
experienced a tad of silvering, especially at the transparent decal parts
between the black lettering, but nothing too bad. For the decals placement I
used camo drawings which are plentifully provided at the Net, as the kit
provided ones looked at places odd.
A coat of Future sealed all decals.
| FINAL CONSTRUCTION |
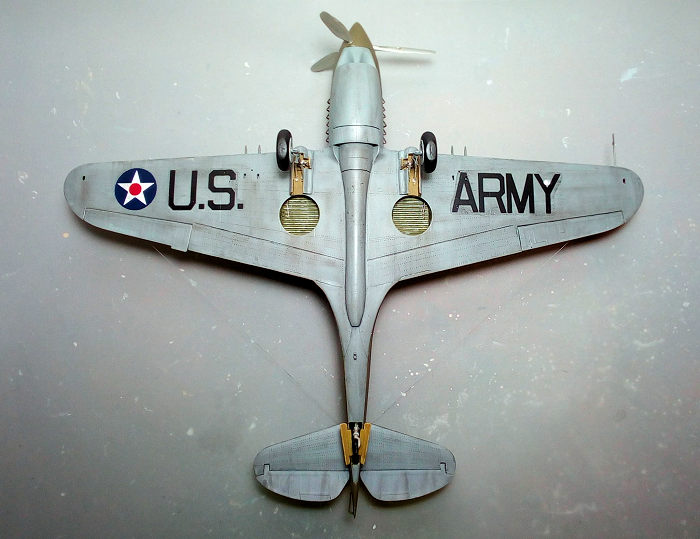
“HawaiIan” P-40Bs color research revealed that landing gear struts were, at
first, aluminum, with only the lower part (externally visible upon wheels up
posture) underside gray. Likewise, the wheel covers' visible side was gray, with
the “hidden” one left yellow zinc. Yellow zinc was used for the main and tail
doors innards and also for the small front main wheel bay area, whereas the rear
of the main wheel bays, and also the tail wheel retraction area, were painted
green zinc and covered with the famous khaki canvases (which were very quickly
removed, as they caused more trouble than help).
This is how I elected to represent my P-40B, with the relative items accordingly
painted and attached (with time progressing, the entire landing gear, including
struts, all doors' innards, bays and wheel covers of the “Hawaiian” P-40Bs were
painted underside gray. The prop blades had their rears painted matt black, as a
means of anti-glaring, with all black blade props and the famous broad white
side fuselage codes appearing later on).
The two mini struts that connect the inner LG doors to the struts were not
provided and, since they are prominent at head on view, were fabricated from
stretched sprue. The tail LG strut was difficult to attach at those later
stages, so it might be wiser to install it per the instructions, before joining
the fuselage halves….Upon succeeding, I attached the rear wheel which had also
been filed down to look “weighted. Finally, the 12 exhausts, the sensitive upper
hinge and lower pushrod of the rudder were attached.
 I decided to apply some weathering, mainly consisting of a hefty black wash,
engine staining / general dirtying with pastels and some chipping by silver dry
brushing. Since it is not uncommon for OD to fade to brown/violet, I used
suitable colored pastels that I run through the upper panel lines to represent
some OD fading. The whole plane then received a satin final coat.
I decided to apply some weathering, mainly consisting of a hefty black wash,
engine staining / general dirtying with pastels and some chipping by silver dry
brushing. Since it is not uncommon for OD to fade to brown/violet, I used
suitable colored pastels that I run through the upper panel lines to represent
some OD fading. The whole plane then received a satin final coat.
The 6 guns were painted gun metal and attached. The wing pitot was accordingly
painted and attached, as well. While many pics exist showing Hawaiian P-40Bs not
carrying the external scope and front sights, I decided to install them, since I
figured out that those items would be present at least at the first months after
planes’ delivery.
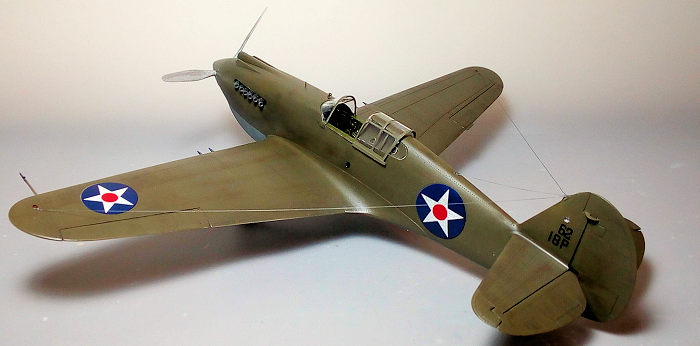
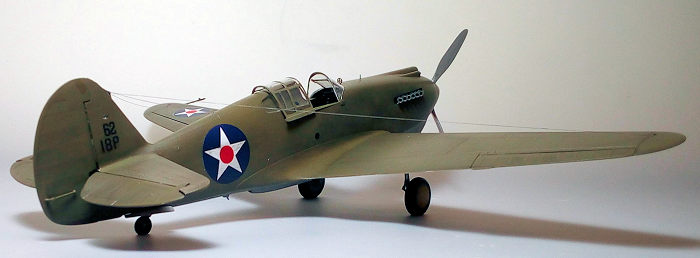
The distinctive three aerial wires were made of stretched sprue and were run
according to net found diagrams and pics. Apart from the port underwing light,
for which I used the kit part, all other lights were represented with blobs of
clear paints of according colors, including the distinctive blue side-fuselage
ones.
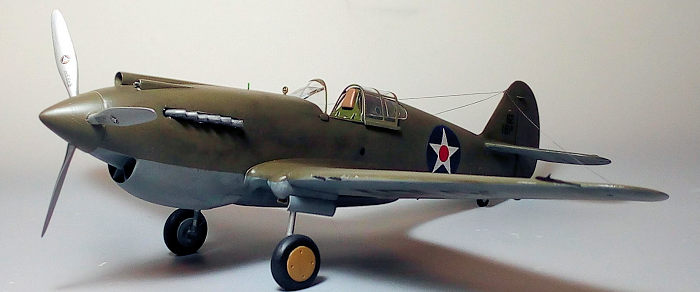
The windscreen had its internal armor plate part attached, then all canopy
transparencies had their frames hand painted and were attached. Fit was good,
with mini gaps taken care of white glue. The canopy was not permanently glued:
it would rest “open”, only to be closed upon viewers coming close, so the
shallowness of the cockpit will not be evident!
It was then time to call my Hawaiian P-40B done!
| CONCLUSIONS |
 Regarding the build process itself, this was a very enjoyable kit: well molded
with good fit, very well detailed without being over engineered, good
instructions and excellent decals. With no major effort, a very impressive model
will result.
Regarding the build process itself, this was a very enjoyable kit: well molded
with good fit, very well detailed without being over engineered, good
instructions and excellent decals. With no major effort, a very impressive model
will result.
Regarding overall accuracy, apart from the apparent cockpit shallowness, the
"secondary" issues, like tail planes shape and fuselage at places cross section
might come into discussion, with the severity or importance of them lying onto
the individual modeler. Truth be told, replacing the cockpit with a nice AM
resin one (an action that nevertheless many modelers at many subjects of this
scale perform) will solve the main accuracy issue of the kit.
By no means an accuracy issue has to be overlooked, with this especially
applying to “modern” kits, where manufacturers have easier access to vast
amounts of info regarding the original subject, than in the past.
Having said that, the final result definitely looks like a well detailed P-40B
and I had a very pleasant time putting it together. This kit is not too
difficult to find nowadays and at very sensible prices. If you own one or come
across one, you might consider the above options, take your pick and build it.
You will be guaranteed a very pleasant building experience.
Happy modeling!
| REFERENCES |
2 May 2022
Copyright ModelingMadness.com. All rights reserved. No reproduction in part or in whole without express permission.
Thanks to me for picking this one up when it was on sale.
If you would like your product reviewed fairly and quickly, please contact the editor or see other details in the Note to Contributors.