Monogram 1/64 P-40N Warhawk
| KIT #: | 6792 |
| PRICE: | ~$5.00 'used' |
| DECALS: | One option |
| REVIEWER: | Chris Mikesh |
| NOTES: | Advanta |
| HISTORY |
(From Instruction sheet – abridged)
The P-40N Warhawk was one of the latest of a long line of P-40s. The first American single see fighter to be manufactured on a mass-production basis, it served in the early part of the war on several battlefronts. Both of the Flying Tigers in China and the RAF squadrons in the Middle East were equipped with P-40Bs which were later replaced with P-40Es. The largest series of all P-40s first appeared in 1943. This was the P-40N, also designated Kitty Hawk IV by the RAF. The first production run amounted to 1,977 aircraft.
| THE KIT |
 Sitting in a hospital bed in a morphine and oxycodone
laced haze; I kept trying to keep my mind busy dreaming of building a model
plane. My fondest childhood memory rolled back to this model in its simplicity
of assembly. For 3 days I dreamed of building this P-40 as I remembered the
details.
Sitting in a hospital bed in a morphine and oxycodone
laced haze; I kept trying to keep my mind busy dreaming of building a model
plane. My fondest childhood memory rolled back to this model in its simplicity
of assembly. For 3 days I dreamed of building this P-40 as I remembered the
details.
I was mostly correct. After a week of recovery, I found the kit in my stacks and began to clean up parts and glue simple assemblies. The plastic is a dark brown with raised surfaces and locomotive rivets. Easy construction is the hallmark of this model. A pilot, 2 Fuselage halves, upper and lower wings, elevators, landing gear. There are no wheel wells and no cockpit interior. The wheels have the option of being retracted or down. Canopy is excellent and although thick – it gives a thin illusion after assembly. Included is a 50 year old decal sheet. Dry-fitting the parts are as I remembered.
| CONSTRUCTION |
 As with most kits, you start
with the cockpit. There is nothing there, so just paint it Chromate Green. Paint
the pilot brown uniform, flesh face, white straps, and yellow Mae West. If you
are ambitious, consider a cardboard instrument panel and side panels. You
generally can’t see it anyway – but if it makes you feel better, go for it.
As with most kits, you start
with the cockpit. There is nothing there, so just paint it Chromate Green. Paint
the pilot brown uniform, flesh face, white straps, and yellow Mae West. If you
are ambitious, consider a cardboard instrument panel and side panels. You
generally can’t see it anyway – but if it makes you feel better, go for it.
Fuselage:
Next is to glue the two fuselage halves together. The great thing about this kit is that it has very thick plastic, so it holds it’s molded shape well. I used Tamiya’s Extra Thin Cement, to glue the two halves. Press and hold for a minute and you have a fuselage. There was no drama. The front including prop and radiator will go on later after painting the propeller and cone. Glue the Pilot’s back to where the seat should be.
 Wings:
Again, no issues. This is such a simple build it is literally enjoyable. 2 wing halves fell into place with no warping. Again, liquid cement on all contact surfaces, and let set.
Elevators: These are one part each. Sand off the leading edge seam and it is all set to go.
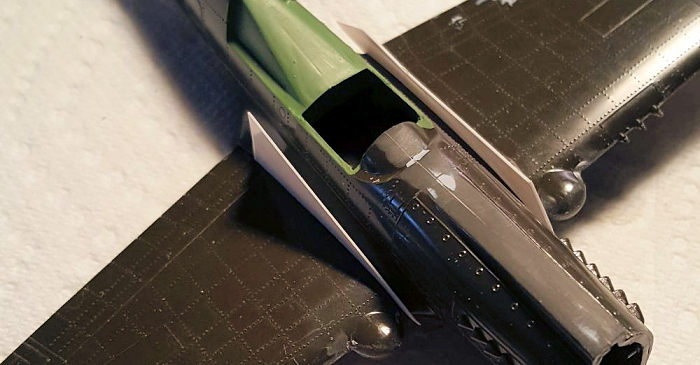
But this is where the fun ends… I fitted the wing to the fuselage only to discover 2 huge gaps in the wing roots. How can this be?? This is supposed to be my dream kit – I’m not supposed to work for it!
The Gods of Plastic and Morphia have deceived me! After fussing for a few minutes and feeling totally let down, I devised a plan. Filling these gaps would cost a lot of time and surface detail. I had some Evergreen plastic sheeting that I jammed into the gaps and glued them in as I glued on the wings. After the wings had set, I used an X-acto knife to trim the extra plastic, and SURPRISE! With a little sanding, I have defeated the Evil Plans of the Model Gods.
 I added the elevators and my
dream plane was starting to take shape. (My wife was getting a little worried
about me as I had this glassy look in my eyes and a wry smile of satisfaction on
my face. It might have been the Oxycodone too.)
I added the elevators and my
dream plane was starting to take shape. (My wife was getting a little worried
about me as I had this glassy look in my eyes and a wry smile of satisfaction on
my face. It might have been the Oxycodone too.)
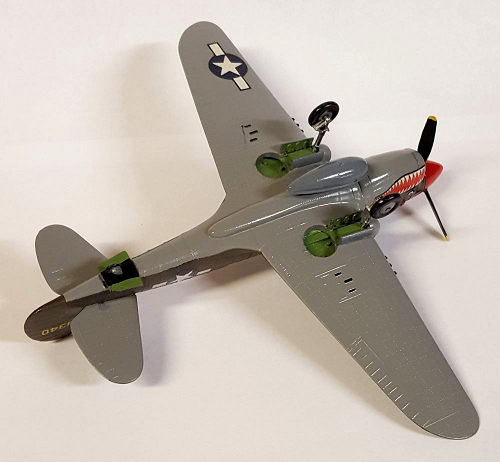
Landing gear: There is no issue here either. Just follow the instructions. No, the landing gear is not correct. But if making the model out of the box, (OTB), there are not too many options. The photos I have seen of the gear doors is that it is a single door – not split as depicted on the model. There are other nit-picky issues as well, but I did not correct them except I trimmed off the post in the wheel wells where the folded wheel glue on (as if retracted).
Nose and Radiator: Without adding the propeller, I dry fit the cowling/radiator with just a touch of Elmer’s white glue. This way, I could shape, fill, and paint without disturbing the propeller (painted separately to be added later).
| COLORS & MARKINGS |
 My childhood’s fondest
memory is the durability of this model as it survived 3 Air Force moves. (Only
one propeller blade survived and no landing gear.) But I never painted it. I
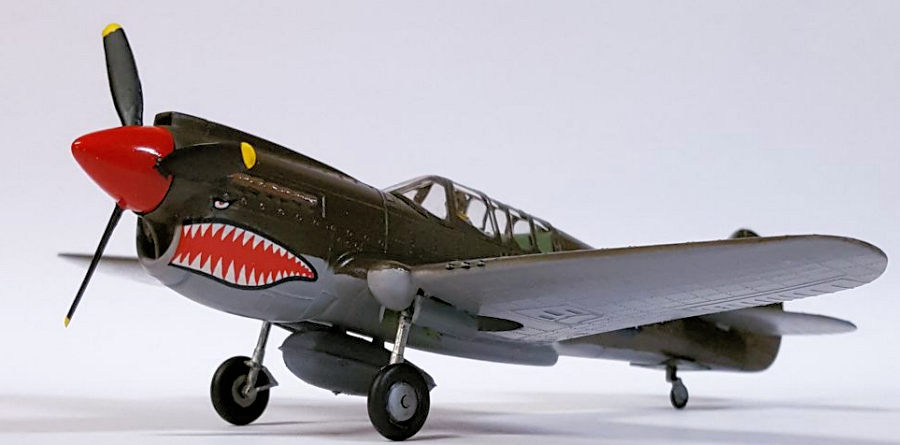
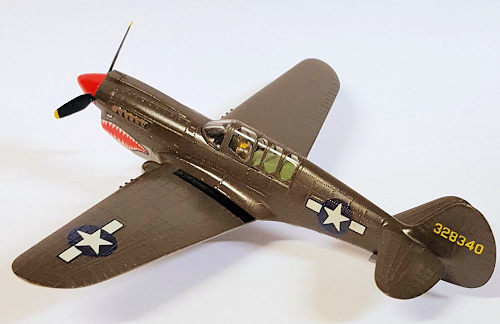
really liked the brown plastic color. Most P-40Ns were Olive Drab (OD) green.
Some were a dirty brown/green-ish if the plane had a lot of time on it or
environment. In my case, I specifically painted the top and fuselage the brown
of the plastic because I liked the first model I built as a kid (builder’s
prerogative!). This paint was a Tamiya mix of NATO Brown (XF-68), Flat Black
(XF-1), and Olive Drab (XF-62). Neutral Gray was on the bottom (AS-7). Don’t mix
gloss and flat paints – regardless of the brand.
My childhood’s fondest
memory is the durability of this model as it survived 3 Air Force moves. (Only
one propeller blade survived and no landing gear.) But I never painted it. I
really liked the brown plastic color. Most P-40Ns were Olive Drab (OD) green.
Some were a dirty brown/green-ish if the plane had a lot of time on it or
environment. In my case, I specifically painted the top and fuselage the brown
of the plastic because I liked the first model I built as a kid (builder’s
prerogative!). This paint was a Tamiya mix of NATO Brown (XF-68), Flat Black
(XF-1), and Olive Drab (XF-62). Neutral Gray was on the bottom (AS-7). Don’t mix
gloss and flat paints – regardless of the brand.
Caution on Tamiya paints. I love them dearly because they go on smooth and airbrush very well if fresh. They brush on or (aerosol) spray nearly perfectly. But I recommend test painting something before expecting the proper end result. The bottle cap colors are misleading and once the paint is dry they tend to darken compared to the color of the pigment on the bottom of the bottle. In my case, I did not learn my lesson the first few times. “Neutral Gray” in spray (AS-7) is NOT the same as in the “Neutral Gray” in bottle (XF-53). I forgot to spray the drop tank, so I painted it by hand. It’s a novice mistake – but I never grew up. Neutral Gray in the bottle is darker.
 I have received many
comments on using Sharpies on my models. Just so you know; a good black Fine
Point Sharpie works great on wheels, interiors, and touch-up. Also a fresh
Silver Sharpie has the near-same tint as the spray aluminum for canopies and
touch-ups. Also if doing wheels/landing gear – it makes it real easy. Red and
Green are very useful for navigation lights. Above all – no brush to clean up.
I have received many
comments on using Sharpies on my models. Just so you know; a good black Fine
Point Sharpie works great on wheels, interiors, and touch-up. Also a fresh
Silver Sharpie has the near-same tint as the spray aluminum for canopies and
touch-ups. Also if doing wheels/landing gear – it makes it real easy. Red and
Green are very useful for navigation lights. Above all – no brush to clean up.
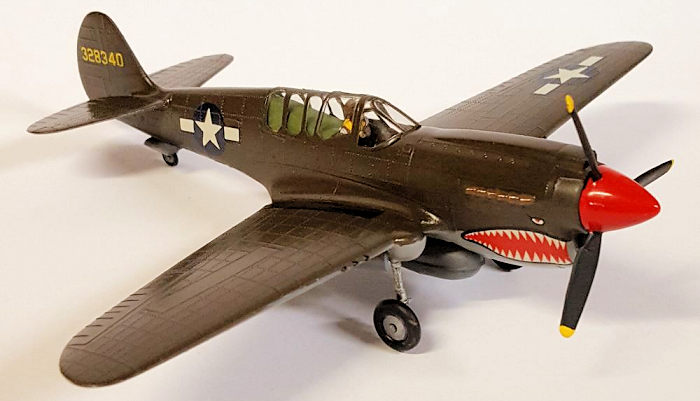
The decals are nearly 50 years old. I noticed that the 1969 decals for this model looked okay from the surface, but as I examined it with a magnifying glass; I saw very small cracks very close together. That meant that this decal sheet was going to have some problems with shattering once in water. (I had no replacement decals.) So, I mopped on some liquid decal film. This is much recommended with any aged decal sheet. The decals settled nicely on the model after using Micro Sol and Set. Trim away as much clear as possible to prevent ‘silvering’.
| FINAL CONSTRUCTION |
 I removed the
cowling/radiator (now painted) and added the propeller and hub so the Grandkids
could spin the prop. Then I re-glued the cowling/radiator in place. The nose
cone was first painted white, and after it dried, was painted red. This prevents
‘see through’ to the dark plastic and dulls the expected red color.
I removed the
cowling/radiator (now painted) and added the propeller and hub so the Grandkids
could spin the prop. Then I re-glued the cowling/radiator in place. The nose
cone was first painted white, and after it dried, was painted red. This prevents
‘see through’ to the dark plastic and dulls the expected red color.
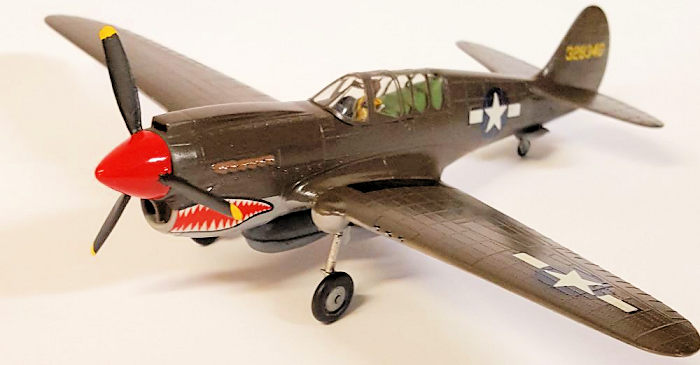
A fast airbrush coating of Future Floor finish sealed everything. Future is excellent for covering over and leveling off minor flaws in surface details as reflected in silver paint. It won’t solve all problems – but helps with the over-all evenness of the surface. Recommended. Then add all the ‘break-off’ details if you have any, like antennas and pitot tubes.
I painted the frame of the canopy last, and when dry, I dunked it into Future Acrylic Floor finish to help clarify the clear windows. The fit is near perfect and glued on with Elmer’s as it dries near clear in small amounts.
NOTE: Just as an interest item, I built the Revell P-40E Warhawk at the same time. How do they compare? They don’t! The 1964 P-40E from Revell has problems of its own (including this builder), but both look like P-40s. Build the Hasegawa, Academy, or Sword kits unless you have a specific agenda like I did.
| CONCLUSIONS |
The biggest issue is the surface detail. It makes the model look “busy”, and is distracting. If you are thinking, “sand it off”! I’d say – ‘Go for it!’ But, Why? Get the Hasegawa P-40N kit and save yourself the agony.
On a scale of 1-10 (1 being ‘trash it’) I think this is a solid 7. It lacks accuracy. But is an excellent kit if you are teaching the Grandkids the fine art of model building (and imaginary flying). For me it was a great sanity solver post-surgery (6 vertebrae in my neck fused, front and back). Yes, I’d do it again… the model – not the surgery!
19 March 2020
Copyright ModelingMadness.com
If you would like your product reviewed fairly and fairly quickly, please contact the editor or see other details in the Note to Contributors.
Back to the Main Page Back to the Review Index Page Back to the Previews Index Page