
Special Hobby 1/72 Kittyhawk Ia
| KIT #: | SH 72377 |
| PRICE: | $13.78 |
| DECALS: | Three options |
| REVIEWER: | Mark Joyce |
| NOTES: | I used DK Decals sheet DKD72055 |
| HISTORY |
So much has been written about the P-40 Warhawk that there’s no need to go into its history here. Suffice to say that although it wasn’t the most produced variant (that distinction goes to the P-40N), the P-40E was arguably the most important. It formed the backbone of the Desert Air Force in North Africa, replaced the aging Tomahawks of the AVG and its successor, the 23rd FG, and equipped most of the Pacific fighter groups in the early stages of America’s involvement in WWII. One of these groups was the 49th FG, of which Sammy Pierce was a member. A native of North Carolina, Pierce joined the 8th FS of the 49th as part of its third group of replacement pilots. Flying both the P-40E and the P-40N, he had three confirmed victories flying the former and then obtained an additional four victories once the squadron transitioned to the P-38.
 Sammy
Pierce provides much insight in his comparison of not only the P-40E to the
P-40N, but the P-40 in general to various Japanese fighters and bombers in
Ernest McDowell’s book “49th Fighter Group.” I had the honor to meet Pierce at a
P-40 Warhawk aces symposium in 2008 at the Aerospace Museum of California in
Sacramento, where he repeated much of what was in the book. He thought highly of
the “E” model, stating that he had the upmost confidence in it and felt that it
would keep flying as long as the engine ran, regardless of other damage, but
considered the “N” model a cheap, dime store copy that required much maintenance
initially to finally bring it up to reliable standards.
Sammy
Pierce provides much insight in his comparison of not only the P-40E to the
P-40N, but the P-40 in general to various Japanese fighters and bombers in
Ernest McDowell’s book “49th Fighter Group.” I had the honor to meet Pierce at a
P-40 Warhawk aces symposium in 2008 at the Aerospace Museum of California in
Sacramento, where he repeated much of what was in the book. He thought highly of
the “E” model, stating that he had the upmost confidence in it and felt that it
would keep flying as long as the engine ran, regardless of other damage, but
considered the “N” model a cheap, dime store copy that required much maintenance
initially to finally bring it up to reliable standards.
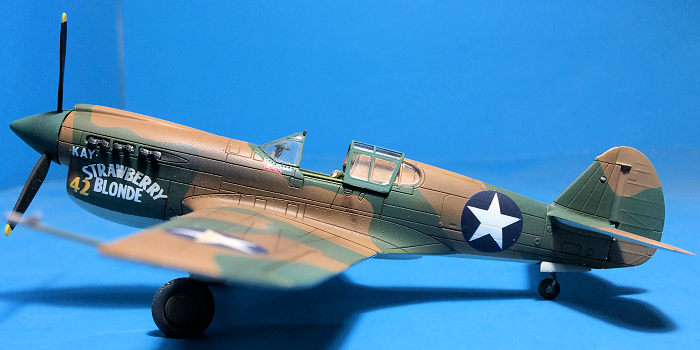
After meeting Pierce, I’ve always wanted to build a model of his P-40E “Kay Strawberry Blonde,” one of the P-40Es he flew in which he had such confidence in. Unfortunately, until recently the only decals for this airplane were available in one of Hasegawa’s 72nd scale kit offerings, and it incorrectly had “Kay Strawberry Blonde” on both sides of the nose. However, recently DK Decals came to my rescue with a 72nd scale decal sheet having “Kay Strawberry Blonde” with the correct marking “Pistoff Pat” (this name courtesy of Pierce’s crew chief) for the starboard side of the nose.
| THE KIT |
The Special Hobby Kittyhawk Mk.Ia (the RAF designation
for the P-40E) kit comprises two sprues of gray plastic and another for the
clear parts with options for either an open or a closed canopy. The plastic is
ni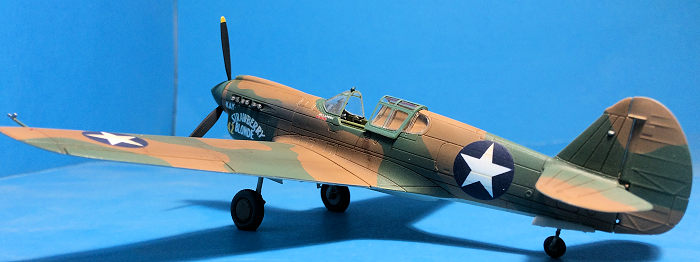 cely
molded with excellent engraved detail and no flash. One of the sprues is the
same as for the Special Hobby P-40N, for it also has the ‘fishtail’ exhausts,
square back seat, spoked wheels (although they appear to be of incorrect size),
and different seatback and instrument panel. Three types of under fuselage
ordinance are also included. The decals, printed by Cartograph, look to be of
its usual high quality and offer three interesting markings. I was somewhat
surprised to discover that, even though all three of the kit markings utilize
the ‘crank’ style pitot tube, the kit only provides a straight one and gives
instructions on how to scratch build the other. Apparently someone at Special
Hobby didn’t have the foresight to see that the crank style might actually be a
good option to provide.
cely
molded with excellent engraved detail and no flash. One of the sprues is the
same as for the Special Hobby P-40N, for it also has the ‘fishtail’ exhausts,
square back seat, spoked wheels (although they appear to be of incorrect size),
and different seatback and instrument panel. Three types of under fuselage
ordinance are also included. The decals, printed by Cartograph, look to be of
its usual high quality and offer three interesting markings. I was somewhat
surprised to discover that, even though all three of the kit markings utilize
the ‘crank’ style pitot tube, the kit only provides a straight one and gives
instructions on how to scratch build the other. Apparently someone at Special
Hobby didn’t have the foresight to see that the crank style might actually be a
good option to provide.
The cockpit is nicely done. The sidewalls have adequate detail for this scale and, once attached to the fuselage interiors, double as the canopy rails: a nice touch that I wish more P-40 manufacturers would consider. The instrument panel uses a decal for all the dials; again something I find adequate for this scale. Perhaps most impressive about the cockpit is that Special Hobby took the unusual, but correct, step of having the cockpit ‘floor’ actually the top of the wing. The only thing really missing for the cockpit are seatbelts, and I used some spare photoetch ones I had on hand.
| CONSTRUCTION |
As is usually
the case, construction starts with the cockpit. I airbrushed the interior Model
Master Interior Green, p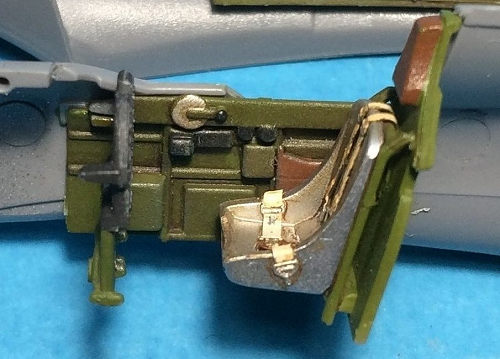 ainted
the instrument panel and some electrical boxes and stuff on the sidewalls flat
black, and decided to go with an unpainted aluminum seat, adding the spare
photoetch seatbelts I had. Once a wash was applied followed by some drybrushing,
I felt the interior colors were close enough to the real thing for me. The
instructions have you attach the backrest with seat, instrument panel, along
with the radiator housing to one fuselage half prior to attaching the other, so
since these parts basically hang in the air I went ahead and taped the fuselage
halves together while the glue was drying to ensure the parts were correctly
aligned. Even then I apparently didn’t get the radiator in just right, for when
I glued the fuselage together I had an ever so slight gap on the lower nose
section that I filled with gap-filling superglue and sanded smooth. Otherwise,
the fit of the fuselage halves was excellent and only required a touch of
filling right in front of the cockpit. A note on the fuselage: Special Hobby has
molded on the formation lights just forward of the cockpit, but not all
Kittyhawk Mk.IAs and P-40Es had them. It appears “Kay Strawberry Blonde” did
not, so I sanded them off. Likewise, a coaming is provided for the top of the
instrument panel, and since many of the P-40Es of the 49th FG appear not to have
it I opted to leave this piece off. As always, check your references.
ainted
the instrument panel and some electrical boxes and stuff on the sidewalls flat
black, and decided to go with an unpainted aluminum seat, adding the spare
photoetch seatbelts I had. Once a wash was applied followed by some drybrushing,
I felt the interior colors were close enough to the real thing for me. The
instructions have you attach the backrest with seat, instrument panel, along
with the radiator housing to one fuselage half prior to attaching the other, so
since these parts basically hang in the air I went ahead and taped the fuselage
halves together while the glue was drying to ensure the parts were correctly
aligned. Even then I apparently didn’t get the radiator in just right, for when
I glued the fuselage together I had an ever so slight gap on the lower nose
section that I filled with gap-filling superglue and sanded smooth. Otherwise,
the fit of the fuselage halves was excellent and only required a touch of
filling right in front of the cockpit. A note on the fuselage: Special Hobby has
molded on the formation lights just forward of the cockpit, but not all
Kittyhawk Mk.IAs and P-40Es had them. It appears “Kay Strawberry Blonde” did
not, so I sanded them off. Likewise, a coaming is provided for the top of the
instrument panel, and since many of the P-40Es of the 49th FG appear not to have
it I opted to leave this piece off. As always, check your references.
Wings were next and the fit of the upper and lower
parts was excellent as well and only a little work around the machine guns was
necessary. The wheel wells are enclosed and adequately detailed. Wing to
fuselage fit was also excellent, with no wing root gap. Attaching the horizontal
stabilizes was the next step, and then I
 went
ahead and used Eduard aftermarket masks on the windscreen and attached it prior
to a primer coat of Alclad II Grey Primer and Microfiller followed by painting.
went
ahead and used Eduard aftermarket masks on the windscreen and attached it prior
to a primer coat of Alclad II Grey Primer and Microfiller followed by painting.
The rest of the parts were applied after painting and decaling. The exhausts come in three sets of two per side. I found them to be the “least best” molded parts and decided to make no attempt to drill holes for the openings, which I did do on the tiny wing mounted machine guns. I also decided to replace the kit wheels with some spare True Details ones with a more accurate tread pattern, and found that I was literally trying to fit a square peg in a round hole. Special Hobby chose to mold the main landing gear so that the ends fit into a slot in the kit wheels, and I had to do a bit of drilling and scraping on the openings of the True Details wheels to get them to fit to an acceptable degree.
| COLORS & MARKINGS |
Few things in the modeling world cause more heated
debate than the colors of P-40s, especially the underside color on the
camouflage schemes. Dana Bell, former curator at the Smithsonian and author of
numerous color-related aviation books, wrote an article in a 1995 issue of
FineScale Modeler on Curtiss camouflage
 schemes
for RAF P-40s. Although nearly a quarter century old, it was applicable for my
build and seems to have held up well over time with some possible changes on, of
course, the underside colors.
schemes
for RAF P-40s. Although nearly a quarter century old, it was applicable for my
build and seems to have held up well over time with some possible changes on, of
course, the underside colors.
For my dark earth and dark green camouflage P-40, perhaps the most frequently stated corresponding underside color seems to be “sky grey.” Unfortunately, there seems to be no consensus on what was meant by any color with the word “sky” in it. However, I had a tin of Colorcoats sky grey on hand and, wanting to use what paints I had, decided to go with it. For the Du Pont dark earth, one of the options mentioned in Dana’s article is Humbrol 118, and for the Du Pont dark green one is Testors Model Master Enamel 1764, which is its Euro dark green; both of those colors I had as well.
After airbrushing the sky grey and masking off the
underside, I airbrushed the Humbrol 118 ‘dark earth,’ which wasn’t as dark as I
thought the actual color should be. Knowing my freehand airbrush skills are
questionable,
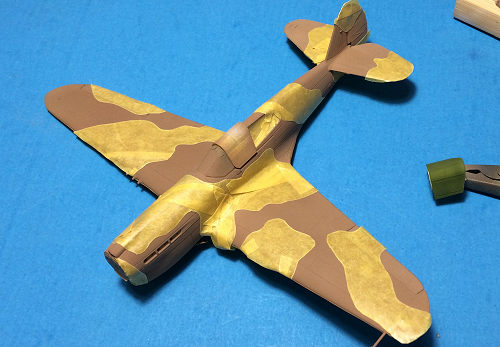 especially
in 72nd scale, and wanting to replicate the factory-applied hard edge between
the camouflage colors, I used Tamiya tape to mask off the dark earth. Once the
Euro dark green was airbrushed I was even more concerned with the look of the
dark earth, so I decided to airbrush a highly thinned mixture of Colorcoats RAF
dark earth with a dash of the Humbrol 118 over the entire upper surface to
darken the dark earth as well as ‘blend’ the two camo colors a bit. The last
part of the main painting was a bit of fading, especially on the fabric covered
control services, by adding a drop or two of white to the main colors. I don’t
know if my colors are completely accurate but I’m pretty happy with the final
look.
especially
in 72nd scale, and wanting to replicate the factory-applied hard edge between
the camouflage colors, I used Tamiya tape to mask off the dark earth. Once the
Euro dark green was airbrushed I was even more concerned with the look of the
dark earth, so I decided to airbrush a highly thinned mixture of Colorcoats RAF
dark earth with a dash of the Humbrol 118 over the entire upper surface to
darken the dark earth as well as ‘blend’ the two camo colors a bit. The last
part of the main painting was a bit of fading, especially on the fabric covered
control services, by adding a drop or two of white to the main colors. I don’t
know if my colors are completely accurate but I’m pretty happy with the final
look.
Once some small exterior details were painted, I airbrushed Alclad Aqua Gloss Clear in preparation for the decals. The decals went down well; however, it’s a good thing that DK Decals provides a slew of national insignia because some of the stars weren’t perfectly printed and had some rough edges, so I selected the best of the bunch.
The final step was a bit more weathering: another coat of the gloss clear, a wash along the panel lines, a flat coat (Future with Tamiya flat base), post-shading, and exhausts and staining using a combination of the airbrush and pastels.
| CONCLUSIONS |
I’m at a crossroads in my modeling life. I’m beginning to build more 72nd scale models, for they generally cost less than their bigger cousins and take up less space in my display case of rapidly diminishing space, but the shaky hands and deteriorating eyesight that come with age make this scale more difficult, and at times less pleasurable, to build. Yet these factors didn’t come into much play here due to the excellent fit and more than adequate detail of this kit, which made it a fun build even considering the couple of minor issues I mentioned with the exhausts and wheels. I’ve built P-40E kits by Hasegawa, Revell, Monogram, AMtech, and Otaki, just to list the ones that come to mind, and in my opinion the Special Hobby is the best kit out there of this variant, regardless of scale. I can highly recommend it.
| REFERENCES |
McDowell, Ernest R. 49th Fighter Group. Carrollton: Squadron/Signal Publishing, 1989. Print.
8 October 2019
Copyright ModelingMadness.com.
If you would like your product reviewed fairly and fairly quickly, please contact the editor or see other details in the Note to Contributors.
Back to the Main Page Back to the Review Index Page Back to the Previews Index Page