| KIT #: | A05130 |
| PRICE: | $39.99 SRP |
| DECALS: | Two options |
| REVIEWER: | Dave Cummings |
| NOTES: | Iliad Decals Early P-40s & Tomahawks |
| HISTORY |
By 1937 it became obvious to the US Army Air Corps that its’s stable of
Pursuit aircraft, the P-35 and 36, were not up to par with new types being
developed in Europe by Supermarine and Messerschmidt. The Curtiss design team
began the project to install the 12-cylinder Allison V-1710 in the P-36
airframe. The initial attempt resulted in the XP-37. The design included a
turbosupercharger and the cockpit moved back near the fin for balance. Problems
with the supercharger system and poor pilot visibility doomed the design.
 But it’s
demonstrated performance was encouraging. Further re-design eliminated the
turbosupercharger and placed the cockpit back in a more conventional position.
The new design was designated XP-40. Elimination of the turbosupercharger
meant the XP-37, though troublesome, outperformed the XP-40 at altitude. Like
its stablemate the P-39 which suffered a similar fate, this would forestall any
chance of the new types being competitive with their European contemporaries
above 15,000 feet. The first production model was the P-40-CU which flew
for the first time in April 1940. There were no YP service test aircraft built
as the airframe was already well proven. The first 3 production aircraft were
utilized for operational evaluation. Initial deliveries were to the 8th, 20th,
31st and 35th Pursuit Groups. The CU was powered by the Allison V-1710-33 rated
at 1,040 hp giving a top speed of 357 mph. Initial armament of two cowl mounted
.50 cal. machineguns was soon upgraded with two wing-mounted .30s. 200 P-40-CUs
were delivered by October 1940 at which time production converted to the more
combat capable, though heavier and slower, P-40B.
But it’s
demonstrated performance was encouraging. Further re-design eliminated the
turbosupercharger and placed the cockpit back in a more conventional position.
The new design was designated XP-40. Elimination of the turbosupercharger
meant the XP-37, though troublesome, outperformed the XP-40 at altitude. Like
its stablemate the P-39 which suffered a similar fate, this would forestall any
chance of the new types being competitive with their European contemporaries
above 15,000 feet. The first production model was the P-40-CU which flew
for the first time in April 1940. There were no YP service test aircraft built
as the airframe was already well proven. The first 3 production aircraft were
utilized for operational evaluation. Initial deliveries were to the 8th, 20th,
31st and 35th Pursuit Groups. The CU was powered by the Allison V-1710-33 rated
at 1,040 hp giving a top speed of 357 mph. Initial armament of two cowl mounted
.50 cal. machineguns was soon upgraded with two wing-mounted .30s. 200 P-40-CUs
were delivered by October 1940 at which time production converted to the more
combat capable, though heavier and slower, P-40B.
| THE KIT |
I was in high school when the then state of the modeling art P-40B was
introduced by Monogram to much fanfare. To a boy enamored by the shark mouthed
fighters of the Flying Tigers it was heaven. Built a lot of those kits
over the years but looked forward to a modern replacement. However, it seems all
the attempts by various manufacturers to provide an updated P-40B kit have
missed the mark in one way or another. The Airfix attempt in 2015 finally got it
right for dimensional accuracy. Engraving is top notch, convincing fabric
covered controls, and a great cockpit. Four parts are used to make the
under-nose radiator assembly which is the most realistic I have seen for this
airplane type. You get both square and round back seats and two different canopy
types (with or without rearview mirror). There are parts for open or closed cowl
flaps. Landing gear is well repr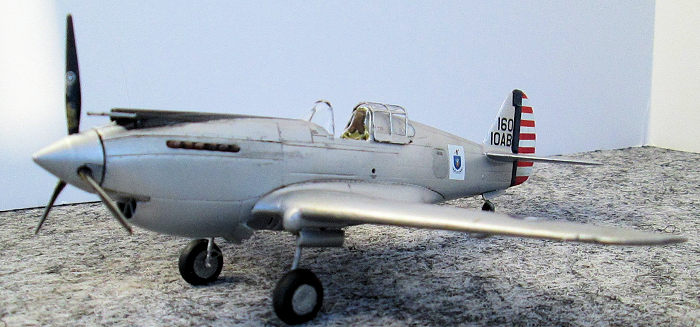 esented
and includes parts for extended or retracted gear. You get both short and the
earlier long MG blast tubes and the two types of pitots. This allows one
to build (with minor panel line filling) any of the early P-40 types including
export models. The only thing I question about the kit is making some of the
structure in separate pieces such as cowl panels and those bulges on the wing
leading edges housing the landing gear mechanism. Unnecessary complication in my
eyes. Decals are for R.T. Smith’s 3rd Squadron AVG aircraft and that flown by
Welch during the Pearl Harbor attack. Decals are well printed and include
stenciling. Clear parts are excellent; clear, thin, and well-defined
framing. There are two windscreens (one with rearview mirror) and two canopies
for open or closed option. The quarter panels have the holes for the fuel and
oil filler caps. The armored glass panel for behind the windscreen is well
done. There is also a clear landing light lens. The six-page Instruction
book comprises 51 easy-to-follow drawings and full color 3-view painting and
decal guides. Painting references are for Humbrol Paints and give only the
product number for those paints. There is no generic color reference.
There is one glaring omission to note here. There is no mention of the
clear landing light lens (part 08). Also, there is no hole in the wing to
receive this part, inexplicable.
esented
and includes parts for extended or retracted gear. You get both short and the
earlier long MG blast tubes and the two types of pitots. This allows one
to build (with minor panel line filling) any of the early P-40 types including
export models. The only thing I question about the kit is making some of the
structure in separate pieces such as cowl panels and those bulges on the wing
leading edges housing the landing gear mechanism. Unnecessary complication in my
eyes. Decals are for R.T. Smith’s 3rd Squadron AVG aircraft and that flown by
Welch during the Pearl Harbor attack. Decals are well printed and include
stenciling. Clear parts are excellent; clear, thin, and well-defined
framing. There are two windscreens (one with rearview mirror) and two canopies
for open or closed option. The quarter panels have the holes for the fuel and
oil filler caps. The armored glass panel for behind the windscreen is well
done. There is also a clear landing light lens. The six-page Instruction
book comprises 51 easy-to-follow drawings and full color 3-view painting and
decal guides. Painting references are for Humbrol Paints and give only the
product number for those paints. There is no generic color reference.
There is one glaring omission to note here. There is no mention of the
clear landing light lens (part 08). Also, there is no hole in the wing to
receive this part, inexplicable.
| CONSTRUCTION |
After reading the other build articles for this kit in Modeling Madness
(much recommended) I began the project anticipating a near Hasegawa like build
experience. But alas, this turned out not to be the case. I had read about close
fit tolerances, and this is true. Scrape the sprue attachment points well.
The slightest blemish on mating surfaces can cause fit problems. Pay attention
to this and test fit, and you should not have any problems. The well-appointed
cockpit built up nicely. Interior colors are yellow Zinc Chromate with the
cockpit having (according to recognized expert Tom Cleaver) a black tint to this
color. Make sure you use the right seat option for your build. No seatbelts are
provided so I added PE lap belts. As I was building the early CU there is no
shoulder harness. The completed assembly is attached to a fuselage half along
with 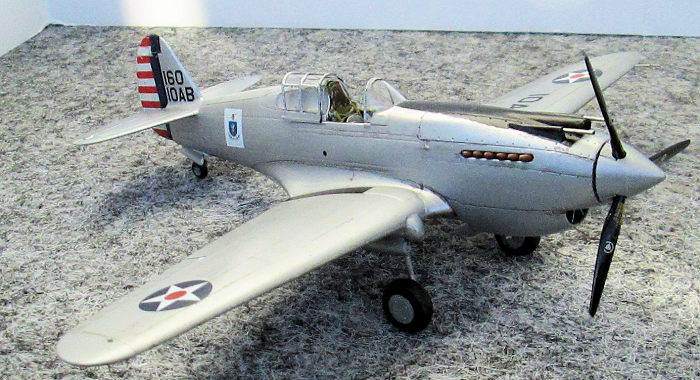 the
four-part radiator assembly. I second Cleaver’s opinion to attach the cowl
panels before closing the fuselage, it’s easier. The fuselage mated well but
required some rubber band clamping to set up with no gaps. No filler was
required here needing just minor seam scraping. Next was the unique wing root
fillets. The one-piece lower wing half has a nice wheel well insert and glues to
the fuselage before mating the upper wing halves. So, I had fit issues with my
wings. No one else in the build articles I have read seemed to have this issue.
On mine the rear of the lower wing just didn’t want to mate to the fuselage
properly. I had to file it down some then clamp it tightly with my fingers until
the glue set to get a decent fit. Try as I might to align the upper wing halves,
I had to settle for noticeable gaps at the wing roots. The biggest issue with my
kit were those separate landing gear knuckles on the wing leading edge. They
glue to a pin on the gear well for alignment. Mine would not mate properly to
the point I wound up cutting off the pins and had to do some filing on the
mounting point. This and the wing gaps required filler on my kit. Next were the
stabilizers and separate elevators. I opted for the open cowl flaps to show off
that detailed radiator assembly. I consulted a 3-view drawing in Squadron
Signal’s P-40 Warhawk in Action for placement of the landing light lens. A 5/32
drill bit proved to be the correct size for the hole. I halted construction at
this point for painting.
the
four-part radiator assembly. I second Cleaver’s opinion to attach the cowl
panels before closing the fuselage, it’s easier. The fuselage mated well but
required some rubber band clamping to set up with no gaps. No filler was
required here needing just minor seam scraping. Next was the unique wing root
fillets. The one-piece lower wing half has a nice wheel well insert and glues to
the fuselage before mating the upper wing halves. So, I had fit issues with my
wings. No one else in the build articles I have read seemed to have this issue.
On mine the rear of the lower wing just didn’t want to mate to the fuselage
properly. I had to file it down some then clamp it tightly with my fingers until
the glue set to get a decent fit. Try as I might to align the upper wing halves,
I had to settle for noticeable gaps at the wing roots. The biggest issue with my
kit were those separate landing gear knuckles on the wing leading edge. They
glue to a pin on the gear well for alignment. Mine would not mate properly to
the point I wound up cutting off the pins and had to do some filing on the
mounting point. This and the wing gaps required filler on my kit. Next were the
stabilizers and separate elevators. I opted for the open cowl flaps to show off
that detailed radiator assembly. I consulted a 3-view drawing in Squadron
Signal’s P-40 Warhawk in Action for placement of the landing light lens. A 5/32
drill bit proved to be the correct size for the hole. I halted construction at
this point for painting.
| COLORS & MARKINGS |
Shark mouthed P-40Bs are the coolest and one of my all-time favorites.
I am a big AVG fan. Six AVG and a 112 Squadron P-40 currently reside in my
collection. I fought the urge to add another and opted for something different
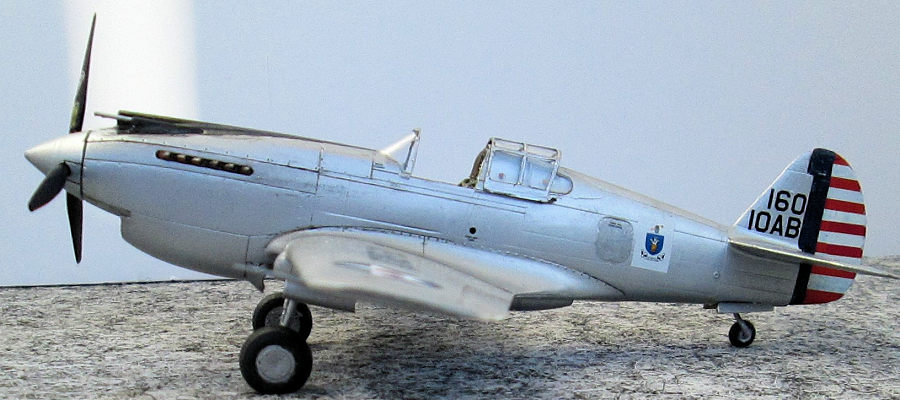
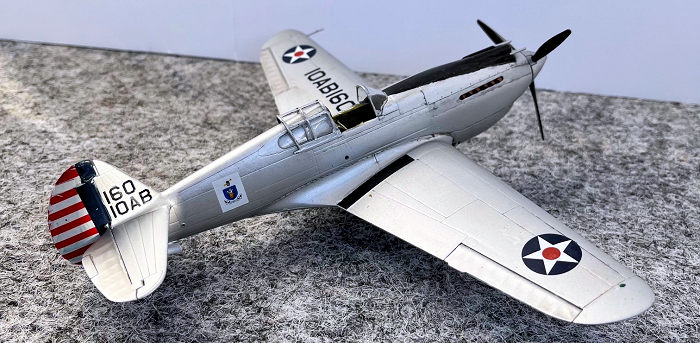
for a change. So, how about a natural metal finish early P-40? Don’t see that
every day. Some research led me to one of the few early production P-40s in NMF
and to Iliad Designs Early P-40s and Tomahawks decal sheet. One of the options
on this sheet is P-40-CU s/n 39-160 assigned to the Air Corps Technical
Command’s 10th Air Base Squadron in 1940 for evaluation. Knowing that NMF
highlights the least flaw and seam, I carefully sanded my filler areas and
fuselage seams. I then sprayed a coat of Tamiya Fine Surface Primer. The primer
revealed areas requiring further work. That dealt with I then sprayed a coat of
AV Model Air Metallic Aluminum 71.062. When dry I inspected the finish and as
expected the silver showed minor flaws needing attention. More filling, sanding,
and panel line scribing. Then final sanding all over with 6000 grit p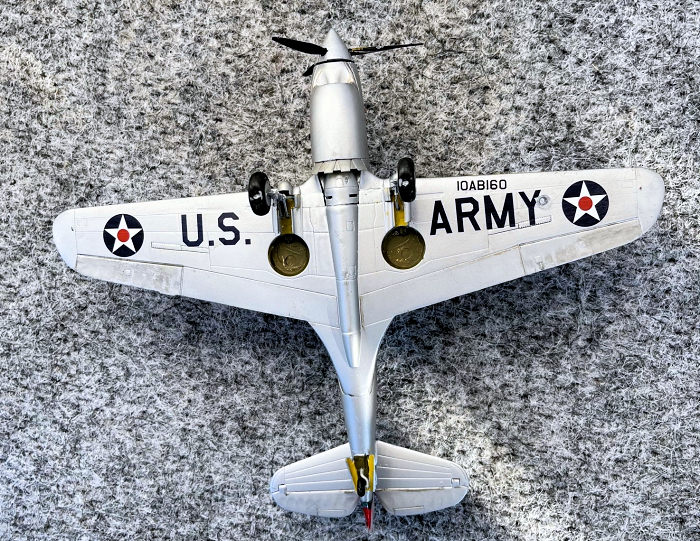 aper.
I then re-sprayed the Aluminum. After curing for a couple days, fabric control
surfaces and cowl panels over the exhaust area were masked with Tamiya tape and
sprayed Mission Models Duraluminum for contrast. The anti-glare panel was masked
and sprayed Tamiya X-1. The canopy was masked with Tamiya tape and the
framework sprayed black first then the Aluminum along with the spinner, gear
doors, and wheel hubs. The one-piece prop was painted Tamiya X-1 Black and the
tires flat black. Gear struts were brush painted Testor’s Flat Aluminum. The MG
blast tubes were picked out with silver. Canvas covers in the gear wells I
painted O.D. as all the canvas I ever saw in the Army was that color.
aper.
I then re-sprayed the Aluminum. After curing for a couple days, fabric control
surfaces and cowl panels over the exhaust area were masked with Tamiya tape and
sprayed Mission Models Duraluminum for contrast. The anti-glare panel was masked
and sprayed Tamiya X-1. The canopy was masked with Tamiya tape and the
framework sprayed black first then the Aluminum along with the spinner, gear
doors, and wheel hubs. The one-piece prop was painted Tamiya X-1 Black and the
tires flat black. Gear struts were brush painted Testor’s Flat Aluminum. The MG
blast tubes were picked out with silver. Canvas covers in the gear wells I
painted O.D. as all the canvas I ever saw in the Army was that color.
The smooth metallic paint did not need to be clear coated for decals. The Iliad Designs decals are good quality though a bit delicate and don’t like to be fiddled with too much. However, I was disappointed with this sheet. Biggest problem is the rudder stripe decals. Both decals are left side, no right side so unusable. Also, they are a little bit out of scale in that the US star insignia and US ARMY are a tad oversized. Had to fish in the big box of stuff for replacements. Luckily, I came up with some, Trumpeter, I think. So, the only decals used from the Illiad sheet are the squadron codes and unit insignia.
The nicely done exhausts were attached. Next was the canopy parts which fit great with no filler needed. The landing gear is well detailed, assembles easily, and provides a solid structure. I attached the landing light lens and the early style pitot and it was done. I passed on antenna wires.
| CONCLUSIONS |
So, not exactly Tamigawa assembly wise. But the only real problems were the landing light and minor wing fit issues. The finished product looks amazing. Easily the pride of my P-40 collection. Assembly issues were no more than one runs into with most model kits. Even beginners should be able to get through these. Highly recommended.
| REFERENCES |
Squadron Signal P-40 Warhawk In Action, Richard S. Dann. Model Airplane International Volume 12 Issue 138 January 2017, kit build article. The internet.
28 August 2023
Copyright ModelingMadness.com. All rights reserved. No reproduction in part or in whole without express permission.
If you would like your product reviewed fairly and fairly quickly, please contact the editor or see other details in the Note to Contributors.