Otaki 1/48 P-40E Warhawk
| KIT #: | OT2-16 |
| PRICE: | CAD$10.00 |
| DECALS: | two options |
| REVIEWER: | Pablo Calcaterra |
| NOTES: | As ferried by RT Smith to the AVG. Seat from Airfix P-40B, scratchbuilt windshield and scallops |
| HISTORY |
Robert T Smith was born in York, Nebraska on February 23, 1918. When his father was hired as Superintendent of Schools the Smith family moved to Red Cloud in 1927. RT graduated from Red Cloud High School in 1935 and continued his studies at the University of Nebraska and then joined the USAAC in 1939. The future ace and famous pilot Robert L Scott gave him a couple of check rides. Smith was commissioned as second lieutenant in June 1940 and became a basic flight instructor. He was very experienced flying trainers by the moment he resigned his commission in July 1941 to join the AVG. A new edict had decreed that pilots taller than 5 feet would not be fighter pilots and as RT was more than 6 feet tall his hopes to become a fighter pilot were squashed. When he read in Time magazine that the Chinese were recruiting 100 pilots to fight against the Japanese RT and his colleague Paul Greene did some enquires, got the address of the recruiter and after sending them a message stating their experience met Skip Adair a week later. They were turned down because they had only experience in BT-9s. They met Adair the following day with a bottle of I.W.Harper and after drinking a lot they managed to convince him to join the AVG (not the only guys who succeeded in joining with this trick during meetings with Adair).
Like Ed Rector, Tex Hill and others they crossed the Pacific in the Bloemfontain and after boarding the Penang Trader they arrived in Burma on September 15, 1941. Two days later RT took to the sky on a P-40 for the first time after Neil Martin explained him the basics of this powerful fighter. As RT was so tall they had to push the seat as far back as it could go and the rudder pedals to the forward top. It was still a tight fit but after taking off RT “was chuckling and grinning to myself like a kid with a beautiful new toy”. Smith was assigned to the 3rd Squadron and fought in the battles over Rangoon in December 1941.
 Being
considered one of the best AVG pilots and with some victories under his belt RT
was chosen as one of the 6 pilots to ferry some brand new P-40Es from Gold Coast
in Africa in February 1942. It took the pilots 12 days and 7,500 miles (as
passengers of CNAC and BOAC) to reach the place where their new planes were
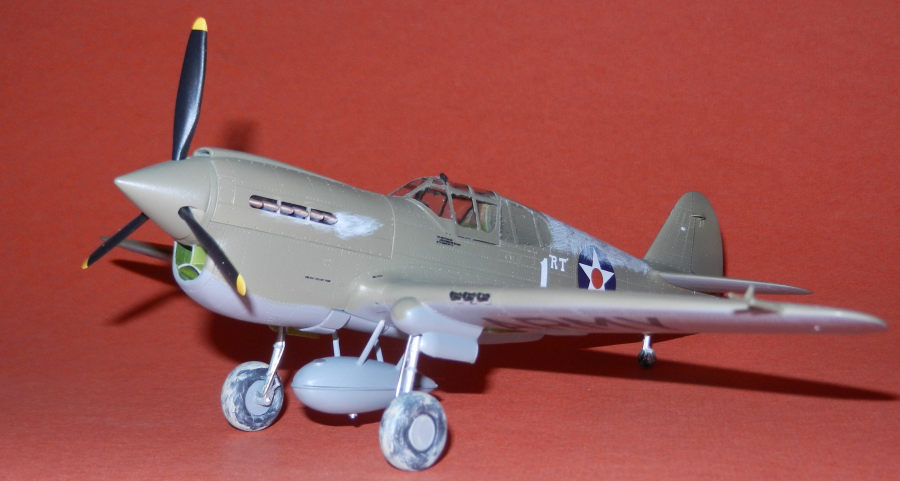
waiting. Smith painted his plane with large white “1” and smaller “R.T” on the
fuselage along with dorsal section of it. The planes still sported the round red
circle in the middle of the US star. Smith said that the planes were “quite a
little nicer than Tomahawks” and that had a better cockpit arrangement along
with more speed, power and guns. The flight back to Burma was not an easy job
with all planes experiencing problems…Smith the most with the prop control going
out, all electrical systems going haywire…once this was fixed the hydraulic
system went U/S. He arrived in Cairo on March 11th where the others were waiting
for him. Along with 3 other of pilots they arrived in Kunming via India and
Burma on March 22nd after almost a month away from their base!
Being
considered one of the best AVG pilots and with some victories under his belt RT
was chosen as one of the 6 pilots to ferry some brand new P-40Es from Gold Coast
in Africa in February 1942. It took the pilots 12 days and 7,500 miles (as
passengers of CNAC and BOAC) to reach the place where their new planes were
waiting. Smith painted his plane with large white “1” and smaller “R.T” on the
fuselage along with dorsal section of it. The planes still sported the round red
circle in the middle of the US star. Smith said that the planes were “quite a
little nicer than Tomahawks” and that had a better cockpit arrangement along
with more speed, power and guns. The flight back to Burma was not an easy job
with all planes experiencing problems…Smith the most with the prop control going
out, all electrical systems going haywire…once this was fixed the hydraulic
system went U/S. He arrived in Cairo on March 11th where the others were waiting
for him. Along with 3 other of pilots they arrived in Kunming via India and
Burma on March 22nd after almost a month away from their base!
Late May Smith and Older were decorated by the Chinese for their role in the combats over Rangoon. A few days later on July 4th the AVG ceased to exist. RT Smith was credited with 8.73 kills.
 He flew to
Calcutta in a CNAC plane on July 4th and returned to rest in the US. He had some
fun with his buddy Bill Reed before deciding to join the First Air Commando
Group as a Major, supporting British commando operations behind Japanese lines.
RT returned to the United States in the late spring of 1944 and was assigned as
Director of Flying Training with the 441st Army Air Force Base Unit at Van Nuys,
California, a P-38 training base.
He flew to
Calcutta in a CNAC plane on July 4th and returned to rest in the US. He had some
fun with his buddy Bill Reed before deciding to join the First Air Commando
Group as a Major, supporting British commando operations behind Japanese lines.
RT returned to the United States in the late spring of 1944 and was assigned as
Director of Flying Training with the 441st Army Air Force Base Unit at Van Nuys,
California, a P-38 training base.
He became a TWA pilot and later started to write scripts for Lum and Abner, the Clyde Beatty Show among others. He also wrote a script for a movie, co owned a toy manufacturing company and worked as a Sales Manager at Weatherby’s Inc. Then in 1955 he joined Lockheed and served as a lieutenant colonel in the Air Force Reserve from 1949 to 1966.
He died at age 77 (the number he had selected for his first P-40 in the AVG) of lung cancer on August 21, 1995.
Besides his role as a fighter pilot in the AVG RT Smith is very well remembered for his contribution to the history of the Group. He enjoyed taking pictures of the planes, pilots and places where they served. He started with a camera borrowed from Bill Reed and some of the pictures were taken with Kodachrome (something new at the time). He then bought a camera with film in November 1941. In February he purchased a Leica with three rolls of Kodachrome. Had it not been for him our visual knowledge of the AVG would have been much poorer.
| THE KIT |
 The Otaki kit
was issued in 1974. With recessed lines and a lot of rivets it was ahead of its
time. The number of parts is quite low, details in the cockpit sparse. It has
been critiqued because the border of attack of the model is not straight but
slightly backwards (from my point of view only visible in plan view and probably
against a ruler under the wing). Decals are for a P-40 in North Africa (RAF) and
Mj Chennault in the Aleutians.
The Otaki kit
was issued in 1974. With recessed lines and a lot of rivets it was ahead of its
time. The number of parts is quite low, details in the cockpit sparse. It has
been critiqued because the border of attack of the model is not straight but
slightly backwards (from my point of view only visible in plan view and probably
against a ruler under the wing). Decals are for a P-40 in North Africa (RAF) and
Mj Chennault in the Aleutians.
My kit had no decals and the clear parts and seat were missing. The box had a Squadron vacuum set of windshield and canopy. It was a great opportunity that my friend Kelly Breen offered me along with some other Otaki kits he had acquired some time ago.
| CONSTRUCTION |
I decided to use the support and seat from the USAAC version of the Airfix P-40B. I had to cut several millimetres of bottom of the supports to make them fit. I made the seatbelts with Tamiya tape painted in beige. The instrument panel, quite basic and with barely visible details was painted black with some dry brushing with aluminum to highlight the details. Everything was painted interior green with boxes and levers in black. The interior of the air intake was also painted interior green along with the landing gear wells. Radiator and air cooler were painted in black with details highlighted with aluminum.
Fuselage halves and wings go together with no fuss. I used a bit of putty along the spine but that’s because I did not do a good job aligning the halves. The joint of fuselage and rear part of the wings needs considerable amounts of putty to cover the gap. This is what I would call the weakest part of the kit in terms of fit. I decided not to use the engine. Because of this I later discovered that it is impossible to make the spinner turn. The flaps for the radiator were replaced with the closed version from the Airfix kit as it has finer details.
 With the
main parts together and before painting them I had to work on the clear parts.
The Squadron ones did not fit because they are for a P-40N. The canopy came from
the spares…actually from my other Otaki P-40 in which I had used a a vacuum
canopy. The scallops were cut from clear plastic from a binder. It took a lot of
patience sanding the edges till it acquired the proper profile to be later on
glued in place. The frames were made with clear decals cut to shape. The kit’s
gunsight was attached.
With the
main parts together and before painting them I had to work on the clear parts.
The Squadron ones did not fit because they are for a P-40N. The canopy came from
the spares…actually from my other Otaki P-40 in which I had used a a vacuum
canopy. The scallops were cut from clear plastic from a binder. It took a lot of
patience sanding the edges till it acquired the proper profile to be later on
glued in place. The frames were made with clear decals cut to shape. The kit’s
gunsight was attached.
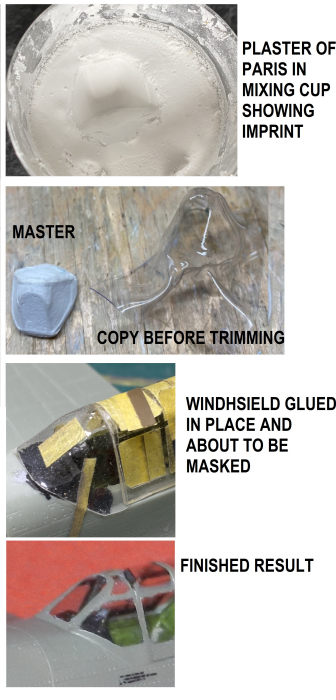
The windshield was more challenging. None of the ones I had in the box of spares would fit nicely on the Otaki kit. Therefore I took my Otaki RAF P-40E from the shelf and as I suspected the windshield was very easy to pluck out (when I built it almost 30 years ago I was not aware I had to remove the paint from areas to be glued…) Then I filled the internal part of the windshield with blue tac. I took a plastic measuring cup and filled it with plaster of Paris (50% water and 50% dry plaster). When it was started to get thicker I pushed the windshield faced down leaving the blue tac on the surface. The following day when the plaster was solid I removed it from the measuring cup and after carefully removing the excess of plaster that had run over the blue tac and after wiggling a bit I was able to remove the windshield leaving a quite good impression on the plaster. Then I took two part epoxy and filled the impression very carefully using a toothpick making sure I was not scratching the imprint. A couple of days later I broke the plaster and exposed quite a good master of the windshield. Using a candle I softened a small square of Squadron’s plastic for clear parts (now not sold anymore). Once it was soft I pressed it against the master which I was holding on a piece of wood using blue tac to temporarily fix it in place. I repeated the operation with 3 different sheets until I achieved a copy I was happy with. With scissors first and then an Xacto blade followed by sandpaper I achieved quite a good fit onto the fuselage. I overdid the cut under the front of the windshield and had to cover it with putty. Otherwise the windshield fit decently. I masked it and the cockpit and internal part of the windshield were covered in damped tissue paper.
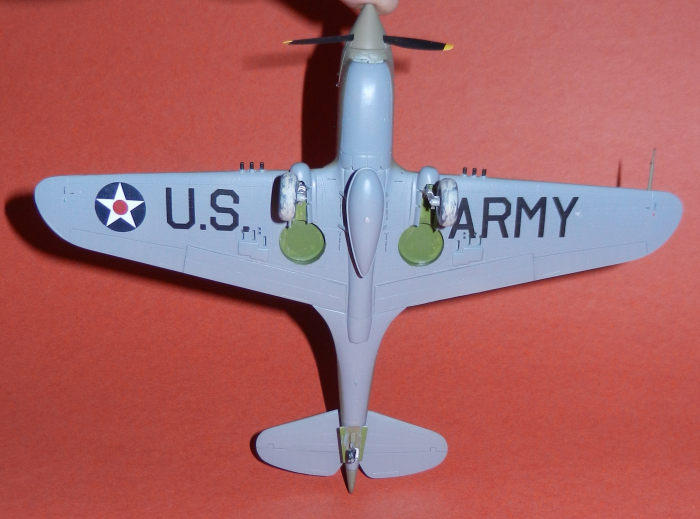
I built the drop tank and fixed the supports onto it. With the plane upside down I inserted the support legs in the holes in the fuselage but I did not use glue. I left the glue to dry overnight and then removed the tank with the support now fixed in place.
More tissue paper was used in the landing gear well. Tail wheel doors were attached. At this point I was able to start painting the kit.
| COLORS & MARKINGS |
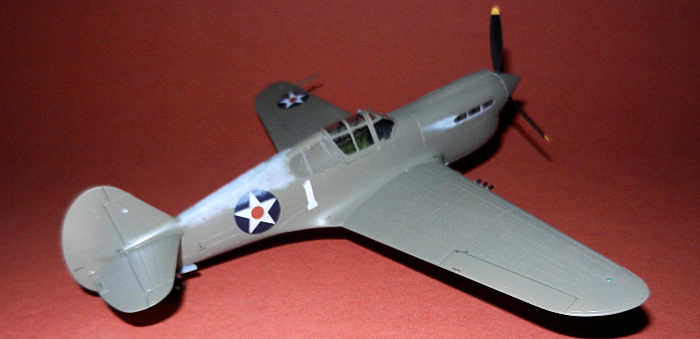
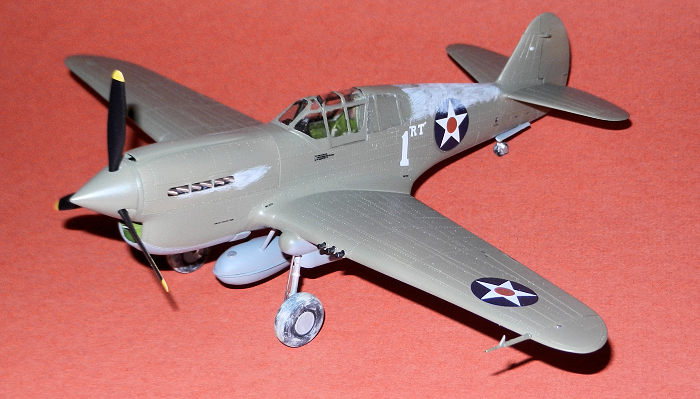
The windshield and canopy were primed in black after they had been masked. I applied a coat of Vallejo light grey primer. Model Master Acryl 4757 Neutral Grey was used for the undersides and drop tank. Then the undersides were masked and the rest of the plane was painted with Model Master Acryl 4728 Olive Drab with 10% white to simulate some sun faded colour.
 The propeller
tips were painted with Yellow and then masked. The blades then painted with
black. I attached the landing gear (minus wheels) that I had previously painted
in Aluminum (Vallejo). The exhaust pipes were painted with Rust and dry brushed
with Bronze.
The propeller
tips were painted with Yellow and then masked. The blades then painted with
black. I attached the landing gear (minus wheels) that I had previously painted
in Aluminum (Vallejo). The exhaust pipes were painted with Rust and dry brushed
with Bronze.
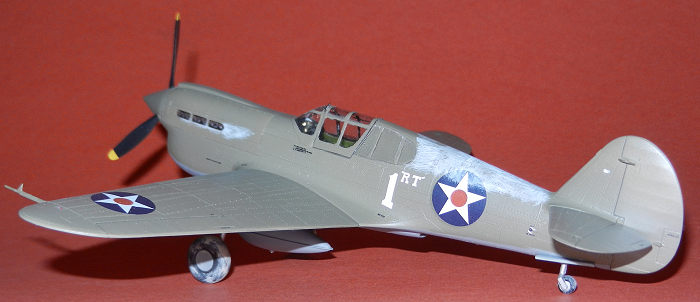
Using very diluted white paint and a flat old brush I dry brushed the spine following the pattern seen in the picture of RT’s “1”. I was quite surprised that I was able to achieve a very good result that mimics the strokes seen in the picture. The same dilution was used to simulate the exhaust stains on the engine covers and under the exhaust pipes (again by the picture mentioned above). Moveable surfaces were highlighted with a very sharp black pencil. Several light coats of Future prepared the kit for the decals.
All decals came from the Cutting Edge set P-40s AVG. (this set was also used for my photo ship with blue lips flown by E. Shilling). I was not decided between Johnny Petach’s “106” or RT’s “1” but I decided to go with the later as a way to thank Brad Smith (RT’s son) for his help during some research I was doing on the AVG planes. I used stencils from the Airfix kit plus some that I made and printed on clear decal paper as these were not present in the Airfix set (i.e. plane identification stencils on fuselage under the canopy)
| FINAL CONSTRUCTION |
I had to make another dilution of white paint to apply it over the top portion of the US roundel on the fuselage. Then the entire kit was painted with Model Master Semi Gloss Clear Varnish.
 I scratchbuilt
the hinge for the rudder on the left side of the tail. Formation lights were
painted with aluminum followed with Model Master Clear Red and Clear Green.
White was used for the lights on the vertical tail surfaces. Exhausts were glued
to the engine covers and these attached to the fuselage.
I scratchbuilt
the hinge for the rudder on the left side of the tail. Formation lights were
painted with aluminum followed with Model Master Clear Red and Clear Green.
White was used for the lights on the vertical tail surfaces. Exhausts were glued
to the engine covers and these attached to the fuselage.
Drop tank was attached. Wheels were glued and then received several strokes of Sand (to simulate what they might have looked during the trip across the Egyptian portion of the ferry trip).Pitot was glued; a rear mirror was scratchbuilt using Evergeen and painted black (front) and Silver (back). There were no external gunsights on this plane per pictures as far as I have seen.
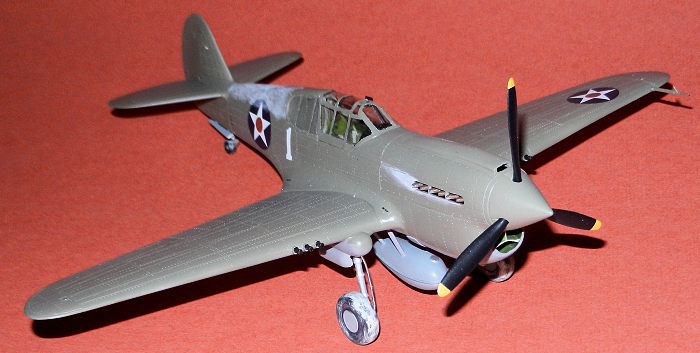
Scallops were carefully glued in place, tissue removed from the cockpit and the canopy glued in place. The propeller was also glued (it does not move) and with this last piece in place another P-40E was finished and added to my collection.
| CONCLUSIONS |
A very simple kit that became challenging due to the lack of clear parts. It became my 6th AVG plane and it honours the famous RTSmith.
Thanks Brad!
| REFERENCES |
Flying Tigers by Daniel Ford
A Tiger’s View of War in the Air by Bob Bergin
AVG Colours and Markings by Terrill Clements (Osprey)
Tigers over China by T. Tullis
Wikipedia
Pictorical History of the Flying Tigers by Larry Pistole
For great pictures taken by Smith visit:
https://www.flickr.com/photos/brad_smith/sets/72157625732910394
30 May 2023 Copyright ModelingMadness.com. All rights reserved. No
reproduction in part or in whole without express permission. If you would like your product reviewed fairly and fairly quickly, please
contact
the editor or see other details in the
Note to
Contributors.