| KIT #: | ? |
| PRICE: | $? |
| DECALS: | ? |
| REVIEWER: | Jim Larkin |
| NOTES: |
| BACKGROUND |
Having already built Hasegawa’s 1/32 scale
P-47D dressed up in Eagle Edition’s excellent “WooHoo” decals, the desire to do
another Jug wasn’t on the “to do” list. That was until Lifelike came out with
their “Tarheel Hal” set.
| THE KIT |
There isn’t any need to review Hasegawa’s
superb P-47D; that has been extensively done by others already.
Right up there with paint schemes like the B-24 “The Dragon
and His Tail” and the MiG-29 Fulcrum Farewell
| CONSTRUCTION |
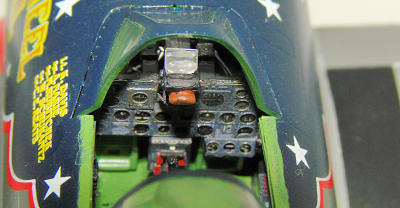 As with
most kits, I started off upgrading the cockpit with Edward’s excellent interior
set. Their colored instrument and side panels are better than anything I could
render. Prior to applying the self-adhesive panels, (which still needed a bit of
cyanoacrylate persuasion) the cockpit was sprayed with Model Master’s acrylic
Zinc Chromate with a wash of burnt umber.
As with
most kits, I started off upgrading the cockpit with Edward’s excellent interior
set. Their colored instrument and side panels are better than anything I could
render. Prior to applying the self-adhesive panels, (which still needed a bit of
cyanoacrylate persuasion) the cockpit was sprayed with Model Master’s acrylic
Zinc Chromate with a wash of burnt umber.
I thought about going with a heavily detailed
engine however, after doing that to my “WooHoo” Jug only to see it all but
disappear inside the cowling, I opted to go with just the basic kit engine.
After spraying a black gloss coat to the cylinders, I high-lighted the cylinder
heads with a dry-brushed Model Master steel enamel to pick out the cooling fins.
The fit and finish of the kit is superb with no
filler needed anywhere. I had a bit of a problem aligning the 4 cowl pieces but
eventually got everything together.
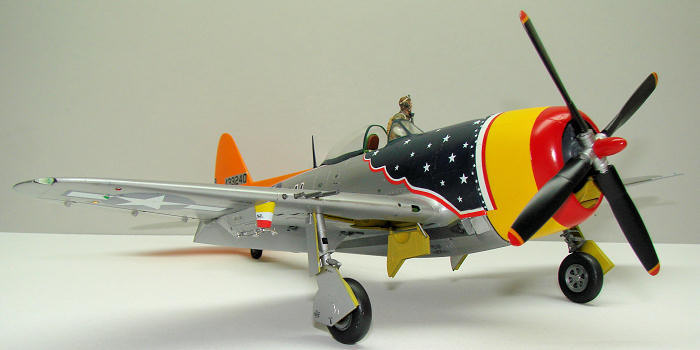
| COLORS AND MARKINGS |
My previous attempts at doing aluminum finishes
left a lot to be desired but with plenty of tips from more experienced modelers,
I forged ahead. Giving the whole plane a wet sanding with 2,000 grit, I then
applied several light coats of Model Master Acrylic Gloss Black. After drying
overnight, another wet sanding with 3,000 grit gave me a butter- smooth finish.
Over a base coat of Alclad dark aluminum, I sect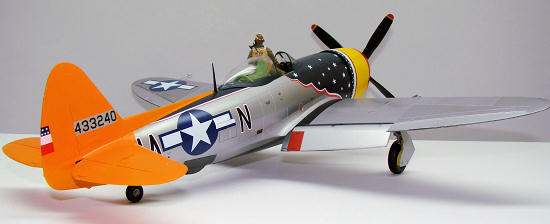 ioned
off various panels with sticky notes and sprayed Alclad aluminum, flat aluminum,
aircraft aluminum, and white aluminum. I can’t praise Alclad enough. This stuff
gives a very realistic finish and dries within minutes.
ioned
off various panels with sticky notes and sprayed Alclad aluminum, flat aluminum,
aircraft aluminum, and white aluminum. I can’t praise Alclad enough. This stuff
gives a very realistic finish and dries within minutes.
Through many previous attempts at painting
yellows and reds, I learned the best technique is to first put down a base coat
of flat white. This gives a base that negates the opaqueness usually experienced
with applying yellow and red and reduces greatly the number of coats needed for
coverage. After taping off the yellow painted cowl, I repainted the front of the
cowl flat white and painted the red band.
The Lifelike decals give you 2 options for the
cowl flaps. You can either use the red, white and blue star covered decal or the
stars decal over your red, white and blue painted cowl flap. I went with option
2 because of the blue shade. More about that in a minute. Using the same
technique I did on the cowl; flat white – gloss white – tape – red – tape –
blue, the cowl flaps turned out perfect. Remember to use a toothpick to score
the tape in the panel lines to prevent bleed-through. The same option is given
for the propeller tips; either use the provided decals or paint them orange and
red. I went with th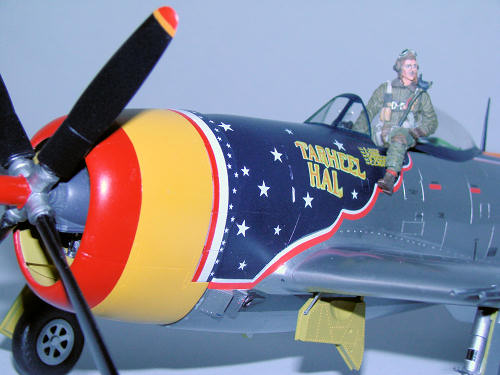 e
later.
e
later.
The only negative comment I can make about the
Lifelike Decals is that the shade of blue is not specified. After copying the
decal sheet on my color printer, I tried several shades of blue to match the
aft-fuselage blue decal; all to no success. Believe it or not, the closest I
could come was Model Master Navy Blue. Using a template cut from one of the
copies of the decal sheet, I taped the aft-fuselage and applied the Navy Blue
paint. Because of the size of the 1/32” Jug, the Lifelike decals gives you a
tape template to use to paint the forward fuselage blue rather than a decal as
they do for the smaller scales.
Finally I got to the orange tail assembly.
After taping, (did I say I used a ton of tape during this project) I sprayed a
base coat of flat white and then the orange. Allowing everything to dry for a
day I sprayed several light coats of Future cut with 25% rubbing alcohol. I cut
the Future because I’ve found it goes on smoother and dries faster.
The decals went on without a hitch, except for
the Yellow “Tarheel Hal” overlay in front of the cockpit. Mine fell apart in the
water and Dave from Victory Models was kind enough to provide me with a
replacement. For the aft-fuselage blue, I cut the white and red border stripes
off the decal sheet and applied them to the edge of the painted blue with no
problem. A final coat of Future was followed with a light coat of Model Master
Semi-gloss. I used M.V. Products railroad lenses for the position and landing
lights on the lower wing.
| CONCLUSIONS |
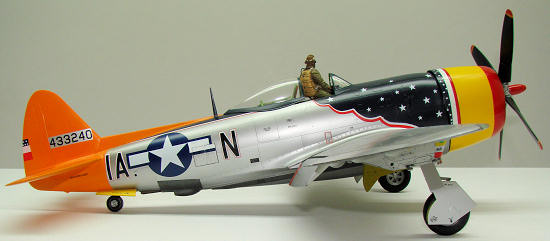 In the
end, I had a great time recreating one of the most colorful airplanes I ever
attempted. Previously, I tried 3 times to do justice to George Preddy’s “Cripes
A’ Mighty” using Dragon’s P-51D only to have all 3 crash on their test flight to
the “Circular File”. So I didn’t think George would mind sitting on the cockpit
sill of “Tarheel Hal” for the photo shoot.
In the
end, I had a great time recreating one of the most colorful airplanes I ever
attempted. Previously, I tried 3 times to do justice to George Preddy’s “Cripes
A’ Mighty” using Dragon’s P-51D only to have all 3 crash on their test flight to
the “Circular File”. So I didn’t think George would mind sitting on the cockpit
sill of “Tarheel Hal” for the photo shoot.
December 2009
If you would like your product reviewed fairly and quickly, please contact me or see other details in the Note to Contributors.