Hobbycraft
1/32 P-51A Mustang "Air Commando"
|
KIT #: |
HC 1712 |
|
PRICE: |
$43.15 |
|
DECALS: |
Two options |
|
REVIEWER: |
Bill Koppos |
|
NOTES: |
Check box for decals first. Mine were missing. |
History of the P-51 Mustang? You've seen that before. The
story of the First Air Commando, and the early Mustangs the fighter unit
flew, is less well-known. Every story has a beginning, and before there
were hordes of silvery bubble-topped P-51D's sweeping the skies, a small
group of recycled training P-51A's were in down-and-dirty action over the
green hell of Burma.
The first Air Commando Group 's history is integral with that
of Wingate's "Chindits", a British army unit organized by one Orde Wingate,
an unorthodox type who's specialty was behind- the -lines raiding and
infiltration. His ideas were based on groups of troops getting behind the
enemy lines, and operating as self-sufficiently as possible, including by
airlifts. His first attempt at this in Burma in 1943 failed due to
insufficient air support, and for his next try, the politically connected
Wingate pulled strings all the way back to Winston Churchill and managed to
get an entire air group assigned to his command. This was the
 beginning of
the First Air Commando. (From here on I'll call it the 1st AC). This was
organized as a unit to be in support of the ground troops all the way. It
included transports, gliders, bombers, fighters, light planes, and even the
first helicopters in use in combat anywhere. The object was to insert the
troops, supply them thereafter, and be able to evacuate wounded quickly. The
fighter component would protect the transports and bombers and do some
bombing themselves.
beginning of
the First Air Commando. (From here on I'll call it the 1st AC). This was
organized as a unit to be in support of the ground troops all the way. It
included transports, gliders, bombers, fighters, light planes, and even the
first helicopters in use in combat anywhere. The object was to insert the
troops, supply them thereafter, and be able to evacuate wounded quickly. The
fighter component would protect the transports and bombers and do some
bombing themselves.
To command this outfit experience was needed. It was found
in the form of Colonel Philip Cochrane, an extremely talented pilot and
leader. Col. Cochrane had already found action at the head of an ad hoc P-40
unit in North Africa flying from a behind-the-lines airfield in Tunisia. He
had managed to down two Nazi planes and cause them all kinds of trouble. The
way he handled his flying and his squadron just added to the material used
by Milton Caniff in drawing the "Terry and the Pirates" comic strip, with
it's character "Flip Corkin", of course based on Cochrane. Serving as his
lieutenant was John Alison, he formerly of the 23rd FG, descendants of the
"Flying Tigers", where in China he became an "Ace". Other former "Tigers"
were in this outfit, like R.T. Smith, Bob Petit, and Arvid Olsen. As if this
weren't enough Grant Mahoney was here to, an aggressive veteran of the
Philippines and Java. Expertise would not be in short supply.
Airplanes, however, were in short supply, with fronts all over
making their demands. Fighters for the 1stACG were found in Florida, on
training fields.30 well-used P-51A Mustangs were sent to India, presumably
because these Allison-engined machines were suitable for the low-level close
support mission, while still possessing good range and performance. Range
would be critical in the Burma area, as distances were long a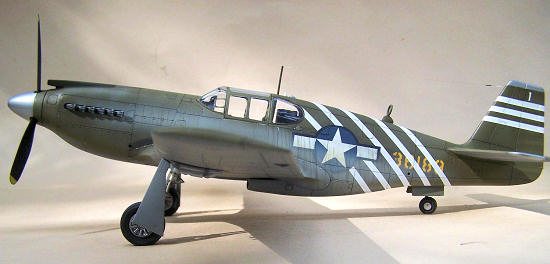 nd the troops
to be supported would be behind enemy lines. The P-51A was good here to
begin with, helped by the ability to carry under wing drop tanks. Men and
machines bought together, it was time for action.
nd the troops
to be supported would be behind enemy lines. The P-51A was good here to
begin with, helped by the ability to carry under wing drop tanks. Men and
machines bought together, it was time for action.
1st ACG's premier mission was on Valentine's Day 1944, when 13
P-51's led by Cochrane escorted B-25's to attack Japanese installations at a
place called Zaundaing. While strafing the target, the ACG fighters were
"bounced' by the old Burma hands of the 50th Sentai, flying Ki43 Hayabusas.
The ACG was taught a lesson by these veterans, as 2 Mustangs went down and 3
were damaged. It was a harsh introduction to combat. Phil Cochrane was
forbidden by Orde Wingate himself from flying again, as his loss could not
be afforded. Things improved in the following weeks as missions were flown
and experience gained. Most of these were flown against Japanese airfields
to soften up opposition to "Thursday", the big airdrop/glider operation
behind the enemy lines. This occured on March 5, 1944.
The target: two clearings in the jungle coded "Broadway" and
"Chowringee". 1st Acg C-47's towed 2 gliders apiece into these areas,
where landing strips were quickly built. Over the next 3 days nearly 600
transports landed troops and supplies, which struck out into the jungle to
cause the Japanese grief. In the ensuing weeks detachments of 1st ACG
mustangs were based at Broadway as were some RAF Spitfires. 3 Japanese
Sentais were in the area, and the radar set had limited range, making things
rather dangerous. Attacks on the Japanese airfields were frequently made to
keep their planes grounded. On 8 March Grant Mahoney led a strike to Aniskan,
where several Ki-43's were destroyed in air and on the field. The P-51's
returned via the Japanese airfield at Shwebo, diving to attack many aircraft
seen there. Lt. Herbert Krug shot up 6 alone, and others downed more. All
through March and April the 1st ACG was very active, beating up the JAAF
bases while keeping their heads down during enemy fighter sweeps, and
supporting the Chindit columns. A tactic taken from Phil Cochrane's time in
Tunisia was used. A weight was tied to a cable, and trailed from the P-51's
tail. This was flown low over enemy communications lines, ripping them out.
"Bazooka" type rocket tubes were used here with some success on airfield
attacks. There were losses, too. Lt Krug and 3 others were caught taking off
on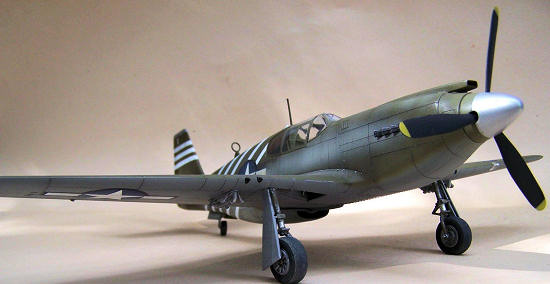 March 16th by the 50th Sentai, and Krug was hit and burned, being sent
stateside.
March 16th by the 50th Sentai, and Krug was hit and burned, being sent
stateside.
Things turned bad on 24th March. Orde Wingate was flying in
a B-25 when it hit bad weather and crashed, the Chindit leader being killed.
His replacement was a conservative soldier, and the mission lost it's
driving spirit. The campaign ground on, the airfield attacks being the main
item. On 4th April several kills were scored in air and enough on the ground
that the 50th Sentai had to be sent back to Saigon for re-equipment. On
April 17th, Grant Mahoney got his elusive 5th "kill" to reach acedom. It had
been a long road from the Philippines for this unflappable, motivated pilot.
The grind continued into May. The small number of P-51A's
were wearing out, and so were the flyers, and missions were fewer. 19 May
proved to be their last day of operations. A pilot was lost, but Lt. Jack
Klarr bagged a Ki-43. In the afternoon a bombing raid was their 230th and
last mission, as they were withdrawn for "re-organization". The 1st ACG's
striped fighters had 10 air kills, with many many others destroyed on
airfields. Burma was tough on men and machines, the constant heat and
humidity, storms out of nowhere, and forbidding jungle making it one
horrendous battleground. The 1st ACG had done one hell of a job.
I originally delayed buying this model because there were
no decals in the box, nor in the A-36 issue my LHS had either. After a
2-week wait the LHS owner had the decals so I took it home. (The A-36 is
still there if anybody wants it). The box is large,
 cheap corrugated
cardboard of the PIA side opening type. The painting/decal charts are on the
box bottom, one for our 1st ACG, the other a postwar Dominican Republic A/C,
colorful with large numbers if anyone likes that. 5 sprues are there, one
being the well-done clear parts. Drop tanks and bazooka type rocket
launchers are provided, both of which the 1st ACG planes used. There are two
prop types, and flattened or regular tires. The fuselage has a separate nose
area, must be B/C versions coming.
cheap corrugated
cardboard of the PIA side opening type. The painting/decal charts are on the
box bottom, one for our 1st ACG, the other a postwar Dominican Republic A/C,
colorful with large numbers if anyone likes that. 5 sprues are there, one
being the well-done clear parts. Drop tanks and bazooka type rocket
launchers are provided, both of which the 1st ACG planes used. There are two
prop types, and flattened or regular tires. The fuselage has a separate nose
area, must be B/C versions coming.
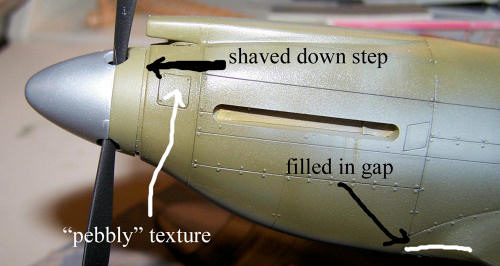
The plastic used is a soft type, which is good because it
makes cleaning up the large sprue attachment points easier. There is an
overall "Pebbly" texture to the surfaces, I've heard it called "Matte" but
it is kind of rough and never entirely disappears under paint. Panel line
and rivet engraving is fine enough. I've heard from several sources, and do
believe, that this kit is the Accurate Miniatures 1/48 model scaled up. So
if you've done one of those and liked it, you will like this one. Anyway
let's get out the sprue cutters and get gluing.
I started with attaching the fuselage fronts to their
respective halves. Fit here was very good and the parting line on a panel
line, no filling or sanding required.(Hello,Hasegawa? got that?) Upon test
fitting the fuse halves I found the rudder to be thick at the trailing edge.
A couple of minutes on the table top with 180 grit sandpaper fixed that. Now
on to cockpit assembly. At this point let me say I am NO Mustang expert.
P-40's and Buffaloes I can help you with, but there are many others out
there more qualified to tell you which cockpit floor is right, what color it
is, etc. My main object in doing this kit was to try and reproduce the
weathered, streaky look of the box art plane, based on a well-known photo.
So Mustang boffins, please be gentle with me.
 The interior provided is OK,
enough detail to look busy when painted, but the aftermarket people could do
well here. 2 seats are on the sprues, I used the one indicated in the plan.
based on internet refs, admittedly restorations, I painted the cockpit a
base of zinc chromate green, with black and aluminum details, and red/white
knobs/switches. The instrument panel provided is nicely detailed and takes
drybrushing nicely. The tiny box that tells you the cockpit colors says to
do the seat "decals over black". Huh? I could not locate any seat belt
decals, so this mystery was not solved. I've seen better English on Japanese
instruction sheets.
The interior provided is OK,
enough detail to look busy when painted, but the aftermarket people could do
well here. 2 seats are on the sprues, I used the one indicated in the plan.
based on internet refs, admittedly restorations, I painted the cockpit a
base of zinc chromate green, with black and aluminum details, and red/white
knobs/switches. The instrument panel provided is nicely detailed and takes
drybrushing nicely. The tiny box that tells you the cockpit colors says to
do the seat "decals over black". Huh? I could not locate any seat belt
decals, so this mystery was not solved. I've seen better English on Japanese
instruction sheets.
I resorted to an aluminum seat a la P-40's. Would a
little more information in this area hurt, Hobbycraft? I'm also still trying
to figure out the "twisted arrow" marking that appears several times. No
explanation is given at all. Nothing like a little mystery with your
modeling. Before sticking the fuselage halves together one must fill the
machine gun apertures in the lower nose area, which are used on the A-36 and
Brits, but not our P-51A. I just stuck some scrap styrene in the holes, let
dry overnight, sand and smooth. Install the tail wheel strut and rear
radiator flap, and begin to juggle the cockpit parts into place. The
locators are a bit sloppy but go slow and all will fit. When together the
fuselage requires minimal seam sanding.
Upon test fitting the wing halves, I saw the machine gun
holes were a little large and even on the leading edge. This ain't right, as
the outers are supposed to be lower than the inners. I decided to fix this,
so I filled the upper outers with styrene, and shaped the bottom holes to
look right. I also shrunk the inners a bit with CA glue and sanding. It
definitely looked better. At this point styrene strips were installed to
make the gun tubes easy to put in later, and the wings were stuck together.
Fitting wing to fuselage, all was well except the front tab area/fuselage,
which required more styrene strip to fill large gaps on both sides. The
lower radiator scoop was next, attaching this leaves a step that needs lots
of CA filling/sanding to achieve a smooth transition. Both the air intake
nose scoop and one-piece stabilizers left gaps that needed filling. Finally
all was smooth and the dust vacuumed, the cockpit aperture masked, and it
was time to repair to the paint room.
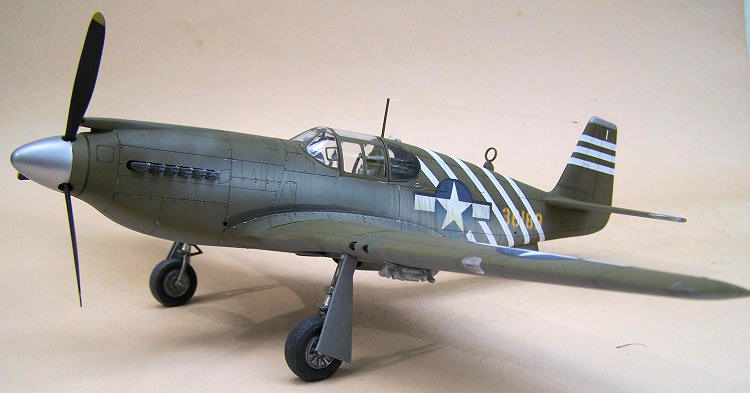
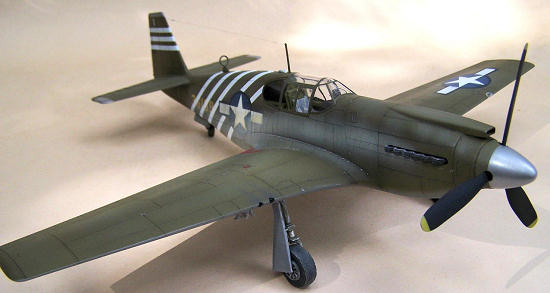
 For many years I had seen in various places a photo taken in
1944. It shows 2 1stACG P-51A's flying above Burma's hills. The foremost
aircraft being "Miss Virginia", flown mostly by one Bob Petit, and in the
background is our subject, plane no.1. Both machines are extremely
weathered, heavy exhaust staining being prominent, and many streaks down the
sides messing up the star insignias. Supposedly this was the Mustang flown
by Commander Cochrane, and since he ended up flying one mission, one would
guess by many others, perhaps second in command Alison? At any rate, I
always wanted to try and reproduce this messy look and here was my chance.
For many years I had seen in various places a photo taken in
1944. It shows 2 1stACG P-51A's flying above Burma's hills. The foremost
aircraft being "Miss Virginia", flown mostly by one Bob Petit, and in the
background is our subject, plane no.1. Both machines are extremely
weathered, heavy exhaust staining being prominent, and many streaks down the
sides messing up the star insignias. Supposedly this was the Mustang flown
by Commander Cochrane, and since he ended up flying one mission, one would
guess by many others, perhaps second in command Alison? At any rate, I
always wanted to try and reproduce this messy look and here was my chance.
Examining the photo one notices the exhaust staining is
very light, almost white. This has been attributed to the extremely lean
fuel mixes these Allison engines were flown on, to stretch the range,
combined with the lead in the gas itself. As to the streaks, I always
thought this was melted paint washed down by rain. Then while driving one
day, I passed a diesel rig. under it's exhaust were black streaks, looking
very familiar. Thinking about this and other times I had seen it, I realized
this effect was from small soot particles blowing out of the exhaust pipe,
then settling on the damp surface below, any wind and water making a streak.
At least this explanation satisfied me. Another thing I noticed was at the
time the photo was taken, the white ACG stripes were painted OVER these
streaks, and the yellow side serial numbers. I can only guess these planes
came from Miami in this condition and not even cleaned up before the stripes
were applied. Talk about ridden hard and put away wet!
At any rate I began to plan how to reproduce all this.
Obviously a coat of Olive Drab/Neutral Gray was needed, first things first.
I wiped the model down with alcohol first to get rid of my greasy handprints
and shot the N/G unders. I always add a touch of white to my paints for
"scale effect". Neutral gray as it comes from the Testor's Model Master jar
seems a little dark to me. MM Olive Drab was used on top, sprayed freehand
as carefully as possible for a tight line on the Gray. I added some more
white, and sprayed the centers of some panels, mostly upper ones, to fade the
paint in the Burma sun. Then I used a mix with a drop of black to do the
upper panel lines, and some random patches here and there for a messy "used"
effect. I then glosscoated the model with Testor's Metallizer Sealer, and
started applying decals. I was a little worried about my better late than
never decals, as they looked kind of thick, but they turned out to be fine,
settling with a light coat of Solvaset Decal Solution. The panel lines were
rather deep, so I ended up cutting along these to get the decals to settle
into them ,a little more Solvaset being applied. T
The U.S. stars/bars come in
separate pieces, the round stars being placed on top of the bars. This left
a little white around the edges, needing touch up. This didn't matter on the
fuselage, as we're going to mess up these decals now. At this stage I had to
plan the exhaust stain/stripe matter. As I had determined the stripes were
painted OVER the staining and around the stars. Now was time for the
stains. The Cochrane plane, no.1, was not as stained as the Miss Virginia
one, so I added some White to the regular Olive Drab until it was quite
light, and made it a th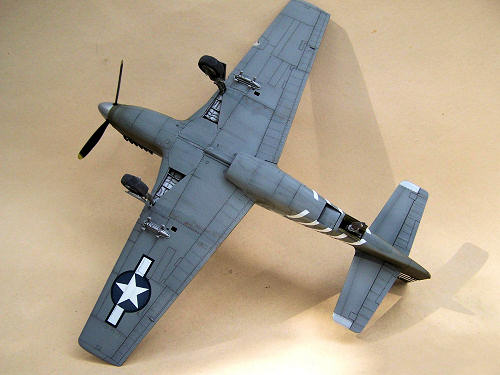 in mixture. Spraying from exhaust to the back I
built up the staining in a curved pattern, over the lower half of the
stars, until I judged it enough. Now for the best part. I mixed up some
Olive Drab "Sludge"-MM Acrylic OD, water and dish soap, darkened with a drop
of black. Working with the reference pic and a fine brush, the soot stains
were streaked on over the exhaust stains and decals. The beauty of water
wash is if you mess up, you can remove it and redo it. A spit dampened
finger does this perfectly. I streaked and fiddled till I had what I wanted,
it even looked like the photo a bit! It was even embellished a bit by
streaking it forward of the cockpit area as seen in other pics of worn CBI
aircraft. I put the serials on, and so far so
good.
in mixture. Spraying from exhaust to the back I
built up the staining in a curved pattern, over the lower half of the
stars, until I judged it enough. Now for the best part. I mixed up some
Olive Drab "Sludge"-MM Acrylic OD, water and dish soap, darkened with a drop
of black. Working with the reference pic and a fine brush, the soot stains
were streaked on over the exhaust stains and decals. The beauty of water
wash is if you mess up, you can remove it and redo it. A spit dampened
finger does this perfectly. I streaked and fiddled till I had what I wanted,
it even looked like the photo a bit! It was even embellished a bit by
streaking it forward of the cockpit area as seen in other pics of worn CBI
aircraft. I put the serials on, and so far so
good.
At this point it was decided to use the decal stripes provided. It would
have looked good with painted stripes but I could not risk pulling up the
decals with the loads of masking tape that would be used. The other decals
had performed well so I began to stripe the 'Stang. Matching the angles to
the photo, I worked from front to back, from the center of the fuselage
spine, trimming along the center line and around decals with a new #11
blade, and ending short of the bottom center line. I could find no shots of
the undersides of these planes, so I assumed the crews would stop short of
crawling around under the low-to-the ground Mustang. After all this the
rudder stripes were a piece of cake. It all worked out pretty well and there
were a couple of stripe pieces left over. Whew!
The rest of the little decals went on, the red wing root
warnings are not the right angle, so were cut and straightened. The landing
gear is simple just doors struts and wheels. I chose the flattened (not
bulged) wheels. The molded tread is weak and once the seam is sanded, are
very bald, like many CBI tires. They also look too square, aftermarkets are
needed here. The struts have tabs on the mounting pins with no matching
slots on the wing, so these were cut off, and the too long pins trimmed down
till fit was correct. I have been told that P-51A's have locks on their
inner gear doors and do not droop when parked, so mine were painted and
glued "up". Fit was fine. I chose the "paddle
 bladed" propeller based on the
pictures.
bladed" propeller based on the
pictures.
The stabilizer tips, rudder tip and spinner were aluminum in the
1st ACG, these were masked and painted. The spinner appears too slim in
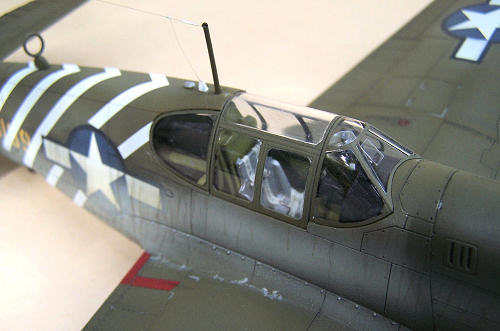
profile but I didn't go nuts fixing it. Another resin bit is needed. The gun sight provided is a strange thing, I made my own from plastic bits and
acetate. For once I decided to have a closed canopy. It was fairly clear,
and the plane looked better with it's lines undisturbed. So it was duly
masked along with the windscreen and rear windows and given its
inside/outside colors. Upon trying to put it on, imagine my shock when I
encountered a problem! (I always screw up canopies). This one was too narrow
for the fuselage, about an eighth of an inch. How to spread it out without
fouling it up? I held the bottom edges apart as much as I dared, and held
the top next to a light bulb. Believe it or not, I got away with it (singed
fingers and all) with just a hint of crazing in the clear canopy. It had
widened just enough to look right. Yay.
Both antenna posts given were wrong according to pics so I
made one out of sprue, and installed nylon thread wires. I cut brass tubing
guns to fit and armed the 'Stang. The landing light lens needed just a
touch of fiddling to fit, lights and lenses were painted, and I had an Air
Commando Pony ready to ride.
Not a bad build, it was punctuated by small annoyances here
and there. The basic kit is very raw material for a Mustang person who wants
to detail it, if some aftermarket stuff comes around. It really could use
some wheel, cockpit and spinner improvements. It might have been interesting
to put those "Bazooka" rocket tubes on it, as these were used in Burma
frequently. I'm thinking about that A-36 that's still sitting on the LHS
shelf......
--Air War for Burma Christopher Shores Grub Street 2005
--Mustang and Thunderbolt Aces of WW2 Osprey Aircraft Of the
Aces 26 John Stanaway 1999
--US Army Air Force Fighters Part 2 WW2 Aircraft Fact Files
Green and Swanborough 1978
September 2009
Bill Koppos
Copyright ModelingMadness.com. All rights reserved. No reproduction in part or in whole without express permission from the editor. If you would like your product reviewed fairly and quickly, please
contact
the editor or see other details in the
Note to
Contributors.
Back to the Main Page
Back to the Review
Index Page 2024