Special Hobby 1/32 Hawk 75M/N/O
|
KIT #: |
32038 |
|
PRICE: |
$ |
|
DECALS: |
Three Options |
|
REVIEWER: |
Bill Koppos |
|
NOTES: |
Limited run kit |
The Curtiss 75 Hawks sure did get around. For an
aircraft I often see referred to as "second rate" or "obsolescent" they
served far and wide, and on both sides of WW2. It was the preferred fighter
of the French Armee D'el Air, giving away nothing but speed to the vaunted
Me109. The Finnish air Force used them long and well, and in Burma the Brits
turned with the Ki-43 Hayabusa, called the most maneuverable fighter of the
War. A pilot flying in his pajamas and with only one machine gun scored a
kill over Pearl Harbor, but here we are concerned with the machines that saw
combat first, in the skies over China.
First flown in 1935 with a retractable-landing gear, Curtiss
produced a simplified version as a demonstrator to shop around to less
sophisticated customers. This machine featured a fixed landing gear in
streamlined fairings and a less powerful engine
 than the US Army prototype.
The aircraft featured a gleaming, high polish finish on it's unpainted metal
skin. This, plus an almost 280 MPH speed, caught the attention of one Claire
Lee Chennault, later famed as the founder of the American Volunteer Group.
At that time he was serving the Chinese government in an advisory position,
and when the plane was offered to China in 1937 it was duly purchased for
Chennault. He supposedly used it in an "observation" role, but I can't
imagine this ex-U.S. Army man with an armed "hot" fighter not wading in to
the plenty of Japanese targets available. Details of the plane's use are
hard to find, and it ended up ground-looped by a another pilot and written
off some months later, an inglorious end shared with many Chinese Air Force
airplanes. China later contracted for 30 more fixed gear Hawks, but their
effectiveness was limited by poorly trained pilots using them in rough
conditions.
than the US Army prototype.
The aircraft featured a gleaming, high polish finish on it's unpainted metal
skin. This, plus an almost 280 MPH speed, caught the attention of one Claire
Lee Chennault, later famed as the founder of the American Volunteer Group.
At that time he was serving the Chinese government in an advisory position,
and when the plane was offered to China in 1937 it was duly purchased for
Chennault. He supposedly used it in an "observation" role, but I can't
imagine this ex-U.S. Army man with an armed "hot" fighter not wading in to
the plenty of Japanese targets available. Details of the plane's use are
hard to find, and it ended up ground-looped by a another pilot and written
off some months later, an inglorious end shared with many Chinese Air Force
airplanes. China later contracted for 30 more fixed gear Hawks, but their
effectiveness was limited by poorly trained pilots using them in rough
conditions.
Fast forward to 1988, Bill Koppos visits Tucson, Arizona. Looking
for things of interest he finds Paul Gaudette's Military Book Store. Within
the walls filled with good stuff is "The Curtiss Hawks", covering the P-1
through the P-40. There in the middle was a photo of a most beautiful
airplane, a fixed-landing gear P-36, of course in reality the Hawk 75 China
demonstrator. I have wanted a proper model of this one since then, my first
attempt from the Hobbycraft 1/48 kit being a foil job that convinced me to
never do that again. Special Hobby released a 1/72 Hawk 75M some years ago,
and finally a 1/32 version appeared. 'Tis a golden age of modeling we're
living in.
Obviously this model is based on the previous Special Hobby 1/32 P-36
series, and having built the P-36 "Pearl Harbor Defender" boxing I pretty
much knew what to expect. What I did not expect was to open the box and find
the wrong front end. Special Hobby split the fuselage at the front to cater
for the Twin Wasp and Wright Cyclone versions, and my box contained the Wasp
parts I had used on the P-36. This of course won't do for a Cyclone-engined
plane. An E-mail to CMK (the parent company) produced a promise to send
replacement parts. If you buy at a Hobby outlet, check your box before
paying!
 The rest were standard P-36 parts but with the addition of a
sprue of 3 sets of wheel 'spats", for each of the 3 versions depicted, the
20mm cannon pods for the Thai version, and a new tailwheel insert to cater
to fixed gear models. 2 etched frets are included, a real nice color etched
one, with a 3 piece "sandwich" for the instrument panel, some cockpit
placards and details, and a seat harness. The other is a stainless sheet
with the mysterious Curtiss underwing light bomb racks complete with tiny
braces. I didn't use this on my model but you bet your bippy I'm saving it
for future use when the mythical 1/32 P-40F's are finally released. Also on
this fret are some nice gun charging handles, more cockpit details and a
ring and bead gunsight set. You will be left with a pile of spare P-36
landing gear parts and if you are like me and get the Wasp parts, a complete
P&W Wasp for the spares box, in case your French Hawk or P-36 blows an
engine.
The rest were standard P-36 parts but with the addition of a
sprue of 3 sets of wheel 'spats", for each of the 3 versions depicted, the
20mm cannon pods for the Thai version, and a new tailwheel insert to cater
to fixed gear models. 2 etched frets are included, a real nice color etched
one, with a 3 piece "sandwich" for the instrument panel, some cockpit
placards and details, and a seat harness. The other is a stainless sheet
with the mysterious Curtiss underwing light bomb racks complete with tiny
braces. I didn't use this on my model but you bet your bippy I'm saving it
for future use when the mythical 1/32 P-40F's are finally released. Also on
this fret are some nice gun charging handles, more cockpit details and a
ring and bead gunsight set. You will be left with a pile of spare P-36
landing gear parts and if you are like me and get the Wasp parts, a complete
P&W Wasp for the spares box, in case your French Hawk or P-36 blows an
engine.
Clear parts include 3 windscreens, and one canopy hood, which of
course will be wrong for my demonstrator, of which more later. Decals are
provided for 3 export versions, Chinese, Thai, and Argentinian, any of which
will make a neat, colorful model. It was hard for me not to do the Thai,
with it's big wing guns, but life is short. If you're really daring, there
are rumors China bought 2 more fixed gear Hawks, one of which was
cannon-armed, and flown with brief success by an American mercenary named
Gus Weigel. Well, let's stick some parts together.
 After 2 nudging E-mails CMK sent my Cyclone fuselage parts. Took about
3 months all told but finally they arrived. I have heard that others have
had trouble getting any response at all. Anyway the model can at last be
started. I believe it is much better to glue the front to the backs of each
side first, carefully lining them up. It is easier to fix the legnthwise
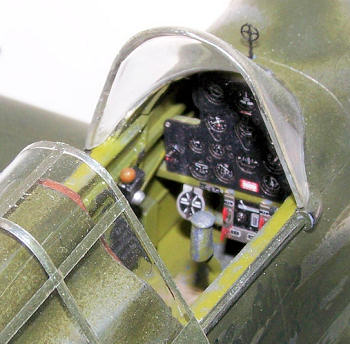
seams than side ones. Before the halves can be joined the cockpit and engine
must be done and installed. Pictures of the Thai Museum's Hawk show a
yellow/green chromate mix inside, I added a drop of black to some Yellow
Zinc chromate, making the seat a bit greener than the rest. The 3-part color
etch instrument panel is really swell looking when assembled, and the
placards add a nice touch. I chipped the dickens out of the wear areas using
Rub 'n Buff and made a set of lap belts from lead foil. I didn't use the kit
harness as photo-etch is too stiff for me, too hard to "pose" on the seat.
Now the nicely detailed Wright Cyclone powerplant was assembled, ignition
wires added, and painted aluminum, with black pushrods and a heavy black
wash. This was attached to the firewall and put into the right fuselage
side, the fuselage now glued together with it's attached cockpit assembly,
taking care to make sure all internal parts are centered.
After 2 nudging E-mails CMK sent my Cyclone fuselage parts. Took about
3 months all told but finally they arrived. I have heard that others have
had trouble getting any response at all. Anyway the model can at last be
started. I believe it is much better to glue the front to the backs of each
side first, carefully lining them up. It is easier to fix the legnthwise
seams than side ones. Before the halves can be joined the cockpit and engine
must be done and installed. Pictures of the Thai Museum's Hawk show a
yellow/green chromate mix inside, I added a drop of black to some Yellow
Zinc chromate, making the seat a bit greener than the rest. The 3-part color
etch instrument panel is really swell looking when assembled, and the
placards add a nice touch. I chipped the dickens out of the wear areas using
Rub 'n Buff and made a set of lap belts from lead foil. I didn't use the kit
harness as photo-etch is too stiff for me, too hard to "pose" on the seat.
Now the nicely detailed Wright Cyclone powerplant was assembled, ignition
wires added, and painted aluminum, with black pushrods and a heavy black
wash. This was attached to the firewall and put into the right fuselage
side, the fuselage now glued together with it's attached cockpit assembly,
taking care to make sure all internal parts are centered.
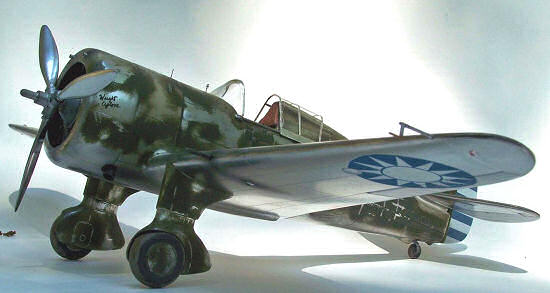
It was at this point that things took a turn. I had originally
intended to do the plane on the box cover, a standard run Chinese Hawk 75M,
with it's paint job being described in the plans as a "very worn finish".
But constant internet surfing in search of Hawk stuff turned up some very
interesting items. Between gentlemen sending me answers to information
requests and just plain luck I turned up a small picture history of the Hawk
Demonstrator. It would appear that after it's delivery to China it was given
an overall coat of a very dark color, over which was crudely painted a large
white "75" on the fuselage. The best pics however showed the Demonstrator
later on with it's paint really badly worn, including a closeup shot of a
smiling Chennault himself in the cockpit, the original "Curtiss" logo of the
Demonstrator vaguely showing through the washed out paint. THIS was the
plane I had to model.
So what was necessary to make the 75M into the Demonstrator? Well
back to my search results. It seems the 75 prototype and early Hawks had no
quarter-panel windows such as the P-36 and P-40 sported. There was just a
scalloped area, an indentation, like a Macch 202 for instance. The fuselage
spine had a slightly more "humped" appearance than the P-36 types, without
the windows there. A nice side view of the Cyclone prototype
 showed these
fairly well. The landing gear fairings were more cut away and streamlined than
the 75M's. Duplicating the paint wear pattern would be a challenge. Some
examination showed these mods doable by my low-tech abilities, so the course
was duly changed. Some deep cleansing breaths-onward.
showed these
fairly well. The landing gear fairings were more cut away and streamlined than
the 75M's. Duplicating the paint wear pattern would be a challenge. Some
examination showed these mods doable by my low-tech abilities, so the course
was duly changed. Some deep cleansing breaths-onward.
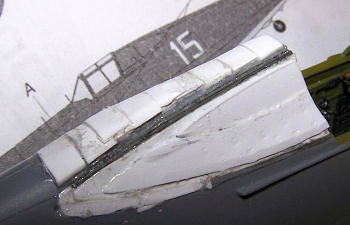
Step one was to fill in the side window cuts, using sheet styrene
and sprue pieces laid in with generous amounts of Tenax liquid cement. . The
object here was to make this area solid, as heavy duty cutting and sanding
would be needed. The spinal surgery also commenced with glueing styrene
slabs onto the areas to
 be raised. After 2 good days of drying the plastic
could be carved down to the basic shapes wanted, and smoothed out with a
coarse sanding stick. The cutouts were started using coarse sandpaper
wrapped around a dowel until the channels started looking like the
pictures, then lighter grades of sandpaper were used. Pinholes and scratches
were filled using Gap filling CA. The spine chunks were then carved and
sanded and filled also, the process continuing until it looked like a match
to the photos. The pics of the actual demonstrator are not too clear in this
area, so I based it on the Cyclone prototype. Sorry purists, this thing is
just not documented like a P-51.
be raised. After 2 good days of drying the plastic
could be carved down to the basic shapes wanted, and smoothed out with a
coarse sanding stick. The cutouts were started using coarse sandpaper
wrapped around a dowel until the channels started looking like the
pictures, then lighter grades of sandpaper were used. Pinholes and scratches
were filled using Gap filling CA. The spine chunks were then carved and
sanded and filled also, the process continuing until it looked like a match
to the photos. The pics of the actual demonstrator are not too clear in this
area, so I based it on the Cyclone prototype. Sorry purists, this thing is
just not documented like a P-51.
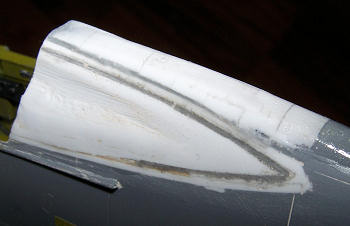
Now I started carving on the landing gear fairings, removing
much of the front, trying to cut them down as close as possible to the real
deal. The wheels I fixed so as to be able to slide them in after the paint
job, by notching them down to the axle holes on the inside where this cannot
be seen. The opportunity was taken to beat the tires up a bit with rough
paper to simulate operation from poor airfields. N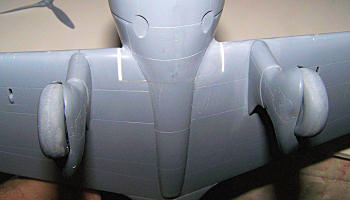 ow the assembled wing was
fitted to the fuselage ,and here is the worst part of the kit, much shimming
and filling is needed to get the correct results. Large gaps were fixed by
cementing styrene shims onto the areas that need attention, dry fitting and
trimming till a semblance of fit results. It also helps to glue a styrene
tab into the fuselage at the rear wing joint to back up the glue and filler
needed here. The stabilizers are fit now, the elevators being separate and I
positioned them slightly down. Mr. surfacer was brushed over all the filled
areas and flaws fixed, several sessions of this procedure being needed. The
undercarriage was now attached using the little arrows underwing as
reference points, only minor trimming was needed.
ow the assembled wing was
fitted to the fuselage ,and here is the worst part of the kit, much shimming
and filling is needed to get the correct results. Large gaps were fixed by
cementing styrene shims onto the areas that need attention, dry fitting and
trimming till a semblance of fit results. It also helps to glue a styrene
tab into the fuselage at the rear wing joint to back up the glue and filler
needed here. The stabilizers are fit now, the elevators being separate and I
positioned them slightly down. Mr. surfacer was brushed over all the filled
areas and flaws fixed, several sessions of this procedure being needed. The
undercarriage was now attached using the little arrows underwing as
reference points, only minor trimming was needed.
The finishing plan included first applying a high-polish
finish using Alclad Polished Aluminum, this required that the plastic be
polished also., using the finest side on the sanding sticks. After checking
for and fixing the flaws, and buffing the whole model, the paint process can
begin.
First order of business was shooting the fabric covered control
surfaces with Aluminum, Alclad White Aluminum with a dash of flat white
works well. Then these areas were masked off, and the airframe carefully
cleaned for a coat of Gloss black, the recommended base for Alclad Polished
Aluminum. I just used plain old Testor's glass jar Gloss Black, allowing 2
days drying time. The fuselage modifications looked good, n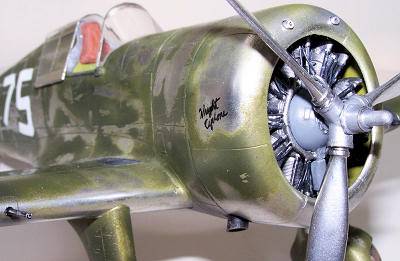 o flaws being
apparent, just the usual stray hairs and dust particles which were polished
out. Now after a good shaking the Polished Aluminum was laid on using thin
dusting coats, and boy was she shiny when done! All paintwork was done with
my trusty Paasche H single action, "external mix" spray gun.
o flaws being
apparent, just the usual stray hairs and dust particles which were polished
out. Now after a good shaking the Polished Aluminum was laid on using thin
dusting coats, and boy was she shiny when done! All paintwork was done with
my trusty Paasche H single action, "external mix" spray gun.
At this point I was tempted to leave her as she was, in shiny
metal condition, and but for one problem I might have. The prominent
"Curtiss" logos under the cockpit rails, or the cowling "Wright Cyclone"
were not available in decal form. I actually attempted to make decals for
it, freehanding the logos with prismacolor pens and printing them onto decal
paper. They looked passable but not great, but a test on a mule model did
not go well, the film being horrible, sticking out like a sore thumb. Some
grumbling and head-scratching later, I figgered if I did the beat-up paint
finish, I could freehand the logos right onto the model, where they would be
partially covered as in the photos, and still be acceptable. Another
carefully thought out decision made by the amazing Koppos thought process.
One of the pictures of the Chennault Hawk made things easier and
harder at the same time. This was a shot from the right rear quarter,
showing clearly that it did have upper wing Chinese National insignia (many
Chinese AF planes did not, including the box art machine). Also clear were
the 2 blast tubes sticking out of the cowling, showing that it did have four
guns. Here too was the paint or lack thereof at the time. This paint had to
be water based judging from the way it
 wore off. An interesting feature was
the grid of peeled paint that followed the rivet lines toward the tail. At
last a use for acrylic paint. What better way to simulate worn-off water
base paint than to actually wash it off? Tests on the poor mule showed that
Tamiya paint will come off with minimal scrubbing with Windex, and looked
much like I wanted. The rivet peeling could be done with good old magic
mask.
wore off. An interesting feature was
the grid of peeled paint that followed the rivet lines toward the tail. At
last a use for acrylic paint. What better way to simulate worn-off water
base paint than to actually wash it off? Tests on the poor mule showed that
Tamiya paint will come off with minimal scrubbing with Windex, and looked
much like I wanted. The rivet peeling could be done with good old magic
mask.
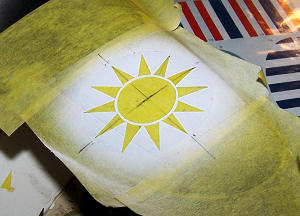
First the insignia problem had to be tackled.The kit provides
only underwing Chinese insignia, and a search of my decal dungeon showed
nothing even close. Time to get out the circle template and X-acto blades.
First a proper sized circle is cut out and the outer part picked up and
applied to it's location. Now the circle is sprayed Flat White,
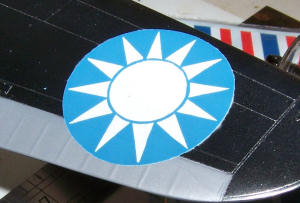 and dried
overnight. Now to cover everything we don't want blue, this being the inner
circle and 12 "rays' of the Nationalist Chinese suns. The inner circle was
cut by template on the round part remaining from step one, and centered
using the precision eyeball. Now the real fun of cutting 12 individual "pie
slices" for the sun rays starts, using the remaining tape ring, these also
being placed by eyeball. Believe it or not it isn't that hard, but sure is
tedious. A mix was made up of Testors Blue and Black to try and match the
decal colors, and sprayed over the masks. After all masks are removed you
will have a Chinese sun insignia. They are a bit light but I will call it
"fading" to match the rest of the beat-up scheme. This was done 4 times, a
lot of work for sure but did it turn out great in the end, eliminating all
the chancy problems that decals can cause. I think you can't beat painted
on markings and will do it every chance I can from now on.
and dried
overnight. Now to cover everything we don't want blue, this being the inner
circle and 12 "rays' of the Nationalist Chinese suns. The inner circle was
cut by template on the round part remaining from step one, and centered
using the precision eyeball. Now the real fun of cutting 12 individual "pie
slices" for the sun rays starts, using the remaining tape ring, these also
being placed by eyeball. Believe it or not it isn't that hard, but sure is
tedious. A mix was made up of Testors Blue and Black to try and match the
decal colors, and sprayed over the masks. After all masks are removed you
will have a Chinese sun insignia. They are a bit light but I will call it
"fading" to match the rest of the beat-up scheme. This was done 4 times, a
lot of work for sure but did it turn out great in the end, eliminating all
the chancy problems that decals can cause. I think you can't beat painted
on markings and will do it every chance I can from now on.
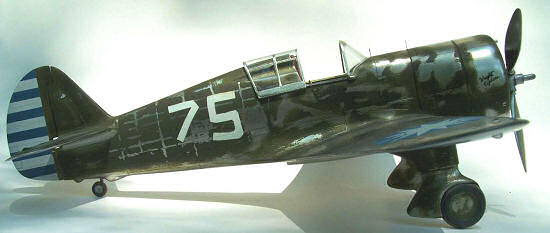
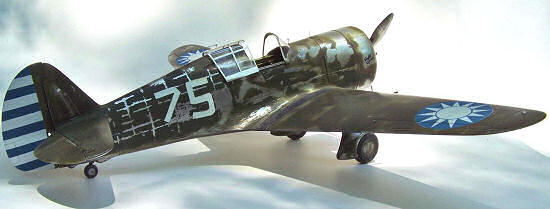
The large fuselage "75's" were penciled out on Tamiya tape
until they looked right in size and crudity, according to our photo
evidence. The numerals were then carefully cut out, the resulting stencils
then applied to the fuselage after much fiddling to guess the proper
positioning, and Flat White sprayed over them. Now the left-behind 7 and 5
were used to cover over the numbers when dry. These numbers had to be
applied to the model before the final acrylic Green overcoat as it would
have been impossible to mask them later without peeling up the Green. More
circles now to cut, to cover ov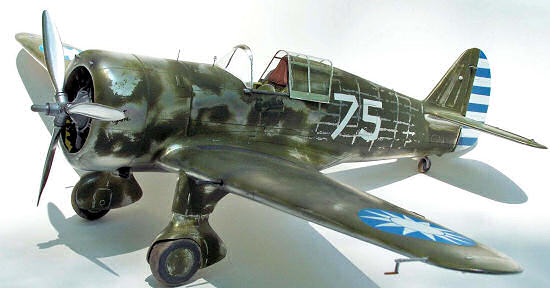 er the National suns we just painted, and
while the white and blue was out might as well mark out and shoot the 12
rudder stripes also. OK, now for the "grid" appearance on the fuselage
rear. Once again using the image, lines were drawn very lightly with a
pencil, following the pattern as best I could. Utilizing a fine brush, Micro
"Magic Masker" was painted along the lines, keeping these lines as fine as
possible. The left side was done trying to randomize the look a bit.
er the National suns we just painted, and
while the white and blue was out might as well mark out and shoot the 12
rudder stripes also. OK, now for the "grid" appearance on the fuselage
rear. Once again using the image, lines were drawn very lightly with a
pencil, following the pattern as best I could. Utilizing a fine brush, Micro
"Magic Masker" was painted along the lines, keeping these lines as fine as
possible. The left side was done trying to randomize the look a bit.
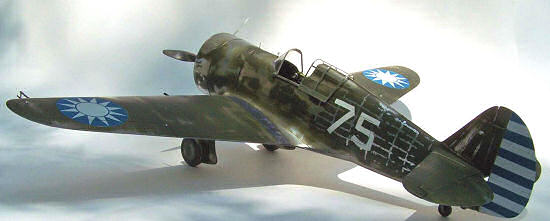
Well it was finally time to apply the Acrylic overcoat. The
paint in the "newly applied" photo appeared very dark and glossy, now not
having any color shots one can only assume it was some form of Chinese
Green. I settled on the very scientific method of color selection-I liked
the look of the one Special Hobby used on the box art. I purchased 2 jars of
Tamiya, an Olive green and a Dark Green, a 50-50 mix of these two yielding
what I wanted. (I warned you purists). Using Tamiya thinner, I sprayed it on
in a somewhat patchy fashion on the fuselage, covering a bit more on the
wings and tailfeathers. Also the wheel spats were done after the bottom
wings were masked off. As soon as the Paasche was cleaned, I bought the
model in and started attacking my new paint job. The magic Mask was peeled
with tape and toothpick, the results turned out pretty well, only one spot
peeling too much. Now using Q-Tip (tm) ear swabs soaked in Windex(tm) (take
that lawyers) I abraded the paint back in the areas indicated in the photo,
the fuselage taking the major beating, also the areas on the wings where the
crew would trod and random wing streaks as other pictures showed. The Tamiya
paint came off the Alclad fairly easily as planned, but I left enough on the
"Curtiss" logos to hide their crude nature, just a hint of them showing
through as was the reality anyway. All the rest of the masking was removed
now, and the wingwalks brushed Black and weathered.
Whoo-wee! Shockingly, this thing had turned out almost exactly
the way I wanted it. While I was calming down I started tackling the
finishing bits. My nicely striped rudder was attached with wire in drilled
holes, to avoid a glue mess. The propeller was assembled, and the blades
given the polished Aluminum treatment with a White Aluminum hub. The Wheel
hubs had been given the green weathering treatment, now the tires were done
Dark Grey and given a dose of Chinese mud. They were clicked into place and
stayed put without glue, so they are unglued still. Now for the glasshouse.
It seems there are two kinds of canopy
 on P-36/Hawks, one with a
rear-sloping windscreen with a canopy hood that matches it, and one that has
a vertical meeting line. The 75 Demonstrator requires a straight set, so
guess what is in the kit? Yup. I scoured through my various 1/32 P-40 kits,
finding the Hasegawa's and old Revell's unusable. I ordered a Squadron Vac
for the P-40E as this was at least straight, though it still has some
bracing not present on the very simple Hawk hood. The natural metal bracing
was done using strips of Bare-Metal foil. This stuff is a pain to use and
hard to get stuck initially, but once rubbed down it stays put. The effect
of real canopy frames is yours if you have patience. Once framed the whole
thing was dipped in a Future Floor Finish bath and the excess wicked off
with paper towels. Once again the final product was what I wanted. On a roll
here. The 75 Demo used the very early curved unarmored windscreen, the kit
part had to be trimmed to sit with a vertical line to match the canopy, this
required quite a bit of fiddling but eventually came around, and was given
the foil frame/Future treatment and attached with white glue. Holes were
drilled at the landing light locations and a drop of correct paint placed in
each (right blue, left red, rudder white), and the clear teardrop shaped
landing lights attached with white glue. The photo-etch ring and bead
gunsights were attached and the kit machine gun barrels placed in the wings,
in addition to my stainless blast tubes in the cowling. This Hawk is ready
to do some shootin'!
on P-36/Hawks, one with a
rear-sloping windscreen with a canopy hood that matches it, and one that has
a vertical meeting line. The 75 Demonstrator requires a straight set, so
guess what is in the kit? Yup. I scoured through my various 1/32 P-40 kits,
finding the Hasegawa's and old Revell's unusable. I ordered a Squadron Vac
for the P-40E as this was at least straight, though it still has some
bracing not present on the very simple Hawk hood. The natural metal bracing
was done using strips of Bare-Metal foil. This stuff is a pain to use and
hard to get stuck initially, but once rubbed down it stays put. The effect
of real canopy frames is yours if you have patience. Once framed the whole
thing was dipped in a Future Floor Finish bath and the excess wicked off
with paper towels. Once again the final product was what I wanted. On a roll
here. The 75 Demo used the very early curved unarmored windscreen, the kit
part had to be trimmed to sit with a vertical line to match the canopy, this
required quite a bit of fiddling but eventually came around, and was given
the foil frame/Future treatment and attached with white glue. Holes were
drilled at the landing light locations and a drop of correct paint placed in
each (right blue, left red, rudder white), and the clear teardrop shaped
landing lights attached with white glue. The photo-etch ring and bead
gunsights were attached and the kit machine gun barrels placed in the wings,
in addition to my stainless blast tubes in the cowling. This Hawk is ready
to do some shootin'!
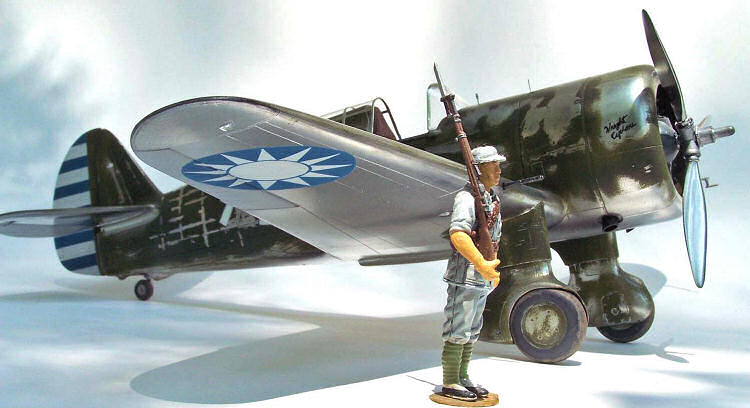
 Well it was a bit of work but I'm happier with this model
than I have been in a long time. I even put a Chinese guard on it. Some
time ago my kid found a 1/32 set of Chinese WW2 soldiers in a Wal-Mart or
one of those type stores, well detailed and authentically painted. I
modified one to be at attention with a shouldered Mauser rifle, to guard a
1/32 P-40 that isn't built yet. He's now keeping an eye on my personal Hawk
Demonstrator.
Well it was a bit of work but I'm happier with this model
than I have been in a long time. I even put a Chinese guard on it. Some
time ago my kid found a 1/32 set of Chinese WW2 soldiers in a Wal-Mart or
one of those type stores, well detailed and authentically painted. I
modified one to be at attention with a shouldered Mauser rifle, to guard a
1/32 P-40 that isn't built yet. He's now keeping an eye on my personal Hawk
Demonstrator.
If you have some experience with limited run kits, this one
is an easier one as these things go. For the record I did test a kit decal
on the mule and it settled down nicely. Using the regular kit parts a fine
Chinese Hawk can be made, as well as the Argentine and Thai versions. The
fuselage parts problem has to be watched for though.
The Curtiss Hawks P-1 through P-40 Shamburger @ Christy Wolverine Press
1972
Flying Tigers Daniel Ford Smithsonian Books 1991, 2007
Various internet sources, some of which have
since become unavailable.
Bill Koppos
May 2012
Copyright ModelingMadness.com. All rights reserved. No reproduction in part or in whole without express permission.
Kit bought with private funds.
If you would like your product reviewed fairly and fairly quickly, please contact the editor or see other details in the
Note to
Contributors.
Back to the Main Page
Back to the Reviews Index Page2023