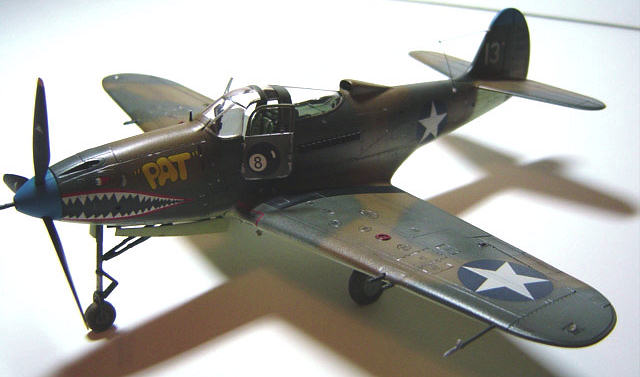
Hasegawa 1/48 P-400 Airacobra
| KIT #: | 09092 |
| PRICE: | $30.00 MSRP |
| DECALS: | Two options |
| REVIEWER: | Kyle Koppos |
| NOTES: | History by Bill Kopos |

| HISTORY |
The Bell aircraft company's advanced-looking
design first took to the air on April 6th, 1938. The XP-39 climbed like a
rocket, 5 minutes to 20,000 ft. and top speed approached 400 mph. The unique
mid-engine design left room in the nose for a heavy armament, in this case a
37mm cannon and 2 .50 caliber machine guns. But Army doctrine of the time
envisioned it's fighters 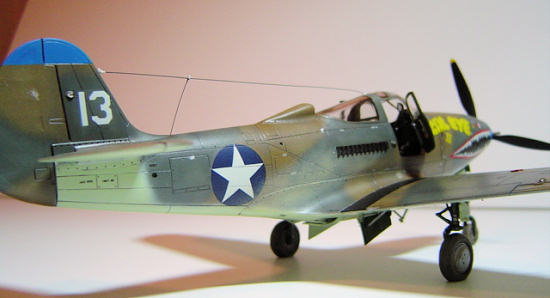 supporting the Army on the ground, not as
interceptors, believing the U.S. sufficiently protected by it's bordering
oceans, in other words a complete lack of foresight of the coming war. Bell
was instructed to remove the turbocharger, and clip the wingspan for low level
maneuverability. This cut power, and the added weight of armor plate and
armament (4 extra .30's in the wings), considerably decreased performance.
Nevertheless, it was ordered into production.
In the meantime, Europe had gone to war. Great Britain, desperate for any modern fighters, ordered 675 Airacobra Mk. 1's, differing only slightly in having a 20mm cannon in the nose instead of the 37 and British instrumentation. These export versions were designated P-400, an unfortunate choice as will be seen later. The Brits allocated them to one squadron for trials, finding performance below specs, and the aircraft totally unsuited for European combat.
Suddenly, the U.S. Army had it's own desperate need for fighters, as the Japanese onslaught spread across the Pacific, and a large part of the P-400 order was repossessed by the U.S. "as is" and sent to the Pacific. These machines were sent to New Caledonia, where they were laboriously assembled in bad conditions, with one assembly manual and every other crate being labeled "spare parts". There, they trained as best as possible till summoned to the Island of Guadalcanal on 22 August, 1942. Immediately in combat, they soon also proved a major disappointment, unable to reach the altitudes needed to combat the Japanese, a lack of proper oxygen supplies making this problem worse. Soon dubbed "clunkers" by their pilots, the maneuverable Mitsubishi Zeros completely outperformed the sluggish Airacobras. Soon however, a niche was found for the P 400's, as their heavy armament and bomb carrying ability made them excellent ground support aircraft (as planned by the U.S.A.A.C., ironically), the Marines on "The Canal" appreciating the high degree of support afforded them, helping to break the backs of several heavy Japanese attacks. The fact that they were no good against the enemy fighters hurt, however, the P-400 becoming a "P-40 with a Zero on it's tail".
These machines continued to serve on this island and New Guinea, thru 1942 until attrition used them up, being replaced by "regular" P-39's. The Russians received numbers of P-400's, liking them more than U.S. pilots, as they were more suited to low level Eastern Front combat.
| THE KIT |
 Done in crisp, classic simplicity, the new tool Airacobra lives up to
Hasegawa's fine standards. Consisting of 2 main sprues, 8 smaller part sprues,
1 poly cap sprue, and 1 clear part sprue, the kit has the usual nicely
engraved panel lines one can expect from this manufacturer. There are optional
parts, such as a bomb, drop tank, their accompanying cradle arms, and radio/no
radio panel for behind the cockpit. different parts and separate panels hint
at future models of the Airacobra to come, such as the separate panel in the
nose top for the guns. Separate under-wing .30 caliber ejection chute panels
suggest an N model, and on sprue L, one can see the short shrouded/unshrouded
cannon barrels for standard US Army versions (37mm).
Transparencies are nice and clear, however with
my example the top of the canopy had scratched a bit in the plastic bag. I
didn't, but one might want to buff these minor scratches out.
Hasegawa does give both of the "car doors" as separate parts, which is a
welcome addition.
| CONSTRUCTION |
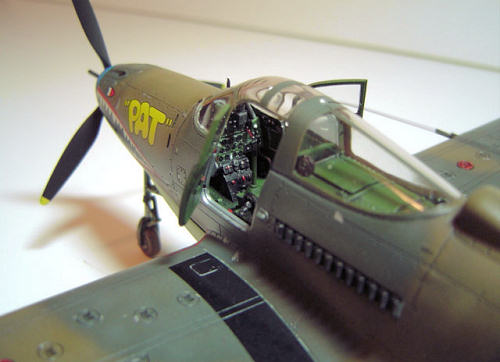
As with most kits, construction starts with the cockpit. Everything can
be pretty much be assembled together as the plans tell you, and painted all at
once. The Airacobra had most of its internal components painted in a medium
green color. The doors were cut off their sprue and had their windows masked,
from the inside and outside, (outside masking would be for later painting) in
order to paint the interior color onto them now. To save time and cleaning,
the landing gear parts, wheel wells, and inner surface of gear doors can be
painted the same green, all at once with the cockpit. These parts can be
sprayed right on their sprues. The seat is the same green color, however it
was not glued in place until after a pair of Eduard photoetched seatbelts were
applied. The instrument panel assembly has 4 parts to it, which were all
sandwiched together, but left off and painted separately to make it easier to
get on with detail painting.
Detail painting included an acrylic black on
parts D2, L3, L4, L5, L9, and the grip of the control stick. The dials of the
instrument panel and various molded on boxes, electronics, and controls were
also painted black. Then, the cockpit was decently liberally drybrushed enamel
aluminum, to add high spots and wear. When dry, an acrylic black wash mixture
was applied to all of the 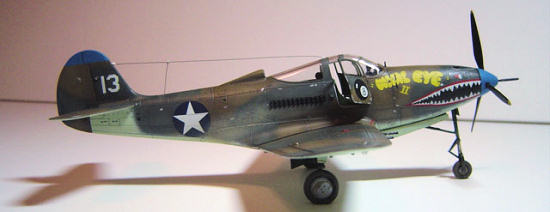 details, and also allowed to dry. Excess was wiped
off with cotton swabs. This adds shadows to the low points. Various buttons
were sparsely touched with white, yellow and red, and the fine raised details
on the instrument panel were detailed with white. The dials then received
drops of white glue applied with a toothpick to represent glass. On the right
door, the molded on mapcase was painted tan and received a detail decal.
Out of the box, the cockpit looks great. Hasegawa has came a long way, and detail is top notch. However, being a picky modeler, I felt the need to modify and add a few things. On the seat bulkhead and at the end of the radio floor (C8), are recessed holes, which were lightening holes on the real aircraft. Obvious ones were drilled out with a pin vise. The butt end of the .50 machine guns protrude from the instrument panel (L30), and with the real aircraft had very noticeable red charging handles. The kit lacks these. I added them with spare photo-etched parts. Apart from the seatbelts, this was all I did to the cockpit.
Before gluing the fuselage and cockpit assembly together, I checked to see where I could place a nose weight. Being a tricycle landing gear aircraft, it would be a "tail-sitter" without ballast in the nose. In the instructions, it is suggested to add 15g of weight. Holding the taped together fuselage at the point where the main landing gear would be, I placed a strip of lead about 3 inches long folded up in the nose. I noticed that with the nose gun panel being separate, one can easily slip weight into the nose through this opening after the fuselage is glued together. I chose to play it safe and glue in the lead before hand.
With the wings, Its neater to glue in the separate under wing gun panels before gluing on the top wing panels, as the instructions say. The inner front of the wings, where the 4 air inlets are for the internal radiator are, is a separate piece (B1). On the sprue, this part has many attachment points, and care is necessary in order to cut this out neatly, If rushed, ugly chunks of plastic is taken out of the part and it doesn't look all that pretty.. sanding was required on mine to fix the problem I could have avoided. I rushed this kit, and failed to notice that the instructions tell the builder to paint the insides of the wings behind the intakes black, as the insides can be seen through the openings. It would be wise to learn from my errors, and take a second look at all things on the instruction sheet. Its there to help you!
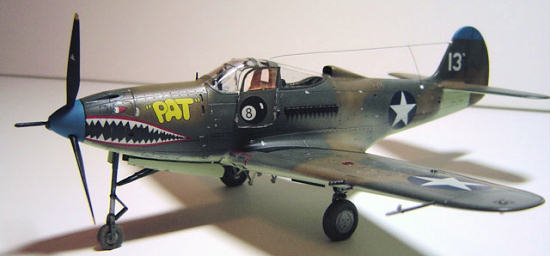 The wing panels went together nicely, and had
their seams cleaned up and sanded. The gun barrel parts (B7 and B8) don't fit
as well, and require some filling and re-scribing. Also, for the P-400, they
are wrong. The kit gives you gun shrouds for the .30s, which the P-400 didn't
have. These were cut off and replaced with Quickboost resin gun barrels (which
were applied after painting of the model). The propeller assembly is done now,
as it is quick and gets sprues out of the way (dont forget that handy polly
cap!). Exhausts are also glued in now, as they are relatively easy to brush
paint with Testors Burnt Iron Metallizer after the plane was painted. The nose
.50s were drilled out, and then glued into the top panel (D3), which was glued
in after the fuselage seams were sanded smooth. The kit gives an option of
clear wing landing lights. The builder has to remove the molded on lights, and
replace them with clear supplied ones later on. I chose to replace the lights,
because I think it looks more realistic with clear lights, however the option
is up to the modeller.
Upon test fitting the wings to fuselage, I was surprised to find almost the perfect wing root seam. With careful gluing, no sanding was required at the root. Minor gaps and ridges are present at the forward and rear points where the wing meets the fuselage, however these were easy to fill and sand. Final parts were put on before final painting, which were parts B9 and the builders choice of L8 and L7 (for the drop tank), or L16 or L15 (for the bomb). I used L7 and 8, however I put no ordinance on my Airacobra. The tail planes were left off and painted separately, as to ease the paint job.
| COLORS & MARKINGS |
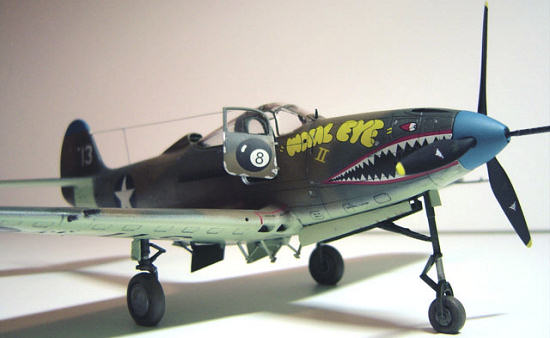
I chose to use one of the marking options given in the kit, as at the
time I had no aftermarket P-400 decals and one of the schemes appealed to me.
Hasegawa offers one machine of the 347FG/67FS squadron based on Guadalcanal,
and another of the 35FG/39FS on New Guinea piloted by Lt. Eugene Wahl; better
known as the commonly done "WAHL EYE II/ PAT". I chose to do the latter, as my
Grandmother is called Pat and my girlfriend's brother (such a great guy) is
named Pat. I can impress two people at once, why not?
First in the painting business is getting the
model prepared. To keep regularity on the model, mask and glue on all the
clear parts in order to get consistent colored frames. So before painting, I
cut off the canopy and masked each pane with yellow kabuki
 tape (Tamiya tape).
I do this by placing a small square sufficient enough to cover one pane, and
burnished down with a toothpick. Most Hasegawa kits have engraved lines on
their clear parts to separate the panes. These are very handy, as a new No.11 Xacto blade is ran along these lines to cut off the access tape, leaving the
individual pane finely masked. Before permanently securing the canopy to the
fuselage, the gun sight was painted up and glued to the instrument panel. The
armored glass panel behind the pilot was also secured with white glue.
Upon placing the canopy in it's place, disaster! A number of problems suddenly revealed themselves in an instant. The fuselage was too wide, and the gun sight too tall: which interfered with the canopy's placement. First, the gun sight was gently (as it was already glued in place) sanded until the canopy could rest on the front placement lip. I then addressed the fuselage problem. On inspection, this was a personal error. When gluing the fuselage together with the interior in it, I did not hold the fuselage together enough, thus it dried in a bit wider position than necessary. However it could still be squeezed together with some force, with some more glue applied in the seam by the seat bulkhead. This corrected the problem just enough, so that the ledge formed between the fuselage and rear portion of the canopy wasn't as badly noticeable as before. even with these problems fixed, the rear lip on the fuselage still interfered with the canopy. This was an easy fix, as it was just shaved down a bit with an Xacto blade. The canopy was finally glued on (with some force, my fuselage problem still was giving me problems) with Tenax liquid cement, making sure not to touch the tape with the glue, as surface tension would pull it right under the tape = bad! The doors are such a good fit, that they can be popped into their places, and don't need white glue to hold them on. The doors serve as their own masks, and equal less work! Hurrah! The whole model was wiped down with windex to remove any oils, mold release, finger prints, and stray particles on the surface. It was allowed to air dry for a few minutes.
The first color to go on is an overall coat of Model Master enamel RAF Dark Earth on the top surfaces. The same paint was lightened with some white, and was applied into the middle of the panels with the airbrush on low. Again, with the same mixture, it was darkened with some black, and was applied lightly over the panel lines. The next day, I sprayed on the Model Master RAF Dark Green. Now wait a minute, I didn't mention masking the Dark Earth, you say. I prefer to use the least amount of masking as possible. This is because paint looks better soft edged (except when it calls for hard edged schemes), most camo schemes were free-handed on the real thing (or with templates, but still had soft edges), and I despise masking... So I freehand any camouflage colors, British schemes being my favorite to do, because of simplicity.
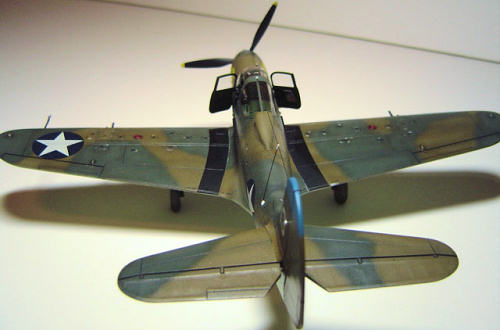 With the airbrush on low, I first marked where
the Dark Green color goes, with "border" lines. I point the airbrush point in
towards the center of the camo-band I'm presently painting, as to further keep
the soft edge less extreme. After the borders are on, I fill in the center of
the bands with the color, and then lighten and darken the color to "fade" the
paint as I did the Dark Earth. Don't mind if the darkened/lightened Green gets
on the Earth a little, as this just adds to the weathered look. When the top
was dry, without masking, I carefully applied Model Master RAF Sky Type "S" to
the underside, making sure the angle of the airbrush didn't catch the topside,
as overspray is a very apparent danger when "free" painting. Make sure to
paint small details, such as the outside of the gear doors and radiator
shutters (parts B5, B13, and B6, if you forgot to apply them before painting
as I did).
After painting, the stabilizers were then glued on carefully, and followed with the first gloss coat with some Testors Metallizer Sealer. The kit decals were then put on. Usually, Hasegawa decals have been tricky to work with, are thick, and success with them vary from kit to kit. However, the decals with the Airacobra were delightful to work with, going on easy, and settling down easily and nicely with some solvaset. A black wash was then carefully brushed over the engraved details on the kit surface, and ten minutes later, the excess was wiped off with a cloth.
| FINAL CONSTRUCTION |
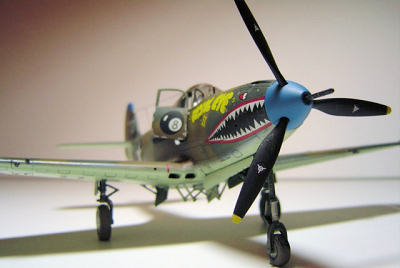 Details such as landing gear were assembled, gear
doors were put on, and the pitot tube was placed. Photo's exist of Wahl's
plane, and they show it with its lower portion of its main gear doors removed
to prevent the wheels from clogging with mud. I cut off the bottom of parts A4
and A3, leaving the top most small panel left, which was glued on at this
point as well. The main landing gear attachment points are so snug, and are at
the appropriate angle already, so they don't require glue. I also added brake
lines to the main gear struts with rubber tubing, wire, and tape, and painted
and attached the wheels. A final coat of a satin finish-making mix (3 parts
Testors flat, 1 part Testors gloss), was applied, and was followed with
Floquil Foundation exhaust stains. Final details were added, such as bead sight
part L10 (gosh was that hard to hold..), under wing landing light (R3), the
even smaller replacement wingtip landing lights, and the painted prop
assembly. The aerial wire was done with 2 lb fishing line aerial wire, brushed
with Metalizer Gunmetal. The final thing I added to my Cobra was "mud" to the
landing gear, done with a Tamiya Mud Weathering Stick mixed in water.
| CONCLUSIONS |
| REFERENCES |
September 2006
If you would like your product reviewed fairly and fairly quickly, please contact the editor or see other details in the Note to Contributors.