Hasegawa 1/32 P-40N '15,000th Anniversary'
| KIT #: | 08195 |
| PRICE: | @$50.00 SRP |
| DECALS: | One option |
| REVIEWER: | Mark Joyce |
| NOTES: | Aftermarket: Eduard 33072 cockpit set; Grey Matter prop; custom decals. |
| HISTORY |
Emmett Davis graduated from flight school in November 1940. As a young pilot, he was destined to be a part of history when the first launch of Army fighters from a carrier occurred on February 26, 1941. Flying from the deck of the USS Enterprise, he and other pilots flew Curtiss P-36s to Wheeler Field in Hawaii. It was there, while assigned first to the 18th Pursuit Group and then the 15th Pursuit Group (before the nomenclature had changed to Fighter Group), his skills as an aggressive pilot and expert dog-fighter led to other pilots (including the future leading USAAF ace in the European Theatre, Francis “Gabby” Gabreski) commenting that flying against Davis was like trying to fight a cyclone. Thus, Davis’s nickname was born and would remain with him the rest of his life.
Davis was again fated to be part of history when, on December 7, 1941, he was one of the few American pilots to get airborne during the Japanese attack on Pearl Harbor. He flew several missions in a P-40 that day, searching for an expected but non-existent ground invasion force while at times dodging friendly fire from the U.S. Navy. None of these missions was officially recognized because Davis didn’t take the time to do the necessary paperwork.
 Promoted
to captain, Davis joined the 35th Fighter Squadron of the 8th
Fighter Group in August, 1942, when the squadron was flying the Bell P-39
Airacobra at Milne Bay. On March 7, 1943, and now a major, he became the
commanding officer of the 35th FS. When P-40Ns became available in
September, Major Davis jumped at the chance to re-equip his squadron with the
new fighters. Action began almost immediately after this transition, as the 35th
FS moved to Tsili-Tsili, an airfield at Nadzab in New Guinea, to support the
upcoming landings of Finschafen. On September 22, 1943, the day after this move,
sixteen 35th FS P-40Ns took to the air in the morning to provide
cover for the invasion fleet when forty-six Japanese Zeros and Betty bombers
were detected. The P-40Ns, along with P-38s from the 39th and 432nd
Fighter Squadrons, intercepted the Japanese attackers. At the end of the fight,
the 35th FS claimed seven confirmed victories and three probably
destroyed or damaged, with no losses to themselves.
Promoted
to captain, Davis joined the 35th Fighter Squadron of the 8th
Fighter Group in August, 1942, when the squadron was flying the Bell P-39
Airacobra at Milne Bay. On March 7, 1943, and now a major, he became the
commanding officer of the 35th FS. When P-40Ns became available in
September, Major Davis jumped at the chance to re-equip his squadron with the
new fighters. Action began almost immediately after this transition, as the 35th
FS moved to Tsili-Tsili, an airfield at Nadzab in New Guinea, to support the
upcoming landings of Finschafen. On September 22, 1943, the day after this move,
sixteen 35th FS P-40Ns took to the air in the morning to provide
cover for the invasion fleet when forty-six Japanese Zeros and Betty bombers
were detected. The P-40Ns, along with P-38s from the 39th and 432nd
Fighter Squadrons, intercepted the Japanese attackers. At the end of the fight,
the 35th FS claimed seven confirmed victories and three probably
destroyed or damaged, with no losses to themselves.
Major Davis led the 35th FS on September 27 as it escorted B-24s to Wewak. During that mission, he chased after a Ki-61 “Tony” that was on the tail of another P-40, and after putting a couple of bursts into the airplane watched as it exploded.
Then, the day after Christmas, 1943, Davis was again leading the 35th FS over Cape Gloucester in a wild engagement that also involved the other two squadrons of the 8th FG. At the end of this engagement his squadron had claimed eighteen victories-13 Zeros, 3 Vals, and 2 Tojos-for no P-40 losses. Davis himself thought he had shot down five or six enemy aircraft but was credited with only two, largely due to losing his wingman and a malfunctioning gun camera.
The 35th
FS continued its success with the P-40N into 1944. It garnered such a reputation
as a ‘hot’ outfit that the squadron took on the moniker of “Cyclone’s Flying
Circus.” Outdoing its success of December 26, on January 16 the 35th
FS sent fifteen P-40Ns to take on over 60 Japanese aircraft over Saidor, New
Guinea. The final tally was nineteen Japanese aircraft claimed as shot down-a
record by a single V Fighter Command squadron in one combat-against three P-40s
being damaged. Japanese records indicate the actual loss of ten fighters in the
battle. These turned out to be the last aerial victories claimed by the 35th
FS while flying the P-40N. Two days later, on January 18, 1944, Davis took
command of th e
entire 8th FG, and by late February the 35th FS had traded
its trusty Warhawks in for P-38s, flying the Lockheed fighter until the end of
the war. The 35th FS’s aerial combat record while flying the P-40N
was truly impressive. My references indicate anywhere from 50 to 65 confirmed
victories against only two P-40 losses, one to ground fire and one in a
collision with a Japanese fighter.
e
entire 8th FG, and by late February the 35th FS had traded
its trusty Warhawks in for P-38s, flying the Lockheed fighter until the end of
the war. The 35th FS’s aerial combat record while flying the P-40N
was truly impressive. My references indicate anywhere from 50 to 65 confirmed
victories against only two P-40 losses, one to ground fire and one in a
collision with a Japanese fighter.
Davis commanded the 8th FG until June 28, 1944, and then resumed its command from June 16, 1945 until the end of the war. Although he made no additional aerial claims, in yet another fate of history he led the 8th FG in one of the escort missions of the two Betty Bombers that carried the Japanese surrender delegation on August 19, 1945. Now a Lt. Col., Emmett “Cyclone” Davis, a natural leader who was more at home leading his men into combat rather than sitting at a desk, yet was personable and approachable, had played a part of the war in the Pacific from its first day until its last.
| THE KIT |
 I’ll
take the lazy way out in describing the kit by referring readers to Scott Van
Aken’s excellent accounting of it, found
here.
I’ll
take the lazy way out in describing the kit by referring readers to Scott Van
Aken’s excellent accounting of it, found
here.
In summary, Hasegawa has provided modelers with a nicely accurate and detailed rendition of the P-40N. The only aftermarket items the kit really needs are seatbelts, since none are included. About the only downfall of the kit involves its engineering. Trying to get the most “bang for the buck,” Hasegawa designed a number of different inserts and plugs so several different variants of the P-40 could be released. Ridding the model of the resultant seams is time and labor extensive; more so due to this kits large scale.
| CONSTRUCTION |
I’ll continue to be lazy and again direct you to Scott’s review of the kit for a comprehensive coverage of its construction, and will simply emphasize a few areas.
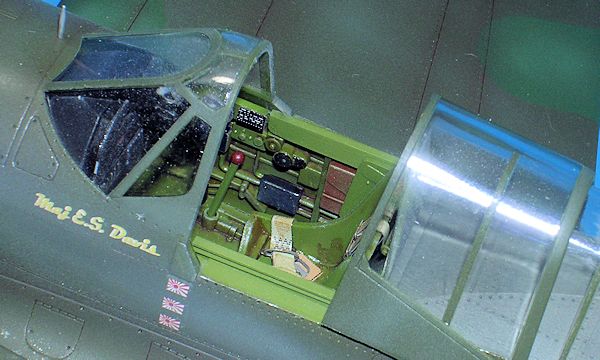
For the cockpit, I utilized Eduard’s photoetch interior set #33072 for an early-model P-40N. This set includes not only the needed seatbelts, but a nice instrument panel and some other odds and ends to further detail what is already a nicely done cockpit. I also replaced the kit’s propeller blades with a resin set available from Grey Matter Figures. Besides decals, these were the only aftermarket parts I used. I would have enjoyed some nice resin wheels but, alas, it appears none are available, at least for the smaller spoked ones prevalent on most P-40Ns.
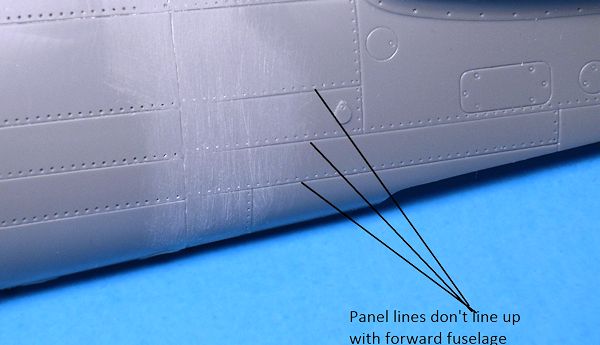 Although
I don’t often deviate from kit instructions, I (and most other builders of the
Hasegawa P-40 series of kits) have found it better to assemble the tail to the
forward fuselage in halves before gluing the fuselage together. I’ve found it
easier to get a flusher, smoother fit between the front and tail this way…
although I’ve also found the panel lines don’t always line up. As luck would
have it, it occurred this time as well, requiring some rescribing. The most
important point to emphasis in building this kit is to be patient in positioning
and fitting those plugs and inserts. The more careful one is, the less time and
effort will be spent in filling gaps and seams. In my case, I had the most
difficulty with the fit of the one piece rear canopy insert. There is a good
chance that a lot of my issues are “operator error,” but I still feel the need
to mention them.
Although
I don’t often deviate from kit instructions, I (and most other builders of the
Hasegawa P-40 series of kits) have found it better to assemble the tail to the
forward fuselage in halves before gluing the fuselage together. I’ve found it
easier to get a flusher, smoother fit between the front and tail this way…
although I’ve also found the panel lines don’t always line up. As luck would
have it, it occurred this time as well, requiring some rescribing. The most
important point to emphasis in building this kit is to be patient in positioning
and fitting those plugs and inserts. The more careful one is, the less time and
effort will be spent in filling gaps and seams. In my case, I had the most
difficulty with the fit of the one piece rear canopy insert. There is a good
chance that a lot of my issues are “operator error,” but I still feel the need
to mention them.
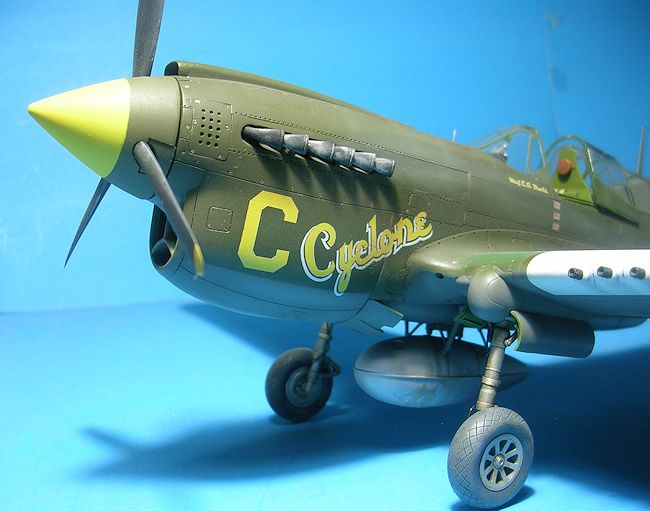
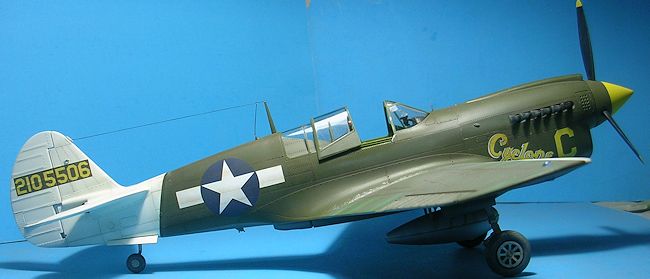
Also, the kit has recognition lights that the instructions indicate go on the sides of the fuselage, below the cockpit. These lights were not present on most P-40s, including the N model, so this needs to be dealt with. I simply glued them in place and sanded the area smooth, using Tamiya putty to aid in this.
| COLORS & MARKINGS |
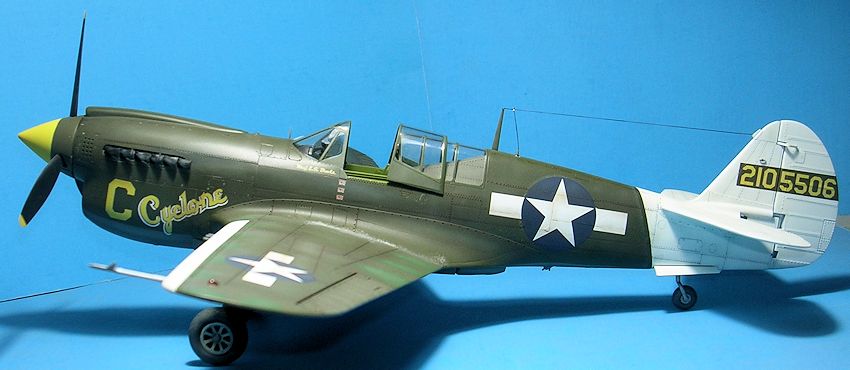
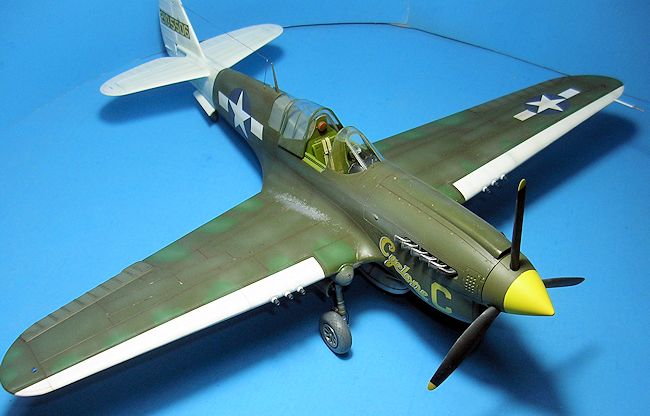
With
the possible exception of one M model, the 35th Fighter Squadron was
equipped exclusively with the N model of the P-40, in the ubiquitous Olive Drab
over Neutral Gray. The leading wing edges and tail assembly were painted white,
which were theatre markings. Photographs show evidence of overspray when these
areas were masked off for the white paint. The front of the propeller spinner
and the code letters on the nose were painted yellow. Although it’s not obvious
in the photographs of Davis’s aircraft that I have seen, photographs of other 35th
FS P-40Ns indicate the presence of medium green splotches on the wings. One can
safely assume that his aircraft had them as well. Two notes regarding these
 splotches:
they were not painted on the wing’s fabric-covered control surfaces and
might have been on the spine of the fuselage.
splotches:
they were not painted on the wing’s fabric-covered control surfaces and
might have been on the spine of the fuselage.
The dilemma in painting my model was how best to duplicate these effects. Starting off was easy enough, for I primed it with Mr. Surfacer 1000 through my airbrush. The primer showed off those seams and other areas that needed additional repair work, while also covering some of the more minor scratches and blemishes. After the primer, I preshaded the panel lines with White Ensign Models (WEM) tyre black. I next decided to paint the white areas, using Floquil Reefer White. Once done, I masked off the wing leading edges and tail and painted the undersides, using WEM’s Neutral Gray that I lightened somewhat with a few drops of white. After masking off the undersides, I again turned to WEM for its Olive Drab. WEM’s OD is quite dark, so I lightened it with a witch’s brew of Model Master Olive Drab and Faded Olive Drab. Once done, I worked on fading and weathering the topside by continuing to lighten the OD bit by bit, randomly spraying it on different areas. The control surfaces received the most attention since, being fabric colored on the real aircraft, they tended to fade noticeably more than the other surfaces.
I cut templates for the splotches from regular printer paper, which I attached to the wings with tape. Model Master Medium Green was used, which was then faded and weathered in the same manner as the OD.
It was
now time to replicate the white overspray. I unmasked the white areas and cut
thin strips of Tamiya tape, which were placed up against the
 edges of
the white. I then misted highly-thinned white paint over the wing leading edges
and tail, basically doing in miniature what actually occurred. My last task
before decaling was replicating the paint chipping and scuffing. For the
chipping, I used a toothpick to pick out areas with Model Master Aluminum paint,
while for the scuffing on the wing roots I dabbed the paint with a small piece
of foam cushion. This latter method worked quite well, as long as I removed much
of the excess paint from the foam by first dabbing it on some paper.
edges of
the white. I then misted highly-thinned white paint over the wing leading edges
and tail, basically doing in miniature what actually occurred. My last task
before decaling was replicating the paint chipping and scuffing. For the
chipping, I used a toothpick to pick out areas with Model Master Aluminum paint,
while for the scuffing on the wing roots I dabbed the paint with a small piece
of foam cushion. This latter method worked quite well, as long as I removed much
of the excess paint from the foam by first dabbing it on some paper.
Finally, after airbrushing Future (now, Johnson Pledge floor care) for the gloss coat it was time for the decals. Since markings for Davis’s P-40N aren’t commercially available, I had custom decals made for the nose art, pilot name, and tail number. The US national insignia on 35th FS P-40Ns had no blue surround on them, and I ultimately resorted to requisitioning some from my Zotz 32-030 “P-40N Warhawks” decal sheet after having no luck in locating any others.
| FINAL CONSTRUCTION |
After applying the decals, it was another gloss coat followed by an oil wash
in the panel lines. I used Payne’s Gray for the white and NG surfaces and
Burnt Umber for the OD. I followed up with some post-shading of the panel
lines using a highly thinned mixture of Tamiya Flat Black and Red Brown,
exhaust
 stains
with Tamiya Dark Sea Gray, and Tamiya Flat Black for the gunpowder stains. I
went light on the latter, since in my opinion these are often overly done on
many models. Afterwards, I airbrushed a coat of a Future/Tamiya Flat Base
mix to flatten the sheen. While some of the earlier construction was
occurring, I had painted and put together the propeller and spinner assembly
and had fully painted, built, and weathered the landing gear. I used thin
wire for the brake lines to add a nice little detail. I played around with
the idea of flattening the base of the tires myself by holding them against
a warm iron, but ultimately decided I would more than likely ruin them in
the attempt so decided that discretion was the better part of valor in this
area. Finally, I unmasked the canopies, attached the landing gear
assemblies, exhausts, propeller/spinner assembly and other tiny parts, used
some stretched sprue for the antennae wiring. I stuck the proverbial fork in
it and called it done.
stains
with Tamiya Dark Sea Gray, and Tamiya Flat Black for the gunpowder stains. I
went light on the latter, since in my opinion these are often overly done on
many models. Afterwards, I airbrushed a coat of a Future/Tamiya Flat Base
mix to flatten the sheen. While some of the earlier construction was
occurring, I had painted and put together the propeller and spinner assembly
and had fully painted, built, and weathered the landing gear. I used thin
wire for the brake lines to add a nice little detail. I played around with
the idea of flattening the base of the tires myself by holding them against
a warm iron, but ultimately decided I would more than likely ruin them in
the attempt so decided that discretion was the better part of valor in this
area. Finally, I unmasked the canopies, attached the landing gear
assemblies, exhausts, propeller/spinner assembly and other tiny parts, used
some stretched sprue for the antennae wiring. I stuck the proverbial fork in
it and called it done.
| CONCLUSIONS |
For anyone wanting to build a 1/32 scale P-40N model, Hasegawa is the only option. Fortunately, the kit is quite detailed and accurate, and the only aftermarket addition it really needs are seatbelts. The plugs and inserts pose an issue, but with careful fitting and a little time and effort are manageable. Otherwise, the construction is pretty straightforward. Since the “N” was the most numerous P-40 variant, there are actually quite a number of nice decal options available, so anyone building this kit should be pleased with how it turns out.
| REFERENCES |
Molesworth, Carl. P-40 Warhawk Aces of the Pacific. Oxford: Osprey Publishing, 2003. Print.
Stanaway, John, and Lawrence J. Hickey. Attack & Conquer: The 8th Fighter Group in World War II. Atglen: Schiffer Publishing, 1995.
September 2015
If you would like your product reviewed fairly and fairly quickly, please contact the editor or see other details in the Note to Contributors.