| KIT #: | 72503 |
| PRICE: | Around $25.00 msrp |
| DECALS: | Four options |
| REVIEWER: | Joel Hamm |
| NOTES: | Short run with injected canopy |
| HISTORY |
Anyone interested in the history of drafted light planes should pick up L- Birds, by T.M.Love, Flying Books International 2001, from which this summary is extracted, and which provided the photos for this model’s livery.
The L-1, also known as
the O-49 and attributed to Vultee, which in 1940 acquired Stinson (and soon
after merged with 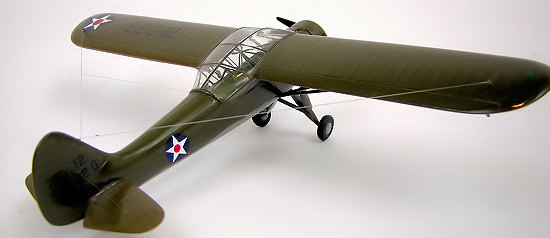 Consolidated Aircraft), owes its existence to the German Fieseler Fi 156 Storch (Stork). At the 1938 Cleveland Air Races, the Luftwaffe
demonstrated it along with some of its other vaunted aircraft. The Storch was
the first ever designed-from-scratch military STOL liaison plane. Its
performance and utility so impressed US observers that they began chanting “IWANTINEEDIGOTTAHAVEONEOFTHOSE”.
Consolidated Aircraft), owes its existence to the German Fieseler Fi 156 Storch (Stork). At the 1938 Cleveland Air Races, the Luftwaffe
demonstrated it along with some of its other vaunted aircraft. The Storch was
the first ever designed-from-scratch military STOL liaison plane. Its
performance and utility so impressed US observers that they began chanting “IWANTINEEDIGOTTAHAVEONEOFTHOSE”.
Out of the resulting competition, Stinson won the only production contract with a design that mimicked the Nazi A/C, particularly in the installation of full span automatic leading edge slats and slotted trailing edge flaps. Slow speed, stability, and short field load capability were the Vigilant’s strong points; while its size, weight, and complexity less than endeared it to personnel who had to service it in the field.
The L-1 upstaged its replacements, the O-52 Owl and O-47, whose speed and power were attributes precisely not needed in the observation / liaison role. It served in all theaters throughout the war, equipped sometimes as an ambulance, and in one version on amphibious floats (an enticing variant which MPM has so far not picked up on).
| THE KIT |
This kit really snuck up on me. There I was on a roll of utility – transport – liaison models, and didn’t know a thing about MPM’s release until reading an off-hand remark on some WEB site. Luckily, I was able to procure one (From NKR Models down in Oz) before it went out of stock and production, which these Czech short runs quickly do.
The molding is a progress /
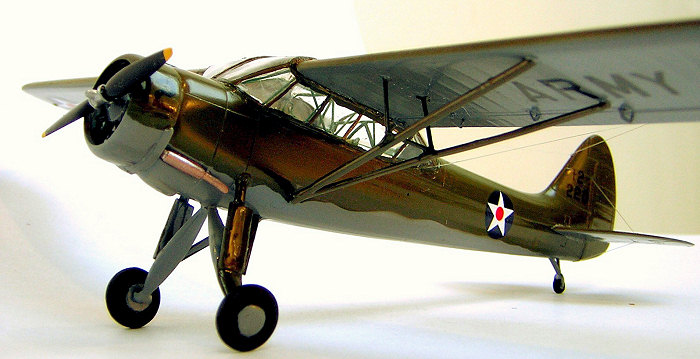
regress move for MPM. The step forward is the perfectly clear injected canopy,
which comes in two parts joined along a central longitudinal framing line. The
framing is scribed as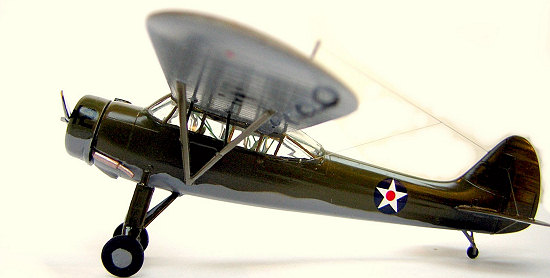 shallow
channels, not sufficiently deep to facilitate hand painting of the side
window and door frames.
shallow
channels, not sufficiently deep to facilitate hand painting of the side
window and door frames.
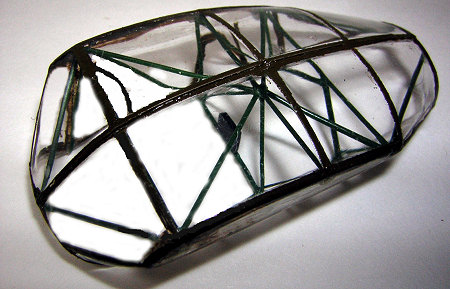
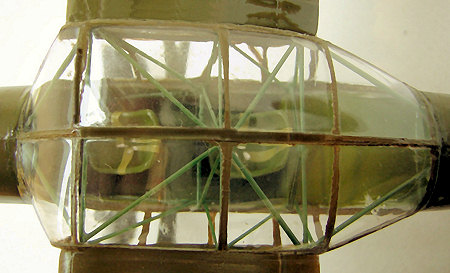
The back step is the lack of resin details, which that huge clear canopy is dying to show off. Nothing is provided of the jungle-gym of structural tubes that filled the real greenhouse, nor do the instructions provide any directions for the do-it-yourselfer.
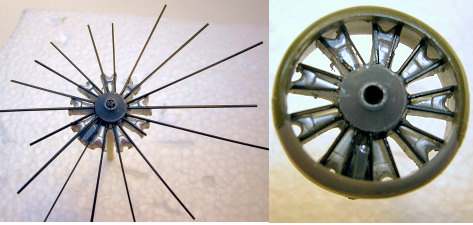
The 7-cylinder button type engine face is also a disappointment – especially since the history on the instructions sheet clearly claims the use of a 9 jug radial. The other disappointment is failure to mold deployed slats. Photos show that’s how they were usually, possibly always, configured on the ground. There are no mounting slots, tabs, pins, or holes, but locations are engraved for struts and tailfins. Dimples are even punched for the aft surfaces’ rigging wires. Take care not to obliterate any markings during sanding – little of which is needed anyway.
Control hinges and balance horns come on a photo-etched fret. Instead of soft brass, however, it is steel or some impervious element from the planet Krypton, that resists all efforts to cut the parts free, a recalcitrance exacerbated by lack of etched parting lines. Attempts to cut the hinges off with a shears just turns them into curled pointed shrapnel useful only for causing painfully embedded subcutaneous wounds. I was lucky enough to find a suitable replacement fret in the spares box. I super glued them on prior to painting and attaching the wings, and continually knocked them off thereafter.
| CONSTRUCTION |
I was to start with the
canopy, but first the fuselage halves had to come together so the transparency
could be properly fit. Mating two clear clamshells without glue glops or fume
fogging is always a challenge. Testors Liquid Cement seems to have the proper
 grab and consistency to be used
in minimal amounts. When smoothing the resulting seam mask the surrounding area
to avoid scrapes (guess how I realized that necessity!). The fit to the fuselage
required some tweaking but still left gaps that would have to be caulked.
grab and consistency to be used
in minimal amounts. When smoothing the resulting seam mask the surrounding area
to avoid scrapes (guess how I realized that necessity!). The fit to the fuselage
required some tweaking but still left gaps that would have to be caulked.
The build would look utterly
bogus if the canopy was left empty of at least a suggestion of the tangle of
tubes that in real life supported the wing (or by which the wing supported the
fuselage). Toward fulfilling that goal I had, several years earlier while
visiting Kermit Weeks’s aviation museum near Tampa, taken detailed photos of a
stripped down L-1 in his restoration shop (the best part of the museum tour).
The photos were carefully filed, but not carefully enough to avoid discovery by
the Model Airplane Gremlins, who delight in such pilferage. An SOS on this site
brought a set of nearly identical photos from a poster who had been to the same
place with the same idea (though a few years later, when the L-1 still sat
undressed). With those, a 4X magnifier over whatever other pics I could find,
and a yard of stretched green sprue, I managed to more or less reproduce the
interior framework. Any divagations from precise
 placement are acceptable under
the Neo-Platonic Philosophy of Plastic, to which I subscribe, which posits that
models are approximate representations, not exact shrinkifications.
placement are acceptable under
the Neo-Platonic Philosophy of Plastic, to which I subscribe, which posits that
models are approximate representations, not exact shrinkifications.
Even with all the framework, the cockpit still needed noodling. The passable bucket seats received Tamya Tape belts. The side walls were dolled up with more “tubing”, and a scratched throttle quadrant and PEB trim wheel gave the pilot something to play with. The canopy got stuck on with Testors liquid, which is really a loose gel, and gaps were caulked with aqueous varnish, whose leveling qualities, clarity, and moisture resistance make it superior to white glue.
Butt joining the wing roots to the canopy with minimal glue was a challenge. I should have left some of the “tubes” poking through as stub spars. The right wing panel flopped over the top, dragging with it a gloppy glue string, one of the many catastrophes that plagued this project. I was able to sand and polish the damage, except for a deep pit that was passably filled with a whopping dose of Future.
Another challenge is figuring
out how to attach the wing struts. Three locator ovals are engraved on the
fuselage side, one for the struts, one for the gear legs, one for good luck.
Trial and error revealed that the highest one is where the strut gets stuck, but
first a millimeter of length should be spliced on to achieve the properly
prominent dihedral. A third perplexity is posed by the mid-wing
 “U” struts, which are too short
and too wide. These parts are best discarded and stick built with lengths
of .025 rod.
“U” struts, which are too short
and too wide. These parts are best discarded and stick built with lengths
of .025 rod.
As I said, the engine button is two jugs short and otherwise unconvincing. A perfectly proportioned radial popped out of the spares box. It was, for some reason, devoid of push rod tubes, which had to be fashioned from pulled sprue stuck into radially drilled holes in the crankcase.
Wheels seem to be a sore point with the Czechs, who insist on molding them as split halves. That wouldn’t be such a problem if they didn’t always embellish the hubs with sink holes. Filing the filler wasn’t as difficult as expected. A few wiggles of a half round riffler file followed by a bit of buzzing with a converted toothbrush vibrating sander.
| COLORS & MARKINGS |
Four or so schemes are included on the decal sheet, none of which approximated the early wartime “meatball-in-star” clad version I wanted.
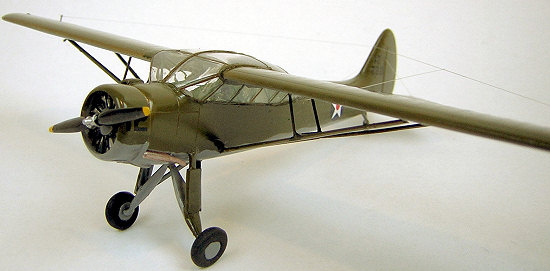 Suitable decals dropped out
of the spares box. Individual numbers had to be cut from an ancient Microscale
sheet. This L-Bird wore its unit identification on the upper port wing.
Interestingly, “22012” was the postal Zip Code of my house in Brooklyn (NY, or
course) where I re-discovered modeling. A misting of Future sealed the transfers
and semi-glossed the enamel shine.
Suitable decals dropped out
of the spares box. Individual numbers had to be cut from an ancient Microscale
sheet. This L-Bird wore its unit identification on the upper port wing.
Interestingly, “22012” was the postal Zip Code of my house in Brooklyn (NY, or
course) where I re-discovered modeling. A misting of Future sealed the transfers
and semi-glossed the enamel shine.
| FINAL CONSTRUCTION |
This build was prolonged by an endless string of paint touch-ups and minor disasters, such as losing PEB hinges and snapping the monofilm antennae.
| CONCLUSIONS |
I know, I’d promised to move on from utility-transport thingies to something else; but I just couldn’t help myself.
March 2007
Copyright ModelingMadness.com. All rights reserved. No reproduction in part or in whole without express permission from the editor.
If you would like your product reviewed fairly and fairly quickly, please contact the editor or see other details in the Note to Contributors.