ProModeler 1/48 P-40E Warhawk
| KIT #: | 5921 |
| PRICE: | $18.00 in 1995 |
| DECALS: | Two Options |
| REVIEWER: | Andrew Garcia |
| NOTES: | Eduard and Moskit aftermarket used. |
| HISTORY |
The
P-40E was the P-40B/C Tomahawk replacement. Using the new Allison V-1710-39
engine to get better performance at altitude the RAF specifications drew Curtis
into building an extensively redesigned aircraft which externally looked similar
to its predecessor but changed enough to be a sibling rather than a warmed-over
clone. The fuselage was modified with a reduced upper cross-section to improve
rearward visibility. The nose guns found in the P-40B/C were removed and wing
armament improved with six .50 caliber guns installed with increased rounds per
gun. The distinctive gun charging handles found in the P-40B/C were removed
with a hydraulic gun charger put in its place. A provision for a future armament
of two 20mm guns per wing 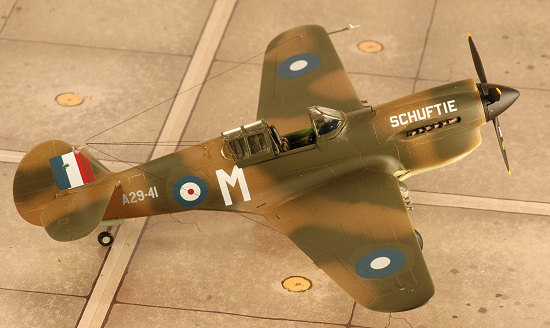 became part of the specification but was never
implemented. The radiator assembly was redesigned and the carburetor intake
relocated to the upper nose giving the P-40E its distinctive appearance.
Fittings for a 500-pound bomb or a 52-gallon drop tank were added. Pilot armor
was increased and the landing gear legs were shortened and strengthened.
became part of the specification but was never
implemented. The radiator assembly was redesigned and the carburetor intake
relocated to the upper nose giving the P-40E its distinctive appearance.
Fittings for a 500-pound bomb or a 52-gallon drop tank were added. Pilot armor
was increased and the landing gear legs were shortened and strengthened.
The distinctive exhausts were initially simple round tubes. Midway through the production of the P-40E, the exhausts were flattened to reduce the flame visibility (what we call the “exhaust signature” today). This is the bane of P-40 modelers who can build a beautiful kit only to someday find a reference showing you used the wrong exhaust! In general most P-40E’s and Kittyhawk I-IA’s used the tubular exhaust. But – there are quite a few with the flattened exhaust and some may have been retrofits to the same airframe resulting in photos of the same aircraft on different occasions using the two alternatives. You may not be able to say the early ones had it and the late ones did not. As an example, look on page 17 of the Squadron In Action #1026 for a fine photo of Col. Holloway of the AVG’s aircraft. It is serial number 41-5741 and uses the flat or fishtail exhaust style.
The other P-40E concern for modelers is determining which antennae configuration is correct for the model you are building. The P-40D/E started out with aerial wires strung from the wing tips to the vertical tail’s edge as well as from the fuselage to tail. Later changes resulted in antenna masts. As the saying goes, use a photo reference to be sure. Drawings, decal instruction profiles and color profiles are not to be relied upon.
| THE KIT |
My build
rate is less than the output of the model kit industry. Here I am building and
reviewing a kit that was originally moulded in 1978 as a Revell release # H-30,
and re-released in 1983 as # 4319. A merger between Revell and Monogram in the
1990’s resulted in some updates and reboxing activities for their newly combined
tooling. At that time, Monogram had a strong product release cycle in progress,
with their ProModeler series of kits. One of the ProModeler releases was a 1978
issue of the re-tooled Revell P- 40E moulds with all the expected ProModeler
enhancements – better decals, excellent Bert Kinsey inspired instructions
complete with photos of pertinent portions of the aircraft and modified or
improved plastic tooling.
40E moulds with all the expected ProModeler
enhancements – better decals, excellent Bert Kinsey inspired instructions
complete with photos of pertinent portions of the aircraft and modified or
improved plastic tooling.
My first P-40E build was an Otaki kit in the 1980’s. I built it mainly because the kit seemed to be a newer release than Revell’s P-40E # H-30 release providing scribed panel lines as its main differentiator. It was an OK kit and satisfied my need for a P-40E at the time. However, it was not exciting in that it was lacking many details and looked almost toy like. There was no big after-market resin or etched metal accessories industry at that time that I could leverage into the improvements required to get a decent P-40E so the Otaki, Revell and Monogram P-40 kits stayed in the stash. It took a long time – 2005 for the Hasegawa release to provide a nice P-40E. The Hasegawa P-40E build drove me to revisit the P-40’s I have accumulated over the past twenty years.
When I bought the Hasegawa release in 2005, I went to my stash and realized I had accumulated a large number of P-40 kits including some nice ones from AMT and AMtech. So, after building the Hasegawa P-40E, I started to build from theP-40B/E stash. I started a five kit simultaneous build consisting of three P-40B’s and two P-40E’s. The five were; a Trumpeter P-40B, two Hobbycraft P-40B’s, one ProModeler P-40E and an AMtech P-40E. The Trumpeter was an OOB build. The Hobbycraft kits contained CE resin cockpits, CE decals and one used an original Kendall MC resin cockpit. The AMtech P-40E kit used a True Details resin cockpit, and TD wheels to round out the after-market parts additions I had placed in the kit boxes as these after-market components were released during the 1990’s.
There have been many P-40B/C reviews and builds of the Trumpeter and Hobbycraft kits so I prioritized the RM P-40E ProModeler offering as my next build. Since I can’t recall seeing a ProModeler P-40E review, I thought this one would be a worthwhile contribution to Scott’s accumulated kit history in MM for those of us with this kit sitting on the unbuilt shelf. It is worth building!
 The RM
ProModeler Kit #5921 has the following improvements from the base Revell kit:
The RM
ProModeler Kit #5921 has the following improvements from the base Revell kit:
· Improved “invisa-clear” Scale-Master decals printed by Vitachrome but with minimal stencils.
· Completely new cockpit including moulded on seat belts and shoulder harness. It is a respectable cockpit. With some detail painting, and a wash to bring out the details it looks nice. While it is not up to resin standards or even the Hasegawa plastic cockpit standard, it is acceptable with the exception of the gun sight which is poor.
· New inserts for the wheel wells greatly improved this area
· A better drop tank with sway braces and a fuselage vent pipe was added.
· A separate rudder link was added replacing the previous moulded on component.
· Improved landing gear – significantly better than the original release with hydraulic lines, gear braces and crisper definition of all the components.
· A new canopy rear view mirror which attaches to the front windscreen canopy top.
· Two new figures – a Pilot and mechanic.
· New “flattened” tires that looked so nice I opted not to use the True Details resin wheels #46014 that I had stored in the box for use in this build.
· No recessed panel lines – the kit kept the old raised panel lines.
| CONSTRUCTION |
I added etched metal from an Eduard release representing the ring and post external gun sight, and pre-painted seat belts as well. Although the kit has moulded on seat belts the Eduard set is superb. This kit is an excellent candidate for a reasonably priced Eduard Zoom etched metal release – but since it is OOP chances are it won’t.
The ProModeler kit was a fast build. However, I had some trouble getting the cockpit to properly fit. Until I build another RM P-40E I am not sure if it is a kit related problem or my fault. Suffice it to say it was not the drop fit I expected since the rest of the kit mould fit was good. The instrument panel did not seem to fit as expected. I continued the building process unsure if the problem was the kit or I. The cockpit when finished looks fine but not where I would expect it to sit.
 The
wing .50cal gun tubes were not changed from the original Revell moulds. They are
a nice attempt to give some extra detail to this area but the execution is
flawed. The guns are short, rounded stubs that resisted my effort to hollow
using a pin vise. I chose to drill them out and replace them with hollow
hypodermic tubing from Small Parts, Inc. #HTX-19 SS Tubing, Hypodermic type 304
with .042 OD and .0075 wall. This was a big improvement over the kit-supplied
parts.
The
wing .50cal gun tubes were not changed from the original Revell moulds. They are
a nice attempt to give some extra detail to this area but the execution is
flawed. The guns are short, rounded stubs that resisted my effort to hollow
using a pin vise. I chose to drill them out and replace them with hollow
hypodermic tubing from Small Parts, Inc. #HTX-19 SS Tubing, Hypodermic type 304
with .042 OD and .0075 wall. This was a big improvement over the kit-supplied
parts.
 I
added two short pieces of thick wrapped guitar wire on the fuselage spine to
replicate the insulators used as antennae attachment points and this is well
illustrated in the Bert Kinsey inspired instructions.
I
added two short pieces of thick wrapped guitar wire on the fuselage spine to
replicate the insulators used as antennae attachment points and this is well
illustrated in the Bert Kinsey inspired instructions.
I used a decal from a Monogram after-market decal sheet to finish off the cockpit instruments.
I enjoy building resin cockpits and use Eduard etched parts. This was an OOB build and I would rather save the additional investment in resin and etched for another kit.
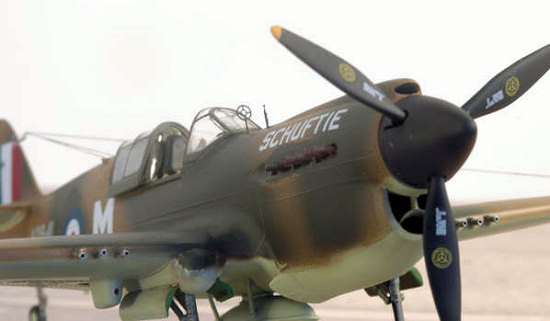
I took the
kit exhausts and set them aside. RM provides both P-40E exhaust versions, the
tubular and the fishtail types. They are acceptable and can be hollowed out with
a Dremel bit. I had placed Moskit metal exhausts in the box years ago and this
was my chance to use them ...so I did. They are beauties. The aircraft looks
much better after this step. The alternative is to get the
 Ultracast resin
exhausts.
Ultracast resin
exhausts.
The kit is missing the post and bead external sights. I used an etched metal gun sight from Eduard post & bead gun sight fret # 48-411. The alternative is to get it from the Eduard Zoom for the P-40B/C and use a piece of guitar wire for the front post. The Eduard parts are very delicate. They have some etched segments causing them to fold or break along those lines so I inserted two guitar wire sections as supports and glued the Eduard parts to these. This had an unexpected benefit of creating a more realistic 3D effect rather than the flat metal look from OOB etched parts. It also allows for a very delicate top post and bead part.
I enhanced the cockpit gun sight by using a circular dremel saw to cut away unwanted portions. To compensate for the lower than expected cockpit I had to raise the gun sight and add some details to it since the kit supplied component is a weak representation. The solid block gun sight in the kit part was a detraction and not on par with the other improvements. Its only advantage is it is moulded in clear plastic.
Some additional information on the hydraulic line for each of the main landing gears is found in the instructions and they are well illustrated in the color detail photos in Squadron’s P-40 Walk Around # 5508 found on page 4.
The engineering of the prop attachment is from the original Revell moulding. I like having the rubber bushing that allows you to remove a propeller blade for transit and cleaning. The kit prop is acceptable but not inspiring.
| COLORS & MARKINGS |
 Painting:
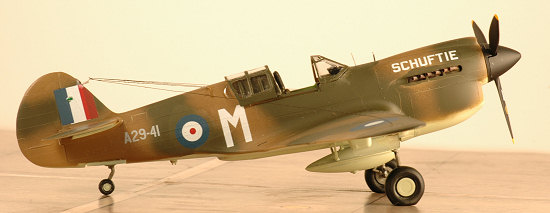
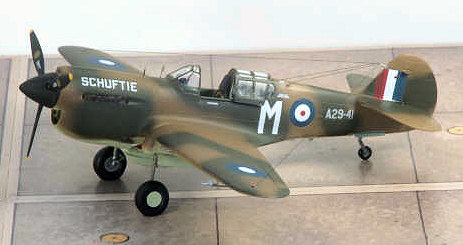
I used a Gunze Sangyo acrylic paint # H074 Sky (Duck Egg Green) on the underside and Gunze H320 Dark Green and H072 Dark Earth on the topside. I used Testors Model Master enamel metallics for the exposed metal areas. I used Pactra rust for the exhausts.
Decals:
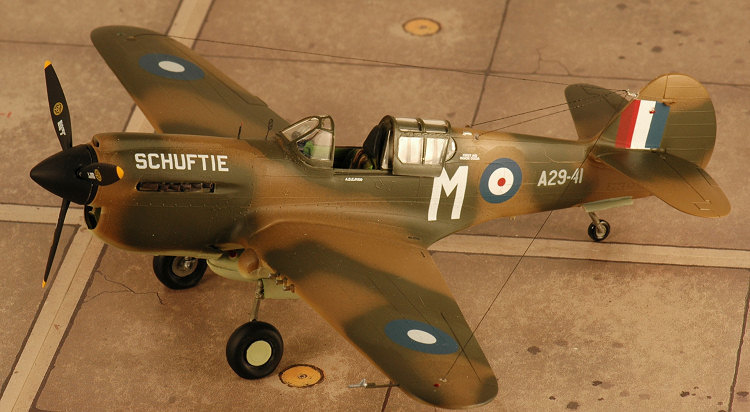
I used the kit decals for an aircraft called “Schuftie” (which is Arabic for “Have a Close Look”) from the No. 75 Squadron , RAAF, Port Moresby, Australia piloted by Australian Ace Flt. Lt. Les Jackson. The decals were excellent and after ten years in storage worked well.
| FINAL CONSTRUCTION |
I painted the various injection-moulded lights on the wings, fuselage and tail, first with Testors chrome enamel followed by Tamiya clear red and green . They do not look as good as the clear parts that are provided with the Hasegawa kit. I did this after all the final decals and clear coats had dried.
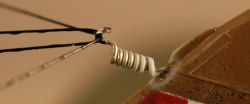
 After the
final detail painting I added the complex tail to wing antenna wires. I decided
to enhance this area by using a piece of thick guitar wire to form an insulator.
The thicker wires on a guitar are wrapped coils unlike the solid, straight wires
for the thinner strings. After cutting an appropriate length I would unravel the
end wire by pulling on it with one of my needle nose pliers. I used some
Squadron metal forming pliers next to twist the ends into hooks and used the
straightened opposite end to insert the coil into the vertical tail leading
edge. I prefer the final look and this is a work in process. I used the same
wire, as insulators at the fuselage attachment points but the coils lost their
look after using cyano glue to attach the antenna wires. Between the glue and
repaint with fuselage acrylic paints the posts lost their coil shapes. I liked
the coiled look before this happened since it had more of an electrical
insulator look.
After the
final detail painting I added the complex tail to wing antenna wires. I decided
to enhance this area by using a piece of thick guitar wire to form an insulator.
The thicker wires on a guitar are wrapped coils unlike the solid, straight wires
for the thinner strings. After cutting an appropriate length I would unravel the
end wire by pulling on it with one of my needle nose pliers. I used some
Squadron metal forming pliers next to twist the ends into hooks and used the
straightened opposite end to insert the coil into the vertical tail leading
edge. I prefer the final look and this is a work in process. I used the same
wire, as insulators at the fuselage attachment points but the coils lost their
look after using cyano glue to attach the antenna wires. Between the glue and
repaint with fuselage acrylic paints the posts lost their coil shapes. I liked
the coiled look before this happened since it had more of an electrical
insulator look.
| CONCLUSIONS |
RM’s ProModeler P-40E Warhawk is a nice build. It makes up into a fine OOB representation of the P-40E and I liked it better than the Otaki/Arii kit. The kit is overall a nice kit but has some drawbacks in the gun sight, wing guns, canopy fit, and fuselage lights compared to newer releases by other manufacturers. I would recommend replacing the sliding portion of the canopy with a vac formed part since I was unable to glue on the kit supplied part without it detracting from the overall look. I kept and used the kit supplied part and just find it annoying to constantly have it fall off when the kit is handled. My suggestion is just that, some advice in a post build recommendation rather than a step I incorporated into the build. The front windscreen fit was poor and required gap filling and repair work to improve its appearance. After building the Hasegawa and Trumpeter P-40 kits there are a number of other parts that rivet counters would complain about such as the missing fuselage side lights under the cockpit edge and the three under fuselage lights that were completely missed. Although I prefer and desire enhanced or improved details found on newer releases of the P-40E, if you have this kit or see one at an attractive price it is worth building – even if its just to add some new camouflage or marking to your P-40 collection. For the kit collector, it is a nice Monogram release.
| REFERENCES |
Although I have many P-40 reference books I really did not use them for this build. I just used the excellent Bert Kinsey kit instruction booklet and a quick glance at -
P-40 Warhawk Walk Around series, No. 8; #5508 Squadron/Signal [USA],1996
P-40 Warhawk, Kinzey Part 1' (Detail & Scale series, No. 61; # 8261 Squadron/Signal [USA], 1999
P-40 Warhawk, Kinzey Part 2' (Detail & Scale series, No. 62; # 8262 Squadron/Signal [USA], 1999
Review kit, resin and decals courtesy of my stash and my wife’s cooperation.
March 2007
Copyright ModelingMadness.com
If you would like your product reviewed fairly and fairly quickly, please contact the editor or see other details in the Note to Contributors.