| KIT #: | 7546 |
| PRICE: | Current release is $23.95 (Revell boxing) |
| DECALS: | One option |
| REVIEWER: | Stephen Young |
| NOTES: | Aeromaster Decals 48-629 Black Widows Best Sellers, Part 1. True Details 48028 wheels. |

| HISTORY |
The Northrop P-61 “Black
Widow” was the first United States aircraft designed exclusively for combat
occurring in the blackness of the night. As the war in Europe was brought to the
night sky over Great Britain by the German Luftwaffe the Great Britain’s Royal
Air Force lacked dedicated aircraft for combating incoming enemy bombers at
night. British developments in the new technology of radar led to evaluation of
aircraft to fulfill the night interceptor role. In an effort to provide
solutions by the end of 1940 U.S. Army Air Corp specifications were released to
American industry. Due to the high weight of the early airborne intercept radar
units and a required loiter time of several hours specified by the British, Jack
Northrop realized the aircraft would be large and require the power of a multi
engine configuration. On November 5, 1940 Northrop presented a preliminary
design was accepted and the Black Widow was conceived. Immediately comprehensive
design work began on a large aircraft powered by two Pratt & Whitney R-2800-10
Double Wasp 18-cylinder radial engines producing 2,000 hp each to be armed with
two four gun turrets. With a projected 22,6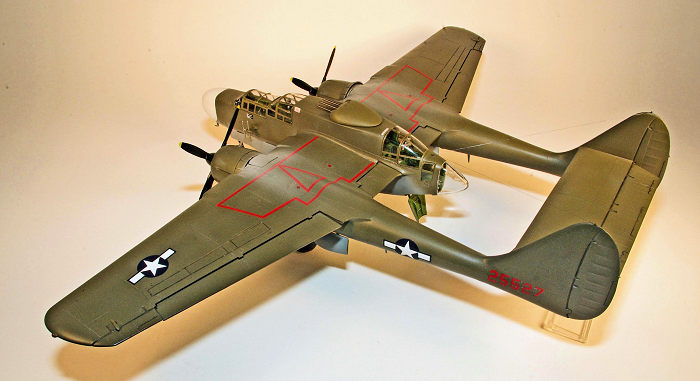 60 pound full load weight the
aircraft far exceeded the size and weight of fighters of the era. By the
following month Northrop submitted the formal specification and the USAAC issued
a contract for two prototypes under the designation XP-61.
Engineering proceeded and spurred by the German blitz over England in March 1940 a contract was issued for thirteen YP-61 night fighters. With the entry of the United States into World War II on December 8, 1941 a flurry of contracts were awarded for several hundred aircraft even though the prototype had not been completed. After numerous engineering changes and various large component delays the XP-61 prototype flew on May 26, 1942 and was found to exceed all performance expectations. Refinements and modifications were made as flight and engineering experience with the prototypes and YP-61 aircraft accumulated and the first P61-A-1 production airplane rolled off the line in October 1943. Most of the A-1 models went to USAAF night fighter squadrons (NFS) in the Pacific theater of operations including the 6th NFS and the 419th NFS. A change in designation to P-61A-5 occurred with the 46th production aircraft that were built with P&W 2,250 hp R-2800-65 engines. The next major variant of the P-61 was the B model that introduced a improved airborne intercept radar necessitating a lengthening of the fuselage nose by eight inches. Many other product improvement changes were made based on combat experience with the A models as well.
 By 1944 the Allied
forces in the Pacific had advanced to the Marianas Islands with the goal of
establishing forward bases for the U.S. Army Air Forces long range B-29 bombers
to attack the Japan home islands. With the capture of Saipan, Tinian, and Guam
these bases rapidly were brought into operation and the 6th Night Fighter
Squadron based in Hawaii sent a six plane detachment on June 21, 1944 to Isely
Field on Saipan. The first P-61 victory occurred on the night of June 30, 1944
when Second Lieutenant Dale Haberman and Radar Operator Flight Office Raymond
Mooney destroyed a night intruding Mitsubishi G4M Betty. Their aircraft, P-61A-1
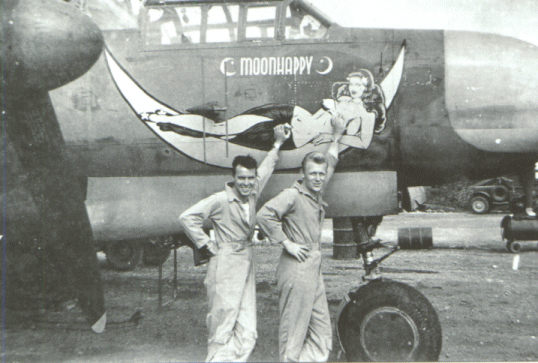
serial number 42-5527, named “Moonhappy” for pilot Dale “Hap” Haberman and Radio
Operator Ray Mooney, carried famous nose art showing a revealingly dressed lady
lying on a crescent moon with stars in her hair and on her shoes. A earlier
version of “Moonhappy” depicted two men riding on a angry moon. On December 25,
1944 Lt. Habermann would be credited with a double kill of two Betty bombers. He
would later add one additional kill to bring his war time total to four.
| THE KIT |
Initially released in
1974 as kit number 7456, Monogram's 1/48th scale P-61 Black Widow has been
intermittently available in the Monogram and subsequent Revell product lines for
an amazing 43 years. It has also been issued by Hasegawa sometime in the 1990’s
and is currently also available in a release by Revell of Germany as #80-4887.
All the issues are the same plastic sprues although the decals have varied as
have the printed instructions. My kit is the original 1974 issue when I
purchased two (one is still in the original shrink wrap). Molded in somewhat
hard black polystyrene plastic there are 130 parts on six parts sprues and one
clear sprue for the transparent parts. The molding is clean with no flash but
there is the usual Monogram lack of precision especially on some clear parts
that are under sized. A small decal sheet is included has a mix of red and black
stenciling and nose art for two aircraft; P-61A, 42-5536, 422nd NFS, 1944, “Husslin’
Hussy” and P-61B, 418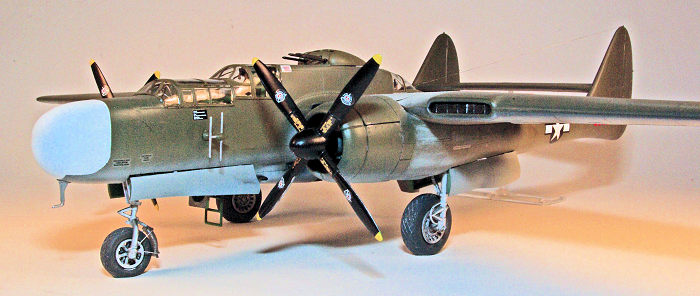 th NFS, 1944, “Times A Wastin’”. The model is fairly
typical of the era for Monogram engineering with features that appealed to young
modelers including open hatches, a partially exposed engine, exposed guns,
exposed nose airborne intercept radar and moveable turret and propellers. The
canopy is engineered to be posed with either open or closed sections. Three nice
ground service figures and a barrel are included as well as optional under wing
fuel tanks. Two nose sections are included to allow the model to be built as a
“A” model or a “B” model with the longer nose. Surface detail is engraved for
the control surfaces and raised panel lines with raised rivet and fastener
detail throughout. The raised detail is heavy handed and typical of that era of
Monogram kits and preservation will be a challenge in some areas due to seam
filling if that is desired. Alternatively removal will be a challenge as there
is a lot to remove if re-scribing to engrave panel lines and engraved detail is
desired.
I am a little surprised that the kit sells well enough to keep it in production for the decades it has been around as no revisions other than the decals and instruction have apparently ever been made. On the other hand it is the least expensive 1/48th scale P-61 kit available even at the current retail price. There are quite a few after market resin and photo etch parts that have been produced over the years but many are out of production since all the attention has shifted to the Great Wall 1/48 P-61 kits although reviewers have noted some short comings in that series as well. Other options include the Hobby Boss kits although all are much more expensive to obtain more refined and precise engineering and part detail.
| CONSTRUCTION |
(As much detail as possible on the construction of the kit. M2 kit reviews are used by readers to help them while building the kit. It is not much help to say 'kit went together well'. - 3 paragraphs
My intent was a
recreational build of the model out of the box without any photo etch for my
personal display and to further develop my building and finishing techniques.
The typical Monogram of 1974 vintage styl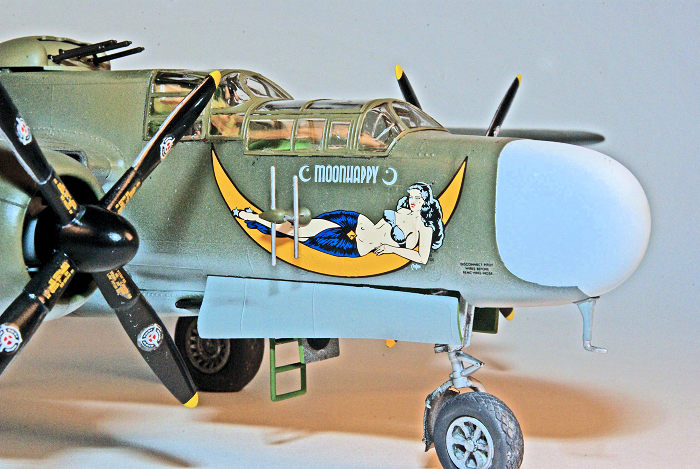 e instructions are simple diagrams with
part numbers and color call outs from the supplied generic color legend. Study
of the instructions is warranted as it is somewhat unclear in describing the
construction options.
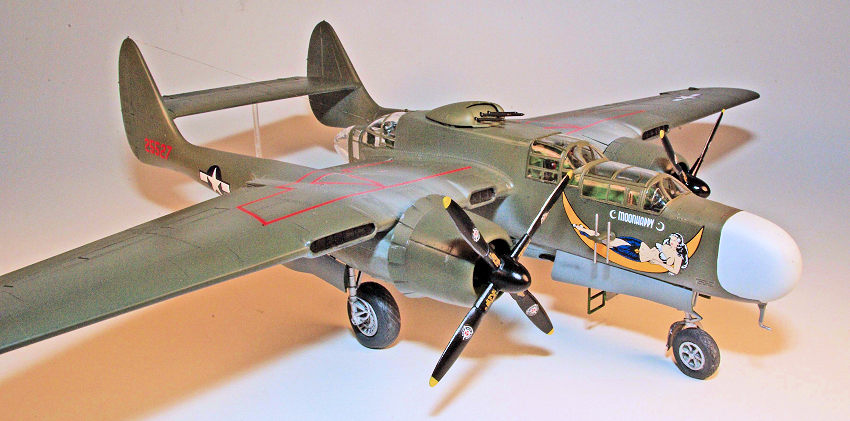
Basically the instructions focus on building a P-61A with a olive drab over neutral gray scheme and a P-61B with a gloss black scheme although one has the option of a turret-less aircraft in either scheme. I had decided before starting construction to model “Moonhappy” so that required a olive drab over neutral gray aircraft with a turret. In addition photos of the aircraft show the tires had a diamond treaded pattern so the kit smooth pattern tires would need to be replaced by True Details set TD48028. The parts were washed in warm water with dishwashing detergent and air dried to remove mold release chemicals. Test fitting of the main components such as the cockpit, fuselage halves and wings was done and revealed good alignment of the internal parts but some poor alignment areas of the fuselage. In addition major gaps exist at the wing to engine nacelle joints. There are also gaps that exist due to under size parts such as the hatches in the cockpit enclosures. I did not recognize these until I was attaching the clear parts near the end of the project. It would be reasonable to consider just assembling all the clear parts together to allow complete fairing in of all the seams for any build in which the cockpit is closed up. The cockpit areas of the fuselage were airbrushed with Testors Model Master Acrylic Interior Green FS16473. The interior panel components painted by hand with Testors Model Master Acrylic Interior Black FS37031. For hand painting of flat surfaces I get the best results not using a traditional brush but rather Microbrush Superfine tuft brushes that apply the paint by flowing it on to the surface rather than brushing it on. In my experience Testors Model Master Acrylic paints brush very well with this technique and level well provided one does not make the paint coat too thin. As long as you keep the paint application moving in one direction only there will be no brush marks or visible dry lines. The instrument panel and consoles have molded relief instruments so the visible surface was airbrushed with Rustoleum gloss white enamel and after the paint was dry the panels were brush coated with Future. After at least 24 hours of drying time Testors MM Flat black was then airbrushed over the dried Future. After allowing to dry over night the dials and switches were picked out by wiping away the black paint from the raised relief details using a enamel thinner dry brush technique. Vallejo Acrylic Red was applied to a couple of instruments and knobs for added visual color. Weathering was done using a wash of water/Future and Tamiya Acrylic Black X-1 followed by light dry brushing with Testors silver enamel over wear areas. The kit interior assembly instructions were generally used a guide rather than followed explicitly to avoid installing parts that would pose a problem with breakage. The nose gear installation was modified as the fit in the hole in the cockpit floor was loose so I installed a short section of aluminum tubing to accept the strut with the intention of gluing it in place after the finish was complete.
Once the interior
components are painted, weathered, and complete the fuselage halves were jointed
trapping the floor and bulkheads. To allow cementing of the bulkheads and floor
to the fuselage sides all paint between mating s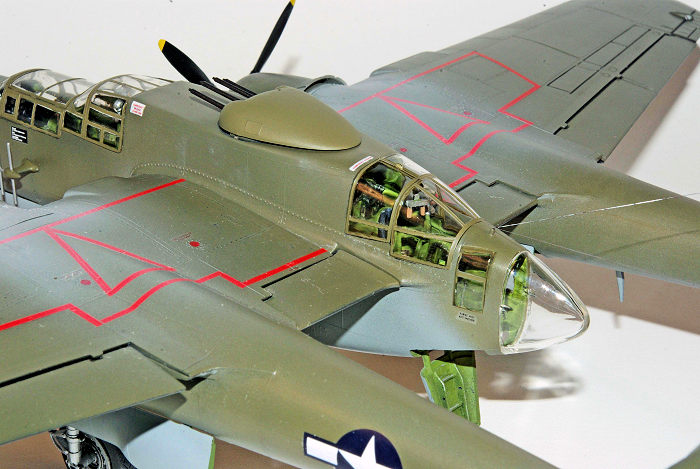 urfaces was scraped away
precisely and only along the joint surface. Using the fast acting Acrylic cement
leads to a clean welded bond. Care must be taken to optimally line up the
fuselage halves to minimize the need for re-contouring with putty but despite
care body putty will be needed in front and behind the turret opening along the
joint. I glued a small section at a time using generic very fast setting acrylic
liquid cement from Tap Plastics, Inc., a local commercial plastic and acrylic
supplier. This cement is very fast acting and evaporates very rapidly dissolving
and welds the styrene with very little surface crazing. I apply it to a joint
about ½ to ¾ inch at a time using a #0 red sable brush. Meticulous alignment of
the mating surfaces is the key to reducing the need for joint filling and seam
work with putty and is well worth the time and effort. On other models that have
alignment issues I will cement small 3 to 5 mm 0.020 sheet styrene tabs that are
trimmed or shaved carefully to force the correct alignment. I used Loctite 5
minute epoxy to glue in three .38 caliber lead bullets (approximately 1 ounce of
weight) in front of the nose bulkhead choosing to not add the airborne intercept
radar parts. I thought this would be sufficient to bring the center of gravity
in front of the main landing gear but my calculation was off and it turned out
much more weight was needed. The wing halves were glued using the acrylic cement
and the joint required minimal putty.
The instructions call for gluing the assembled wing halves into the fuselage before attaching the engine containing booms but I decided to assemble and finish all joint work on each boom before they were attached to the wings. The left boom includes a full engine that can be exposed through a open panel. I painted the engine without adding detail and planned on closing the panel. The boom halves require painting of the wheel wells prior to assembly as the landing gear needs to be trapped between the halves. Nonetheless they assemble well with only a small amount of seam work necessary. However the boom to wing joint is a different story leaving a relatively large gap between the wing and boom and requiring putty to fill and re-contour the area on the top surface at the wing-boom joint. Having the right and left wing plus boom components separate allows easy manipulation and management of the joint and contour work. I lightly crazed the plastic at the wing/boom joint with the acrylic cement followed by filling the gap with several applications of Testors Clear Parts Cement allowing complete drying between applications. The contour was made smooth by wiping away any excess cement with a Q-tip moistened with water. After the final layer seam was filled perfectly. A caveat regarding this technique is that there must be absolutely no play or flex in the joint otherwise the cement will separate so the joint must be solid and completely cured before application. On the wings the almost full length flaps can be assembled in the lowered position or up position. I did not want to deal with the joint line of the upper and lower wing halves so I assembled the flaps so they would rest in a slightly lowered position. Once these three large assemblies were completed it was time to do the seam work and quite a bit is needed for this kit. I use Bondo Auto body putty heavily thinned with lacquer thinner to the consistency of a heavy cream or thin paste and applied sparingly and if necessary in multiple applications with contour sanding using a Squadron fine sanding stick between layers. After finish sanding of the final application with a Squadron super fine sanding stick, Mr. Surfacer 500 is hand painted over the putty to act as a sealer and primer.
Once the Mr. Surfacer is
dry light polish sanding is done and the resulting surface accepts finish coats
of paint in a manner indistinguishable from the plastic. Fit in the wing
attachment to the fuselage was good and positive and correct alignment was
checked with a 90 degree square. A normal seam exists at the joint between the
wings and the fuselage. To eliminate this I again used the Testors Clear Parts
cement method. The only caution needed is that the seam cannot be masked as
adhesion will be low. The right engine and cowling
 is a separate component and
after painting and assembly is to be attached. I found the mating surface to be
inadequate so I made four attachment brackets from sections of Evergreen right
angle 0.020 styrene cemented to the front of the nacelle. The instructions call
for installation of the clear canopies and it would be a option to do that at
this stage for full fairing in of all permanently attached clear section. My
alternative was to attach all these sections near the completion of assembly.
After wiping down the model with isopropyl alcohol to remove oil and residue the
engine openings, landing gear openings and cockpit were masked off in
preparation for painting. As a separate step all clear parts were carefully
trimmed of flash and the sprue gates removed using a CMR microsaw or sprue
cutter followed by careful trimming with a sharp #15 scalpel blade before being
dipped in Future and allowed to dry for at least two weeks.
| COLORS & MARKINGS |
Disclaimer: the following technique applied to Testors Model Master Acrylic is not recommended by the Testors Corporation and is provided for entertainment purposes only. The author and publisher shall have neither liability nor responsibility to any person or entity for any injury, damage, loss or expense caused or alleged to have been caused, directly or indirectly by the information provided herein.
The Aeromaster decal sheet nominally provides markings for three P-61A aircraft all in olive drab and neutral gray camouflage. These are all 6th Night Fighter Squadron aircraft based in Saipan in 1944 and are “Moonhappy”, “Nightie Mission”, and “Jap Batty”. The decals are printed in Italy, presumably by Cartograph, and show excellent art, register, and thinness. Full stenciling is provided. The only unfortunate aspect of the decal set is that although nose art, national insignia, and aircraft numbers are provided for the three aircraft there are only sufficient stencils for two aircraft, and red wing walk markings for one aircraft. The original kit decals include nose art for two aircraft and a mix of red lettered and black lettered stencils plus national insignia for one aircraft. To preserve some of the Aeromaster stencils for a possible future model using the nose art for “Nightie Mission”, I decided to use as many stencils as possible from the kit decal sheet. I also cut Microscale red decal film into strips to match the width of the Aeromaster walkway strips to decal the walkways.
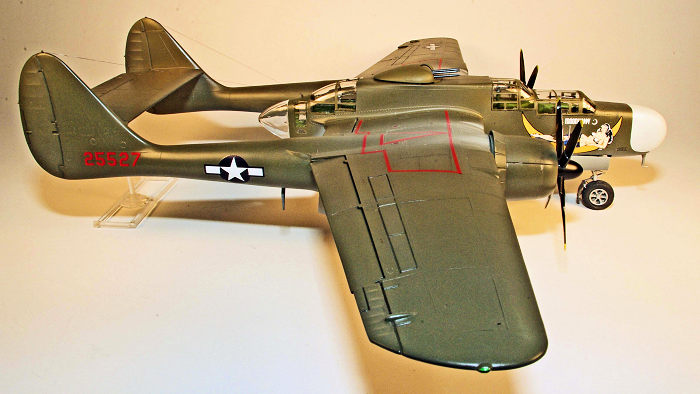
“Moonhappy” was a
P-61A-1 turret equipped aircraft painted in Olive Drab upper surfaces and
Neutral Gray undersurfaces. The Aeromaster instruction diagram shows the Neutral
Gray on the fuselage to be a line from the nose to the radio operator
compartment but one historical photo of the aircraft clearly shows the Neutral
gray extended up the sides of the fuselage to meet the under surface of the
wing. Although I most often use enamel paint I wanted to try Testors Model
Master Acrylic on this model as I had purchased a assortment of the WW II era
colors several years ago when I resumed modeling. I have encountered difficulty
with airbrushing this particular brand of paint and after researching various
techniques by other modelers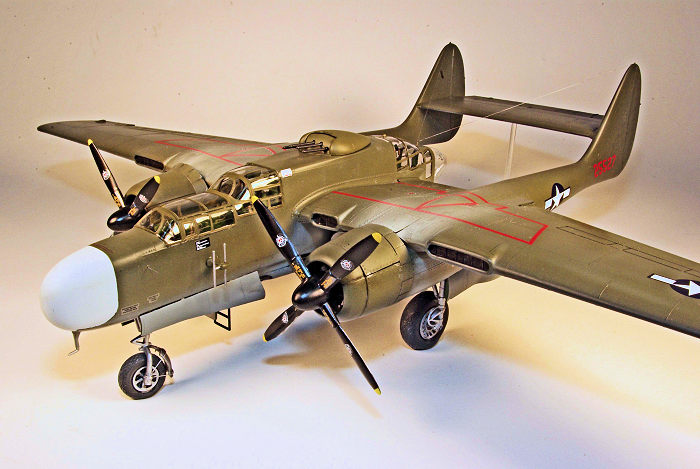 wanted to see if I could improve the airbrushing
performance. After a careful wiping of the surface with a tack cloth, the model
was airbrushed with a light coat of Rustoleum gray primer enamel to provide a
surface for the acrylic paint to adhere to. This is the same product available
at Home Depot and most hardware stores in a large aerosol can. I decant this
from the can into small jars to maintain a ready supply and airbrush this
usually without any thinning using a Badger Anthem 155 or Badger 150 airbrush at
about 15-20 psi. MM Acrylic dries within minutes when airbrushed and its fast
drying property is one of the major problems I encounter with airbrush use.
Usually within a few seconds of airbrushing the paint dries on the needle tip
creating splattering and significantly degrading the spray pattern. It also
dries into a acrylic film within the paint cup which can not be dissolved by any
solvent other than lacquer thinner. Needing to then use lacquer thinner for
clean up defeats one of the main benefits of using acrylic paints, that being
safety from aerosolized toxic organic petro-chemicals.
To improve performance I added Vallejo flow retarder medium #70.597 (an alternative is pharmacy glycerin) in the amount of one or two large drops (the retarder is viscous) into each ½ ounce jar of MM Acrylic and added additional thinner using plain vodka. Why vodka? It is relatively cheap and essentially non-toxic (unless one drinks it!) unlike methanol (wood alcohol; highly poisonous) or denatured alcohol which is ethanol manufactured with toxic additives including petro chemicals specifically included to make it toxic for human consumption. All vodka regardless of brand/price is 80 proof or 40% ethanol by volume with the balance being water. Ethanol (ethyl alcohol) sharply reduces the surface tension of water further improving the flow property the paint. The Testors Corporation website states that thinning should only be done with Testors Acrylic thinner that is predominantly water plus a small amount of glycols that are complex alcohols but in my experience thinning with Testors thinner does not change the airbrushing properties significantly. Sufficient vodka (about 10% to 20% of the total volume of paint) is added to bring the consistency to that of milk and the paint was then airbrushed at 20 psi using a Badger 155 Anthem with a medium head (in my experience too much clogging occurs with a fine head). This significantly improved the airbrushing performance and although drying of paint on the needle still occurs it is much less pronounced preserving the airbrushing pattern longer before tip cleaning is needed. As an alternative most modelers and airbrush artists recommend and utilize isopropyl alcohol as a thinner or thinner component and this is readily available as a 90% solution (90% isopropyl alcohol plus 10% water) in most grocery and pharmacy stores. It is less expensive by volume than cheap vodka and not subject to age restriction for purchase but isopropyl alcohol is a significantly more toxic chemical than ethanol and although not normally ingested by drinking (it is poisonous) can be inhaled in the spray aerosol unless a organic chemical respirator is worn or a outside venting spray booth is used. (As a side note, one of my concerns regarding modeling is the somewhat casual approach to safety when using the chemicals, especially petro chemicals, common in various paints, lacquers, and cements.) I airbrushed the top and side surface of the model first with MM Acrylic Olive Drab adding 20% MM Acrylic White for scale effect applying to each panel area separately to create variation in the density of paint coverage. After drying overnight Testors MM Acrylic Neutral Gray thinned more heavily was airbrushed in a similar manner with the separation line being done free hand at about 10 psi pressure to create a fine spray pattern. After the finish was dry for several days the model was then given a coat of Future airbrushed un-thinned using a Badger 250 single action external mix airbrush using the heavy tip. After several days of drying decal application was next.
The Aeromaster decals
went on very well with Microset and Microsol. The large nose art decal required
several applications of Microsol to settle over the rained panel line detail but
no unusual problems were encountered. The Microscale red decal film strips went
on perfectly as expected. Most experienced modelers have lon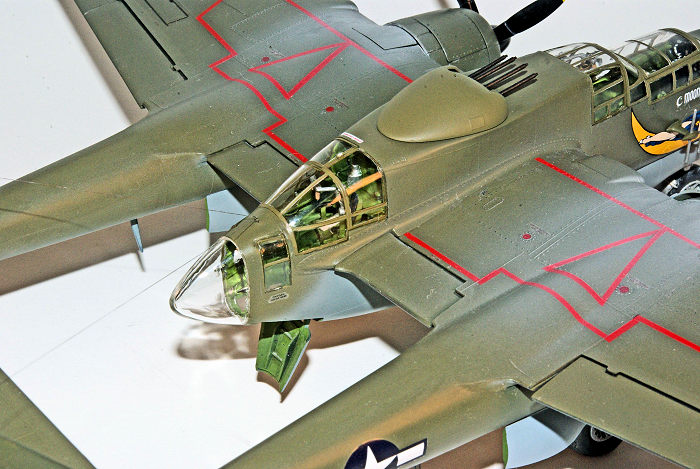 g recognized the
flaws of Monogram decals; thick, glossy carrier film, poor print resolution, and
questionable color selection. All kit decals have a thick, white adhesive that
will remain and discolor a dark background. The instructions claim this will dry
clear but in my experience some clouding always remains. Since I was using only
the small stencil decals I was able to achieve satisfactory (to me; your mileage
may vary) results using the following method. I soak the decals in warm, not
cold or room temperature water. Water heated to your tap water “hot” setting
works well. After decal separation from the paper swishing the decal in the
water will remove the white adhesive. It is then applied on the model surface
over Microset. It is important to avoid any raised detail areas due to the
thickness of the decal. Almost always once dry follow up multiple applications
of Microsol will be needed to flatten the decal to the surface. I have also used
a small amount of Future applied by brush under the decal with good results as
it acts as a adhesive, being careful to remove the excess and pressing the decal
to the surface with a cotton tip applicator. In my experience the Monogram
decals work best over a natural metal finish surface that visually hides the
adhesive as well as the carrier film. After several days of drying for the
decals the entire model was airbrushed with a coat of 50/50 Dullcote and
Glosscote for a satin/semi-matt finish followed by an application of Tamiya
Black Panel Line wash to the control surface engraved lines.
Once completed the entire model received a light coat of Testors Dullcote lacquer to seal the decals and provide a surface for weathering. My weathering skills are rudimentary at best so it was limited to some white pastel brushing for the exhaust, somewhat random application of Tamiya Black Panel Line wash to highlight surface detail to give the impression of weathering and heavily thinned MM Acrylic White on the wing surface to simulate the exhaust discoloration. The remainder of the assembly of all parts then proceeded in the usual manner. Rather than mask the canopy framing I hand painted it using the same MM Acrylic Olive Drab used for the upper surface color. This omitted the interior green inner framing color but since the build is a closed canopy I felt it was a reasonable compromise. The paint is applied carefully in a relatively thick layer using a superfine Microbrush applicator. It is easy to stay within the frame lines due to the Future coating over the clear styrene and once dry for about an hour it is very easy to scrape away any paint applied outside the framing using a small chisel fabricated from a small piece of Evergreen strip plastic. The key to this step is that the Future must be hard which means at least a couple of weeks of drying time and the acrylic paint must be scrapped away within a couple of hours of application to avoid scratching the clear plastic. This method does not work for me using enamel paint due to the lack of surface tension with petroleum based paints against the Future covered plastic surface. The final interior parts including the assembled seats with masking tape belts using the Waldron belt hardware was attached with CA glue followed by Testors clear parts cement to attach and assemble all the clear parts. Some final details were added including the antenna wires using my daughter’s straight hair colored with a silver Sharpie marker, the two whip antenna on either side of the nose, and the brackets holding the nose gear mudguard. Unfortunately, due to my miscalculation on the amount of extra nose weight needed the model ended up as a tail sitter requiring a support keep all the wheels down.
| CONCLUSIONS |
Monogram’s (now Revell’s)
P-61 is a nostalgia kit for those modelers who grew up with the great 1/48th
scale kits that were Monogram’s pioneering efforts in the 1970’s and 1980’s.
Although the supplied parts rem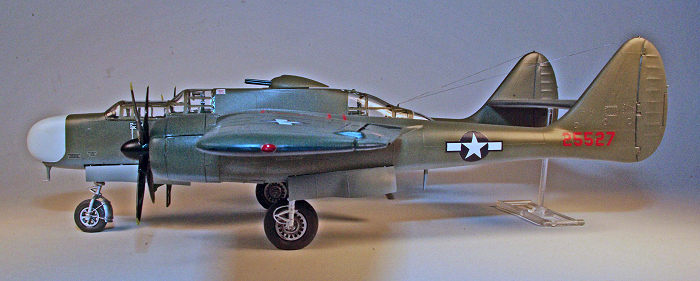 ain unchanged with care and basic model building
techniques it builds up into a nice replica out of the box for a steal of a
price in 2017 dollars. Bringing the finished model to competition level will
require a significant amount of skill, work, and aftermarket parts and a much
better starting point would be the more expensive Great Wall or Hobby Boss P-61
series of kits. There are a relatively large number of build reviews available
on the internet from fellow modelers to guide ones efforts so if you have this
classic build it and enjoy.
One of the most enjoyable parts of modeling for me is the range of information and images that can be found on the internet regarding the history of aircraft that far exceeds what is accessible through the traditional library. One such story is listed below in the reference item number 8 where both sides involved in combat lived to tell the story.
| REFERENCES |
Northrop P-61 Black Widow, The Complete History and Combat Record, Pape, Campbell, and Campbell, Schiffer Military/Aviation History, 1995 – excellent comprehensive history with many photographs
Evolution of the P-61 Black Widow, Thompson, Squadron/Signal Publicatins, 2009 – emphasis on development and engineering
Combat Chronicles of the Black Widow, Thompson, Squadron/Signal Publications, 2011 – excellent combat history with many photographs
P-61 Black Widow in Action, Boyle, Squadron/Signal Publications, 2013, typical photograph rich in Action book
P-61 Black Widow in Action, Davis and Menard, Squadron/Signal Publications, 1990
Pilot’s Manual for the Northrop P-61 Black Widow, Kohn, Aviation Publications, 1977 – excerpts from operating manual with factory pictures/diagrams from same
Famous Airplanes of the World, Northrop P-61 Black Widow, No. 72, Bunrin-Do, 1976 – Japanese text with many good photographs
http://falkeeins.blogspot.ro/2011/03/p-61-black-widow-versus-he-177-griffon.html - historically documented combat encounter from ETO 1944
6 November 2017
Copyright ModelingMadness.com If you would like your product reviewed fairly and fairly
quickly, please
contact
the editor
or see other details in the
Note to
Contributors.
Back to the Main Page
Back to the Review Index Page
Back to the Previews Index Page