| KIT #: | 11626 |
| PRICE: | $ |
| DECALS: | Two options |
| REVIEWER: | John Summerford |
| NOTES: | Fundecals used. |
| HISTORY |
“Blackhawk is the eponymous fictional character of the long-running comic book series Blackhawk first published by Quality Comics and later by DC Comics. Primarily created by Chuck Cuidera with input from both Bob Powell and Will Eisner, the Blackhawk characters first appeared in Military Comics #1 (August 1941).
 “Led by a
mysterious man known as Blackhawk, the Blackhawks (or more formally, the
Blackhawk Squadron) are a small team of World War II-era ace pilots of varied
nationalities, each typically known under a single name, either their given name
or their surname. Though the membership roster has undergone changes over the
years, the team has been portrayed most consistently as having seven core
members.
“Led by a
mysterious man known as Blackhawk, the Blackhawks (or more formally, the
Blackhawk Squadron) are a small team of World War II-era ace pilots of varied
nationalities, each typically known under a single name, either their given name
or their surname. Though the membership roster has undergone changes over the
years, the team has been portrayed most consistently as having seven core
members.
“In their most well-known incarnation, the Blackhawks operate from a hidden base known only as Blackhawk Island, fly Grumman XF5F Skyrocket planes, and shout their battle cry of "Hawk-a-a-a!" as they descend from the skies to fight tyranny and oppression. Clad in matching blue and black uniforms (with Blackhawk himself boasting a hawk insignia on his chest), early stories pitted the team against the Axis powers, but they would also come to battle recurring foes such as King Condor and Killer Shark, as well as encounter an array of gorgeous and deadly femme fatales. They also frequently squared off against fantastical war machines ranging from amphibious "shark planes" and flying tanks, to the aptly named War Wheel, a gigantic rolling behemoth adorned with spikes and machine guns
| THE KIT |
Two bags each contain a light gray styrene sprue with a clear sprue in one of the bags. Detail is crisp without much in the way of seams or flash. Options are available for early or late airframe. Seat belts, radio aerial masts and wire are not included. Total parts count is 85. 22 decals –12 of which are for prop tips and logos – are on the 4” by 2 ½ “sheet. Instructions included a history, parts map, plus a paint and decal guide. 10 steps are delineated on an 11” by 24” two-fold sheet.
| CONSTRUCTION |
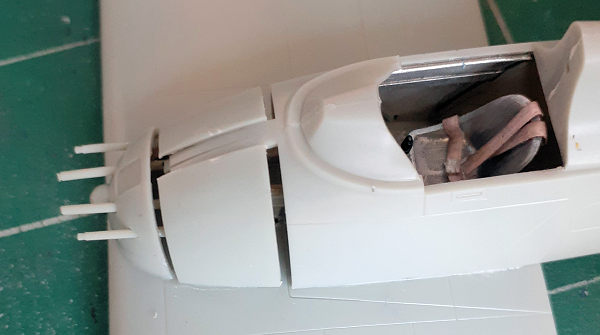
Unconventionally, the build starts with the wings being glued together and the navigation lenses added. The floor of the cockpit is the upper wing, so the next step is to install the instrument panel/rudder pedals sub-assembly, stick, and seat. I added seat belts made from card stock.
If needed, the guns are added next. I found their alignment problematic, so before the glue set up, I added the nose piece so that the barrels were parallel.
 The next
two steps call for assembling the engines and fuselage. I switched back and
forth as paint, glue, and filler cured. I also drilled holes for the radio
aerials as well as for the masts in the fins. The tail assembled without a fuss.
The next
two steps call for assembling the engines and fuselage. I switched back and
forth as paint, glue, and filler cured. I also drilled holes for the radio
aerials as well as for the masts in the fins. The tail assembled without a fuss.
When I went to add the fuselage to the wing, I discovered that I misplaced the nose by putting about 3/16” too far forward. I glued the weapons bay access panels in roughly the correct place and filled the gaps with shims and putty. Several sculpting sessions ensued.
That drama behind me, I finished the engines. Detail on them is OK. They were painted aluminum and washed with black with the gearbox painted gray.
The next step calls for the nacelles and main gear to be assembled. I found it best to trap the retraction rod in the mounts on each half and assemble the rest of the gear after the nacelle halves were glued together. The fit of the nacelles to the wings is very good as is the engines to the nacelles. The cowl rings didn’t fit nearly as well. I let the ridges remain prominent so that the nacelles looked more “comic book” like.
Foam rubber was stuffed in the wheel wells, cowls, and cockpit in preparation for painting. The canopy was masked. Due to the complexity of the compound curve of the windshield, it was painted by hand. Since acrylic paint was used for the colors, it was easy to clean up the frame with a sharpened toothpick.
A coat of automotive primer was sprayed on, then the wings and tail were masked. This took longer than usual due to all of the curves at the mating surfaces. It became time for the paint booth.
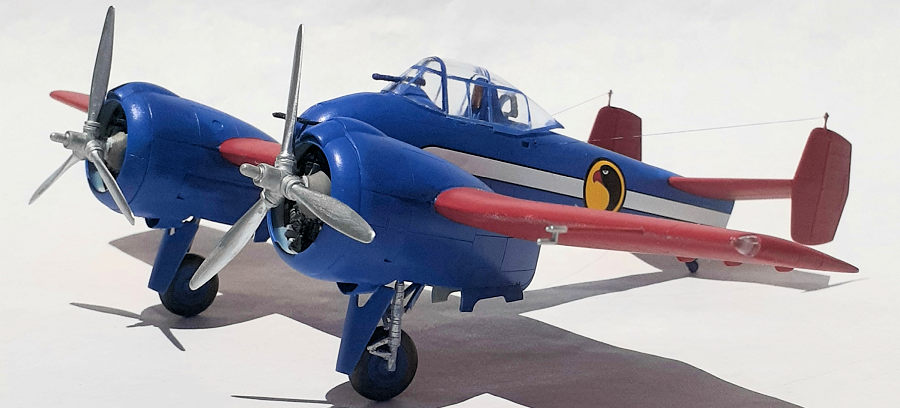
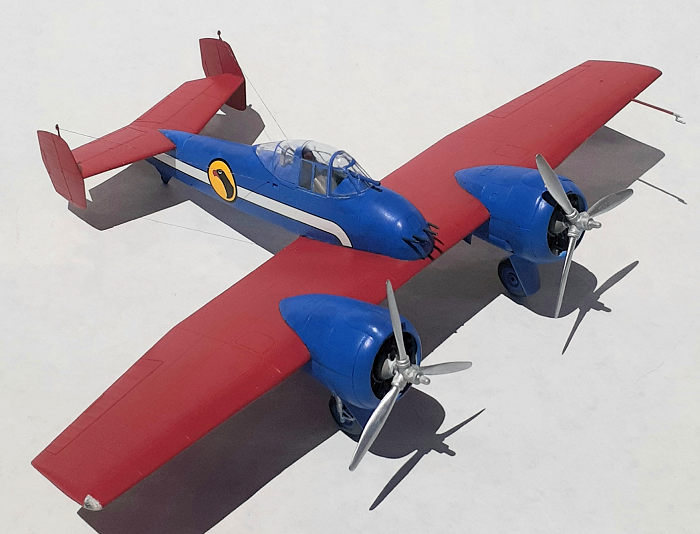
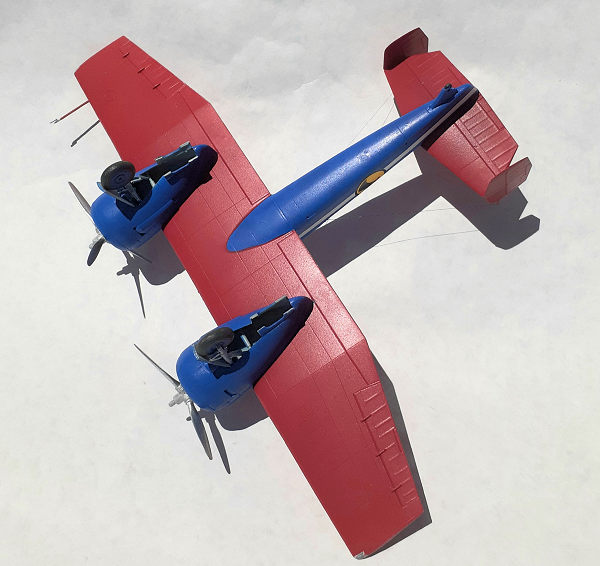
| COLORS & MARKINGS |
 Fundekals: )
supply markings for six color schemes. One is all gray with a red stripe. Three
as gray fuselage and nacelles plus red wings and tails and either a yellow, red,
or white stripe. More striking is a black fuselage and nacelles, red wings and
yellow stripe, and the option I chose, blue fuselage and nacelles, red wings and
white stripe.
Fundekals: )
supply markings for six color schemes. One is all gray with a red stripe. Three
as gray fuselage and nacelles plus red wings and tails and either a yellow, red,
or white stripe. More striking is a black fuselage and nacelles, red wings and
yellow stripe, and the option I chose, blue fuselage and nacelles, red wings and
white stripe.
Vallejo dark blue thinned with airbrush flow improver was sprayed on. A nice looking, but easily scratched, coat was the result. The blue was masked and the Vallejo flat red applied. Thankfully, the masking tape didn’t pull off any blue paint. Touch-ups were done by brush, then a clear gloss coat to protect the paint and prepare for decals.
Two white stripes and two logos were all that was needed from the decal sheet. They have nice density and behaved well. When they were dry a clear coat of satin was sprayed on to tone down the gloss.
 After
removing all of the masks, the headrest and loop antenna in the cockpit were
glued in place as well at the wheels. Some gentle pressure was needed to get the
canopy to set properly. Even so, I didn’t get in on correctly and left a gap at
the rear. The gun sight was glued to the windscreen and that assembly glued on.
After
removing all of the masks, the headrest and loop antenna in the cockpit were
glued in place as well at the wheels. Some gentle pressure was needed to get the
canopy to set properly. Even so, I didn’t get in on correctly and left a gap at
the rear. The gun sight was glued to the windscreen and that assembly glued on.
Next came the gear doors. These are a bit fiddley. The rear doors have to be cut lengthwise and their tabs don’t have corresponding slots to fit into. The front doors don’t have any locating tabs at all.
The radio aerials were glued into the pre-drill holes in the fuselage and then to the masts while stretched by a cloths pin as a weight.
Putting the model on the wheels, the pitot was glued in the leading edge of the left wing and the model was completed by installing the props.
| CONCLUSIONS |
It was fun to not get wound up in details. Fit is generally good and the model builds quickly. The solution to the nose alignment issue that I encountered is to install the gun barrels after painting. I have about 16 hours in this project.
Another way to model this airframe is as a “What If” Thompson Trophy racer with polished aluminum fuselage and engine nacelles plus a painted wing and tail. Hmmm.
| REFERENCES |
Wikipedia
10 November 2020
Copyright ModelingMadness.com.
If you would like your product reviewed fairly and fairly quickly, please contact the editor or see other details in the Note to Contributors.
Back to the Main Page Back to the Review Index Page Back to the Previews Index Page