ProModeler 1/48 P-39Q Airacobra
| KIT #: | 5294 |
| PRICE: | €35 in 2001 |
| DECALS: | Three options |
| REVIEWER: | Spiros Pendedekas |
| NOTES: | Monogram kit |
| HISTORY |
The origins of the Airacobra can be traced back in 1937, when USAAC issued a specification calling for a single-engine high-altitude interceptor. The aggressive specifications called, among others, for a liquid-cooled Allison engine equipped with a General Electric turbo-supercharger and a tricycle landing gear.
Bell came out with an innovative design, with the engine mounted in the middle of the fuselage, the propeller itself being driven by a shaft passing beneath the pilot's feet under the cockpit floor. Access to the cockpit was through side doors, mounted on both sides of the cockpit, with the starboard used for normal entering and exiting and the port one used only for emergency exit, both of them being jettisonable.
Though the main reason for going with a mid-mounted engine can be attributed to providing space for the big 37 mm cannon that would fire through the center of the propeller hub, the design nevertheless benefited from this arrangement, exhibiting a streamlined nose profile.
The XP-39 made its maiden flight on 6 April 1938 at Wright Field, Ohio. While it managed to reach 20,000 ft in only five minutes, its top speed at this altitude was notably lower than the 400 mph of the original proposal.
 From then on, a combined effort, including Bell,
NACA and the Army itself took place, in order to achieve the top speed goal.
Quickly the main focal point became the much protruding turbo-supercharger
on the fuselage side. With the very tightly planned XP-39 offering no
internal space left over to efficiently bury it, the Airacobra's "maximum
speed goal" case proved to be a challenge.
From then on, a combined effort, including Bell,
NACA and the Army itself took place, in order to achieve the top speed goal.
Quickly the main focal point became the much protruding turbo-supercharger
on the fuselage side. With the very tightly planned XP-39 offering no
internal space left over to efficiently bury it, the Airacobra's "maximum
speed goal" case proved to be a challenge.
With the whole "performance improvement" story having become a complex one, the production P-39 ended up fitted with a single-stage, single-speed supercharger. While production and maintenance were simpler, the fitted supercharger's critical altitude (above which performance rapidly declined) of about 12,000 ft destroyed any chance that the type could serve as a high-altitude front-line fighter. When flown at lower altitudes within the engine's efficient area, the plane exhibited a number of favorable flying characteristics, along with a few “idiosyncrasies''.
The centrally mounted engine, being close to the aircraft's center of gravity, allowed for a more nimble turning attitude (it is reported that at low altitudes the Airacobra could outturn the Bf-109F). However, with the nose-located ammo boxes becoming empty during combat, the plane's center of gravity itself moved further backwards, affecting balance. This and the fact that its single stage supercharger did not allow the Airacibra to perform at high altitude, had in some cases created “underrating” aura that is absolutely not fair for this well designed, fine machine: though at times demanding in flight, it was a potent weapon, robust, with good firepower and excellent low altitude flying capabilities, successfully serving in many theaters of operation and equally successfully used by other Air Forces, too, with the VVS immediately springing into mind.
 The 72nd Fighter squadron made good use of the
P-39. Established as a defensive interceptor squadron for Hawaii in late
1941, after suffering tremendous casualties and aircraft losses at Wheeler
Field during the Pearl Harbor Attack, it was re-equipped and used as Seventh
Air Force training unit, also flying reconnaissance patrols over Hawaii. In
late 1943 it was deployed to the Central Pacific as part of Seventh Air
Force island hopping campaign against the Japanese, flying combat missions
from Makin Island, using Airacobras.
The 72nd Fighter squadron made good use of the
P-39. Established as a defensive interceptor squadron for Hawaii in late
1941, after suffering tremendous casualties and aircraft losses at Wheeler
Field during the Pearl Harbor Attack, it was re-equipped and used as Seventh
Air Force training unit, also flying reconnaissance patrols over Hawaii. In
late 1943 it was deployed to the Central Pacific as part of Seventh Air
Force island hopping campaign against the Japanese, flying combat missions
from Makin Island, using Airacobras.
In April 1944, the squadron returned to Hawaii, where it was re-equipped and trained with long-range P-51 Mustangs, to be re-deployed to Western Pacific. Stationed on Iwo Jima while battle for the island was still ongoing, it was engaged in long-range B-29 Superfortress escort missions over Japan. Continuing that mission until the end of hostilities in August 1945, it was reassigned to Mariana Islands, as a Far East Air Force Fighter Squadron until 1946, where it was deactivated.
The Airacobra was a solid asset, being present when desperately needed and thus offering valuable breathing space to the USAAF till newer designs became available. Among the Great Pilots who talked positively about the Airacobra, the much missed Chuck Yeager himself (having clocked around 500 flight hours at the type) had stated that many of the rumors were from pilots who had never flown the airplane. That sums everything up.
| THE KIT |
 This is the 1995 Pro Modeler
edition of the venerable and very good 1969 Monogram Airacobra. What you get
inside the typical Monogram-style top opening box with the attractive box art of
“ The Flying Undertaker” Lt. Col. William Shomo’s “Snooks 2nd” bird, are the
well known to many of us 1969 sprues, a newer “detailing” sprue, a PE fret that
either replaces kit parts (like the oleo scissors) or caters for new ones (like
the central pylon’s sway braces), a beautifully done Scalemaster decal sheet,
fantastic instructions and, if memory serves, a very nice Pro Modeler badge and
a poster featuring a superb Randy Green artwork of P-40 “Star Dust”. For a more
in-depth look at this fine kit’s contents, you may read its preview found
at the MM archives.
This is the 1995 Pro Modeler
edition of the venerable and very good 1969 Monogram Airacobra. What you get
inside the typical Monogram-style top opening box with the attractive box art of
“ The Flying Undertaker” Lt. Col. William Shomo’s “Snooks 2nd” bird, are the
well known to many of us 1969 sprues, a newer “detailing” sprue, a PE fret that
either replaces kit parts (like the oleo scissors) or caters for new ones (like
the central pylon’s sway braces), a beautifully done Scalemaster decal sheet,
fantastic instructions and, if memory serves, a very nice Pro Modeler badge and
a poster featuring a superb Randy Green artwork of P-40 “Star Dust”. For a more
in-depth look at this fine kit’s contents, you may read its preview found
at the MM archives.
The specific copy had been bought still wrapped in 2005 by a good friend who intended to build it. When such a thing did not happen, it was handed to me, along with a few other unbuilt kits. Residing in my shelf of Doom for a good 20 years, I figured it would be a great idea to build this Airacobra and return it to him upon his name day. Off it went to the bench, then!
| CONSTRUCTION |
Prior to starting, the modeler
has to decide whether he will go for open or closed gun/ammo bay, the reason
being that the model is a candidate for severe tail sitting: if you go for an
open bay, your choices for adding weight are really limited, mainly into the two
ammo boxes, the central magazine and, possibly, at some other neighboring areas
that will not be visible, or, maybe, aft of the rear cockpit bulkhead (and I am
not sure the weight will be enough, hence the clear supporting rod provided -
alternatively, you may “attach” the provided figure of the mechanic standing on
a barrel, to "support" the rear of the model).
In order not to change my lifetime habits, I took the easy road and went for a
closed bay, so, the first thing I did was to glue the bay door shut and
strengthen the joint with some liquefied styrene brushed from the innards. I
also decided to go for a closed engine access panel and starboard entry door, so
I, too, glued them shut. While the starboard exhaust stack can easily be
attached from the outside, at end stages, the port one is supposed to be
attached from the fuselage innards, so I glued a styrene piece at the insides of
the cutout, in order to be able to also attach it at end stages with some
trimming. This concluded the fuselage halves preparation.
 The reasonably well detailed cockpit was next assembled and attached to the
starboard fuselage half. Main cockpit color was Hu226 Interior Green, with black
instrument panel, various consoles, boxes, gunsight base and stick grip. The
stick boot and map case were painted “leather” and the rear ammo boxes gunmetal.
The seat was painted the same interior green and the nicely molded belts and
buckles were painted khaki and brass respectively. The instrument panel and
console faces were dry brushed with silver and had various white, red and yellow
“knobs” painted on with a very fine brush. The seat, stick, gunsight and
instrument panel were left off, to be attached at end stages. Since I am not too
comfortable with PE, I refrained from using the PE throttle lever and belt
buckles provided, as I found the kit supplied ones acceptable, but you may
consider using them and come up with better results, especially if you decide to
go with an “open” entry door.
The reasonably well detailed cockpit was next assembled and attached to the
starboard fuselage half. Main cockpit color was Hu226 Interior Green, with black
instrument panel, various consoles, boxes, gunsight base and stick grip. The
stick boot and map case were painted “leather” and the rear ammo boxes gunmetal.
The seat was painted the same interior green and the nicely molded belts and
buckles were painted khaki and brass respectively. The instrument panel and
console faces were dry brushed with silver and had various white, red and yellow
“knobs” painted on with a very fine brush. The seat, stick, gunsight and
instrument panel were left off, to be attached at end stages. Since I am not too
comfortable with PE, I refrained from using the PE throttle lever and belt
buckles provided, as I found the kit supplied ones acceptable, but you may
consider using them and come up with better results, especially if you decide to
go with an “open” entry door.
Having the cockpit attached, I secured a 20g fishing weight in the nose with
styrene pieces and joined the fuselage halves. Only then I attached the engine
compartment top cover (with some tweaking), as I could fit it nice and tight
with the fuselage assembled. Despite instructions stating so, I neither trapped
the nose leg between the fuselage halves, nor attached the nose doors, as they
would have little chance of surviving my less than delicate handling qualities
(only hoping, of course, to be able to attach the leg at end stages with some
trimming - the doors can easily be attached).
The wing lower half was next attached to the bottom of the fuselage, followed by
the upper wing halves, which were first attached to the fuselage (ensuring a
gap-free root joint), then let “rest” onto the lower wing and “secured” using
water thin glue’s capillary action, with the wing locator pins beforehand being
removed. The above approach not only obtained the best possible fit, but also
ensured that the wing dihedral would not be affected (should the wing had
beforehand been assembled and attached, the fuselage might “force” the wing to
deflect, compromising its dihedral).
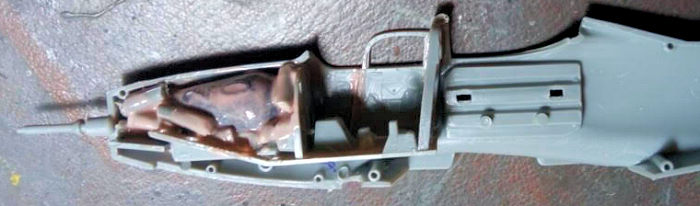
 The nose bay is in reality partially boxed, with the
driving shaft very prominent: while the shaft is adequately represented by the
kit, the surrounding area is way too empty and unrealistic, so I used trimmed to
fit sheet styrene pieces to close some voids and obtain more believable looks.
The tail planes were attached at this time, as well.
The nose bay is in reality partially boxed, with the
driving shaft very prominent: while the shaft is adequately represented by the
kit, the surrounding area is way too empty and unrealistic, so I used trimmed to
fit sheet styrene pieces to close some voids and obtain more believable looks.
The tail planes were attached at this time, as well.
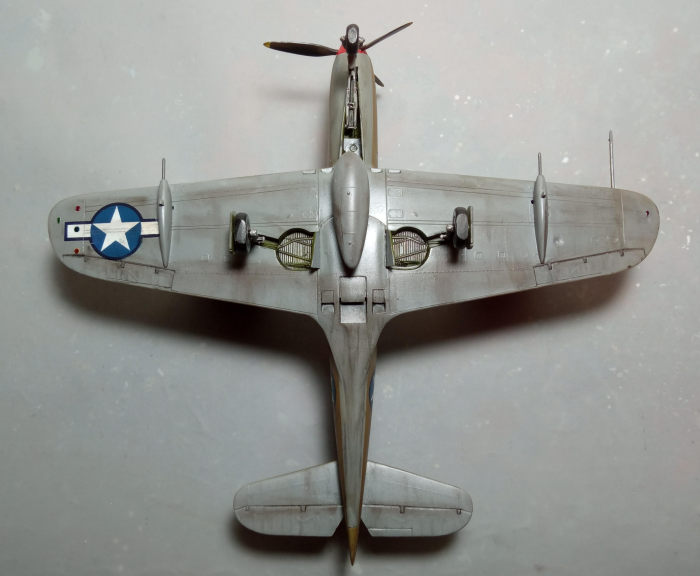
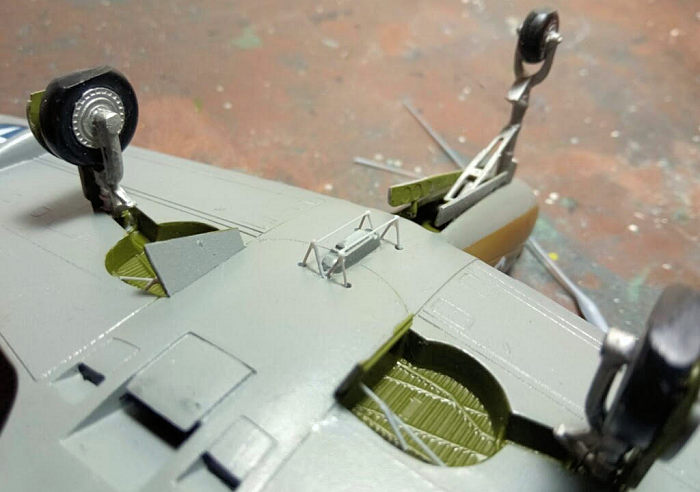
The underwing located triple radiator air exits (which, in reality, feature
moveable scoops) are somehow simplified: the outer ones are just plain
squared-off, while the central one is rendered as a square recession of around
1mm depth with a hole molded, in order fo to attach the transparent rod, should
the model tail sits. I used this recessed area to my advantage and attached a
suitably sized styrene sheet which protruded at the rear, in order to somehow
represent the central scoop and make the oversimplified area more believable.
The dual vents that are found bilaterally of the nose are provided as bendable
PEs, which I deemed challenging to tackle. I used leftover gun barrel fairings
to replicate the larger vents, whereas I totally omitted the smaller ones. The
wing gun packs were attached and their ejector chutes were replicated by
leftover styrene lookalike pieces, rather than using the PEs provided for the
same above reasons. The top air intake splitter was replicated by an
appropriately sized thin styrene sheet, rather than the PE part provided. I
finally attached the nose top gun fairings and put together the 2-piece drop
tank, concluding basic assembly.
While overall fit was not perfect, needing its filling and sanding at the usual
places (mostly wing-to-fuselage joints), it was definitely manageable and this
is pleasantly surprising for a 1969 mold. Well done Monogram! After a couple of
filling and sanding rounds, I took the bird to the paint shop!
| COLORS & MARKINGS |
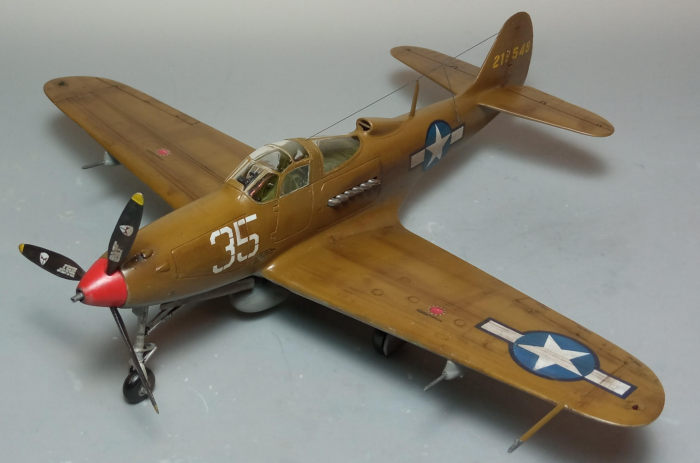
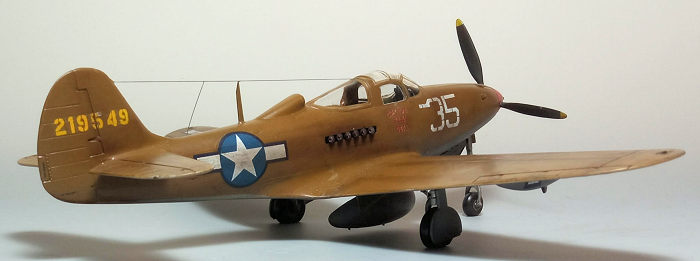 I first applied a coat of a leftover Molak1126 Medium
Gray at all undersides, including the drop tank and the gear doors. This dried
to a believable neutral gray. After masking it off, I applied Testors 1702 Field
Drab on the topsides, which sprayed beautifully. Upon masks removal, I gave the
bird a coat of Future to prepare it for decaling.
I first applied a coat of a leftover Molak1126 Medium
Gray at all undersides, including the drop tank and the gear doors. This dried
to a believable neutral gray. After masking it off, I applied Testors 1702 Field
Drab on the topsides, which sprayed beautifully. Upon masks removal, I gave the
bird a coat of Future to prepare it for decaling.
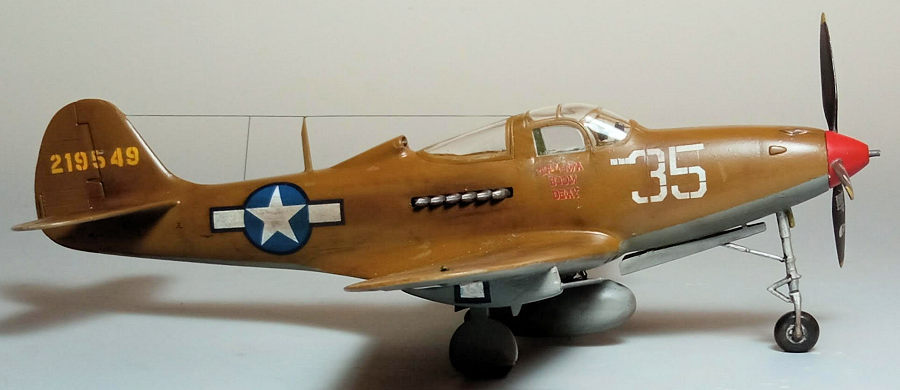
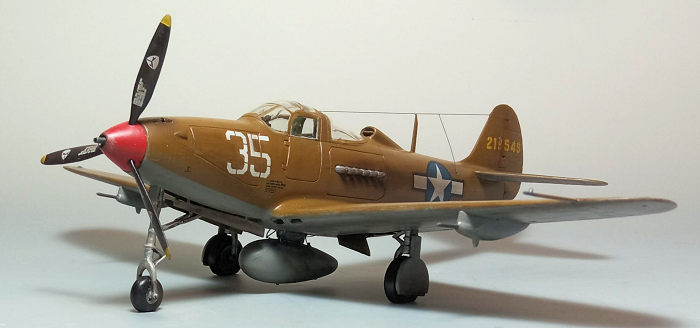
I used the kit decals, in order to represent Maj. Joseph H. Powell’s “Tarawa
Boom Deay” bird of 72FS, 21Fg, as it stood in the Marianas in 1944. The superbly
printed Scalemaster decals behaved very well despite their age (though, upon
dipping them in water, their bonding agent horrendously peeled off in white-ish
streaks, which were effectively repelled by lightly shaking the decals while
still submerged). The decals followed reasonably all surface details, helped by
quite strong decal softener. Per instructions, the lower wing insignia bar bent
down over the side of the gun pod, so I went for it. A coat of Future sealed the
nice decals, which, moreover, contained a good number of maintenance stenciling.
| FINAL CONSTRUCTION |
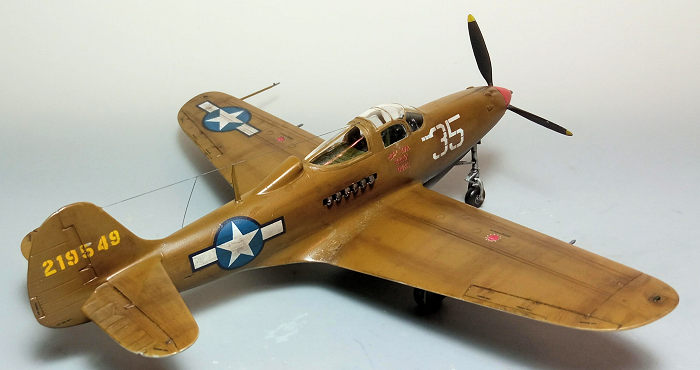
 It was then time for some weathering, for which I did not restrain myself
too much, as these birds were well exposed to the harsh Pacific Theater
environment. I started by applying a black wash at all areas suspected to
exhibit an oily look (bays, landing gear, moving surfaces hinges, radiator
exits and the like), then applied brown/black dry pastels at places where
dirt, grime or even engine stain would show. Finally, some silver dry
brushing was applied at areas where paint would rub away (wing/blade leading
edges, wing roots where personnel would step on and so on). I exaggerated by
even rubbing a bit the top of the plane’s name decal at the point where the
pilot would rest his right arm outside! A coat of satin gave the bird its
final hue.
It was then time for some weathering, for which I did not restrain myself
too much, as these birds were well exposed to the harsh Pacific Theater
environment. I started by applying a black wash at all areas suspected to
exhibit an oily look (bays, landing gear, moving surfaces hinges, radiator
exits and the like), then applied brown/black dry pastels at places where
dirt, grime or even engine stain would show. Finally, some silver dry
brushing was applied at areas where paint would rub away (wing/blade leading
edges, wing roots where personnel would step on and so on). I exaggerated by
even rubbing a bit the top of the plane’s name decal at the point where the
pilot would rest his right arm outside! A coat of satin gave the bird its
final hue.| CONCLUSIONS |
Though elderly, this is a still good kit of the iconic Airacobra:
general shape is correct, overall detailing is not bad, with the cockpit itself
pleasantly comprehensive, parts fit is good, clear parts are acceptable,
instructions rock and decals are great. Even using the basic mold without the PE
extras, a nice Airacobra can emerge out of the box, with the straightforward
construction deeming it buildable even by a novice.
The particular Pro Modeler boxing was a beefed up package, featuring a busy PE
fret, very detailed instructions, superb decals and a nice Pro Modeler poster
and badge. Despite being offered at a higher price, it was worth it, considering
that little else was available back in the mid-90s.
The venerable Monogram kit was superseded in 2000 by the really nice and very
sensibly priced Eduard mold, which, in turn, was superseded by the great and
more expensive Hasegawa offering from 2006 onwards, so, regarding the quarter
scale Airacobra kits, you more or less get what you pay for.
Even in today’s (2023) “Golden Age of Modeling”, the Monogram kit does not look
out of place, promising a pleasant build and a great result. Should you wish to
go aftermarket, you will not be disappointed, since a plethora is available,
with the decision of paying for them or going for the more expensive but more
comprehensive Eduard and Hasegawa offerings left to you.
Last reboxed in 2011 by Revell, carrying a very fair price tag and not that easy
to find nowadays, I would not be surprised if I see this long lasting mold
reboxed in the future, offering its virtues at an equally fair price.
As for the finished model, the joyful eyes of my friend upon receiving it is my
priceless reward.
Happy modeling!
Spiros Pendedekas
27 June 2023
Copyright ModelingMadness.com. All rights reserved. No reproduction in part or in whole without express permission of the editor.
If you would like your product reviewed fairly and fairly quickly, please contact the editor or see other details in the Note to Contributors.
Back to the Main Page Back to the Review Index Page Back to the Previews Index Page