Tamiya 1/48 P-47D Razorback
| KIT #: | 61086 |
| PRICE: | $34.95 SRP |
| DECALS: | Three options |
| REVIEWER: | Dan Lee |
| NOTES: | Eduard PE, Master brass gun barrels and Superscale Decals |
| HISTORY |
Robert S. Johnson was the first US World War Two ace to break Eddie Rickenbacker's record of 26 kills. He was born in Oklahoma on Feb 21, 1920. He took interest in flight at an early age when he watched a USAAC demonstration team fly. At the age of 12 he started learning how to fly.
 While attending college he joined the Civilian
Pilot Training Program and accumulated more flight hours as the storm clouds of
war gathered over Europe. He joined the USAAF in the summer of 1941 and was
commissioned as a 2nd Lieutenant after he completed in training in
July 1942. He wanted to fly bombers (A-20s), but was assigned to the 56th
Fighter Group instead.
While attending college he joined the Civilian
Pilot Training Program and accumulated more flight hours as the storm clouds of
war gathered over Europe. He joined the USAAF in the summer of 1941 and was
commissioned as a 2nd Lieutenant after he completed in training in
July 1942. He wanted to fly bombers (A-20s), but was assigned to the 56th
Fighter Group instead.
Robert Johnson didn't exactly get off to a good start with the 56th FG as it took a long time for him to get qualified a fighter pilot and when he got his first kill, he was reprimanded by his commanding officer “Hub” Zemke for leaving formation. The bad luck didn't end there as he was involved in an ambush of the 56th FG by JG26 that left him wounded and his P-47C filled with countless bullet and cannon shell holes (described in depth as part of an episode of History Channel's show Dogfights) courtesy of Luftwaffe FW190 ace Egon Mayer.
It wasn't till Oct of 1943 when Johnson started
really shooting down German aircraft. Between Oct of 1943 and March of 1944,
Johnson shot down 17 German fighters (mostly single engined FW190s and Bf109s
wit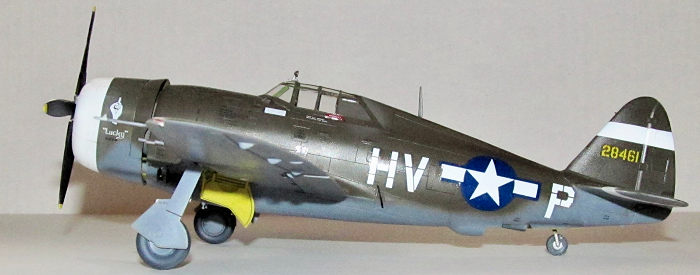 h some twin engined fighters mixed in.) He applied for a 25 (combat) hour
extension on his 200 (combat) hour tour of duty which he got. Robert Johnson
shot down eight more fighters over this time period including his last kills, a
dual kill, on May 8, 1944. When he left Europe, he had 27 air to air kills. He
spent his remaining time on war bond tours.
h some twin engined fighters mixed in.) He applied for a 25 (combat) hour
extension on his 200 (combat) hour tour of duty which he got. Robert Johnson
shot down eight more fighters over this time period including his last kills, a
dual kill, on May 8, 1944. When he left Europe, he had 27 air to air kills. He
spent his remaining time on war bond tours.
Robert left the Air Force after the war working for Republic Aviation as a test pilot and executive while remaining in the USAF reserves till 1951. He later worked as an insurance executive. He died in December of 1998.
| THE KIT |
It is one of Tamiya's best kits. For those who have been hiding under a rock for the last 15 or so years, here is Tom Cleaver's preview of the kit.
| CONSTRUCTION |
 I started off painting the cockpit and interior
parts. I used Tamiya XF-5 flat green for the cockpit parts and zinc yellow
chromate made using a mixture of 50/50 XF-4 Yellow Green/XF-3 Flat Yellow ( for
the wheel wells and non cockpit interior parts.) The various interior parts were
brush painted according to the Tamiya instructions. I used silver, flat black,
red, red brown, white and yellow to paint various items/locations for the
interior (mostly for the cockpit) and added the console decal. As mentioned by
Tom Cleaver and others, the Tamiya cockpit doesn't really need much resin or PE.
I only added some Eduard PE seatbelts/harness to the seat. I dry brushed some
areas with silver, grey and yellow to show wear, but did not add too much.
I started off painting the cockpit and interior
parts. I used Tamiya XF-5 flat green for the cockpit parts and zinc yellow
chromate made using a mixture of 50/50 XF-4 Yellow Green/XF-3 Flat Yellow ( for
the wheel wells and non cockpit interior parts.) The various interior parts were
brush painted according to the Tamiya instructions. I used silver, flat black,
red, red brown, white and yellow to paint various items/locations for the
interior (mostly for the cockpit) and added the console decal. As mentioned by
Tom Cleaver and others, the Tamiya cockpit doesn't really need much resin or PE.
I only added some Eduard PE seatbelts/harness to the seat. I dry brushed some
areas with silver, grey and yellow to show wear, but did not add too much.
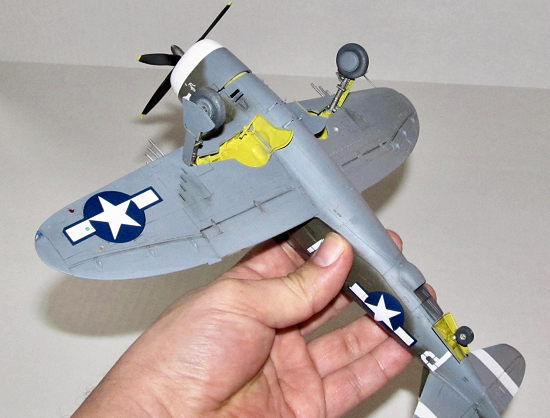
I sort of followed the next step in the instructions as I added the already painted engine, but did not glue it in (yet) as I left off the cowling (interior painted) too. The reason for this was to deal with with painting the plane and masking off the cowling. The landing gear parts that required the same color were glued together.
The fuselage and wing subassemblies were glued together using a mix of Tamiya extra thin cement (on the non visible seams) and CA glue on the exposed seams. The seams were sanded down and polished to remove any obvious scratches in the plastic. Once the seams were dealt with, I glued the wings and fuselage together with Tamiya extra thin cement. It was now time for painting.
| COLORS & MARKINGS |
I masked off the various orifices of the model and the windscreen/canopy using rice paper tape. The interior color of flat green was sprayed on the clear parts and when dry the parts were glued on using a drop of white glue. Next I preshaded the model with dark grey and flat black
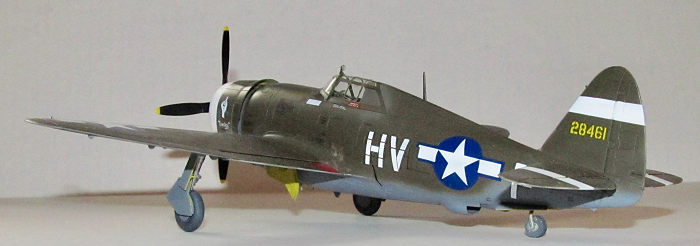
 Now it was time to work on the base colors. I
painted the cowling, tailplanes and tail flat white. When the paint was dry I
masked the white sections off using rice tape and stuck the parts on the model
without any glue. The model (and the separate parts like landing gear doors) was
painted neutral grey (Tamiya XF-53 with a couple of drops of white paint to
lighten up the color which I feel is too dark) and when it was dry, I cut up
some painters tape to mask off the underside. Gunze OD1 was sprayed on the
topside in a couple of light coats. Lastly, I had to retouch up some areas with
more OD1 as I had sprayed some areas a bit too light. After everything was dry,
I sprayed on Tamiya gloss coat to prepare for the decals. When everything was
dry, I removed the masking on the cowling, tailplane and ailerons and had to do
some touch ups to the white paint.
Now it was time to work on the base colors. I
painted the cowling, tailplanes and tail flat white. When the paint was dry I
masked the white sections off using rice tape and stuck the parts on the model
without any glue. The model (and the separate parts like landing gear doors) was
painted neutral grey (Tamiya XF-53 with a couple of drops of white paint to
lighten up the color which I feel is too dark) and when it was dry, I cut up
some painters tape to mask off the underside. Gunze OD1 was sprayed on the
topside in a couple of light coats. Lastly, I had to retouch up some areas with
more OD1 as I had sprayed some areas a bit too light. After everything was dry,
I sprayed on Tamiya gloss coat to prepare for the decals. When everything was
dry, I removed the masking on the cowling, tailplane and ailerons and had to do
some touch ups to the white paint.
Meanwhile, the landing gear doors was sprayed the zinc chromate mixture on the inside and neutral grey on the outside while the landing gear themselves was painted flat black then Vallejo Metal Color Silver.
The tips of the propeller was sprayed flat white and then yellow. When the paint was dry, the tips were masked off and the prop was spayed gloss black. When the flat black was dry, the prop blades were masked off and then the hub was painted Vallejo Metal Coat white aluminum.
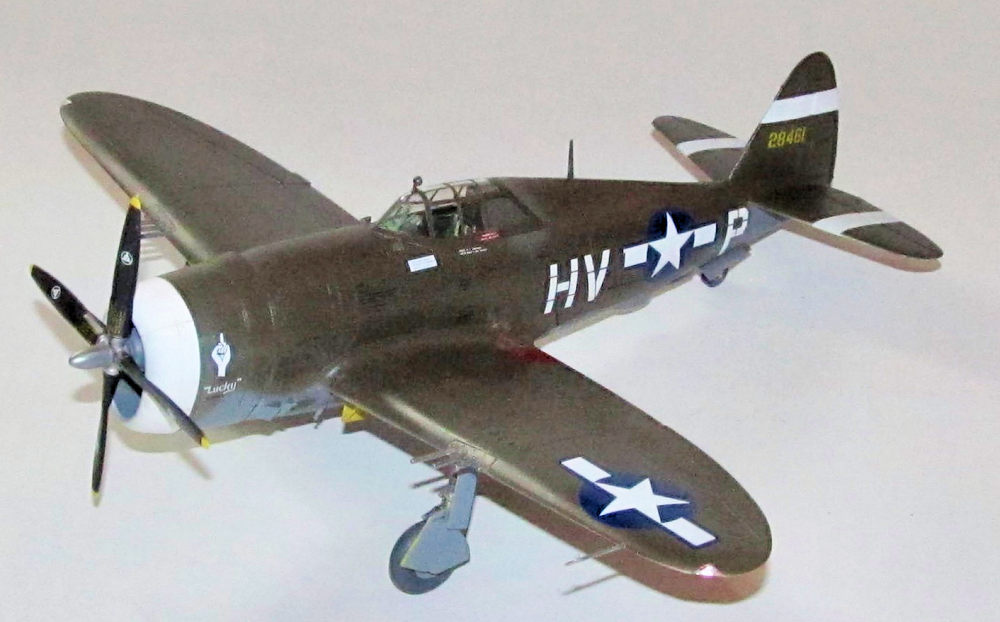
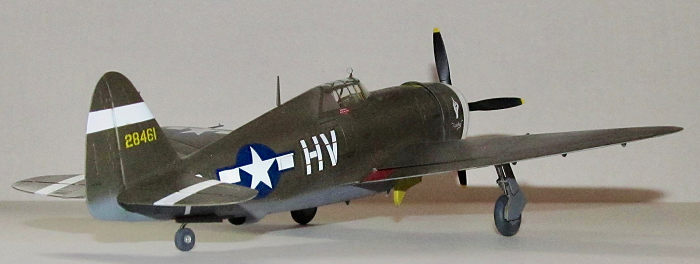
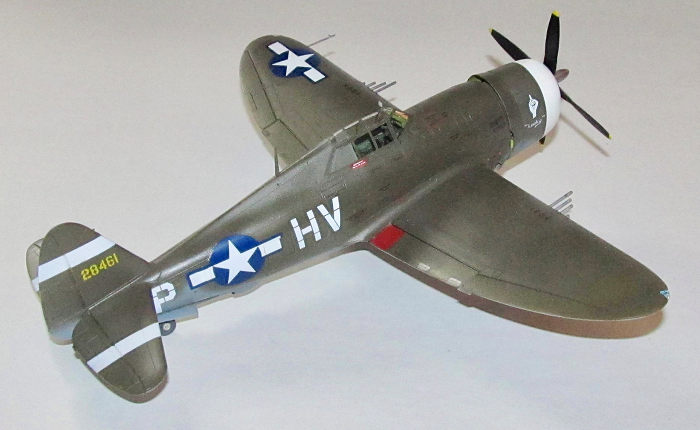
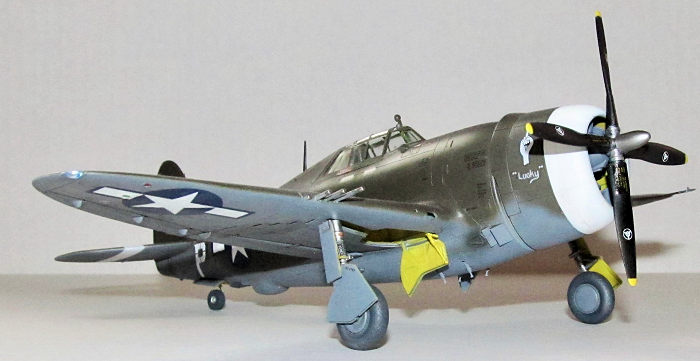 I used the Superscale Sheet 48-831 which had
decals for Lucky, the plane that Johnson used to shoot down the vast majority of
his 27 kills. Admittedly, the first decals I put down on the model were the
middle fingers on the cowling. I had no issues adding all the decals using
MicroSet/Sol. After the decals were dry, I wiped down the plane to remove the
decal solution residue.
I used the Superscale Sheet 48-831 which had
decals for Lucky, the plane that Johnson used to shoot down the vast majority of
his 27 kills. Admittedly, the first decals I put down on the model were the
middle fingers on the cowling. I had no issues adding all the decals using
MicroSet/Sol. After the decals were dry, I wiped down the plane to remove the
decal solution residue.
Photos showed Lucky being well maintained so I only used a thinned watercolor wash on the seams and underside. I sprayed on some flat black for some light exhaust stains and used the Tamiya weathering set to make slight gunfire stains. The wing landing lights were painted with a brush. I first brush painted the light silver then when dry, I painted the light a clear color (red, green or yellow.)
The excess wash was wiped away and two thin coats of Tamiya flat XF-86 were sprayed all over the various parts.
| FINAL CONSTRUCTION |
 The various already painted small bits were added
to the model including the flaps, landing gear, tail wheel, landing lights, wing
tip lights and pitot tube. I decided to use Master brass gun tubes instead of
the plastic ones supplied with the kit as they had more depth in the tube. These
were painted metallic grey first and then inserted into the holes in the wing,
secured in place with a small dot of CA glue.
The various already painted small bits were added
to the model including the flaps, landing gear, tail wheel, landing lights, wing
tip lights and pitot tube. I decided to use Master brass gun tubes instead of
the plastic ones supplied with the kit as they had more depth in the tube. These
were painted metallic grey first and then inserted into the holes in the wing,
secured in place with a small dot of CA glue.
The engine and cowling were secured to the model using dabs of Tamiya extra thin cement. Next the reflector gunsight was painted then added into the cockpit. I brush painted the reflector gunsight and added it to the cockpit, secured with a drop of Tamiya extra thin cement. The radio antenna was added, but I did not add the radio aerial. Lastly, I glued on the wheels and inserted the prop into the engine cowling.
| CONCLUSIONS |
The 15 year old Tamiya P-47 Razorback is still a beautiful kit. Definitely a palate cleanser if you want an easy but detailed build that won't take that much time or effort. With many possible and colorful options due to the large number of available aftermarket decals (and not just for the famous 56th FG.) I had fun building this kit and it only took a couple of week's worth of work to finish.
22 October 2018 Copyright ModelingMadness.com If you would like your product reviewed fairly and
fairly quickly, please
contact
the editor
or see other details in the
Note to
Contributors.
Back to the Main Page
Back to the Review
Index Page
Back to the Previews Index Page