Sword 1/72 P-66 Vanguard
| KIT #: | 72002 |
| PRICE: | $15 retail in 2002, comically gouged on online markets at this writing |
| DECALS: | Three options |
| REVIEWER: | Ryan Grosswiler |
| NOTES: | Limited-run injection molded, resin and photo-etch detail parts, 2x vac-form canopy |
| HISTORY |
In the run-up to the Second World War, the more cognizant
American aircraft
The fighter, soon designated "P-66", was on the other hand doomed by various factors to the dust bin of history.
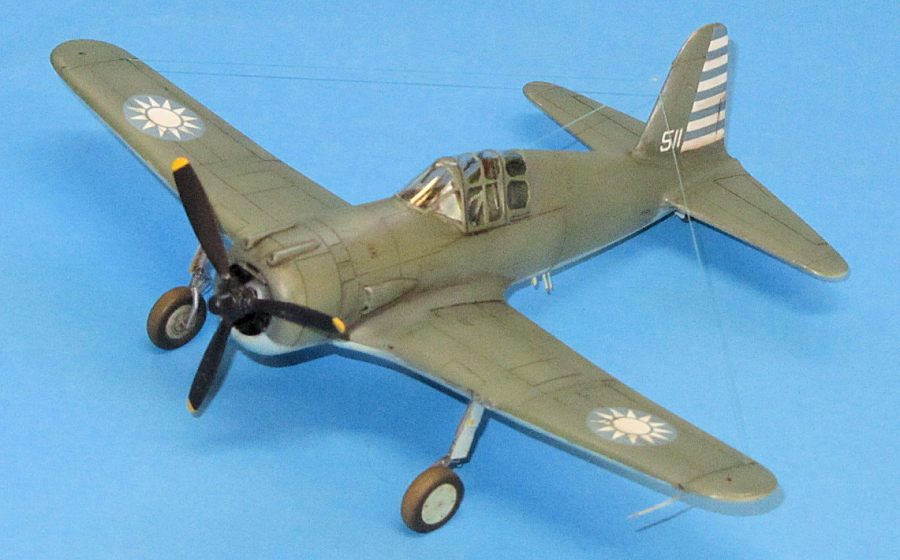
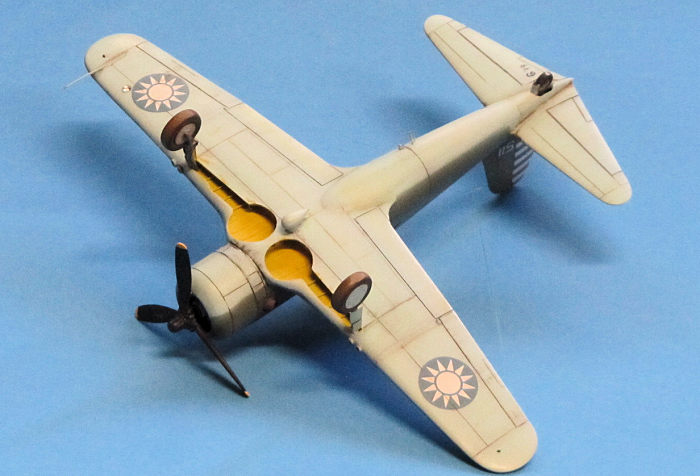
Rolled out and flown as the Germans overran Poland, the P-66's radial engine with its radical streamlining immediately had cooling problems. The prototype was quickly rebuilt with a conventional cowl, but remained hampered by a mere 1200 HP at a time when fighter designs were moving towards engines almost twice that output. The competition simply ran away from the aircraft, and it suffered from a maneuverability problem, being 2000 lbs heavier but with less wing area than the even lower-powered A6M2 Zero. It also had a tendency to fatally ground-loop. The desperate Swedes nonetheless ordered a gross, a purchase sequestered quickly by the also-desperate Roosevelt administration. The USAAF futzed around with the embargoed Swedish aircraft for a year or two (giving it the name "Vanguard") as an advanced trainer/stateside backup fighter. Next offered to the British, who rejected them after a brief evaluation, the survivors were then foisted on the Chinese. 128 were shipped, 104 received: the vessel carrying the remainder was torpedoed en route.
Sent in June, 1941, these took an excruciating 18 months to be shipped, assembled, tested, and given to their intended recipients. By the beginning of 1943 it was numerically the most important fighter in the CAF. However, China's Mad Max internal conditions meant that these fighters were used sporadically at best, mostly just remaining static at their airfields except when goosed into performing aerial displays for the sake of impatient and skeptical USAAF advisors. A couple of Chinese pilots with a bit of get-up-and-go eventually gained several kills with the aircraft in mid-1943. However, for reasons that are probably closely related to the questionable loyalties of the Chinese officer corps at the time, the P-66 saw little further combat and faded from that desultory war front rapidly after that, replaced by P-40s.
| THE KIT |
 This kit was the second release from this now-prominent Czech source. All
contents are predicable late '90s limited run: plastic parts in light gray,
resin in old-school yellow-tan, and a little fret of brass photo-etch. Some
issues had the engine in resin, but mine was plastic. All very nicely done, with
especially fine plastic main parts with commendably thin wing and tail trailing
edges and petite engraved lines--a little too petite in places, as you shall
see. Nice Propagteam decals for USAAF, RAF, and Chinese examples.
This kit was the second release from this now-prominent Czech source. All
contents are predicable late '90s limited run: plastic parts in light gray,
resin in old-school yellow-tan, and a little fret of brass photo-etch. Some
issues had the engine in resin, but mine was plastic. All very nicely done, with
especially fine plastic main parts with commendably thin wing and tail trailing
edges and petite engraved lines--a little too petite in places, as you shall
see. Nice Propagteam decals for USAAF, RAF, and Chinese examples.
| CONSTRUCTION |
No parts-numbering system is imposed on the parts or instructions, but this wasn't a problem. I prepped as I always do with limited run kits: by clipping off the main parts, sanding their mating surfaces lightly, and cutting out and checking their fit, especially of the canopy. Best to deal with canopy fit problems before anything else, but all was well this time.
 The instruction sequence is laid out logically enough, but I opted to
fit the resin cockpit next to ensure best fit. I'd recommend slicing off the
armor plate/roll-over pylon behind the pilot and the control stick before you do
anything else: the former sits about 1/8" too low, and the latter simply gets in
the way of painting/weathering. The tub itself mainly consists of a floor with
integral fore-aft bulkheads to which the instructions have you attach the
sidewalls and shove the completed assembly up into the joined fuselage.
The instruction sequence is laid out logically enough, but I opted to
fit the resin cockpit next to ensure best fit. I'd recommend slicing off the
armor plate/roll-over pylon behind the pilot and the control stick before you do
anything else: the former sits about 1/8" too low, and the latter simply gets in
the way of painting/weathering. The tub itself mainly consists of a floor with
integral fore-aft bulkheads to which the instructions have you attach the
sidewalls and shove the completed assembly up into the joined fuselage.
There's a more elegant way to achieve this that better
ensures the cockpit fits and looks more native in its intended location: 1) Tape
the fuselage halves together and test-fit the main (floor and bulkheads) part.
Mine required a little trimming on the forward bulkhead and floor. 2) Sand the
sidewalls down as thinly as possible, especially at the top (at the canopy
railing), then 3) glue either sidewall in place, using the floor/bulkheads part
taped in as a guide, paying close attention to getting the top edges of the
sidewalls pressed together against the fuselage to be as thin combined as
possible. Then repeat for other sidewall, leaving the floor separate or gluing
to one fuselage side. With everything still accessible, attaching the rollover
pylon at a more accurate height and adding the various other small parts can now
be followed by the usual internal painting and weathering.
I
also left the engine out until the fuselage halves were joined. The cowl opening
is slightly too small, but this is actually a good thing because it allowed me
to slowly work it open (after fuselage assembly) to the correct diameter with
various large drill bits from my shop, turned by hand, finishing with 7/16". All
traces of the
 seam were eliminated in this way and the opening restored to a
proper circle, too. The engine itself was drilled for a brass tube. This
accepted a shaft for the prop itself which had been assembled on my Prop Master
Jig and drilled for it. The engine was then glued in using the prop assembly to
ensure correct alignment.
seam were eliminated in this way and the opening restored to a
proper circle, too. The engine itself was drilled for a brass tube. This
accepted a shaft for the prop itself which had been assembled on my Prop Master
Jig and drilled for it. The engine was then glued in using the prop assembly to
ensure correct alignment.
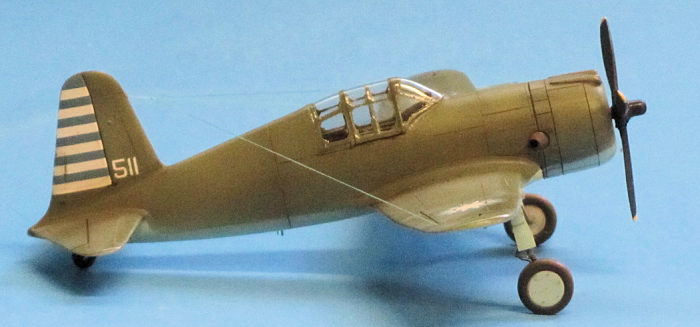
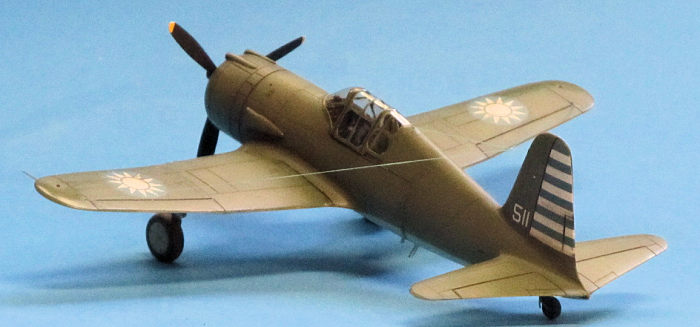
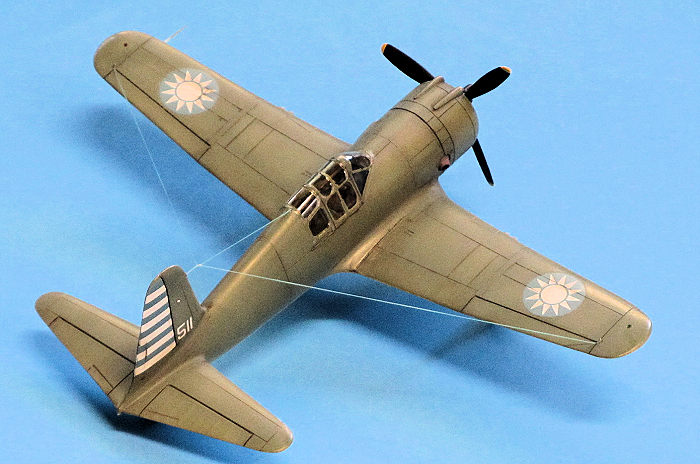
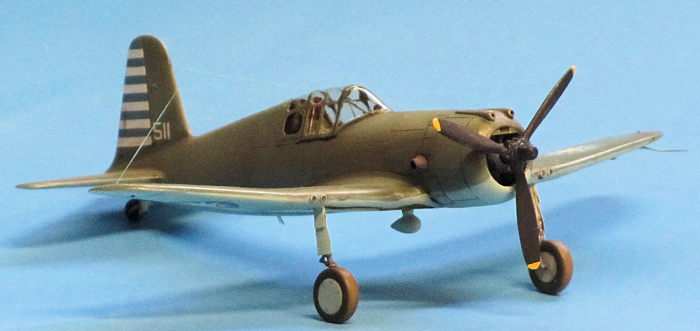
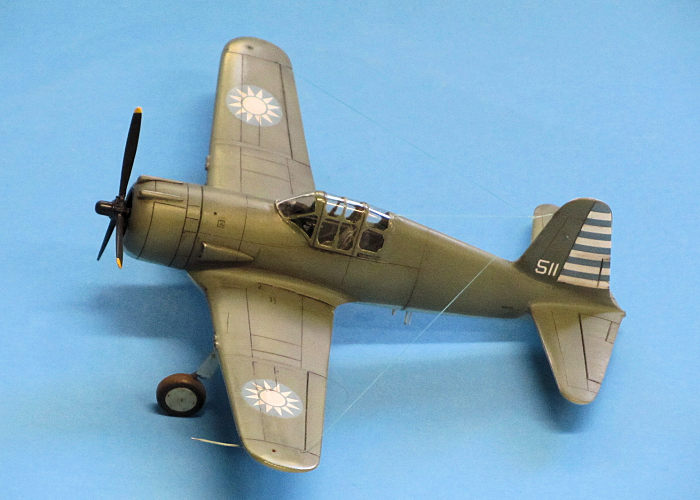
The rest of assembly then proceeded normally. The only major addition I made was to fit a proper wheel well roof from a sheet of thin styrene, with rib and stringer detail from bits of same. The kit does provide a part to fit up into the fuselage, but the real wing center section was a single piece and I wanted a seamless internal surface to reflect that. A few other items were spiffed up along the way: The overly large kit gun muzzle bulges were replaced with little disks of styrene, suitably faired into the wing leading edges, shaped, and drilled. I also amended the kit's fine panel scribing quite bit, especially around the engine cowl, control surfaces, and gun access panels. I was concerned that the kit's recessed lines were too shallow to retain a dark wash after painting/decaling, and the cooling flaps really needed to be much more distinct than they are in the kit.
| COLORS & MARKINGS |
 The instructions give a "Dark Green" and "Light Blue" scheme
for a CAF machine, and provide FS numbers. I don't know if they were shipped
this way from Vultee according to Kuomintang specifications, and I find it hard
to believe that the hard-pressed USAAF mechanics in India would have bothered
repainting them. But with little else to go by I simply used my custom-mix USSR
underside blue for the bottom and RLM 71 for the top.
The instructions give a "Dark Green" and "Light Blue" scheme
for a CAF machine, and provide FS numbers. I don't know if they were shipped
this way from Vultee according to Kuomintang specifications, and I find it hard
to believe that the hard-pressed USAAF mechanics in India would have bothered
repainting them. But with little else to go by I simply used my custom-mix USSR
underside blue for the bottom and RLM 71 for the top.
I didn't weather it much; just a little pre-shading followed
by light color coats and a wash after the decals were on, locking it all in with
a dead-flat clear coat. I wanted to imply a new machine delivered to do little
but sit there and oxidize. Last touches were position lights and that clumsy ADF
sense antenna array from EZ Line.
| CONCLUSIONS |
 I really enjoyed this one. Superb little enthusiast's kit.
This would be a great first limited-run project for someone wanting to try out
their hand at the medium after several mainstream injected projects. Despite the
P-66's lackluster history, it's really a neat little fighter and fits nicely in
my lineup. This kit is currently unavailable, but given Sword's history of
frequent re-releases don't be surprised to see it again, and at a much more
reasonable price than the gougers are currently demanding for it online!
I really enjoyed this one. Superb little enthusiast's kit.
This would be a great first limited-run project for someone wanting to try out
their hand at the medium after several mainstream injected projects. Despite the
P-66's lackluster history, it's really a neat little fighter and fits nicely in
my lineup. This kit is currently unavailable, but given Sword's history of
frequent re-releases don't be surprised to see it again, and at a much more
reasonable price than the gougers are currently demanding for it online!
My mind can't decide if I'm looking at a Zero or early F4U, depending on
the angle.
| REFERENCES |
9 September 2019
Copyright ModelingMadness.com
If you would like your product reviewed fairly and fairly quickly, please contact the editor or see other details in the Note to Contributors.
Back to the Main Page Back to the Review Index Page Back to the Previews Index Page