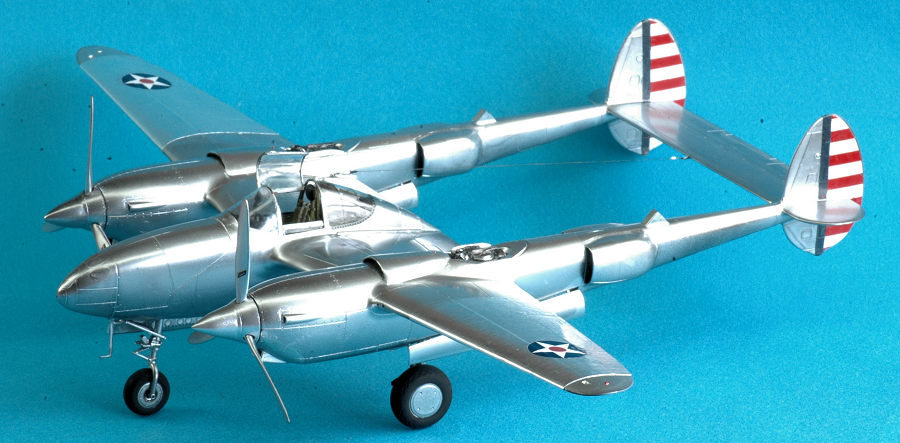
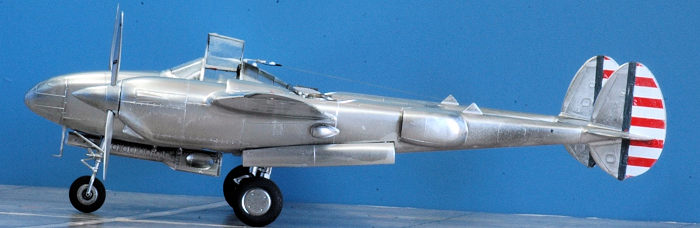
Tamiya 1/48 XP-38 Lightning
| KIT #: | 61120 |
| PRICE: | $85.00 |
| DECALS: | Two options |
| REVIEWER: | Andy Garcia |
| NOTES: | Fundecals 48035 |
| HISTORY |
For a complete history of the P-38 Lightning, Wikipedia is your friend. As a starting point Wikipedia states "The Lockheed P-38 Lightning is an American single-seat, twin piston-engined fighter aircraft that was used during World War II. Developed for the United States Army Air Corps (USAAC) by the Lockheed Corporation, the P-38 incorporated a distinctive twin-boom design with a central nacelle containing the cockpit and armament. For this build here's just the History of the XP-38, again from Wikipedia "The Lockheed Corporation designed the P-38 in response to a February 1937 specification from the United States Army Air Corps (USAAC). Circular Proposal X-608 was a set of aircraft performance goals authored by First Lieutenants Benjamin S. Kelsey and Gordon P. Saville for a twin-engined, high-altitude "interceptor" having "the tactical mission of interception and attack of hostile aircraft at high altitude." Forty years later, Kelsey explained that Saville and he drew up the specification using the word "interceptor" as a way to bypass the inflexible Army Air Corps requirement for pursuit aircraft to carry no more than 500 lb (230 kg) of armament including ammunition, and to bypass the USAAC restriction of single-seat aircraft to one engine. Kelsey was looking for a minimum of 1,000 lb (450 kg) of armament. Kelsey and Saville aimed to get a more capable fighter, better at dog fighting and at high-altitude combat. Specifications called for a maximum airspeed of at least 360 mph (580 km/h) at altitude, and a climb to 20,000 ft (6,100 m) within six minutes, the toughest set of specifications USAAC had ever presented.”
XP-38 and YP-38 prototypes (again from Wikipedia)
 Lockheed won the
competition on 23 June 1937 with its Model 22, and was contracted to build a
prototype XP-38 for US$163,000, though Lockheed's own costs on the prototype
would add up to $761,000. Construction began in July 1938 in an old bourbon
distillery purchased by Lockheed to house expanding operations. This secure and
remote site was later identified by Johnson as the first of five Lockheed Skunk
Works locations. The XP-38 first flew on 27 January 1939 at the hands of Ben
Kelsey.
Lockheed won the
competition on 23 June 1937 with its Model 22, and was contracted to build a
prototype XP-38 for US$163,000, though Lockheed's own costs on the prototype
would add up to $761,000. Construction began in July 1938 in an old bourbon
distillery purchased by Lockheed to house expanding operations. This secure and
remote site was later identified by Johnson as the first of five Lockheed Skunk
Works locations. The XP-38 first flew on 27 January 1939 at the hands of Ben
Kelsey.
Kelsey then proposed a speed dash to Wright Field on 11 February 1939 to relocate the aircraft for further testing. General Henry "Hap" Arnold, commander of the USAAC, approved of the record attempt and recommended a cross-country flight to New York. The flight set a speed record by flying from California to New York in seven hours and two minutes, not counting two refueling stops.[28] Kelsey flew conservatively for most of the way, working the engines gently, even throttling back during descent to remove the associated speed advantage. Bundled up against the cold, Arnold congratulated Kelsey at Wright Field during his final refueling stop, and said, "don't spare the horses" on the next leg. After climbing out of Wright Field and reaching altitude, Kelsey pushed the XP-38 to 420 miles per hour (680 km/h). Nearing his destination, Kelsey was ordered by Mitchel Field tower (Hempstead, New York) into a slow landing pattern behind other aircraft. Carburetor icing caused it to be brought down short of the Mitchel runway, and it was wrecked. On the basis of the record flight, though, the USAAC ordered 13 YP-38s on 27 April 1939 for US$134,284 (~$2.31 million in 2023) each. The "Y" in "YP" was the USAAC's designation for service test, i.e. small numbers of early production aircraft, while the "X" in "XP" was for experimental.
| THE KIT |
Tom Cleaver's Modeling Madness post of 31 October 2019 for his Tamiya P-38F/G kit build was the first of many accolades on the virtues of the Tamiya P-38F/G kit. His kit comments stand the test of time and I refer you to that article. Tamiya’s kit accuracy incorporating details from exceptional research, precision fit and buildability made it the best P-38 kit available. It was the logical starting point for a conversion into the XP-38 version.
| CONSTRUCTION |
 I started my 1/48th scale
XP-38 conversion project in 1995 when I purchased the Rebellion Creations 4805
XP-38 Prototype conversion kit. That conversion set was very crude, composed of
resin parts that looked like hand molded clay, full of bubbles, it was not a
pretty sight. It was designed to be used with the Monogram P-38J/L kit. In 1993
Hasegawa released its kit # 9101 P-38J ‘Virginia Marie’ and that was an
improvement in 1/48th scale P-38’s but an expensive kit to experiment with in an
XP-38 conversion so the XP-38 project again went dormant.
I started my 1/48th scale
XP-38 conversion project in 1995 when I purchased the Rebellion Creations 4805
XP-38 Prototype conversion kit. That conversion set was very crude, composed of
resin parts that looked like hand molded clay, full of bubbles, it was not a
pretty sight. It was designed to be used with the Monogram P-38J/L kit. In 1993
Hasegawa released its kit # 9101 P-38J ‘Virginia Marie’ and that was an
improvement in 1/48th scale P-38’s but an expensive kit to experiment with in an
XP-38 conversion so the XP-38 project again went dormant.
In the intervening years I built a number of P-38’s and P-38 Photo Recon versions using Monogram, Academy, Academy/Eduard, Hasegawa and more recently the stunning Tamiya P-38F/G version, all in 1/48th scale. On occasion I looked at the Rebellion Creations 4805 XP-38 Prototype conversion kit but that was so poorly made it always went back into the stash. But I wanted a 1/48th scale XP-38.
 After building several
Tamiya P-38's I looked into adapting the Rebellion Creations 4805 XP-38
Prototype conversion kit to use it with the Tamiya P-38. The Rebellion Creations
components have not aged well. It looks even worse when considered for use with
the Tamiya kit so I decided to compile the list of modifications required for
the XP-38. The Rebellion Creations parts pointed out the obvious changes. The
changes would require a new set of engine cowlings with different oil cooler
intakes, a new set of engine cooling radiators with exhaust outlets on the top
of the boom, on both of the twin booms. There was a turbo air intake covering
the area in front of the turbo. A new prop spinner, fuselage nose changes
including a longer nose wheel bay and different nose wheel configuration and
canopy modifications were added to my list. That was just a starting place.
After building several
Tamiya P-38's I looked into adapting the Rebellion Creations 4805 XP-38
Prototype conversion kit to use it with the Tamiya P-38. The Rebellion Creations
components have not aged well. It looks even worse when considered for use with
the Tamiya kit so I decided to compile the list of modifications required for
the XP-38. The Rebellion Creations parts pointed out the obvious changes. The
changes would require a new set of engine cowlings with different oil cooler
intakes, a new set of engine cooling radiators with exhaust outlets on the top
of the boom, on both of the twin booms. There was a turbo air intake covering
the area in front of the turbo. A new prop spinner, fuselage nose changes
including a longer nose wheel bay and different nose wheel configuration and
canopy modifications were added to my list. That was just a starting place.
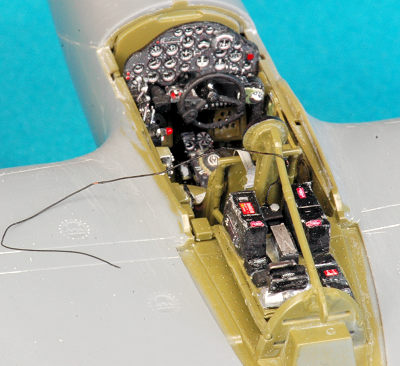 Some reading, and web
searches later new details emerged of what I should consider in the XP-38
conversion. The very visible radio set in the rear or aft canopy area was
different. It was the SCR-283 radio not the SCR-274-N that comes with the Tamiya
kit. That change also meant changes inside the cockpit area to the starboard
(right side) cockpit wall affecting the radio communication controls. The
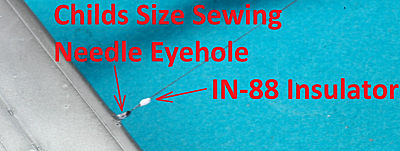
antenna configuration was no longer the Vee antenna but a single wire attached
to the center of the horizontal rear stabilizer running back to the cockpit
area. No clear detail photos of exactly what I wanted hindered me at every step.
The turbo exhaust outlet was reversed, the prop rotation was the reverse of
later P-38’s. It felt like either I needed to learn CAD and get a 3D printer to
print a new airframe or accept some less than perfect alternatives to
incorporate the now very long list of changes. It felt like I was trying to boil
the ocean at times. The more I knew the longer the build would take. Even the
shape of the prop blades including the Curtiss prop logo on the blades was
different.
Some reading, and web
searches later new details emerged of what I should consider in the XP-38
conversion. The very visible radio set in the rear or aft canopy area was
different. It was the SCR-283 radio not the SCR-274-N that comes with the Tamiya
kit. That change also meant changes inside the cockpit area to the starboard
(right side) cockpit wall affecting the radio communication controls. The
antenna configuration was no longer the Vee antenna but a single wire attached
to the center of the horizontal rear stabilizer running back to the cockpit
area. No clear detail photos of exactly what I wanted hindered me at every step.
The turbo exhaust outlet was reversed, the prop rotation was the reverse of
later P-38’s. It felt like either I needed to learn CAD and get a 3D printer to
print a new airframe or accept some less than perfect alternatives to
incorporate the now very long list of changes. It felt like I was trying to boil
the ocean at times. The more I knew the longer the build would take. Even the
shape of the prop blades including the Curtiss prop logo on the blades was
different.
 So I opted to
use the Tamiya instructions as my guide and note the required changes at every
assembly step. It took months of reading and researching Lockheed LAC P-38
drawings (DWG) to get to a satisfactory point of modifying the kit part,
assembling and incorporating the changes into the kit build. One person in
particular, John Clements, was the seminal resource time and time again on all
things P-38. John has been recognized for many years in the modeling community
as the leading authority on the P-38 Lightning. When it comes to real answers,
deep diving on the why’s and how’s of the P-38 John had the answer. I can’t
thank him enough for making all my P-38 builds better and more accurate
especially this XP-38. What I did serves my goal of having an XP-38 in 1/48th
scale on the shelf next to my other P-38’s. If I could do it in 3D CAD producing
a 3D printed product it would be much better.
So I opted to
use the Tamiya instructions as my guide and note the required changes at every
assembly step. It took months of reading and researching Lockheed LAC P-38
drawings (DWG) to get to a satisfactory point of modifying the kit part,
assembling and incorporating the changes into the kit build. One person in
particular, John Clements, was the seminal resource time and time again on all
things P-38. John has been recognized for many years in the modeling community
as the leading authority on the P-38 Lightning. When it comes to real answers,
deep diving on the why’s and how’s of the P-38 John had the answer. I can’t
thank him enough for making all my P-38 builds better and more accurate
especially this XP-38. What I did serves my goal of having an XP-38 in 1/48th
scale on the shelf next to my other P-38’s. If I could do it in 3D CAD producing
a 3D printed product it would be much better.
| COLORS & MARKINGS |
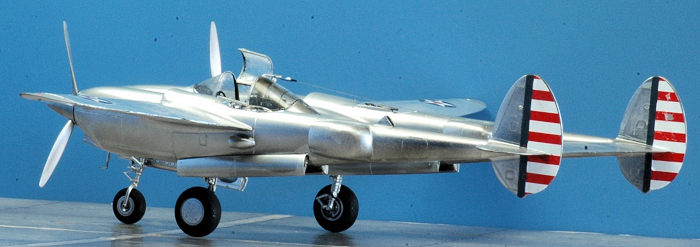 The XP-38 was a highly
polished aluminum airframe. I used some bare metal foil and metallic paints for
the overall external finish. I used Alclad II ALC-126 Hi-Shine Plus Aluminum for
the overall finish with some Tamiya panel washes. Gunze Aqueous and Tamiya
acrylics were used for the interior cockpit small detail parts, anti-glare
panel, tires etc.
The XP-38 was a highly
polished aluminum airframe. I used some bare metal foil and metallic paints for
the overall external finish. I used Alclad II ALC-126 Hi-Shine Plus Aluminum for
the overall finish with some Tamiya panel washes. Gunze Aqueous and Tamiya
acrylics were used for the interior cockpit small detail parts, anti-glare
panel, tires etc.
The XP-38 had minimum markings, no noticeable stencils just national markings from the excellent fundekals:) FD48035 US National Insignias 1919-1942 and the red, white and blue rudder painting.
| CONCLUSIONS |
A very enjoyable and fascinating project. I had to do deep dives into the actual Lockheed manufacturing drawings (blueprints) in order to understand what change to existing kit plastic parts were needed. That information can be found on the Air Corps Library (https://aircorpslibrary.com/) in their P-38 Lightning references section. Occasional pieces fell into place from reading the Technical Orders, Airframe and Maintenance manuals and a variety of references found on the Air Corps Library which is accessible only by a subscription.
| REFERENCES |
https://aircorpslibrary.com/
Detail and Scale series Volume 57, P-38 Lightning Part 1: XP-38 Through P-38H (1998)
A new version of the P-38 Detail and Scale series was released in 2024, D&S Vol 18 XP-38 - P-38H. It is also highly recommended and comes in a digital format that allows enlarged photos of the contents which is very useful in answering modeling related questions.
Valiant Wings Airframe & Miniature No. 19, The Lockheed P-38 Lightning, pages 5-7, and 31-32 (2022)
Modelers Guide to the P-38 Lightning by Jay Sherlock Aero Research (2012) pages 31-34 (has a list of 26 items of note, essentially the main differences of the XP-38 compared to later P-38’s).
Andy Garcia
13 May 2025
Copyright ModelingMadness.com. All rights reserved. No reproduction in part or in whole without express permission.
If you would like your product reviewed fairly and fairly quickly, please contact the editor or see other details in the Note to Contributors.