| KIT #: | 72070 |
| PRICE: | $30.00 shipped |
| DECALS: | unknown |
| REVIEWER: | Joe Essid |
| NOTES: |
Poor fit for wings and canopy, no cargo door, lots of hobby-knife blades gave up the ghost |
| HISTORY |
The lineage of Republic's outstanding P-47 Thunderbolt is well known, starting with Alexander de Seversky's racing planes and extending through Republic's P-43 Lancer. In the middle, we find a little 1930s design bearing Seversky's name in US Army Air Corps service. It was supplanted by the aircraft it beat during Army trials, the P-36 Hawk. As with the Hawk, which led to the P-40 series, the P-35 merits its place in aviation history. Though the P-36 fought for many nations, the smaller number of Severskys in US service saw a lot more combat.
In the Philippines it helped to slow Japan's early offensive
push. The planes sent there had been impounded from a Swedish-ordered batch of
P-35As (as the EP-1-106, featuring an ingenious cargo / passenger compartment
and longer fuselage). This compartment proved useful in evacuating personnel as
the Air Corps fell back under the Japanese onslaught. These aircraft reached the Philippines in Swedish
markings and with controls labeled in Swedish, where they then fought a doomed
but valiant fight. They arrived in 1941, and the US planned to hand them over to
the Philippine Air Force as replacement P-40s were delivered. When the more
modern planes did not arrive in time, the P-35As, many with high-hour engines,
fought on with Americans at the controls.
under the Japanese onslaught. These aircraft reached the Philippines in Swedish
markings and with controls labeled in Swedish, where they then fought a doomed
but valiant fight. They arrived in 1941, and the US planned to hand them over to
the Philippine Air Force as replacement P-40s were delivered. When the more
modern planes did not arrive in time, the P-35As, many with high-hour engines,
fought on with Americans at the controls.
The otherwise rugged planes lacked self-sealing tanks and were lightly armed, but they fought from the first air-strikes by Japan, where many were destroyed on the ground, until the last airframe was lost. We should note that final act occurred one day before US and Japanese carriers locked horns at The Battle of the Coral Sea, and just a month before the decisive American victory at Midway. At least one air-to-air kill, Tom Cleaver has written perhaps many more, can be credited to the surprising tough little Severskys, as well as the destruction of a Japanese minesweeper. We may never really know the final tally, as the retreat of US and Allied forces back to the Dutch East Indies, then Australia, meant that many records were lost in those chaotic, early months of the Pacific war.
The gallant pilots and ground crew in those dark days bought us time, like their counterparts on the ground holding Bataan and Corregidor, then later as holdouts alongside Pilipino guerillas. We mercifully will never know what might have occurred had the Philippines fallen in a month, as the Japanese military planned.
| THE KIT |
 I have long
wanted a P-35 for my collection of 1/72 early WW 2 US aircraft. My late friend
and fellow modeler Gary Braswell would look in my display case at my P-36,
Devastator, and Buffalo and make a crack about "Joe's Clunker Collection." He'd
note that I needed a Seversky.
I have long
wanted a P-35 for my collection of 1/72 early WW 2 US aircraft. My late friend
and fellow modeler Gary Braswell would look in my display case at my P-36,
Devastator, and Buffalo and make a crack about "Joe's Clunker Collection." He'd
note that I needed a Seversky.
I began with a Rareplanes Vacuform kit, with all the challenges those pose, yielding a bulbous result but still good fun to build as a P-35, rather than the longer-fuselage P-35A represented by this kit. Special Hobby also kits the P-35, for those wanting that version in 1/72. MPM molds in a medium gray softish plastic that I found easy to work with, including removing abundant flash from many parts. As with other limited-run kits, cleaning up parts and dry-fitting will help assure a decent result, though I found that I ended up inventing methods to align my parts that I'd not tried with other kits.
| CONSTRUCTION |
I began with the cockpit, straightforward enough and with some nice details to add. I pre-painted everything in Tamiya bare metal, since the Swedish P-35s came that way; zinc chromate came later to US P-35s stateside (used for training and ground schools). MPM's kit includes a PE set that jazzes up an otherwise spartan cockpit, as well as a multi-part control panel with dials on a separate sheet. That setup proved daunting for this hobbyist. I painted the backing part in silver, along with the rest of the cockpit, when white would have worked better for showing the instruments. I ended up with a monochromatic panel that I covered with a decal from the spares box. For the rest of the cockpit, a lot of the PE was too tiny to see when buttoned up, though I used the excellent seat belts and some of the other larger parts.
 Then troubles
set in. What looked simple in the box proved to be anything but. While in the
end I got it all to fit, it's not a kit I recommend for a beginner. As expected,
you'll find no locator-pins for mating parts. For the fuselage, I used small
bits of masking tape on the top edges, then added Revell liquid glue and closed
things up. Many clothes-pins held the halves together until the glue set up.
Then troubles
set in. What looked simple in the box proved to be anything but. While in the
end I got it all to fit, it's not a kit I recommend for a beginner. As expected,
you'll find no locator-pins for mating parts. For the fuselage, I used small
bits of masking tape on the top edges, then added Revell liquid glue and closed
things up. Many clothes-pins held the halves together until the glue set up.
The wings and stabilizers need to be fitted with a spar or rod through the fuselage. I managed that by drilling into the parts, inserting a plastic rod, then marking the spot on the fuselage for a hole. I felt proud that it worked, too proud as it turned out.
In attaching the wings I got the dihedral all wrong, when instead I should have put plastic strips into the rather huge gaps between the upper wing and the fuselage. Others building the kit report the same issue. I got the seam closed with CA, putty, and cursing, but as with any limited-run kit, fit and fit again before pulling out the glue. Late in the game, when I had things together and airbrushed, I found that the bottom joints of the wings sat lower than the mating surface on the fuselage. This required a lot more CA and sanding. In the end, I didn't rescribe the details lost under the airframe.
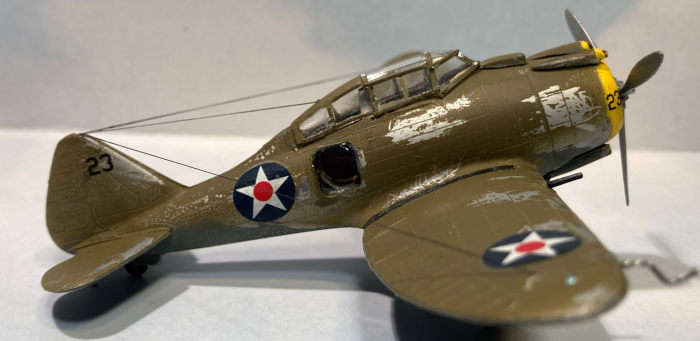
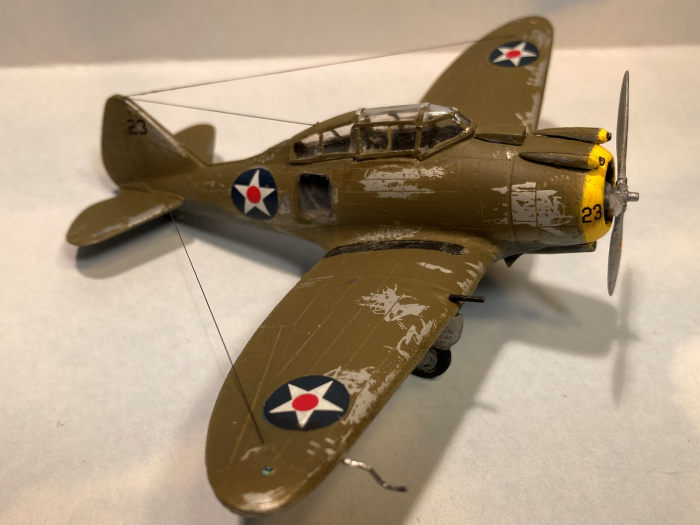
 Be aware
that MPM's P-35A kit lacks an opening for the cargo/passenger door. Special
Hobby's P-35A has that part cut out. Some modelers building the MPM kit simply
put a black decal where the door's glass should go, given how cramped and dark
the little compartment must have been. Still, a ride in there away from the
front lines would have been infinitely better than becoming a POW of the
Japanese. With this kit's petite panel lines, it can be a challenge to mark the
door. Cutting the opening, however, proved easy: MPM's soft plastic let me shape
it correctly with no more than a new hobby-knife blade.
Be aware
that MPM's P-35A kit lacks an opening for the cargo/passenger door. Special
Hobby's P-35A has that part cut out. Some modelers building the MPM kit simply
put a black decal where the door's glass should go, given how cramped and dark
the little compartment must have been. Still, a ride in there away from the
front lines would have been infinitely better than becoming a POW of the
Japanese. With this kit's petite panel lines, it can be a challenge to mark the
door. Cutting the opening, however, proved easy: MPM's soft plastic let me shape
it correctly with no more than a new hobby-knife blade.
I didn't study the Air Force Museum's P-35A in detail during my last visit some 20 years ago, so I used one extant photo of another Seversky's cargo area to put in a seat, fire-extinguisher, and electrical panel. Here masking tape, painted cream, supplied passenger seat-belts seen in the photo. I wonder if these seats came from the many wrecked P-35As caught on the ground on 10 December at Del Carmen airfield.
As I had feared from test fitting, the canopy was much narrower than the assembled fuselage. I struggled to attach it and decided to have one side fit well. With a notable step on the other side, I shaved that back with a new blade on the hobby knife, trying to taper the soft plastic in to meet the canopy's frame. This did not work very well, and I spent a lot of time filling, sanding, cursing more, and touching up paint to avoid what to me looked "grotty" in the extreme. Here, unlike my problem with the wings, I blame the kit. Everything else fit well enough after a lot of practice and enough sanding, but the canopy remains a weak spot.
| COLORS & MARKINGS |
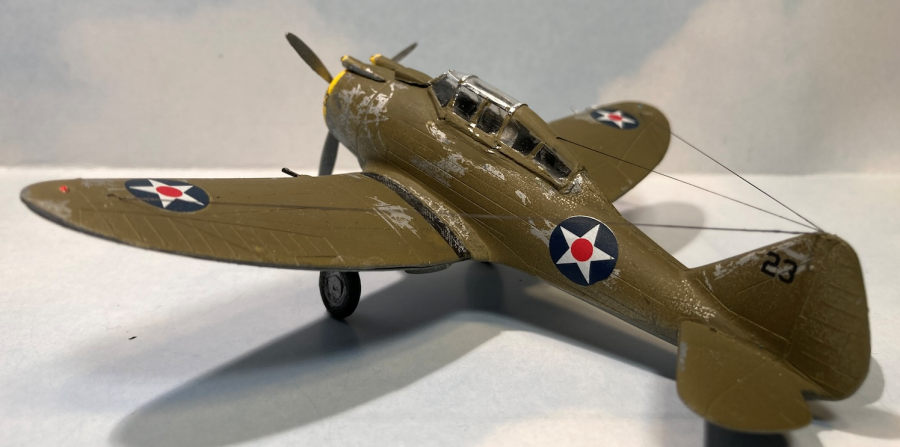
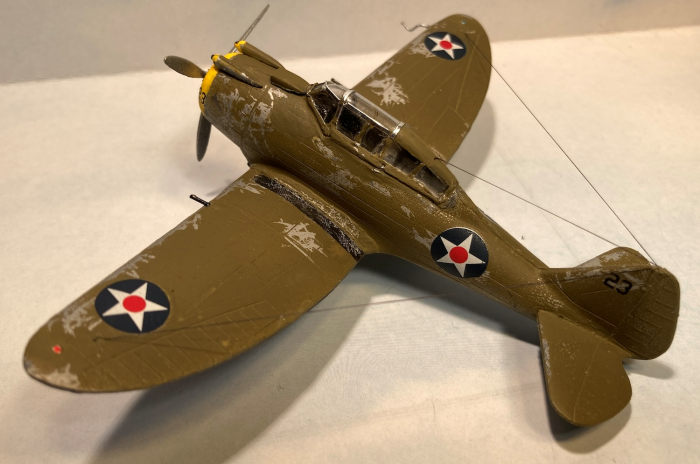
Aircraft 23 is shown on cover of Squadrons P-35 In Action book, shooting down a Zero. Two pilots in the 34th Pursuit Squadron were credited with kills on 8 December, 1941, over Del Carmen Field during the first Japanese attacks. I wanted to build that aircraft, and MPM supplies decals for it and a Swedish Seversky.
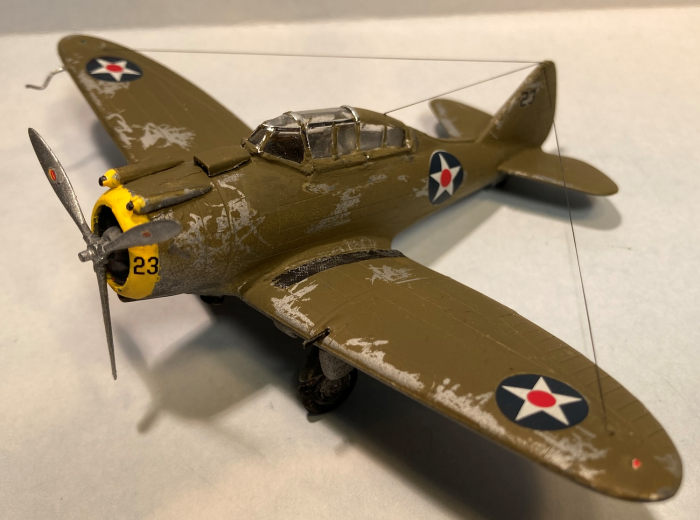
The planes in the Philippines got a hasty camo job in the Fall of 1941, as war-clouds gathered. The painting, done in the field, happened without primer, so the camo simply began peeling off in flight. This proves easy to replicate with acrylics. I primed the kit in white, then shot it with Tamiya Bare Metal. When that cured I airbrushed Mission OD and Neutral Gray without the additive that makes the paint harder to scratch. I like how Mission sprays but it's fragile stuff until top-coated. So when it dried, before top-coating in Tamiya Flat from a rattle can, I used cotton swaps to rub off the camo, in several areas. The peeling in photos does not always follow the airstream. I think the paint came off in chunks after tropical moisture got under the paint, as I once saw on a poorly painted automobile that peeled at highway speed on a very cold day. The results on the kit were pleasing. Other than that, I did little weathering beyond exhaust stains. The Severskys were tired out mechanically by December 1941, but the paint jobs were recent.
 Mission
paints work well for touch-up when brushed on, so I was able to rework areas
(especially where one lower wing joined the fuselage) after filling with CA and
sanding it yet again. Then I turned to MPM's decals, which conformed nicely to
the kit wit Microset, but one insignia tore and had to be touched up. I also
found that two of the insignias were printed off-center to show a rim of white
on one side when put on the kit. You may wish to score some aftermarket decals.
The tiny aircraft numbers on the nose posed a problem when I lost one in the
decal tub. By the time I recovered it, it was too curled up to use and finally
tore. I found some 23s from my spares and though they are bit larger than the
kits, I like how they look on the cowling. I had painted that Tamiya Yellow.
Mission
paints work well for touch-up when brushed on, so I was able to rework areas
(especially where one lower wing joined the fuselage) after filling with CA and
sanding it yet again. Then I turned to MPM's decals, which conformed nicely to
the kit wit Microset, but one insignia tore and had to be touched up. I also
found that two of the insignias were printed off-center to show a rim of white
on one side when put on the kit. You may wish to score some aftermarket decals.
The tiny aircraft numbers on the nose posed a problem when I lost one in the
decal tub. By the time I recovered it, it was too curled up to use and finally
tore. I found some 23s from my spares and though they are bit larger than the
kits, I like how they look on the cowling. I had painted that Tamiya Yellow.
I left the propellor silver, having found photographic evidence that camo planes in the Philippines retained the prewar silver props. See the blog noted in sources for photos of both a wrecked and flying P-35A for your build. Many modelers paint the props black, which seems in error unless you want a ground-school P-35 for a 1942 or 43 diorama. Squadron's book shows one such plane, with a black prop, being taken apart by students as late as 1943. It might have been the last Seversky in the US inventory.
Before I installed that silver prop, everything got a top coat of Tamiya Flat. I brush-painted some of the canopy frames with a tiny brush, and for others I used aluminum HVAC tape, the variety without the ribs, painted OD and cut into strips for other framing. That technique works best on straight frames.
| FINAL CONSTRUCTION |
 After
attaching the prop, gluing down the landing gear (check photos of actual
aircraft to get the angle of the parts correct), and making .50 caliber barrels
from stitched sprue for the wing guns, it was time for the cargo door's clear
part. With a bit of blister-pack plastic held in place with two toothpicks and
some "Crazy Aaaron's Mini Sunshine Thinking Putty" (in Piglet Pink) that I found
left in my classroom, the kit got a door. I had swabbed the opening with Testors
clear-parts cement before fitting the clear part. I also drilled out the ends of
small lengths of sprue, cut them at an angle, and attached them to the lower
edge of the cowling where the exhausts exited. The kit's scribed ones had been
lost in sanding.
After
attaching the prop, gluing down the landing gear (check photos of actual
aircraft to get the angle of the parts correct), and making .50 caliber barrels
from stitched sprue for the wing guns, it was time for the cargo door's clear
part. With a bit of blister-pack plastic held in place with two toothpicks and
some "Crazy Aaaron's Mini Sunshine Thinking Putty" (in Piglet Pink) that I found
left in my classroom, the kit got a door. I had swabbed the opening with Testors
clear-parts cement before fitting the clear part. I also drilled out the ends of
small lengths of sprue, cut them at an angle, and attached them to the lower
edge of the cowling where the exhausts exited. The kit's scribed ones had been
lost in sanding.
I rigged the radio antennae with EZ-line, added a pitot tube (the kit did not seem to have one) of stretched-and-bent sprue, and called the kit done.
| CONCLUSIONS |
Good practice and skill-building for me, but definitely not for novices. Recommended for those with experience building limited-run kits. It may well break other hearts. I don't know when, but now I'm going to try that Special Hobby Seversky in Swedish markings. As of writing this review, that kit is on its way to me.
Since the MPM kit gave me courage and I'd already done one vacuform already, I may get another vac at the next local show to stretch into and SEV SM-WW floatplane, a clean design with three serving as river-patrol aircraft in the Columbian Air Force.
This little airplane that soldiered on in spite of hopeless odds deserves more attention.
| REFERENCES |
Davis, Larry. Seversky P-35 Mini in Action. Squadron Signal Publications, 1994.
"The Survivors: Seversky P-35 -- In Pursuit of Success." Aces Flying High Blog. https://acesflyinghigh.wordpress.com/2018/01/13/the-survivors-seversky-p-35-in-pursuit-of-success/
Joe Essid
4 April 2024
Copyright ModelingMadness.com. All rights reserved. No reproduction in part
or in whole without express permission from the editor.
If you would like your product reviewed fairly and fairly quickly, please
contact
the editor or see other details in the
Note to
Contributors. Back to the Main Page
Back to the Review
Index Page
Back to the Previews Index Page