Revell (Monogram) 1/48 P-61 Black Widow
| KIT #: | 7546 |
| PRICE: | $25.00 |
| DECALS: | Three options |
| REVIEWER: | Dave Cummings |
| NOTES: | After Market Items: resin cowl/engine, Scale Aircraft Conversions metal landing gear, EZ Mask #281 paint masks, True Details resin wheels. |
| HISTORY |
The P-38s ruled the skies by day
but at night the bombers came looking for targets. At first this caused the
hospital personnel to scramble for slit trenches during the raids. But this
proved too disruptive when treating an influx of wounded, so they just stayed at
their jobs as the bombers droned overhead. Besides, those bombs that were
dropped were mostly scattered and ineffective. But dad s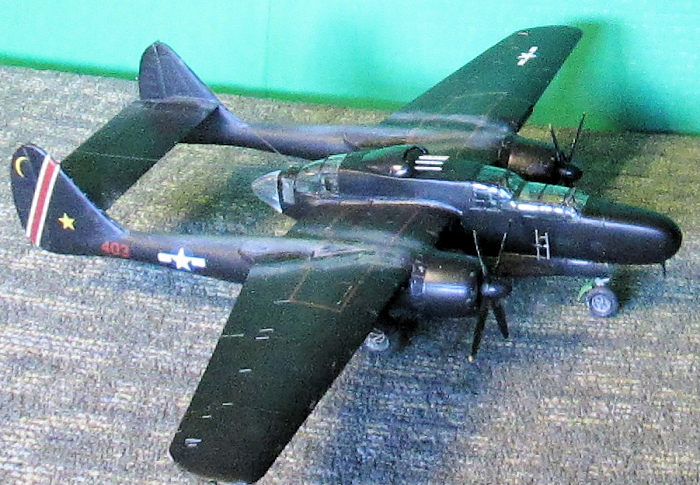 aid you never knew, what
if one got lucky? They lived with that fear. Searchlight batteries crossed the
night skies as distant anti-aircraft blasted away at the invisible intruders.
Then as things quieted down and the soldiers tried to grab some much needed
sleep, Washing Machine Charlie paid them a visit. This was a single plane whose
pilot played with the prop pitch controls to make the most racket possible. His
job was to simply keep people awake, and scared.
aid you never knew, what
if one got lucky? They lived with that fear. Searchlight batteries crossed the
night skies as distant anti-aircraft blasted away at the invisible intruders.
Then as things quieted down and the soldiers tried to grab some much needed
sleep, Washing Machine Charlie paid them a visit. This was a single plane whose
pilot played with the prop pitch controls to make the most racket possible. His
job was to simply keep people awake, and scared.
The next island to be secured was Mindoro which would provide a jumping off point and much needed airfields for the major push against the big island of Luzon and the capitol, Manila. It was here that life for the field hospital personnel began to get a bit better. Mindoro wasn’t as heavily defended as the larger islands so the casualties were not as heavy. Also, the nightly visits by Japanese aircraft began to wane. It was now possible to get an undisturbed sleep. My dad said the talk was that the new black painted airplanes arriving in the Philippines, were night fighters.
The P-61 Black Widow and its highly trained night fighter crews were not available until fairly late in the war. The 418th Night Fighter Squadron was one of the earliest of these specialized units. They began operations in New Guinea flying P-38s and B-25s equipped with searchlights. These did not prove very effective. After receiving their P-61s things turned around immediately for the 418th and they became the highest scoring NFS in the Pacific. On December 29th, 1944, the 418th CO, Major Carroll Smith, and his radar operator, Lt. Phillip Porter, intercepted and destroyed four Japanese aircraft in a single night with their P-61B, “Times-A-Wastin’”. With these four Japanese aircraft, destroyed off the coast of Mindoro, Major Smith became the highest scoring U.S. Night Fighter Ace with a total of seven kills. I’m sure my father slept well that night.
| THE KIT |
The Monogram P-61 was a much
heralded super-kit upon its release in 1974. You could build the A and B
versions. Hatches could be posed open to reveal engine, guns, and interior
details. The kit interior was state-of-the-art at the time and is still quite
presentable. This made for a very educational kit, but those optional position
hatches do not fit very well when closed. Another annoyance is the left nacelle
 with the exposed engine has closed cowl flaps while the right one has them open
giving the model an unbalanced look. The removable nose exposes a nicely done
radar set, but this will rob you of needed space for weights to balance an
obvious tail setter, if that is your goal. The instructions are adequate but a
bit vague for some assemblies like the turret. Paint references are just generic
colors. Parts fit is not great on these kits so check your filler supply. There
is also the raised panel line detail, overdone fabric effect on control
surfaces, and oversize rivets typical of the era. The clear parts on mine are
pretty clear with some distortion. However the fit of these are the biggest
problem with these re-issue kits, it is just terrible. That’s the bad news. The
good news is the quality of the moldings in this kit look pretty good compared
to some of these Revell re-issues of the old Monogram line which, on occasion,
have had horrible quality control. Still, if you can find an original Monogram
offering I would recommend that. Molded in black plastic, the parts in my kit
were straight with no warping and just minor flash here and there. There were no
obvious sink holes, ejector pin marks, or mold mismatch seams on this one. The
decal options include MAJ Carroll’s “Times-A-Wastin.” Remembering my dad’s
stories of the impact these aircraft made on his life, and those of countless
other Soldiers in the Philippines, inspired me to do this build. To that end I
determined to give this a good effort. That means investing in some aftermarket
items to correct some of the more obvious deficiencies of this old kit. These
include:
with the exposed engine has closed cowl flaps while the right one has them open
giving the model an unbalanced look. The removable nose exposes a nicely done
radar set, but this will rob you of needed space for weights to balance an
obvious tail setter, if that is your goal. The instructions are adequate but a
bit vague for some assemblies like the turret. Paint references are just generic
colors. Parts fit is not great on these kits so check your filler supply. There
is also the raised panel line detail, overdone fabric effect on control
surfaces, and oversize rivets typical of the era. The clear parts on mine are
pretty clear with some distortion. However the fit of these are the biggest
problem with these re-issue kits, it is just terrible. That’s the bad news. The
good news is the quality of the moldings in this kit look pretty good compared
to some of these Revell re-issues of the old Monogram line which, on occasion,
have had horrible quality control. Still, if you can find an original Monogram
offering I would recommend that. Molded in black plastic, the parts in my kit
were straight with no warping and just minor flash here and there. There were no
obvious sink holes, ejector pin marks, or mold mismatch seams on this one. The
decal options include MAJ Carroll’s “Times-A-Wastin.” Remembering my dad’s
stories of the impact these aircraft made on his life, and those of countless
other Soldiers in the Philippines, inspired me to do this build. To that end I
determined to give this a good effort. That means investing in some aftermarket
items to correct some of the more obvious deficiencies of this old kit. These
include:
If you don’t want the cowl covers open to display that left engine then a resin replacement cowl/engine is the easiest way to correct all of the problems posed by this assembly. I got this one off E-bay. It didn’t have a brand name so I assume this guy makes them himself, but it’s pretty nice.
 Scale Aircraft Conversions
metal landing gear. The kit gear is OK but all the weight required to get
this kit off its butt will put some strain on plastic struts. Plus metal
gear looks like…metal gear.
Scale Aircraft Conversions
metal landing gear. The kit gear is OK but all the weight required to get
this kit off its butt will put some strain on plastic struts. Plus metal
gear looks like…metal gear.
Pre-cut paint masks are a real convenience for the P-61’s very extensive greenhouse.
True Details resin wheels. The kit wheels have smooth tread and are OK for the P-61A, though without the bulged flat spot we now expect in our kits. However, the P-61B had tires with a diamond pattern tread.
Vac-form replacement canopy (if you can find one, I couldn’t).
| CONSTRUCTION |
This kit allows you to build either a P-61A or 61B and you
have to decide early which one you are doing as some construction steps differ
between the two. I began construction with (drum roll please) the left boom
assembly (you thought I was going to say something else didn’t you). I took a
razor saw to the left boom halves to remove the nacelles at the cowl flaps for
the resin replacement. Boom assembly requires trapping the landing gear legs
between the halves, and attaching the gear doors. The A model has the gear doors
open. The B model has you cut the small forward section from the doors which is
attached in the open position while the remainder of the door is closed (ala
B-25). The Scale Aircraft Conversions metal legs look good, but there was a bit
of flash and mold seam clean up to do on mine. They did fit perfectly. The boom
halves were glued together to complete the assemblies, fit was OK but required
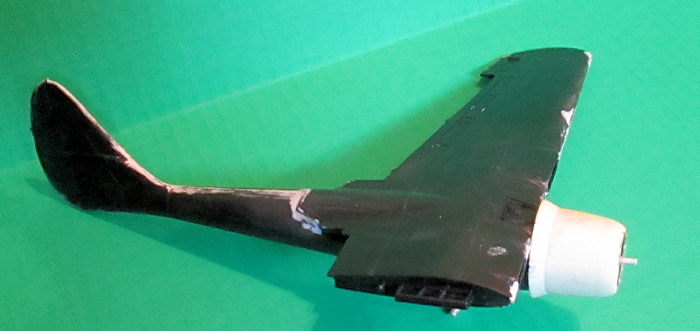
filler here and there. Next (don’t get ahead of me), I put the wings together.
Fit is not great and will also require some filler in places. The flaps were
assembled and attached in the up position. I think the Black Widow is a very
attractive aircraft (Yes, I admit it, I find some aircraft attractive) and
wanted to build this one clean without a lot of hangy down things spoiling the
lines. So I didn’t open the holes for the drop tanks which, if you want them,
you must do prior to gluing the wing halves. I then assembled the booms to the
wings which is a departure from the instruction sequence. For I knew, from other
excellent reviews of this kit in Modelling Madness, that
 there was going to be a
major gap issue with the nacelle to wing joint, which there is. Assembling in
this order allows you to tackle that issue before the rather flimsy fuselage
assembly can get in the way. I used wallboard compound smoothed with a wet
finger for the large gaps. This is the stuff used to fill the seams between
sheetrock sections. It works OK for a filler and is very easy to use. However it
must be allowed to dry, then completely sealed and primed before painting. I use
Mr. Surfacer 500 for this. When cleaning up the seams, the areas just in front
of the gear wells include air intake screen detail. Sanding this area will
destroy some of that detail. I carefully filled then scraped that seam best I
could to minimize the damage but still lost some of it. Next I painted the kit’s
starboard engine and cowl insides. My port engine resin replacement is nicely
done, but it is one solid piece. You have to reach down in there with a brush to
paint the engine details. Then you have to carefully paint the inside of that
cowl without getting any interior green on the engine. The cowls were than glued
to their booms. The attachment of the kit starboard cowl is not positive and
required some playing with to get proper alignment. The resin cowl required a
little shaving in places with a knife to fit with proper alignment and was then
superglued in place. The cowls were packed with wet tissue then I painted these
assemblies with Model Master Aluminum and clear coated. This highlights any
areas needing more seam cleanup. It will also produce more realistic paint
scrapes when weathering because you actually scrape the paint. These were set
aside to go on to the next step, assembling the fuselage.
there was going to be a
major gap issue with the nacelle to wing joint, which there is. Assembling in
this order allows you to tackle that issue before the rather flimsy fuselage
assembly can get in the way. I used wallboard compound smoothed with a wet
finger for the large gaps. This is the stuff used to fill the seams between
sheetrock sections. It works OK for a filler and is very easy to use. However it
must be allowed to dry, then completely sealed and primed before painting. I use
Mr. Surfacer 500 for this. When cleaning up the seams, the areas just in front
of the gear wells include air intake screen detail. Sanding this area will
destroy some of that detail. I carefully filled then scraped that seam best I
could to minimize the damage but still lost some of it. Next I painted the kit’s
starboard engine and cowl insides. My port engine resin replacement is nicely
done, but it is one solid piece. You have to reach down in there with a brush to
paint the engine details. Then you have to carefully paint the inside of that
cowl without getting any interior green on the engine. The cowls were than glued
to their booms. The attachment of the kit starboard cowl is not positive and
required some playing with to get proper alignment. The resin cowl required a
little shaving in places with a knife to fit with proper alignment and was then
superglued in place. The cowls were packed with wet tissue then I painted these
assemblies with Model Master Aluminum and clear coated. This highlights any
areas needing more seam cleanup. It will also produce more realistic paint
scrapes when weathering because you actually scrape the paint. These were set
aside to go on to the next step, assembling the fuselage.
Fuselage assembly begins with the
cockpit (yes, finally). The interior detail is actually pretty good with
sidewall inserts for the cockpit. The gunner and radar operator control yokes
for the upper turret are glued to the seats, but the instructions are a bit
vague on exact placement. There are two pins on the control columns that appear
to be the glue point where they attach to the arm rest. But it’s a trap, ignore
them. I found this mounted the controls too high to allow the canopy to seat. I
assembled all seats and bulkheads to the floor then all the inside stuff was
airbrushed Model Master Interior Green. D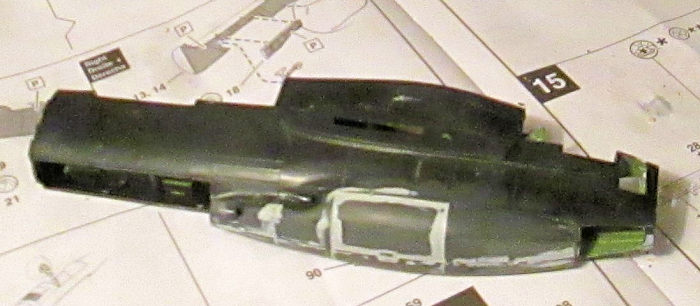 etails were painted, then everything
was dry brushed with aluminum. There are a few decal placards to apply in
places. I just painted the molded seat belt detail. The instrument panel has
raised detail so I painted it white, clear coated, then painted over it flat
black. When that dried I carefully scraped paint to reveal the white dial
detail. Doing a closed canopy I didn’t fuss with it too much. I cut the barrels
off the 20 mms to facilitate painting and glued the receivers in place. Using a
needle, I center punched the cut 20mm barrels and hollowed out the ends with my
smallest bit in a pin vise. I painted all the gun barrels Model Master Steel.
They probably should be a darker color, but I wanted mine to stand out against
the black paint. I dot my .50 barrels with black applied with a toothpick to
hint at cooling holes. Next is to stuff everything into a fuselage half. The
fuselage halves were closed up and wrapped with rubber bands to dry. Fit was not
great. The gun bay covers were glued in place and the gaps around these are
atrocious requiring much filler and seam cleanup. A scribing tool was used to
replace filled and sanded out panel lines. I know that makes for a combination
of raised and scribed lines, but it looks okay to me under paint. The nose wheel
assembly is designed to allow the strut to turn. Not caring about this I glued
the bay roof insert in place and will just glue the strut on later. This was a
tight fit and had to jiggle mine in there. The top turret is engineered to
rotate but I don’t care about that. I left the guns off and tacked it in place
for painting.
etails were painted, then everything
was dry brushed with aluminum. There are a few decal placards to apply in
places. I just painted the molded seat belt detail. The instrument panel has
raised detail so I painted it white, clear coated, then painted over it flat
black. When that dried I carefully scraped paint to reveal the white dial
detail. Doing a closed canopy I didn’t fuss with it too much. I cut the barrels
off the 20 mms to facilitate painting and glued the receivers in place. Using a
needle, I center punched the cut 20mm barrels and hollowed out the ends with my
smallest bit in a pin vise. I painted all the gun barrels Model Master Steel.
They probably should be a darker color, but I wanted mine to stand out against
the black paint. I dot my .50 barrels with black applied with a toothpick to
hint at cooling holes. Next is to stuff everything into a fuselage half. The
fuselage halves were closed up and wrapped with rubber bands to dry. Fit was not
great. The gun bay covers were glued in place and the gaps around these are
atrocious requiring much filler and seam cleanup. A scribing tool was used to
replace filled and sanded out panel lines. I know that makes for a combination
of raised and scribed lines, but it looks okay to me under paint. The nose wheel
assembly is designed to allow the strut to turn. Not caring about this I glued
the bay roof insert in place and will just glue the strut on later. This was a
tight fit and had to jiggle mine in there. The top turret is engineered to
rotate but I don’t care about that. I left the guns off and tacked it in place
for painting.
Next was the clear parts. I
searched high and low for a replacement vac-form canopy but couldn’t find one.
So I had to use the kit parts (play theme music from “Jaws.”) First, I masked
all the parts with the EZ Masks, which makes this task much easier for that big
greenhouse. These masks are a little undersize though making the framework lines
a little too thick. But that’s not necessarily a bad thing for this canopy. As I
said I wanted to build this one with closed canopy to keep the lines clean. If I
wasn’t so obstinate in insisting on this I could have made life much easier for
myself. The only thing that made this task possible was canopy glue, lots of it.
I am no expert on the relative merits of different white glues and canopy
cements. I just happened to have a bottle of Formula 560 brand Canopy Cement. I
now swear by this stuff as it worked miracles for me. The big top hatch over the
pilot is so undersize it falls right through the opening it’s supposed to cover.
I glued the hatch to the rear and left side of the opening and let dry. The
resulting rather large gaps were filled in with the Formula 560 applied with a
toothpick. This dried quite clear and actually came out pretty good. I dry fit
the canopy into position (this is where I found out about the gunner control
being too high). It kinda fits at the forward end but the rear edge is lower
than the fuselage top creating an abrupt step here. There is not much one can
do. I cut and sanded some fuselage away to kind of bevel the fuselage down to
the canopy so it didn’t look so obvious, then glued the canopy on. But it isn’t
good. The right rear canopy hatch had to have the edges filed in places to fit.
Major gaps here, and all around the canopy edges, were sealed with the 560. At
the rear of the fuselage the two small windows were fitted and glued in place.
The EZ Mask set does not include masks for these windows and it becomes obvious
why as you work with them. Solution here is to cover these with scotch tape
after they are installed and cut out around the edges with a sharp blade. The
rear canopy fit was not as bad but the separate hatch part again had to be
fitted and gaps sealed. Just leave that rear cone off until after pa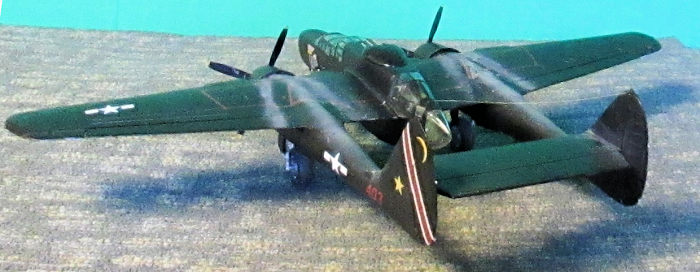 inting, it
doesn’t have any framework on it. There is a hole in the fuselage bottom for a
clear rod that props the model up on all three wheels. If you are using weights
like me, fill this in.
inting, it
doesn’t have any framework on it. There is a hole in the fuselage bottom for a
clear rod that props the model up on all three wheels. If you are using weights
like me, fill this in.
The sub-assemblies were then glued together along with the tail plane. I don’t know what it was with my kit. Nothing looked warped, but it just did not want to go together with the wings properly aligned level with each other. I had to use a little force to get the right wing level then stacked some weight on the wing tip letting the rest of the model hang over the table edge out in space while the glue dried. It came out properly aligned, but to do so the right wing could not be seated tight against the fuselage creating a huge seam there. This needed some plastic strips and much thick, gap filling, superglue to fill. This is a good place to determine how much weight will be needed in the nose to balance the model so it sets on all three wheels. Building the 61 B version is an advantage here due to the larger nose cap that has more room for weights. I dry fit the kit main wheels to the struts, then used a strip of tape to hold the nose cap in place. This allowed me to keep adding fishing weights until I had enough to achieve balance, then the nose cap was glued in place. You can omit this step though. Basically, it’s just pack all the lead you can fit into that nose and hope it’s enough. The fuselage was also painted aluminum then seams, erased panel lines, and sanding scratches re-checked and fixed. Took a bit of work, but I now had a complete airframe ready for painting.
| COLORS & MARKINGS |
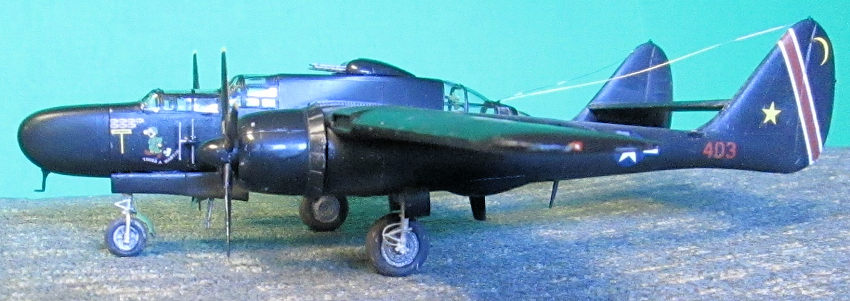
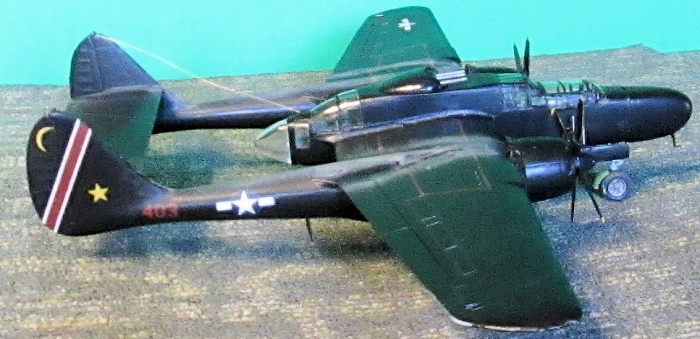
All the openings were stuffed with damp tissue and I wrapped the gear legs with plastic wrap. I wiped it down with a rag dampened with alcohol, then sprayed Testor’s Gloss Black from a rattle can. It’s a large model and needs a lot of paint. I sprayed three coats. Being able to set the model on its gear legs while it dries is a plus. The heavy coat of gloss paint took three days to cure enough to not leave finger prints. I then airbrushed a 50/50 thinned dark gray on selected top areas and control surfaces to fade and break up the monotone some.
Decals: The kit decals were used to
make “Times-A-Wastin.” I have seen mixed reviews on the decals Revell currently
produces for these kits. I found mine to be well printed, somewhat thick and
resistant to solvents, but easy to work with and apply. The biggest
disappointment is that the little stenciling decals were not opaque enough and
became invisible on the black paint. You can’t see them. I came
 up with some
yellow prop data stencils from my stash, one prop has P-47 stencils while the
other is from a P-51 – better than nothing.
up with some
yellow prop data stencils from my stash, one prop has P-47 stencils while the
other is from a P-51 – better than nothing.
Weathering: The factory paint was gloss but sun fading, maintenance, wear, oil throwing radials, dings, and dirt has its effects. But to varying degrees depending on many factors. Photos run the gamut from the pristine look of machines newly arrived to the combat zone, to high mission count machines operating from primitive facilities. Even the latter can vary when breaks in operational tempo allow ground crews to wash, spot paint, and spiffy up their charges. You just have to have an idea of what you’re particular subject should look like at any certain point in time. Photos are essential, but since most from this era are black-and-white, much is still subjective. This is the artistic part of modeling, no two models of the same subject will ever be perfectly identical.
I applied an acrylic wash of dark gray and umber to all the recessed engraving such as control surfaces. Next I carefully scraped paint from selected wear areas like leading edges and wing walk areas to reveal the underlying aluminum paint. Photos show those R-2800s left a substantial exhaust stain in a consistent pattern which I tried to replicate. I airbrushed a highly thinned light gray for this. In my opinion weathering is easy to overdo. When I thought this one was still looking a little understated, it was really just about right (in my opinion). But again, depends on the subject. There are plenty WWII color photos of warplanes looking so dilapidated I would hesitate to fly in in them.
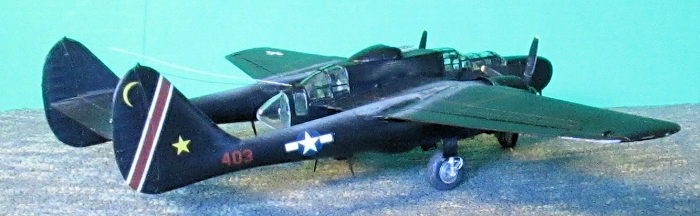
| FINAL CONSTRUCTION |
 All masking was removed. The
axle holes for the True Details wheels have to be drilled, which is a bit
annoying. I matched a drill bit to the kit wheel axle holes. The trick here
is to center punch the part in the exact center with something pointy to
guide the bit. Drill the hole to an appropriate depth without going all the
way through the wheel. True details does not make this as easy as they could
have. The wheels were then painted and weathered. They do look great. The
cannon barrels were glued back in place with fast setting superglue. The top
turret was removed, the guns installed, and glued back in place. The props
were painted aluminum, then flat black. The tips were painted white for
undercoat then yellow. When dry I dinged them up with coarse sand paper and
attached. Various antennae were glued in place. I made an antenna wire from
.008 music wire.
All masking was removed. The
axle holes for the True Details wheels have to be drilled, which is a bit
annoying. I matched a drill bit to the kit wheel axle holes. The trick here
is to center punch the part in the exact center with something pointy to
guide the bit. Drill the hole to an appropriate depth without going all the
way through the wheel. True details does not make this as easy as they could
have. The wheels were then painted and weathered. They do look great. The
cannon barrels were glued back in place with fast setting superglue. The top
turret was removed, the guns installed, and glued back in place. The props
were painted aluminum, then flat black. The tips were painted white for
undercoat then yellow. When dry I dinged them up with coarse sand paper and
attached. Various antennae were glued in place. I made an antenna wire from
.008 music wire.
| CONCLUSIONS |
It is what it is. A 70’s era kit that has been superseded by more modern offerings for those demanding a higher level of detail and quality. But that doesn’t mean there is no value in these kits. There are many plusses including; cost, overall dimensional accuracy, and multiple options. Of course, the purchase of aftermarket items may make prices a wash. I guess I just liked the challenge. If you can make a decent model out of this kit, then my boy, you are a modeler. Not recommended for beginners.
| REFERENCES |
References – Combat Chronicles of the Black Widow, Warren E Thompson, Squadron Signal Publications. Modeling Madness kit reviews. Google search of P-61 pictures.
15 January 2018
Copyright ModelingMadness.com
If you would like your product reviewed fairly and fairly quickly, please contact the editor or see other details in the Note to Contributors.
Back to the Main Page Back to the Review Index Page Back to the Previews Index Page