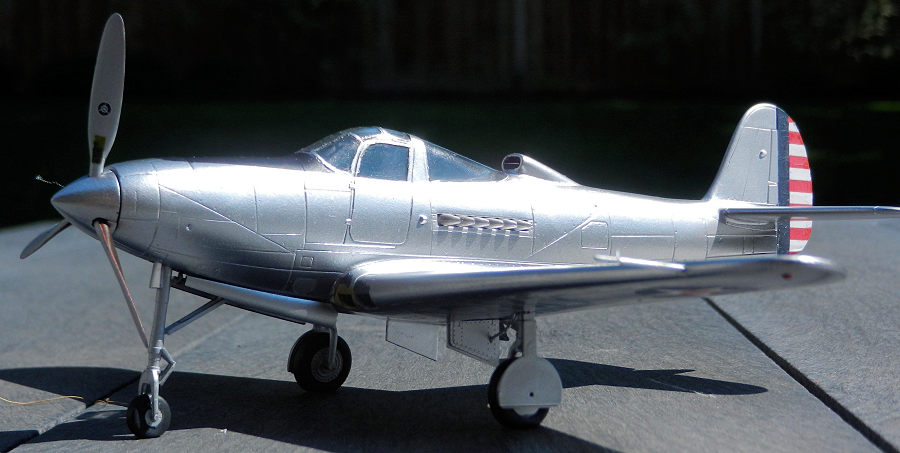
Eduard 1/48 YP-39 Airacobra
| KIT #: | 84161 |
| PRICE: | CAD $30.00 |
| DECALS: | Two options |
| REVIEWER: | Pablo Calcaterra |
| NOTES: | Simple conversion |
| HISTORY |
 After deciding to remove
the supercharger from the prototype the USAAC ordered 13 service test planes in
April 1939. Called B Model 12 and designated YP-39B they eventually had a wider
chord on the vertical tail.
After deciding to remove
the supercharger from the prototype the USAAC ordered 13 service test planes in
April 1939. Called B Model 12 and designated YP-39B they eventually had a wider
chord on the vertical tail.
These had a more pointy spinner, different access panels on the nose, no filet at the front of the vertical tail surface and some of them had armament installed. The first plane was delivered on September 13, 1940. These were probably the most streamlined and beautiful versions of the long line of P-39s.
| THE KIT |
 This was a weekend edition of Eduard’s P-39. Moulded
in gray plastic, Eduard’s kit all the parts you need to make an Airacobra from
the very first model to the last.
This was a weekend edition of Eduard’s P-39. Moulded
in gray plastic, Eduard’s kit all the parts you need to make an Airacobra from
the very first model to the last.
Level of detail is very good with very fine panel lines. It does not have the lead weight for the nose (more about this later)
As well known, the trailing edge of the wings is a bit too thick but sanding can take care of this. Another contention point is the fact that the canopy is not as narrow as the fuselage. In my opinion this is a misconception. For these parts to be aligned properly you need to make sure that the deck behind the pilot is glued to the internal sides of the fuselage. This pushed the wall inward…and makes it align to the canopy. But more about this later.
Decals are excellent like always but not used for my
model.
| CONSTRUCTION |
As these were pre production planes they missed some of the relevant features seen in later models. The bulky radio behind the pilot and the armoured glass were not present. With no machine guns installed then the machine gun butts were not there, same goes for the gunsight.
As a consequence the build of the cockpit is a pretty straightforward affair. All surfaces were painted in Bronze Green. Decals for the seat belt were used (but I have speculated that only the lap ones were present)
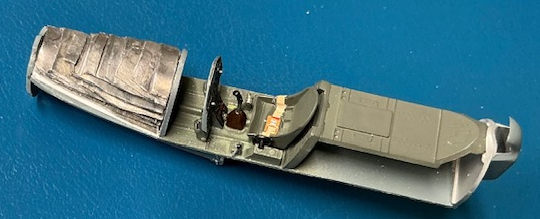 The instrument panel was painted black with all the
details picked up with aluminum. Face of dials received a drop of Future.
The instrument panel was painted black with all the
details picked up with aluminum. Face of dials received a drop of Future.
After looking on line what was the needed weight to keep the nose down (20 grams) and realizing that the use of buck shot was not going to deliver the desired weight (due to the air between the shots) I looked for options on line looking for flexible/pliable lead. I found some good priced sheets of lead and, using gloves and a respirator (you never know) I cut strips that were increasingly shortened as the layers were built up on top of the top of the nose landing gear. They were glued together using cyano.
The plane was put together with no problems, a little bit of filler on the fuselage at the trailing edge of the wings, and some Vallejo liquid masking for the wing roots.
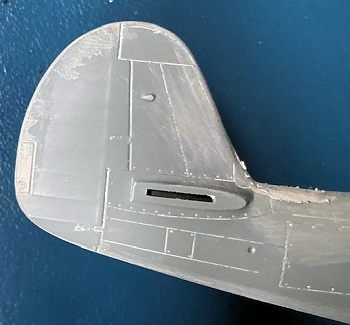 Two things that were needed addressing were removing
the curved panel at the base of the front of the vertical tail surface (which
created a gap between the two halves that I had to fill with plasticard and
putty) and rescribing some panels, adding rivets and erasing other panels on the
nose. The propeller spinner had a gun attached and then merged using two part
epoxy. Once this had dried I sanded the epoxy and achieved a pointy spinner. The
machine gun panels on the wings, along with the exit chutes were erased/blanked.
Two things that were needed addressing were removing
the curved panel at the base of the front of the vertical tail surface (which
created a gap between the two halves that I had to fill with plasticard and
putty) and rescribing some panels, adding rivets and erasing other panels on the
nose. The propeller spinner had a gun attached and then merged using two part
epoxy. Once this had dried I sanded the epoxy and achieved a pointy spinner. The
machine gun panels on the wings, along with the exit chutes were erased/blanked.
Learning from my experience from the previous Eduard P-39 I had added extra glue and firm pressure to ensure that the fuselage walls were narrow enough to prevent a gap around the canopy. This one was attached along with the left door and the technique worked quite well. Clear parts were masked. The right hand door was barely attached with white glue (to be able to remove it later and glue it open)
The landing gear bays were masked with blue tac (new technique for me) and the plane was ready for painting.
| COLORS & MARKINGS |
Vallejo Gloss black primer was applied diluted with
their thinner. After 5 thin layers I could not get more than a satin finish.
Went on line to their tutorial. Spray it pure it said! No dilution. After 2 more
layers it was gloss but it was too much primer on the model…
Then painted the plane with several thin layers of Vallejo Metal Chrome Silver.
Fine enough but the « damage » done by the primer was done…it is not as smooth
and shiny as my P-40 prototype
Masked multiple areas (tail, moveable surfaces, a couple of small access lids on
the nose) and they were painted Vallejo aluminum. Then with blue tac masked area
around leading edge and painted in bronze per colour pic found on line. The
panels around exhausts were painted with a mix of aluminum and black and a
portion of the rudder in white with aluminum. Top of the nose was painted
Vallejo Black.
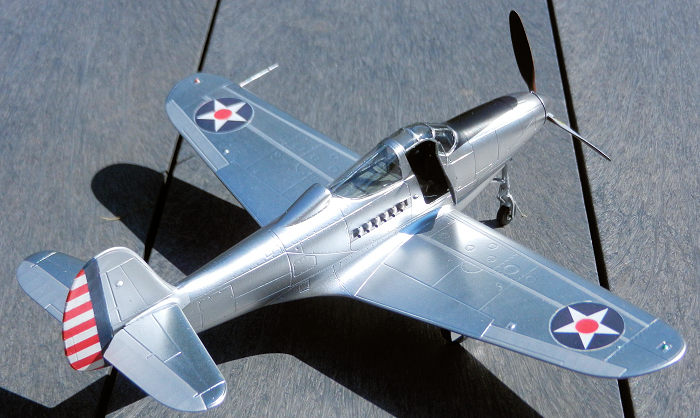 After some retouches I thought the model was ready for
the decals but then realized I had forgotten to paint two long panels along top
and bottom of wings in aluminum! I just remembered when thinking about the stars
decals I had to make in 20 mm diameter (none in spares) and that these 2 long
panels are a reference for placement of such decals. Ok. More masking and
painting in aluminum. The back face of the propellers was painted in hull
brown/red (Vallejo).
After some retouches I thought the model was ready for
the decals but then realized I had forgotten to paint two long panels along top
and bottom of wings in aluminum! I just remembered when thinking about the stars
decals I had to make in 20 mm diameter (none in spares) and that these 2 long
panels are a reference for placement of such decals. Ok. More masking and
painting in aluminum. The back face of the propellers was painted in hull
brown/red (Vallejo).
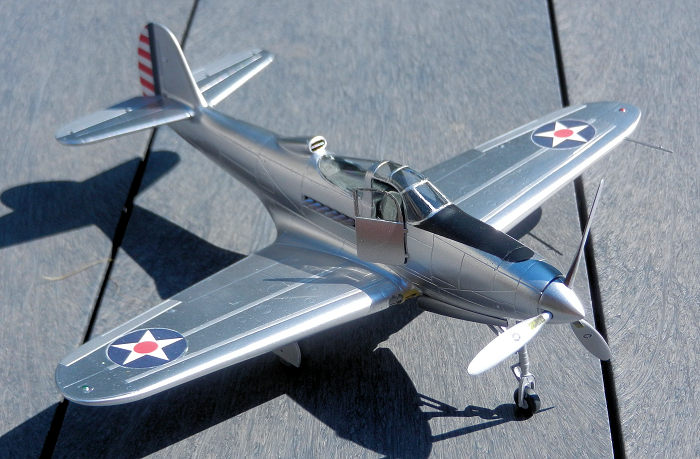
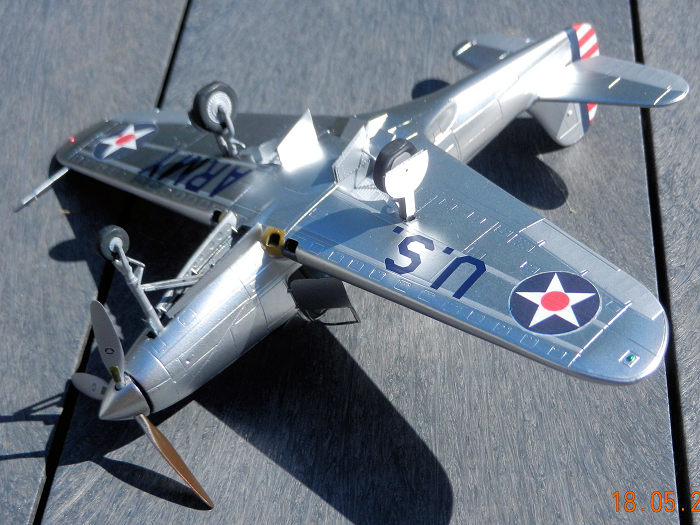
I designed and printed all the decals (blue and red stripes for the rudder, stencils for propellers, stars for wings. The rudder ones took a lot of work and copious amounts of Set and Sol but final they conformed to the moveable surface. A bit of scrapping the excess of decal and some retouches in red and blue delivered a somehow acceptable result. US ARMY came from the spares box (Airfix P-40 I had built as an AVG one).
Exhausts were gently drybrushed with Vallejo Rust and the holes in the exhausts painted in black.
Removed the blue tac masks from the landing gear wells, some black and metallic had sipped thru thus aluminum was brushed on. Then the landing gear legs and doors were attached. Removed the canopy masks, attached the right hand door open. Added the propeller using a trimmed rubber stopper from a Tamiya kit.
Navigation lights were painted with Model Master Clear Red and Clear Green. Those on the tail with Gloss white. The exhausts were attached and the last part was the pitot tube.
| CONCLUSIONS |
Simple, no headaches. The modifications were not very painful and now my preproduction P-39 sits on my shelf close to the all shiny first production P-40.
| REFERENCES |
“P-39 Airacobra In action” by David Doyle
20 July 2026
Copyright ModelingMadness.com. All rights reserved. No reproduction in part or in whole without express permission.
If you would like your product reviewed fairly and fairly quickly, please contact the editor or see other details in the Note to Contributors.