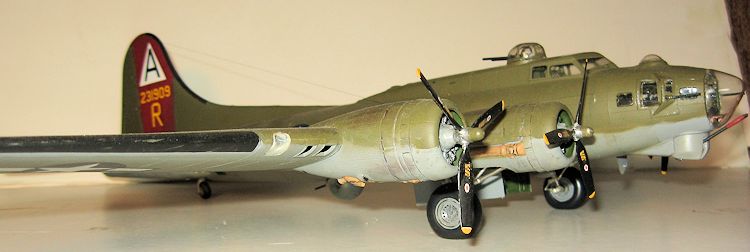
Monogram 1/48 B-17G
| KIT #: | 5600 |
| PRICE: | $25.00 (cheap) |
| DECALS: | Two options |
| REVIEWER: | Dave Cummings |
| NOTES: |
Superscale 48-017 (not cheap), Verlinden
B-17G Update set, Squadron B-17 Vac canopy sets #1 and #2, Scale
Aircraft Conversions metal landing gear set.
Squadron B-17G Canopy Mask
set. |
| HISTORY |
 The Collings Foundation (www.collingsfoundation.org):
Dedicated to the preservation of historical aircraft.
Each year the Wings of Freedom tour brings historical
aircraft (including the only B-24 still flying) to communities across the U.S.
as a living museum and an opportunity to actually fly in them.
I had the opportunity to fly in their B-17 (birthday
present) when WOF visited our town a couple years ago.
Between take-off and landing you are allowed to wander
about the aircraft (except for the cockpit of course).
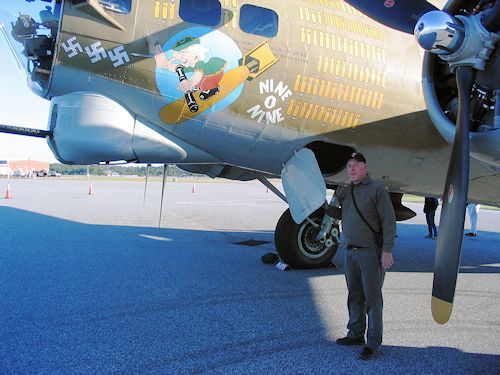
The Collings
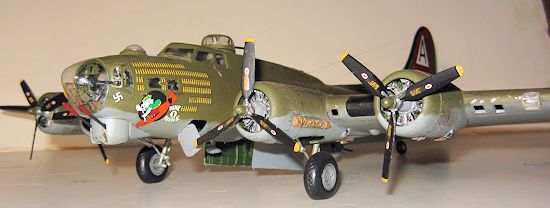
B-17G is painted as Nine-O-Nine of the 91st
Bomb Group.
This B-17 was notable for completing 140 combat missions over
Europe with three different crews.
Throughout she never had an abort and never lost a
crewman, an 8th Air Force record.
The Collings Foundation (www.collingsfoundation.org):
Dedicated to the preservation of historical aircraft.
Each year the Wings of Freedom tour brings historical
aircraft (including the only B-24 still flying) to communities across the U.S.
as a living museum and an opportunity to actually fly in them.
I had the opportunity to fly in their B-17 (birthday
present) when WOF visited our town a couple years ago.
Between take-off and landing you are allowed to wander
about the aircraft (except for the cockpit of course).
The Collings
B-17G is painted as Nine-O-Nine of the 91st
Bomb Group.
This B-17 was notable for completing 140 combat missions over
Europe with three different crews.
Throughout she never had an abort and never lost a
crewman, an 8th Air Force record.
| THE KIT |
That
B-17 flight was a memorable moment.
Armed with that motivation and a wealth of photos and
film footage I set out to create a fitting tribute to the occasion.
I would create the ultimate B-17 Nine-O-Nine replica.
It had to be 1/48 scale to provide the space for all the
detailing I envisioned and the old Revell-Monogram kit is still the only game in
town in that scale. Despite
its age it still offers good accuracy and “build-ability.”
I also purchased all the aforementioned detail accessory
sets. Finding
decals for Nine-O-Nine proved to be quite an endeavor, nearly ending the project
before it got started.
The only decal sheet I could find reference to at the
tim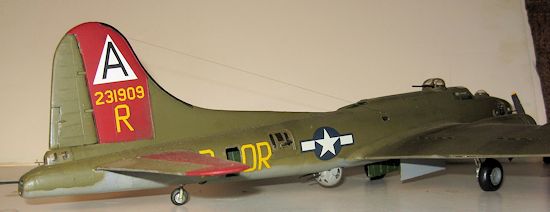 e was an old Superscale sheet out of print for nearly 30 years (There is now
a new set out I hear).
Amazingly, I found a set on E-Bay still sealed in
original envelope.
The bidding was intense.
Desperate with no alternative in sight I put in a hefty
bid to secure the deal.
The guy that had held on to that decal sheet made a
handsome return on his investment.
e was an old Superscale sheet out of print for nearly 30 years (There is now
a new set out I hear).
Amazingly, I found a set on E-Bay still sealed in
original envelope.
The bidding was intense.
Desperate with no alternative in sight I put in a hefty
bid to secure the deal.
The guy that had held on to that decal sheet made a
handsome return on his investment.
So, I
had the kit, the bits, and great references.
This would be the best B-17 replica ever built.
I had pics of every nook and cranny of that bird.
No excuses for it not being perfect in every detail……
Then suddenly I felt intimidated.
It all seemed like such a chore.
Did I have the skills needed for this?
Lot of cutting and fitting photo-etch bits and such.
What if I screw it up? Sure be a lot of work. And so it set there for over a
year.
One
day recently while at my bench I looked over at the now dusty box.
Just on impulse I grabbed the box and a razor saw and
started hacking away plastic.
Heck with it, it either turns out good or it don’t.
| CONSTRUCTION |
First
order of business was to cut away the cockpit area from the fuselage halves for
the Squadron vac canopy.
It is not just replacement windows but the whole cabin
area forward of the top turret.
Advantage here is the windows look part of the airframe
and not just stuck on as an afterthought.
An interesting aspect of this old Monogram kit is that
you get a detailed bomb-bay that can only be seen in the kit version with the
clear fuselage half because the bay doors are molded shut.
Those doors had to go along with the crew entry hatch
under the nose and the rear crew entry door.
I also cut out the doors from the interior bulk heads to
adjoining compartments.
Why?
Because that was the way it was during my flight.
So, there I was; knee deep in plastic!
As
airplane kits are built from the inside out, construction began with the
interior.
The left fuselage half, which is the clear one in that kit with
the visible interior, lacks the interior ribbing in the bomb-bay present in the
other half.
Using plastic strip material I built up the missing rib detail.
Verlinden provides photo-etch replacement bomb-bay
doors.
The individual ribbing detail of these doors are individual photo-etch
pieces super-glued to the doors (labor of love, labor of love….).
 The
kit interior is built per instructions augmented with various details from the
upgrade set.
Starting at the tail, the gunner position is pretty stock as you
can’t see much in there through the tiny windows.
The gunner’s bicycle seat and handle-bars that control
the MGs are in there but you can’t really see them.
This was OK, there were two places you could not go in
the Collings B-17.
The tail gun compartment (they didn’t want Homer kicking
a hydraulic line loose from the tail wheel while on the ground, (and can’t get
there easily with tail wheel retracted while in flight) and the ball-turret.
The
waist compartment is likewise hard to view on the model except for the immediate
gunner locations and rear of the compartment through the opened rear crew door.
I liked the kit guns better than the Verlinden resin .50
MGs here.
The kit guns are slightly larger than the more scale resin pieces
but have better detail.
Opposite the crew entry door on the Collings bird was
the APU generator which is a small gas engine mounted against the wall.
I assembled a plausible APU from bits in the spare parts
box.
I drilled a small hole through the fuselage for the APU exhaust vent.
Absent from the kit is the plywood flooring running the
length of the fuselage which I made from some card stock painted in wood color.
The
ball turret mechanism was detailed with oxygen bottle and bits.
The halves that make up the 37mm magazine for a
Pro-Modeler P-39 worked well for the metal ammo bins attached to the ball turret
mechanism.
I built the ball turret itself pretty well stock with the kit
clear parts instead of the vacform replacements.
The instructions have you attach the turret at this
point but I left it off until after assembly and painting. You can pry the
mounting arms apart enough to snap it in there later but I felt the vacform ball
might be too delicate to perform this maneuver.
I added a couple resin parts like control handles but
didn’t bother with the rest, you can’t see it.
 Moving forward the radio room was spruced up some.
A radio set was mounted to the operator’s table,
replacement resin seats, some wiring, portable oxygen bottle, fire extinguisher,
and stuff. A
small hole was drilled in the right fuselage where the antenna wire enters.
During
my flight on the Collings B-17 they flew with the radio compartment canopy slid
forward and stowed.
This allowed us to actually stand up, head in the
slipstream, and gaze about the outside of the aircraft, IN FLIGHT, awesome.
In memory of that and to gain more visibility to the
innards I cut and attached the vacform canopy in the stowed position also.
Looking through the opening one can glimpse just enough
of the ball turret mechanism through the opened bulkhead door to make all that
worthwhile.
Nine-O-Nine did not have a MG in the radio Compartment.
Later in the war they quit using these as there was more
risk from the radio operator shooting the tail off than German fighters.
The
one item I regret now is the radio operator’s table.
It is molded as a solid block.
I believed that painting the sides of that block flat
black would make it disappear as you are looking down on the compartment from
above anyway.
If I had a do over I would cut this out and scratch build the
table.
Moving forward the radio room was spruced up some.
A radio set was mounted to the operator’s table,
replacement resin seats, some wiring, portable oxygen bottle, fire extinguisher,
and stuff. A
small hole was drilled in the right fuselage where the antenna wire enters.
During
my flight on the Collings B-17 they flew with the radio compartment canopy slid
forward and stowed.
This allowed us to actually stand up, head in the
slipstream, and gaze about the outside of the aircraft, IN FLIGHT, awesome.
In memory of that and to gain more visibility to the
innards I cut and attached the vacform canopy in the stowed position also.
Looking through the opening one can glimpse just enough
of the ball turret mechanism through the opened bulkhead door to make all that
worthwhile.
Nine-O-Nine did not have a MG in the radio Compartment.
Later in the war they quit using these as there was more
risk from the radio operator shooting the tail off than German fighters.
The
one item I regret now is the radio operator’s table.
It is molded as a solid block.
I believed that painting the sides of that block flat
black would make it disappear as you are looking down on the compartment from
above anyway.
If I had a do over I would cut this out and scratch build the
table.
I
elected to not have any bombs blocking the view of the bomb-bay innards.
Besides there is a nice bomb cart included in the kit
for displaying those.
I used some black string for the hand-lines girding the
bomb-bay catwalk.
Was great fun crossing the catwalk as I moved about the
Collings aircraft during my flight.
I added some bay door operating mechanism gadgets, a
fire extinguisher, switch boxes, and stuff.
The
Flight Engineer / top turret station received some Verlinden fire extinguishers,
portable oxygen bottles, parachute packs, and extra ammo cans.
The resin replacement .50 MGs do not look any better
than the kit guns so I stuck with those.
The top turret mechanism was built but would be dropped
in after painting during final assembly.
The Verlinden set, which includes a reflector gun sight,
added to the turret detail as did the Squadron vac turret dome.
 In
the cockpit I spruced up the instrument panel with instrument decals, added some
little photo-etch throttle levers, and seat harness.
Verlinden supplies auxiliary consoles for overhead and
on the sides.
To move forward you go through a small hatch between the pilots
and crawl hand-and-knees under the cockpit into the nose.
I opened up these passageways so I could make the
virtual trip through my model to ward off any future nostalgia attacks for B-17
flight.
By the way, the interior of these aircraft are not nearly as roomy as
depicted in the movies.
It’s tight in there.
In
the cockpit I spruced up the instrument panel with instrument decals, added some
little photo-etch throttle levers, and seat harness.
Verlinden supplies auxiliary consoles for overhead and
on the sides.
To move forward you go through a small hatch between the pilots
and crawl hand-and-knees under the cockpit into the nose.
I opened up these passageways so I could make the
virtual trip through my model to ward off any future nostalgia attacks for B-17
flight.
By the way, the interior of these aircraft are not nearly as roomy as
depicted in the movies.
It’s tight in there.
Most
of the Verlinden resin bits are for the nose compartment which makes sense at it
is the most visible interior area.
More portable oxygen and fire bottles, extra ammo cans,
wood ammo bins for the cheek guns, Norden sight, switch consoles, parachute
packs, a bunch of stuff.
Key pieces are the Bombardier station and chin turret
controls.
Verlinden provides the circular plywood chin turret access cover
under the Bombardier’s seat.
That seat (more like a stool) is mounted on four metal
legs that bolt to the floor outside the cover’s circumference.
The kit layout takes liberties with this to provide a
mount for the chin turret to attach and rotate.
It’s totally wrong and this piece has to be cut from the
flooring.
A seat is provided in resin with PE legs along with the turret
controls and sight.
Missing from both kit and update accessories are the
ammo belt flex feed chutes running from the ammo bins to the cheek guns.
I created a facsimile from a photo-etch .50 ammo belt
from a 1/35 armor vehicle upgrade set.
Basically I folded the bullets back along the belts,
coated with super glue,
 painted steel color, then cut and bent into shape.
I ran these from the ammo bins to the two cheek guns
which I had installed in their windows with barrels cut off until after painting
so I could mask the windows.
painted steel color, then cut and bent into shape.
I ran these from the ammo bins to the two cheek guns
which I had installed in their windows with barrels cut off until after painting
so I could mask the windows.
The
tail wheel strut is attached at this point.
The kit part
has the tail wheel and strut molded as one solid mass and needs replacing.
The metal landing gear set does this nicely. (Verlinden
also has resin replacement parts that are spliced to the kit strut).
Of the two the metal is the way to go as it is more
sturdy.
So
now I had enough detail inside to render some justice to my ambition for an
accurate replica.
Super detailed?
Not really.
I worked to my patience limits and moved on.
I’m happy with it and you can’t see most of it anyway.
I closed up the fuselage halves with plenty of testers
tube cement and used lots of rubber bands to hold it together.
These are big pieces supporting a lot of stuff inside
and I wanted a strong join.
The
Squadron vac canopy section was attached with superglue for strength.
Fit is excellent if you follow directions for your cuts
and test fit frequently as you sand to fit.
Fortunately I did and only needed a small amount of
clear parts cement applied with a toothpick to fill minor gaps.
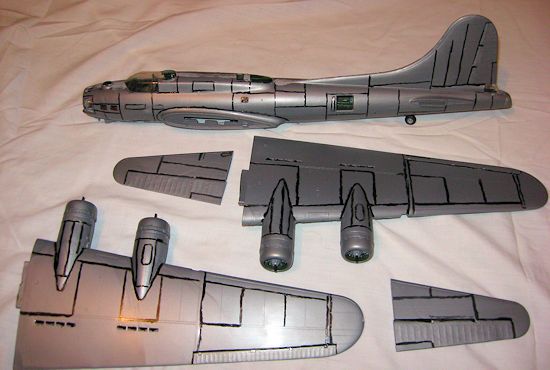
Next the wings were assembled and engines painted and installed. I used a razor saw on the cowl flaps to heighten that detail and attached the cowls. There is an inherent problem with the large wing attachment lugs sticking out into the bomb bay. While touring Nine-O-Nine I studied the bomb-bay compartment for any vestige of that wing attachment tab. It ain’t there and I had a good chuckle at myself as I had half expected to see some kind of wing attachment tabs. I sawed off as much of the tabs as I could without compromising structural integrity and filled, sanded, and painted. The result is a couple of small square boxes along the bay walls that are not too obtrusive. The model’s big heavy wings needs those locking lugs for strength so I left enough to do the job. With the major sub-assemblies completed I decided to paint and decal at this stage instead of painting this gi-mongous airplane all at once. This old kit still goes together surprisingly well for its age but needed a good bit of scraping, filling, and sanding of the old fuselage glue seam. The seams of the engine nacelles also require quite a bit of attention.
| COLORS & MARKINGS |
Painting was pretty simple.
I masked windows and covered openings.
The Squadron masking set is well worth the money here,
especially the masks for the turrets.
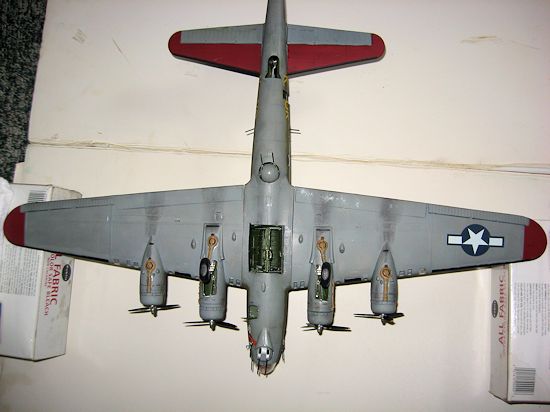
After pre-shading panel lines flat black I airbrushed
Testor’s Model Master Enamels. I began with those areas painted Insignia Red.
These were masked with blue painters tape when dry and
standard OD uppers, grey lowers were sprayed. Fabric control surfaces were
painted a slightly lighter shade.
The fuselage
 demarcation line was masked by
simply holding a cardboard straight edge in place with one hand while
airbrushing.
This was easy with the wings off and offers a softer edge, but
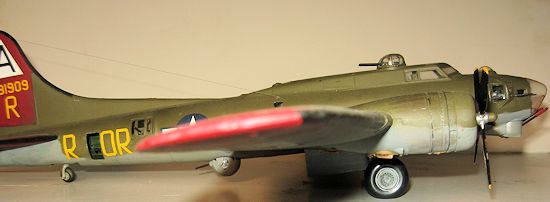
not too fuzzy. Being
too lazy for more taping and masking I brush painted all the de-icer boots flat
black. When
dry I coated with a clear gloss acrylic.
demarcation line was masked by
simply holding a cardboard straight edge in place with one hand while
airbrushing.
This was easy with the wings off and offers a softer edge, but
not too fuzzy. Being
too lazy for more taping and masking I brush painted all the de-icer boots flat
black. When
dry I coated with a clear gloss acrylic.
I worried about the age of the Superscale decal sheet even though the packaging appeared unopened. I tested one of the decals from another of the marking offerings on the sheet and had no problem with it. I applied the decals using Micro-Set and Micro-Sol where needed and they reacted well to the solutions. The plentiful mission markings make for a very large and unwieldy decal so I cut this one in to sections to make it more manageable. I had to be diligent to make sure the large areas of clear decal film went down smoothly with no wrinkles. Next I applied my exhaust and oil staining using pastels and added paint chipping with small brush and aluminum enamel. I sprayed another coat of gloss clear to seal everything then finished with a coat of Testor’s Flat. When dry I removed all the masking.
| FINAL CONSTRUCTION |
The
Verlinden set offers replacement resin turbocharger and exhaust parts.
I didn’t think the turbochargers looked that much better
than the kit part which made their complexity not really worth it to me.
I did use the resin exhaust pipes.
All were painted tan, dirtied up a bit, and installed in
the nacelles.
The metal landing gear set presented no issues replacing the kit
part perfectly.
Besides looks the strength of the metal gear legs are an asset in
holding the weight of this big model. The kit wheels were used.
You have to round out the axle holes so have to be
careful the tire flat spots are in the right place.
With the wings
completed I glued them to the fuselage along with the horizontal stabilizers.
Fit was excellent with no gaps. With the model up on its
wheels the turrets were attached.
The chin turret barrel elevation slots have zippered
canvas weather covers that zip and un-zip as the barrels move.
I filled these slots with putty and painted O.D.
With
the stock kit chin turret attachment point cut off it won’t be able to rotate
and was glued in the position I wanted it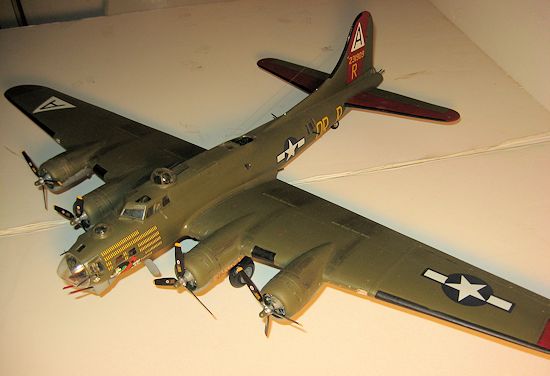 .
Next the props were painted, decaled, and attached.
.
Next the props were painted, decaled, and attached.
The
PE perforated nose bulkhead makes a very convincing attachment point for the
vacform nose canopy.
Another convincing bit of PE is that little triangular
piece in the nose.
It is not framing as the nose cap is just one piece of
blown Perspex.
It is actually a copper defroster outlet to keep that area clear
for the Norden sight.
I ran a monofilament antenna wire from tail to radio
compartment.
At this stage I attached all the doors and hatches to their
openings.
The PE has to be shaped to conform to fuselage contours.
They are very well done and look great.
Final bits were gun barrels, antennas, PE windshield
wipers, and the PE tail gun bead sight.
Working on that tiny tail gun sight had me thinking of an experience I had during my Collings tour. While walking around the plane on the ground taking pictures I noticed an older gentleman standing there staring into the tail gun station. I was waiting for him to move so I could get some close up pictures, but he just stood there, staring. Then I overheard another guy speaking to him and realized he was a veteran WWII B-17 Tail Gunner so I started talking to him also. He had done two tours with the 91st BG, one in early 43 and another in late 44/45. He remembered Nine-O-Nine. I expressed my thanks for his service, especially during those tough early days of the 91st when daylight bombing was nearly abandoned due to horrendous losses. He seemed amazed that I even knew about this. He thought America had long since forgotten. I assured him there are many that remember the heroic service and sacrifice of our WWII Airmen. He was so very humble about it all.
| CONCLUSIONS |
 Revell/Monogram’s
old warhorse of a kit still makes up into a decent replica with a little work.
My attempt to capture my B-17 experience came off pretty well.
The plane is parked on a mirror base and with flashlight
and magnifying glass I can virtually tour a good bit of my replica.
Doing so, I can almost feel the throbbing beat of those
four R-1820s.
Revell/Monogram’s
old warhorse of a kit still makes up into a decent replica with a little work.
My attempt to capture my B-17 experience came off pretty well.
The plane is parked on a mirror base and with flashlight
and magnifying glass I can virtually tour a good bit of my replica.
Doing so, I can almost feel the throbbing beat of those
four R-1820s.
| REFERENCES |
References:
My own video and photos of the Collings B-17G.
Dave Cummings
February 2013
Thanks to If you would like your product reviewed fairly and fairly quickly, please contact the editor or see other details in the Note to Contributors.