| KIT #: | 1557 |
| PRICE: | CAN$29.95 |
| DECALS: | Three options |
| REVIEWER: | Pablo Calcaterra |
| NOTES: |
| HISTORY |
The Argentine Military
aviation was in bad shape at the beginning of the 30’s and the material was
obsolete with bombers from WWI and French fighters from 1925. This moved the
Government to launch the process to buy new equipment. In terms of fighters 11
Hawk III and a Hawk IV were purchased and joined the Army Air Force starting in
1936. Even though they were a significant improvement over the De-21s they were,
by then, out of age. A new contract was signed after a bidding process was
carried out and 30 Hawk 75-O were purchased from Curtiss in 1938. Another
contract allowed the Argentines to build up to 200 planes locally for which
funds were allocated to buy all the tooling required.
The Argentine version had
1,000 HP Wright GR-1820 engines which gave the planes a maximum speed of 455
km/hr at 5,000 mt and a range of 2,500 km at cruising speed. Ceiling was just
below 10,000 meters. All machine guns were Madsen (11.35 or 12.7 mm on the nose
and 7.62 mm on the wings). Different combinations of up to 100 kg of bombs could
be carried under the wings or under the fuselage (in this case a single one).
The first planes arrived by ship in March 1939. The first 5 planes were sent to the Escuela de Aplicacion (in charge of perfecting the performance of the pilots) based at El Palomar (Buenos Aires Province) and the other 15 were allocated to the Air Regiment #2 (BAM Gral. Urquiza). The first 30 planes were given numbers 601 to 630.
 On August 10th
1940 the first locally build Hawk 75 rolled out (#631). Engines and parts had
been purchased for 20 planes but WWII prevented the Argentines from procuring
the now scarce resources and materials needed to build more units.
On August 10th
1940 the first locally build Hawk 75 rolled out (#631). Engines and parts had
been purchased for 20 planes but WWII prevented the Argentines from procuring
the now scarce resources and materials needed to build more units.
It is said that the
20 Argentine planes had been built with more care and at higher standards than
the imported 30 ones.
Until 1940 the planes were
polished aluminum with propeller tips in blue, yellow and red. A large Argentine
flag adorned the rudder. Serial numbers were painted in large black fonts on
wings and fuselage. Roundels were located in 6 positions. Starting in 1941 an
antiglare panel was painted in front of the windshield.
Olive Green and light blue
became the colour of the planes starting in 1943 and for the remainder of their
service. The large flag painted on the rudder was reduced significantly and
moved to the tail. The large serial numbers on wings and fuselage were removed
at the same time. Around this time the different squadrons got their
identifications painted on the fuselage just forward of the windshield on the
left side. These were local cartoon characters very famous at the time.
Throughout their life and
to identify the different sides during air exercises bands of different colours
were painted behind the cockpit and on the wings. These could be blue, yellow,
red.
The move to create
the Air Force as an independent branch started in 1945 when the Air Regiment #2
became the Regimiento de Caza #2 (Fighter Regiment). On January 4th
1945 the Aeronautics Secretariat was created and thus the Air Force started her
own life.
With the end of the War
and the acquisition of Fiat G55 and Gloster Meteors Mk4 the surviving 35 Hawk
75s become relegated to secondary duties and moved to BAM El Plumerillo
(Mendoza)
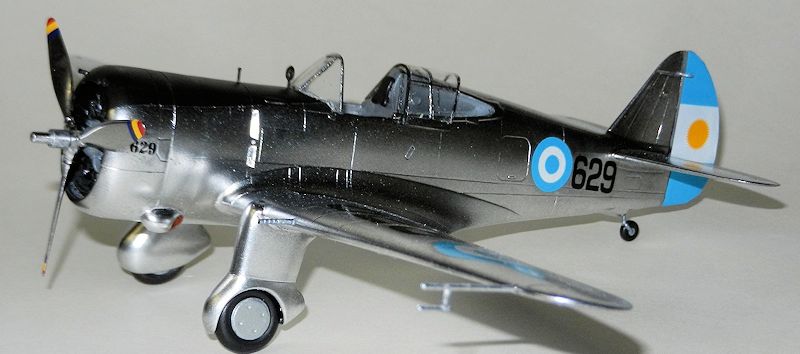
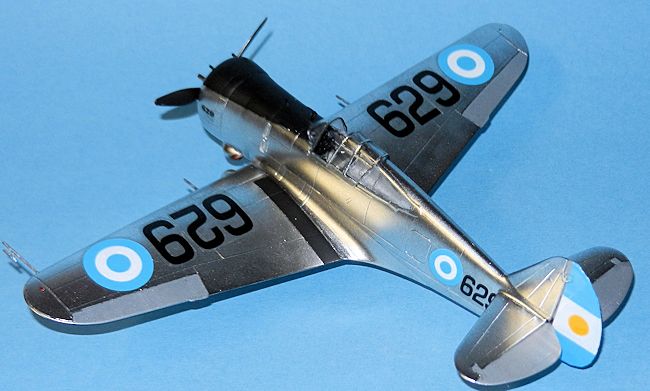
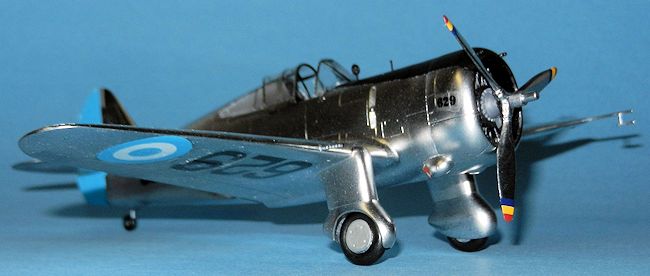
In the case of 629
this plane was received on April 25 1939. It moved thru several of the bases and
units thru her life (Air Force Academy, Fighter Regiment 2, IV Air Brigade). On
March 27 1952 the plane suffered and a accident and most of the landing gear got
sheared off and the propellers got bent. Alferez Mela suffered no injuries. The
plane was repaired and kept on flying until being SOC on December 10th
1952 along with 3 of the remaining planes from the original batch of 30 and all
the surviving ones made in Argentina. 629 was one of the longest serving Curtiss
made planes.The last 3 planes were Curtiss made and were SOC on December 31
1954. None survived.
| THE KIT |
 This is
the Hobbycraft kit in which many P-40 and export versions are based. There is a
plethora of pieces that are not needed and found their place in the spares box.
This is
the Hobbycraft kit in which many P-40 and export versions are based. There is a
plethora of pieces that are not needed and found their place in the spares box.
Because
the manufacturer has decided to start many version using the same fuselage there
are several unions that will need intensive use of putty.
There
are subtle differences in parts to be used for the 3 versions available:
Chinese, Thai and Argentinean (this one with 2 different cammo schemes that
reflect the change of missions flown during their service).
| CONSTRUCTION |
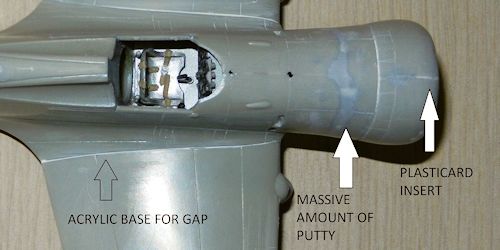
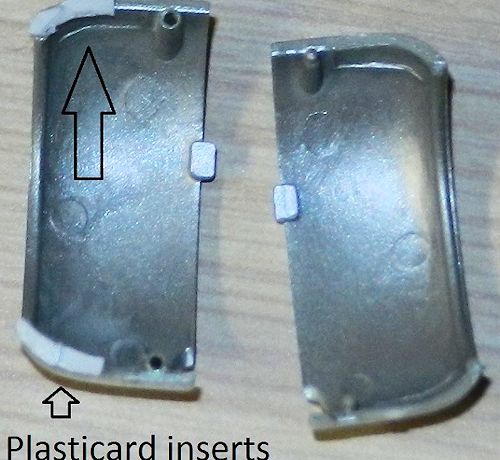 The
most glaring error in the kit is the shape of the engine cowling. Hobbycraft
depicts it as oval when in fact it was round. This is really hard to fix (I
toyed with the idea of using the parts of the French Hawks as it is properly
represented by Hobbycraft) but the diameter and general look were not good
enough to justify the amount of work to copy these parts in resin.
The
most glaring error in the kit is the shape of the engine cowling. Hobbycraft
depicts it as oval when in fact it was round. This is really hard to fix (I
toyed with the idea of using the parts of the French Hawks as it is properly
represented by Hobbycraft) but the diameter and general look were not good
enough to justify the amount of work to copy these parts in resin.
Therefore the path I decided to take was to enlarge the front area by adding
pieces of plasticard on top and bottom union of the halves of the cowling. This,
added to some gentle pressing/squeezing down of the halves to make them
rounder/shorter helped to get closer to the look of the actual plane. This left
a gap between the halves behind the inserts that I filled with glue and putty.
The end results in not perfect but at least it much better resembles a circle.
The
interior of the cockpit and cowling were painted in aluminum with boxes and
details picked in black. I scratch built the flares gun and glued it in the
cockpit.
 PE
seatbelts were painted in beige and added to the seat. With all the details
added (including drops of Future to represent the glass of the dials) the
fuselage halves were closed.
PE
seatbelts were painted in beige and added to the seat. With all the details
added (including drops of Future to represent the glass of the dials) the
fuselage halves were closed.
These
parts fit quite well with minor sanding required to achieve a decent union.
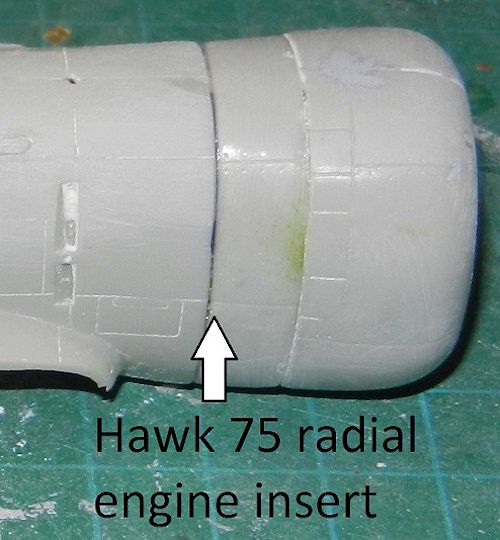
The
next problem came when the intermediate insert for the Hawk 75 was added between
the fuselage and the cowling. Fit of this part is good but the gaps are huge.
Copious amounts of putty were used and several sessions of sanding and more
putty were required to smooth the union. Then the front cowling was added with
the small engine in place (having previously painted the bulkhead in black) and
more putty plus some acrylic base for the small gaps towards the end of the
process.
Once
satisfied with the result I moved to the exhausts. There are 3 types supplied
with the kit, none of which is a perfect representation of the model O. Fairings
are good but the exhausts stick out too much. After the fairings had been glued,
the panel line added and union merged with the fuselage the exhausts were
trimmed to the correct length and carefully placed inside the fairings.
 The
fairing for the tail wheel was glued and the union fixed using putty.
The
fairing for the tail wheel was glued and the union fixed using putty.
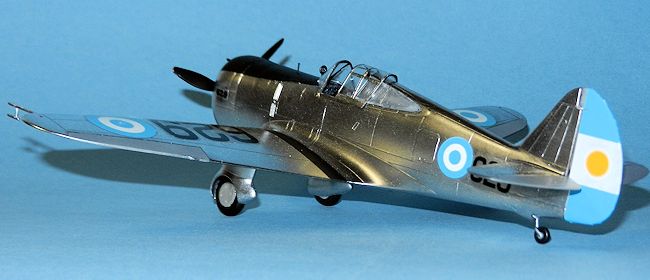
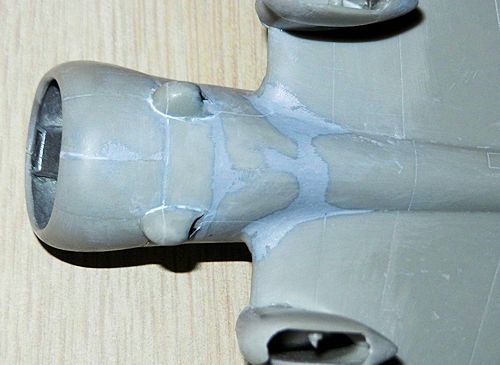
The
next nightmare came when the wings were attached to the fuselage (having
previously opened the opening for the spent cartridges). The top sides are quite
good with just a minor gap that was easy to fix with acrylic base. The
undersides looked like the plane had been shot at with 40 mm guns. Huge gaps.
Everywhere. The picture shows the amount of work that was required to solve this
problem.
On to
the wheels. The export version had fixed landing gear and spats. Looking for
information in the web
 I found that these should be moved 2 mm or so forward
thus creating another nice gap to be worked on. Plus more putty around the
uncomfortable area at the union of the legs and fuselage…
I found that these should be moved 2 mm or so forward
thus creating another nice gap to be worked on. Plus more putty around the
uncomfortable area at the union of the legs and fuselage…
The
horizontal tail planes have no panel lines. These I scribed with no fuss.
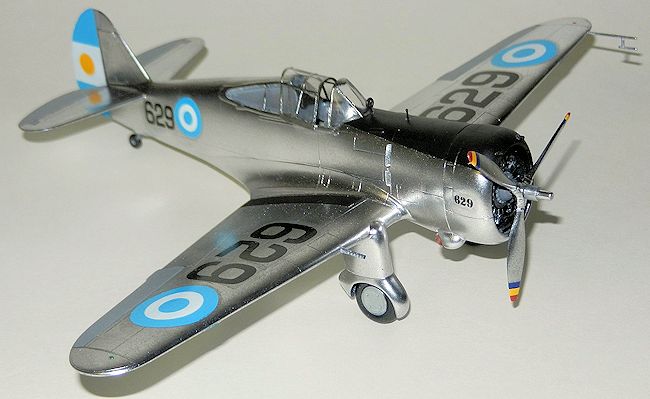
Finally after 3 months of work (shared with another kit) the plane was ready for painting.
| COLORS & MARKINGS |
I went
with the 1940 (or original) colour scheme in very shiny aluminum with black
antiglare paint over the front half of the fuselage. Trying to give it my best I
decided to use Alclad II.
To this
effect I gave the plane a nice coat of Humbrol Gloss Black. I left it to dry for
2 days and then I masked the antiglare area and sprayed it with clear matt
Modelmaster Acryl. I had achieved a very smooth finish with the Enamel paint…now
if you are following me you’ll realize I made a catastrophic mistake…Enamel and
Aclad II??? They don’t work together well, do they??? Correct!!! Imagine my
surprise that then turned into desperation when, upon spraying the first light
coats of Alclad this one was cracking badly. More spraying to cover the
cracks…more cracks developed. So I went back to the Alclad II
 instructions and
realized I had miss read them.
instructions and
realized I had miss read them.
I tore
all masks apart and immediately proceeded to remove the black enamel paint using
oven cleaner. Gone were the nice smooth finish and all the work done on the
antiglare panel…
I
painted again the antiglare panel and the anti-slipping area on the wings in
black. The moveable surfaces were given a painted aluminum.
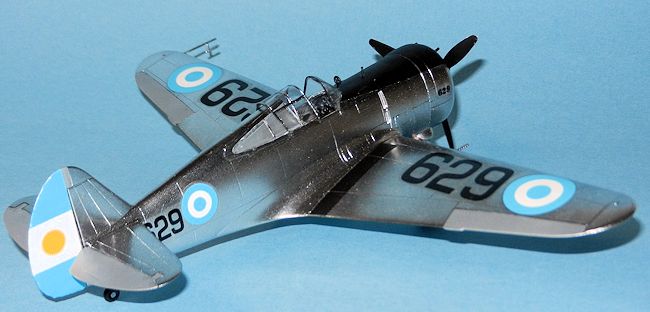
There
are no stencils on the kit. I decided to go with plane #629 based on the history
as told by Fernando Benedetto in his excellent Hawk III/IV/75 in Argentina.
One
problem with the decals supplied with the kit is that there are some of the
large numbers missing. In this case I was short of 2 of the large “9”. I scanned
them from the kit ones and printed them in clear decal paper.
 The
only problem was the flags for the rudders. Those Argentine flag decals were
quite stiff, were too large (had to trim them at the back and front) and did not
bend properly to adhere to the edge of the rudder. So they developed some cracks
and broke in a couple of areas when trying to get them to follow the contours.
After leaving them to dry overnight I used white glue to get them to set on the
edges. Not perfect but decent looking from a distance…I should have painted the
flag…
The
propeller tip colours are decals taken from the Pearl Harbour set from
Starfighter Decals
| FINAL CONSTRUCTION |
I glued
the wheels (having removed the covers at an early stage as in the original
planes these trended to gather mud and grass and were discarded after some years
of use), the propeller, the pitot tube and the actuator for the rudder (this one
scratch built).
 The
(oversized) gunsight (bead and ring) was attached. The fuselage machine guns
were painted black and attached to the front of the cowling. The ones on the
wings were also painted black but then drybrushed with silver as some planes had
the muzzles (not) painted this way.
The
(oversized) gunsight (bead and ring) was attached. The fuselage machine guns
were painted black and attached to the front of the cowling. The ones on the
wings were also painted black but then drybrushed with silver as some planes had
the muzzles (not) painted this way.
Finally
the windshield was attached (having previously removed the too long side frames)
along with the two windows behind the sliding canopy which was sat in place.
| CONCLUSIONS |
A very
tough kit to build with some almost impossible mistakes to overcome. No matter
how much I always try to look at the bright side of the Hobbycraft kits I have
for once agree with all the bad “press” out there regarding this particular one.
Nevertheless I have now in my collection my oldest Argentine plane which
represents a moment in which, for a while, the Argentine’s Army Air branch was
one of the most advanced in the region.
| REFERENCES |
Curtiss
III, IV & H75-O Hawk (Fernando Benedetto)
August 2014
If you would like your product reviewed fairly and quickly, please contact the editor or see other details in the Note to Contributors.