Italeri 1/72 B-25C Mitchell
| KIT #: | 123 |
| PRICE: | $10.00 |
| DECALS: | Two options |
| REVIEWER: | Peter Burstow |
| NOTES: |
|
| HISTORY |
The Mitchell was one of the best medium bombers of World War II. Manufactured in large numbers in a variety of versions, it was subject to continuous upgrades and modifications in the factories and the field.
| THE KIT |
The editor did a comprehensive preview of the kit at this link. The only difference with my kit being the decals. The Italeri instructions clearly call out differences between the versions.
 The
end-opening box has two large frames of dark green plastic parts and a
separately bagged clear frame with an array of very clear parts, some with
flash, and with some vague framing lines marked. The kit is getting elderly,
first released in the late 70's, there is some flash, sink marks and mould seams
visible. There is also some mould damage evident under the starboard wing tip.
The
end-opening box has two large frames of dark green plastic parts and a
separately bagged clear frame with an array of very clear parts, some with
flash, and with some vague framing lines marked. The kit is getting elderly,
first released in the late 70's, there is some flash, sink marks and mould seams
visible. There is also some mould damage evident under the starboard wing tip.
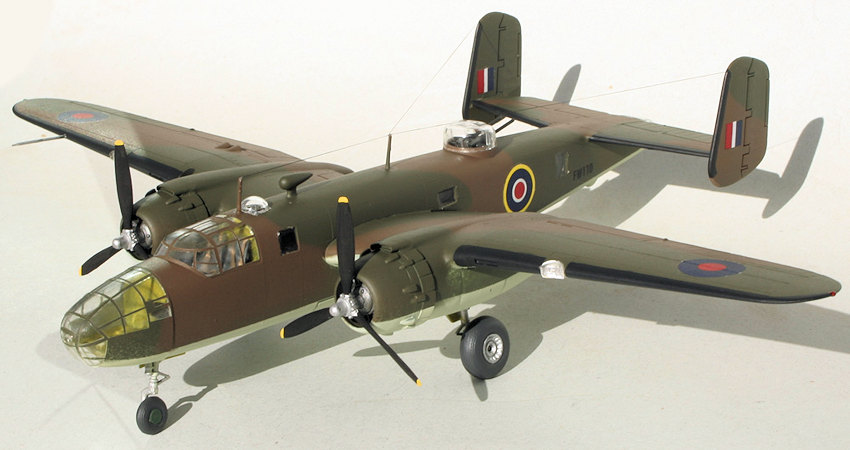
There are decals for two versions, a USAAF B-25B, 40-2344, Col. Doolittle's aircraft from the famous Tokyo raid of 18 April 1942, and a RAF Mitchell II, FR397, MQ-V, from 266 Squadron in June 1944. I chose to model R.A.F. Mitchell II, FW170, a B-25C ex 42-87611, at Kirkbride, 28 May 1944. This aircraft was probably painted in the factory with North American's interpretation of the RAF standard scheme.
| CONSTRUCTION |
 Before
starting assembly, I opened the over-wing windows in each fuselage half. The
only photo I found of a Mitchell II from this serial group had those windows.
Started with the cockpit, adding seats, control columns, wheels and console to
the floor. This assembly was painted using more or less the colours called out
in the instructions. I then added the forward and rear cockpit bulkheads, and
mounted the assembly into a fuselage half, more detail painting then the
instrument panel decal was added. I also added some brass seat-belts from the
stash of spares.
Before
starting assembly, I opened the over-wing windows in each fuselage half. The
only photo I found of a Mitchell II from this serial group had those windows.
Started with the cockpit, adding seats, control columns, wheels and console to
the floor. This assembly was painted using more or less the colours called out
in the instructions. I then added the forward and rear cockpit bulkheads, and
mounted the assembly into a fuselage half, more detail painting then the
instrument panel decal was added. I also added some brass seat-belts from the
stash of spares.
After adding the
nose-wheel leg I packed as much lead as would fit, into the area above the nose
gear bay and behind the cockpit. I then closed the fuselage halves, trapping the
base of the dorsal turret. Some sub-assemblies next, the two part wing halves
and engine nacelles, which trapped the main gear legs, were joined, they needed
a little clamping along the leading edge, as the dihedral w as
different between the upper and lower halves. The starboard wing had a pair of
vents added to the top surface just outboard of the engine. Then the engines
were assembled, using the cowling with the individual exhaust ports moulded.
as
different between the upper and lower halves. The starboard wing had a pair of
vents added to the top surface just outboard of the engine. Then the engines
were assembled, using the cowling with the individual exhaust ports moulded.
I then put the sub-assemblies together, added the tailplane and fins, and the ventral turret. It all fitted very well, with the only gaps being between the fins and the tailplane. The rest of the joints only needed a little sanding to clean up, with a line of Mr Surfacer 500 used along the main seams. There were a couple of small sink marks on the underside of the fuselage, they were filled with superglue and sanded. Then I masked the cockpit and nose transparencies and added them. I gave the model a shot of Tamiya grey primer, all looked good so I added the wheel doors and aerials.
| COLORS & MARKINGS |
 The
underside was painted with Humbrol 'beige green', an odd pale grey green colour.
This was then masked, four words which do not adequately describe the hours
needed to do it. Then the top surfaces painted with Tamiya olive drab and dark
earth. I hand painted the de-icing strips on the leading edges, an easy task as
there were raised panel lines moulded, and I hadn't sanded them off during
construction.
The
underside was painted with Humbrol 'beige green', an odd pale grey green colour.
This was then masked, four words which do not adequately describe the hours
needed to do it. Then the top surfaces painted with Tamiya olive drab and dark
earth. I hand painted the de-icing strips on the leading edges, an easy task as
there were raised panel lines moulded, and I hadn't sanded them off during
construction.
The kit decals were added, they were a bit thick, cracked and non-compliant, but a few doses of Mr Mark Softer settled them in. I added home made serials, dry transfer letters onto Microscale film. The kit was then given an overall coat of floor polish and then a coat of Tamiya flat clear.
| FINAL CONSTRUCTION |
 The dorsal
guns, turret transparency, and the clear tail cone were then attached. The
landing light clear parts were then added to the wing leading edges, they didn't
fit very well, and needed a bit of carving to get them in. Then the pre-painted
wheels and propellers.
The dorsal
guns, turret transparency, and the clear tail cone were then attached. The
landing light clear parts were then added to the wing leading edges, they didn't
fit very well, and needed a bit of carving to get them in. Then the pre-painted
wheels and propellers.
Added the pitot, and the small rod under the fuselage, which may be a base for a trailing antenna. A little bit of detail painting, then I used Micro Kristal Klear for the fuselage windows. Last was some Uschi rigging thread for the HF antenna.
| CONCLUSIONS |
An easy build of an important World War II bomber, with a little modification, any of the early version Mitchells could be built from this kit. It is a big improvement on the earlier Frog B-25C model from 1964, with much more detail, slightly different in shape, span and length, and with a different arrangement of fuselage windows.
Recommended for everybody, a good first twin engined kit for beginners, and a basis for a great model for more advanced modellers.
| REFERENCES |
https://en.wikipedia.org/wiki/North_American_B-25_Mitchell
https://en.wikipedia.org/wiki/Doolittle_Raid
David Doyle, B-25 Mitchell in Action, Squadron Signal, Carrollton, 2011.
If you would like your product reviewed fairly and fairly quickly, please contact the editor or see other details in the Note to Contributors.