| KIT #: | A09010 |
| PRICE: | 45 Euros or so |
| DECALS: | Two options |
| REVIEWER: | Frank Spahr |
| NOTES: | DK Decals 72067. New Ware AM 1228 masks. |
| HISTORY |
Disclaimer: I freely admit being thoroughly intimidated by all the Liberator lore as hinted at in this short description already. It never has been a subject I felt drawn to or spent any time with, so I´ll rather not try to cram my aging brain with things I´ll probably only get wrong, and let those speak who actually know what they are talking about (See below)
„The Consolidated B-24 Liberator is the most-produced United States military aircraft in history, with nearly 18,500 manufactured by four different firms (Consolidated-Vultee, Douglas, North American Aviation, and Ford Motor Company). It served in all theaters of operation during World War II, was the primary heavy bomber in the Pacific until the B-29 arrived, and was a significant contributor to the strategic bombing campaign against Germany.
 The G
(built by North American), H (built by Ford), and J (built by Consolidated
at their Fort Worth and San Diego facilities, as well by Ford and Douglas)
models of the Liberator incorporated the same upgrades in defensive
capabilities from lessons learned in combat with the B-24D. A manned Sperry
ball turret was added to the ventral position, either a Consolidated A-6A or
Emerson A-15 turret was placed in the nose, and an upgraded Consolidated
A-6B turret was installed in the tail position. Note: this can become very
confusing due to the multiple production blocks produced by these four
facilities, and there was a myriad of window and turret configurations, with
A-6B turrets installed in the nose when supplies of Emerson turrets were not
keeping up with production. (Note: I recommend Alan Griffith's book
'Consolidated Mess' which clears up the myriad of differences in this
regard).
The G
(built by North American), H (built by Ford), and J (built by Consolidated
at their Fort Worth and San Diego facilities, as well by Ford and Douglas)
models of the Liberator incorporated the same upgrades in defensive
capabilities from lessons learned in combat with the B-24D. A manned Sperry
ball turret was added to the ventral position, either a Consolidated A-6A or
Emerson A-15 turret was placed in the nose, and an upgraded Consolidated
A-6B turret was installed in the tail position. Note: this can become very
confusing due to the multiple production blocks produced by these four
facilities, and there was a myriad of window and turret configurations, with
A-6B turrets installed in the nose when supplies of Emerson turrets were not
keeping up with production. (Note: I recommend Alan Griffith's book
'Consolidated Mess' which clears up the myriad of differences in this
regard).
The H and J were the most numerous of the B-24 variants produced. The additional weight of the two new turrets made the airplane even more difficult to fly than the B-24D, with freezing cold drafts whipping through the fuselage, very heavy flight controls for the pilots, and less performance as the Pratt & Whitney R-1830 engines had not been appreciably upgraded. In the Pacific theater, many B-24Js had their ball turrets removed to save weight starting in September 1943, a move also adopted by Europe-based Liberators beginning in spring 1944.
The daylight bombing campaign against Germany by aircraft from the 8th and 15th Air Forces has garnered the lion’s share of attention from aviation enthusiasts and historians. B-17s outnumbered B-24s in the ETO by a ratio of 4 to 1. B-24 operations in the Pacific, Southeast Asia, with the RAF, over the Atlantic, and in the Americas aren’t generally well-known or romanticized like the tales written about the titanic air battles over Germany, but that doesn’t diminish from the essential support that the B-24 provided in the armed conflict that consumed nearly the entire world from 1939 to 1945.“ (Shamelessly, yet not uncreditedly taken from Lee Kolosna´s Hasegawa 1:72 B-24J review)
| THE KIT |
 I can tell you the
following without being conversant on the type: This is a high-quality kit,
both in moulding, casting, level of raised and recessed detail, and fit.
There are a lot of transparencies, and they are crystal clear. The box is
pretty much jam-packed with sprues. There is an extensive and realistic and
actually helpful instruction manual breaking down the assembly process into
many small sections, thus making the instructions clear and easy to follow.
I can tell you the
following without being conversant on the type: This is a high-quality kit,
both in moulding, casting, level of raised and recessed detail, and fit.
There are a lot of transparencies, and they are crystal clear. The box is
pretty much jam-packed with sprues. There is an extensive and realistic and
actually helpful instruction manual breaking down the assembly process into
many small sections, thus making the instructions clear and easy to follow.
Colour callouts are Humbrol, as usual with this manufacturer, and there is a big folding full colour sheet for both options and their markings. The decals are well-printed and work well. The model has a rather full interior with a good level of detail before you think about aftermarket options.
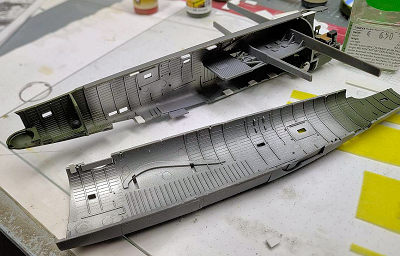
As with any B-24, you are in dire need of space for weight ahead of the main landing gear to somehow keep the aircraft from tailsitting. Deploying the crew access ladder might give you that desperately needed ground contact if the weight wasn´t enough.
| CONSTRUCTION |
 I had been asked to
build a Coastal Command aircaft for a planned communal display, and had
chosen the Vickers Wellington. But upon seeing this fine new Airfix release,
I opted to build a Liberator, too. No matter whether it was needed for the
display, the kit interested me, and I hadn´t ever built a B.24 before in my
life. So when, if not now?
I had been asked to
build a Coastal Command aircaft for a planned communal display, and had
chosen the Vickers Wellington. But upon seeing this fine new Airfix release,
I opted to build a Liberator, too. No matter whether it was needed for the
display, the kit interested me, and I hadn´t ever built a B.24 before in my
life. So when, if not now?
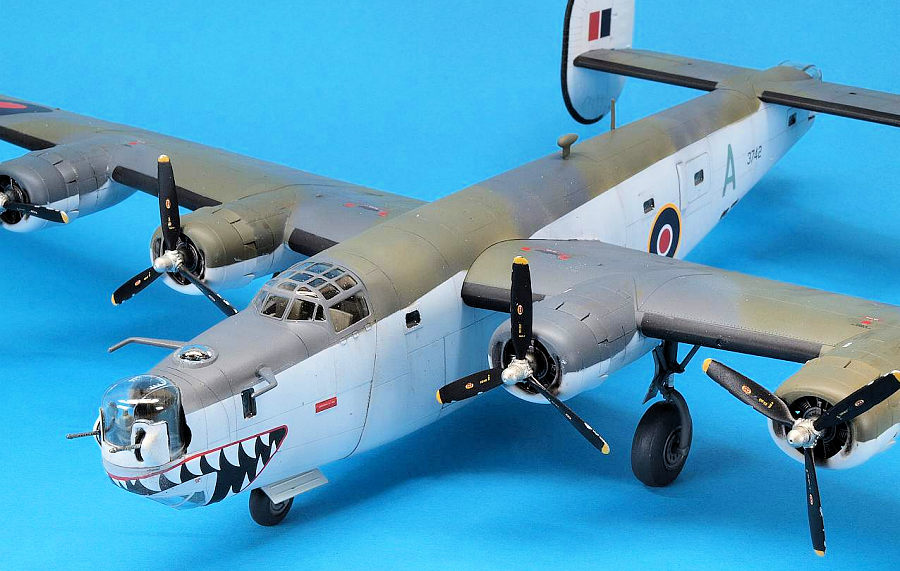
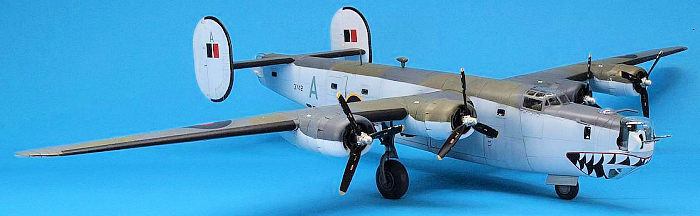
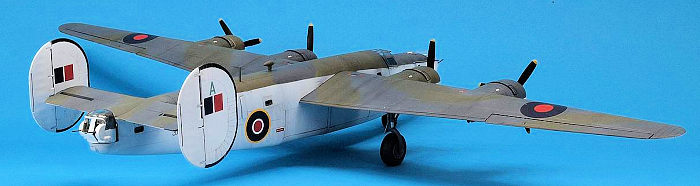
As mentioned before, I was soon intimidated by the sheer amount of Liberator lore and veritable jungle-like forest of subtypes and factory modifications in existence. So I (wisely?!) decided to just steer clear of all that knowledge, and build an aircraft that would broadly speaking work for me. I looked into aftermarket decal sheets until I found one by dkdecals with a lot of nice Liberators. There was a Canadian plane with the attractive Coastal Command scheme, plus a sharkmouth to boot. Moreover, it looked as if I only needed to blank the ventral and dorsal turret over, and not add any hard to build stuff like perspex blisters. It was based in Gander Newfoundland, in 1945 with No 10 (BR) Sqn. RCAF. It was marked „A“ with the serial number 3742.
 Having made my
experiences with multi-engined planes, and still having an Airfix Dambusters
Lancaster with Eduard´s BigEd in the stash, I decided to do this one
entirely without PE. I would only use pre-cut masks. I got those from New
Ware for a change, as I couldn´t get them from Eduard. I also decided only
to use that part of the kit´s interior that was visible after completion.
Quite a different approach from my usual, when I use what I have got. The
Liberator being such a card-carrying tailsitter only strengthened my resolve
to leave out as much interior aft of the main landing gear as possible.
Having made my
experiences with multi-engined planes, and still having an Airfix Dambusters
Lancaster with Eduard´s BigEd in the stash, I decided to do this one
entirely without PE. I would only use pre-cut masks. I got those from New
Ware for a change, as I couldn´t get them from Eduard. I also decided only
to use that part of the kit´s interior that was visible after completion.
Quite a different approach from my usual, when I use what I have got. The
Liberator being such a card-carrying tailsitter only strengthened my resolve
to leave out as much interior aft of the main landing gear as possible.
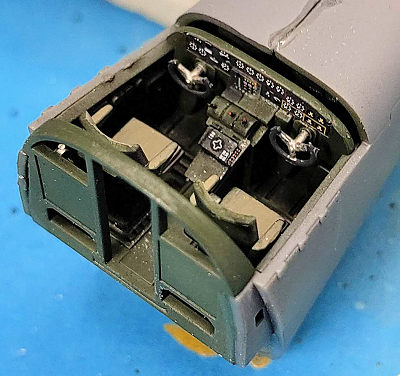
So I started the kit by tackling the necessary interior sections, and inserted as much weight into them as I could. Outcome so far undetermined. My kitchen scales told me I did not get the required 30 grams into the reserved compartment, for starters. So I added some metal here, there and somewhere else.
The kit parts did fit well, and over the first week of the build I made good progress. At the end of the week, I had my, um, selection of the interior ready for assembly, save for decaling the instrument panels. The wings were assembled, likewise the engine sections. I had the flying surfaces primed and preshaded, and ready to mask off the de-icer boots.
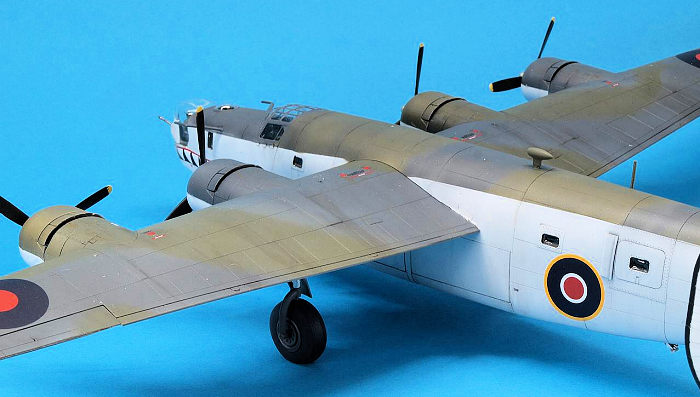
That done, I sprayed the undersides of the flying surfaces white, taking care not to let the paint cover fully. I then masked off the engine sections and cowlings, and sprayed Dark Sea Grey first, avoiding the proper Extra Dark Sea Grey as I feared it would be too dark for my liking in this scale. The camo scheme was now masked with Patafix, our version of BluTac. Eventually I found out that Vallejo Model Air´s EDSG (#110) is actually lighter and has more of a blue tinge so looks correct after all. After redoing the masking and spraying. Practice is seldom wasted.
 At the fuselage, I
flatcoated the cockpit area after decaling, and then closed the cockpit and
main fuselage halves sequentially. Leaving out the interior bulkheads, I
added some styrene pieces to make sure the halves would align properly.
Nonetheless I ended up with some gaps, most notably in the area of the bomb
bay doors, which I filled with several aplications of CA glue. I assume it
was my clumsiness rather than the kit design which led to those gaps.
At the fuselage, I
flatcoated the cockpit area after decaling, and then closed the cockpit and
main fuselage halves sequentially. Leaving out the interior bulkheads, I
added some styrene pieces to make sure the halves would align properly.
Nonetheless I ended up with some gaps, most notably in the area of the bomb
bay doors, which I filled with several aplications of CA glue. I assume it
was my clumsiness rather than the kit design which led to those gaps.
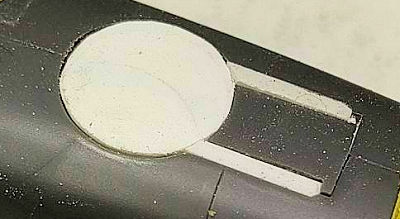
After the usual (for me) filling and sanding and checking and redoing, I was ready to mate the fore and the main fuselage. That went well, and needed virtually no seamwork. I was soon able to mask the front transparencies, and the New Ware masks worked very nicely. Having added the transparencies (which fit very, very well) to the fuselage, I filled the very small seams simply with Future. Not too long after, I had the fuselage openings protected with pieces of foam and primed the fuselage in total. I needed to redo the areas where I had blanked off the turret openings, filling with CA, and then sanding and priming and rechecking.
| COLORS & MARKINGS |
But then I could preshade and spray the fuselage white over that. Having masked off the demarcation line, I then tackled the camouflage scheme, masking it again with Patafix. The stabilizer was then added, in order to blend the paint scheme in. Remaining small gaps were filled with a mixture of PVA glue and the appropriate paint.
At the wings, I now added the engines and corrected the demarcation line at the nacelles where necessary. The lateral stabilizers / rudders needed more work, as the masking didn´t work too well on their engraved details, but I got there in the end.
Once it all was at that stage, I glosscoated all the subassemblies with Future, in preparation for the decals.
I then worked on the
nose and tail turret, cleaning up, masking, spraying, washing and
drybrushing. Then I intended to start with the decals, but had to find out
that my pack contained the wrong sheet. Big ARRGGHH. I sent a note to the
manufacturer, and almost immediately received an answer. The sheet was sold
out, but he always retains some spares, and would send one to me if at all
possible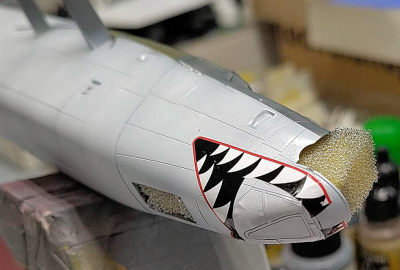 . Luckily, and this truly is outstanding customer service, he came
back to me the very next morning. He still had a spare sheet, and would send
it to me that day. That well and truly made my day.
. Luckily, and this truly is outstanding customer service, he came
back to me the very next morning. He still had a spare sheet, and would send
it to me that day. That well and truly made my day.
In the meantime, I added the generic kit decals to the model, there were not too many of them. USAAF Liberators seem to have had wide yellow warning bands at the edges of the bomb bay doors, at least both kit decal options had those. I decided to leave them off, as I could not see them in the scant reference images I had. I also tackled the quite complex and well-detailed nose and tail turrets at this time, with the aim of having most subassemblies ready when decaling and weathering was done.
Once the correct decals had arrived, I applied them. They went on very well and are of high quality. The only problem I ran into was that the sharkmouth would not fit well, leaving a gap between the two halves. I guess that is caused by the decals being designed before this kit existed.
| CONSTRUCTION CONTINUES |
Not being overly joyous, I spent some thinking time on the couch and came up with this solution: I cut a piece of white decal material from the same sheet to the size of the gap. Then I masked off two teeth with kabuki tape. I then sprayed the material red, and masked off the red border. That done, I sprayed the rest black. After de-masking, I waited quite a while before I soaked the painted decal and applied it into the gap. Luckily the paint held.
That cured, I coated the model with Future to blend the decals in, and then added a flat coat. For weathering, I used thinned black oil paint, and for exhaust stains a light spray of medium grey paint and pastel chalks. I aimed at a used yet not abused look.
I then added the
landing gear, taking care to let it all cure well and overnight. To my
dismay, the model very pronouncedly sat on its tail when I placed it onto
its landing gear. Despite the serious amount of weight added, and my
attempts at weight reduction. So I needed to place as much weight as
possible into the nose gear well. Having secured it with a bit of CA and
then quite some PVA glue, and let that cure overnight again, the model would
just about rest on its nose wheel. But with all that weight, I was sure I
would have to store it on a cradle and not on the gear. That done, I
prepared the
 remaining fiddly bits as in gear doors, access ladder, tail
skid and antennae,
remaining fiddly bits as in gear doors, access ladder, tail
skid and antennae,
Some more weathering was done using pastel chalks and artist´s oils, and everything went well, until two things happened. One, I posted images here on our forum, and was informed my prop wingtip markings were too wide – which they were. So I needed to correct that mistake. Sadly, my coat of Future over the prop decals was not as sturdy as expected, and half of them chose to rather remain with the masking tape than with the prop. Luckily, by wetting the masking tape I was able to free the decals and re-apply them. The second was that I realized that painting the nose and tail turrets after the kit instructions wasn´t the right way for this scheme. So I had to brush paint the relevant areas in white (gulp!) to make them conform.
But at some point this also was done. I applied a final flat coat to the model, and then removed the paint masks from the transparencies and the Maskol from the many small windows. I tried using the kit parts for the windows, but the first one would not fit, and then disappeared inside the fuselage. I could get it back out, but decided to use thin PVA for the glazing of these small windows to preserve my good mood.
I finally attached the smallest bits and added the repainted turrets, securing them with a bit of PVA. Then came building a cradle for the now really heavy model not to overstrain the plastic landing gears. Now I was ready to take the model to the next show.
| CONCLUSIONS |
Well, let me make a confession first. I found a reference image of this exact plane after I had the decals and started the build. On it you can clearly see that the sharkmouth was only part of an elaborate nose art, with a large yellow area and stylized eyes and in fact a head of some mythical toothy creature. As Rowan Atkinson would have said in „Loce Actually“ – „This is so much more than a sharkmouth“. It wasn´t part of the decal sheet, and that got me thinking.
I soon realized that brush painting that would be too much for my limited skills, so I decided to very stupidly follow the decal sheet and leave anything else be. Maybe, just maybe the sharkmouth was the first version of the nose art, and the colourful additions only came later, perhaps only after VE day? When the higher echelons took kinder to these embellishments? Anyway, this is my explanation, or evasion.
Anyway – I had wanted to build a Liberator, and this surely is a fine kit which leaves you with a great-looking model out of its very nice box. I had less than my usual share of, um, misfortunes, and both glues and paints behaved as they should. Yay. I like the paint scheme, and the look of the model, and I feel that this time I got the weathering right. What´s not to like?
| REFERENCES |
2
3 March 2026
Copyright ModelingMadness.com. All rights reserved. No
reproduction in part or in whole without express permission from the editor.
If you would like your product reviewed fairly and fairly quickly, please
contact the editor or see other details in the
Note to
Contributors.