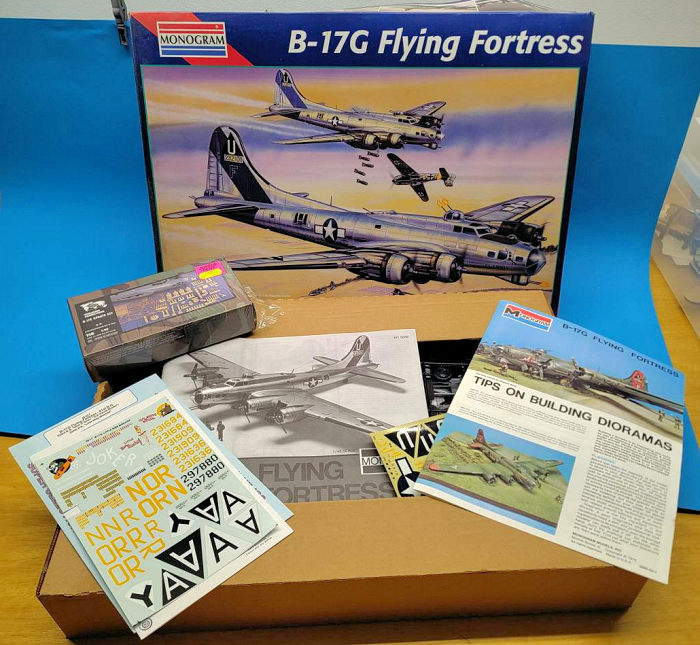
Monogram 1/48 B-17G Flying Fortress
| KIT #: | 5600 |
| PRICE: | around 55 Euros |
| DECALS: | One option |
| REVIEWER: | Frank Spahr |
| NOTES: | Verlinden set 718, Kitsworld 148-128, -015, -1024, -086. Superscale 48017 |
| HISTORY |
 Iconic
is the first word that comes to my mind if I think of this aircraft. Derived
from a passenger plane, the B-17 evolved into the most numerous aircraft and
backbone of the strategic bombing campaign in Europe. Much more worthy
people have filled books and webspace with virtually all you can say about
the Flying Fortress, and then some.
Iconic
is the first word that comes to my mind if I think of this aircraft. Derived
from a passenger plane, the B-17 evolved into the most numerous aircraft and
backbone of the strategic bombing campaign in Europe. Much more worthy
people have filled books and webspace with virtually all you can say about
the Flying Fortress, and then some.
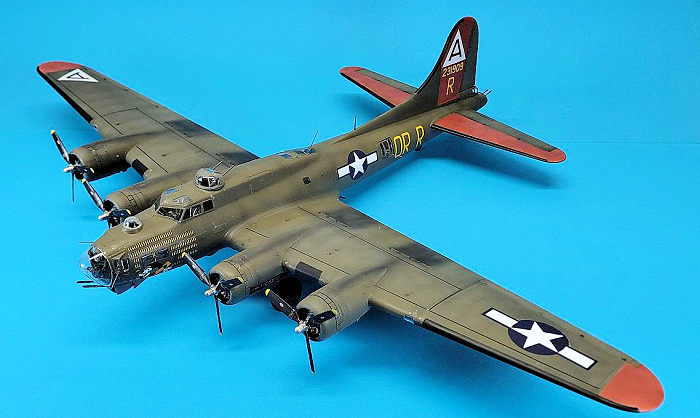
Suffice it to say that the „G“ model was the most numerous of the B-17 variants, with 8,680 built. With a crew of ten, and armed with 13 machine guns of .5 inch (12.7 mm) calibre, the plane could deliver a bomb load of 4,500 lb (2,000 kg) at a distance of 800 miles (1,280 km) and at a service ceiling of 35,600 ft (10,850 m). The „G“ incorporated and standardized improvements made over the preceding production runs.
Even though the B-17 had the reputation of being able to get home even after heavy damage, it is chilling to see wartime footage of bombers shot down, or to walk along the „Counting the Cost“ memorial in Duxford. It reminds of the 30,000 USAAF personnel and over 7,000 aircraft lost from UK bases during WW2.
| THE KIT |
I wrongly assumed that this kit has been previewed here already. It is – to me - equally iconic as its subject matter and has been first produced back in 1975. Even though it has been superseded by more modern kits, it still is a fair representation of this important aircraft. My late 1990s Monogram issue is molded in silver and black styrene, plus clear parts, and it has the very nice and helpful Shep Paine diorama how-to guide.
The parts in my kit are reasonably well-molded and mostly free of flash. There are raised ejector pin marks on many important mating surfaces, all of which need removing. Overall fit is quite good. The kit has raised panel lines, and only a few rivets. There is a quite comprehensive interior, and five crew figures, only usable for outside the aircraft. There is also a bomb trolley, and four bombs. The bomb bay doors are molded closed, and the instructions do not indicate how to pose them open. Generations of modelers have shown initiative here.
The instructions are well done and give colour callouts overall and for individual parts. The kit decals are rather thick and glossy, and I chose to discard them already when I bought the kit. But they do not look yellowed to me, that is the backing paper.
When the kit was first issued, I was 13 and did not know about Monogram. Either way, I wouldn´t have been able to afford it.
When I restarted modeling in the 1990s, that changed. I learned about the kit, had to have it, and now could afford it. What motivated me most to get it was the movie „Memphis Belle“, which I still rate quite highly. So buy it I did, and I even obtained aftermarket decals for it, and – holiest of holy – the Verlinden detail set comprising not just PE, but also: My first real actual resin. Gasp.
 There
things remained through almost 30 years, with the shrinkwrap still intact on the
detail set. Until I gave my stash and modeling prospects a good hard think.
Being retired now, and soon turning 63, I figured now was the best time to build
kits from my stash and decrease it a bit.
There
things remained through almost 30 years, with the shrinkwrap still intact on the
detail set. Until I gave my stash and modeling prospects a good hard think.
Being retired now, and soon turning 63, I figured now was the best time to build
kits from my stash and decrease it a bit.
So I took out the kit and paraphernalia, opened the detail set and looked into the decals. Well, what was state of the art in the 90s has been superseded since then. The PE was on the thick and crude side, the resin partly miscast and by far not on par with what today´s market has to offer. But I decided to use of it what I deemed made sense. I was worried about the decals´ age, and decided to bite the bullet and get new ones. So I invested in fresh decals by Kitsworld. I got a general sheet with national insignia and stenciling, and a sheet for the well-known „Nine-o-nine“ . Plus I bought my very first 3D decals, one set for instrument panels, the other for seatbelts. I somehow did not realize the old Superscale sheet included Nine-o-nine at that point, but it should prove helpful later on.
I had decided to suspend this large model from our hall ceiling, so I wouldn´t go over the top with interior work. But having a bit of fun with it and trying the 3D decals sounded like a plan. Moreover, I had pondered whether to build the model wheels up or down, and what to do about the props. In the end I chose ease of handling whilst assembly, so the wheels would be down. And as I have so far not been happy with any of the options simulating running props, I would leave them as they were. My main aim was to have a B-17 on permanent display in my home, and one with a nice paintjob and weathering.
For references, I had bought a Squadron booklet back in the 90s, and had a book with photos of warbirds, including some taken during the filming of „Memphis Belle“. I had taken a few photos of the Duxford B-17s in 2008 and then again in 2024. Plus I had the DVD of „Memphis Belle“ and access to Apple TV and „Masters of the Air“. On top, I bought „12 O´Clock High“ and watched it for the first time. To say I was impressed would be a blatant understatement. That is one important movie.
Moreover, I bought two books: „A Wing and a Prayer“ by Harry H. Crosby and „Eigth Airforce“ by Donald L. Miller. They were recommended to me by a very knowledgeable friend, and both I consider as essential, even though they make chilling reading.
| CONSTRUCTION |
I started by unpacking
the detail set and checking out how useful it was. As I said before, the PE
is on the thick side, and hence harder to work with. I soon decided I would
not use the PE bomb bay doors, and only use what really looked like an
improvement. Some of the resin parts were miscast and had blobs of resin
where detail should have been. That was especially true for the turbo
chargers, where I also found myself wondering how much of the kit part to
remove to add the resin
 seamlessly.
In the end I decided to discard them. The gear legs were a different matter.
Using my newly bought micro drills and thin lead wire, I even added brake
lines to them. I also used the micro drills on the machine guns, to better
attach the barrels.
seamlessly.
In the end I decided to discard them. The gear legs were a different matter.
Using my newly bought micro drills and thin lead wire, I even added brake
lines to them. I also used the micro drills on the machine guns, to better
attach the barrels.
Having looked at a lot of
photos and movie footage, I decided to add rivets to the large model, using my
new riveting tool. That took some time, but improved the look of the surface in
my eyes. I had first worried the spacing of the rivets was too narrow, and
anyone counting them would soon find fault with them, and me. Maybe even fatal
flaws. But after watching „12 O´Clock High“ I was very much relieved, as the
planes therein had rivets galore.
I had to get some paint for this model, as I had no Zinc Chromate in my stash, and needed enough OD and Neutral Grey to cover this large, um, canvas. Another thing I had taken with me from watching „12 O´Clock High“ was that you couldn´t overdo weathering and grunging the model. I was looking forwards to that.
Looking through the kit instructions, I was surprised to note that the better part of the interior was to be painted natural aluminum, and not chromate green as seen in „Memphis Belle“, for instance. So I looked for references and found one I considered made sense to me. As usual, you all are fully entitled to your own opinion. So I decided I would do something revolutionary – and follow the kit instructions.
In cleaning up the fuselage parts, I found that the mating surfaces were riddled with ejector pin marks, all of which needed to be removed prior to assembly. Which I did. These marks were also present on the wings and other parts.
The next issue I wanted to tackle was how to later install the landing gears. I am no friend of fiddly stuff trapped between fuselage or wing halves, sticking out for all the world to see. In my experience they are merely waiting for disaster whilst you glue the parts, fill and sand them, mask and paint them. So I was very happy to note that I would be able to mount the gears after everything else was safely done. And I vowed to do my utmost to proceed similarly with the other high-risk objects, as in gun turrets and machine gun barrels sticking out into the wild blue yonder.
I then laboriously sanded the very small rear bulkhead to fit which would mount the tail wheel gear. It needed quite some attention. So I decided to make sure all the other internal decks and bulkheads would fit as well as possible prior to gluing anything.
Speaking of fit, I then pulled out the 3D printed instrument decals, and looked how the main panel would fit. Not that well, it turned out, as the sheet was designed with the HK models kit in mind. Well, I cut out the decal and then spent some time grinding and sanding the kit part to make the instrument panel fit somehow.
In between, I glued the stabilizer halves together, before I took a break. They needed some regluing afterwards. With the undercarriage, I checked the fit of the resin and kit parts mix, trimmed where needed, and prepared them for subsequent painting and mounting. That out of the way, I removed all the raised ejector pin marks from the wing halves and then glued them together.
I then tackled the props and engines, clearing the parts up first. The engine parts had quite some flash, and also sported those raised marks on the mating surfaces. I cleared those up and then thinned the cooling flaps with a rotary tool, plus carefully opening the gaps between the individual flaps with a fine saw.
Whilst indulging myself with that really delightful work, something crept up on me. It had lingered there for a while, but now it surfaced with an audible „plop“. The kit depicts an early „G“ model, with the early tail turret (and not the later Cheyenne version), and it has its waist gun positions right opposite each other, and not staggered. Well, the plane I was building had the staggered guns, and the decals would not fit on the starboard side if the gun position stayed where it was.
 So I
was in for some surgery. I had read that the staggering was to the extent of
three frames, which I replicated using my surmised frame width as used while
riveting. I scored the fuselage section with a sharp blade until I could remove
the section. Then it was quite some sanding and fitting and adding styrene
stock, until I could reglue the section farther tailwards. With some shimming up
with stock, I achived a good fit for the clear part, and let the transfered
section and my styrene stock cure overnight. The next morning I sanded the area,
but had to add some little putty.
So I
was in for some surgery. I had read that the staggering was to the extent of
three frames, which I replicated using my surmised frame width as used while
riveting. I scored the fuselage section with a sharp blade until I could remove
the section. Then it was quite some sanding and fitting and adding styrene
stock, until I could reglue the section farther tailwards. With some shimming up
with stock, I achived a good fit for the clear part, and let the transfered
section and my styrene stock cure overnight. The next morning I sanded the area,
but had to add some little putty.
Whilst that cured, I started fitting the inner sections (nose and cockpit / bomb rack / radio compartment ) to the hull, which needed some trimming, until the fuselage would close up well. I then removed as many parts from the sprues and mounted them for painting as possible.
Given that the 3D decals were made for the HK kit meant the main instrument panel needed some creative work to fit. But now that I had the decals, and nobody would see them after the fuselage was closed save for my photos, I decided to go ahead with them to the best of my abilities. So I tried to identify on the meagre instructions which decal went where, and to remove the molded-on details from the kit parts.
I had also added some more putty to the wings, and now let it all cure. After a while spent waiting, I then completed sanding the fuselage area I had operated on, and re-riveted it. The proof of the pudding came when I primed it, and to my immense relief, it had worked.
Then it was time to do some painting for the subassemblies on the inside, and the fuselage halves themselves. The cockpit area was painted chromate green, the rest in a not too bright metallic shade. Details were painted as per kit instructions. As I now had a lot of subassemblies, and some parts needed several coats of paint, that took its time. I painted the wooden items by first spraying them tan, and then applying reddish brown oil paint in a drybrushing way, to hint at the woodgrain. That was sealed with an acrylic flat coat, and finalized with a light black wash.
I also tackled the engines and props at this time, upon completion covering the engine faces with round pieces of foam I had cut with my trusty foam cutter.
The turbochargers were pretty rusty-looking on all the images I could find, so I used darker metalizers, artist´s oils, pastel chalks and AK True Metal on them until I found them convincing enough. Their rear (exhaust?) openings were drilled open, same as the various air scoops molded closed on the kit.
 After
having added the 3D printed interior decals, I brought the interior parts
(seats, navigator´s table, bomb sight and the like) together. I then sealed them
with a gloss and then a flat coat, and then applied a black wash for good
measure, followed by some drybrushing. That concluded work on the interior
parts, and now I thought about how to best close up the fuselage.
After
having added the 3D printed interior decals, I brought the interior parts
(seats, navigator´s table, bomb sight and the like) together. I then sealed them
with a gloss and then a flat coat, and then applied a black wash for good
measure, followed by some drybrushing. That concluded work on the interior
parts, and now I thought about how to best close up the fuselage.
I had already decided to add the various gun turrets only after mating the fuselage halves, and for most of them this is already provided in the instructions. What I did not like was the thought of five machine gun barrels sticking out of the window panes over the rest of the building process, and being knocked off every five minutes. Not your problem? Well, I am that clumsy.
So I decided to remove the barrels, drill appropriate holes into the gun bodies, and add them only after completion, using thin metal tubing. I made .6 mm holes and prepared five lengths of tubing, and also added the swivel mounts at that stage. I could not refrain from removing the blobs representing the gun sights, and replacing them with PE handwheels.
Now I tackled the window panes, being prepared by other reviews that their fit would be less than perfect. But I got them glued and any remaining gaps sealed with thin PVA. Then it was time to mask the windows and add the prepared interior parts, one at a time. When everything looked all right, I added the gun bodies from the inside (navigator/bombardier/waist gunners´stations) , filled the gaps around them with thinned PVA and covered the areas with Maskol from the outside.
| COLORS & MARKINGS |
The first „decals“ I used were the 3D items for the instrument panels and seatbelts. Well, it turned out they are not actual decals, and they need only a bit of moistening to easily leave the backing paper. After which I found they needed to be glued to the plastic, for which I used clear gloss which worked reasonably well. As the instrument decals were meant for the HK kit, they did not actually fit or match with the Monogram parts, so I found myself trimming them and creatively distributing them over the kit parts. Not actually in the vein of uncompromising realism, but it looked quite neat in the end. The seatbelt decals worked similarly, and needed some trimming, too.
Having added and rechecked
everything to the interior, I then proceeded to glue the fuselage halves,
working in sections, beginning with the tail fin and working myself forward from
there. Some rubber bands and masking tape helped keep everything together.
Filling the main fuselage seam was less work than expected, and Vallejo´s filler
worked well. Prior to sanding, I tried to make sure all the remaining a ccesses
to the fuselage were reasonably protected against dust. I cut plugs from foam
material and those helped with the turret mounts. I had prepared the windscreen
prior to gluing the fuselage halves, and that work now paid off, as it fit quite
well. The window panes were masked off, and the remaining seams I filled with
white glue.
ccesses
to the fuselage were reasonably protected against dust. I cut plugs from foam
material and those helped with the turret mounts. I had prepared the windscreen
prior to gluing the fuselage halves, and that work now paid off, as it fit quite
well. The window panes were masked off, and the remaining seams I filled with
white glue.
The nose cone transparency was a bit iffy to work with, and needed masking and spraying twice, but I got there in the end. I also prepared the turrets as far as I could at this stage. The Eduard mask set proved indispensable to me again.
At some point I had all accesses taken care of, and all transparencies masked.
After drilling two holes and fixing mounting screws through them, I mounted the fuselage on my vise, and then started priming, the inevitable re-sanding and re-filling, and then adding real paint.
I started by applying some random preshading in black primer, and spraying the de-icer boots in black. After I had masked those, I applied Neutral Grey to the undersides, and a lighter shade of grey to the fabric-covered control surfaces. I aimed at something neither too dramatic nor too uniform and boring, and hope I achieved the look I wanted. Then the demarcations between the Grey and OD areas had to be masked. I used masking tape a bit removed off the model´s surface by our version of BluTac (Patafix), plus masks for the rounded demarcations below the stabilizers and alongside the engine nacelles cut from Post-it notes and attached similarly. Where I didn´t feel quite comfortable with mask adherence, I resorted to Maskol.
Now I could spray my OD carefully and quite strongly thinned, taking my time. Again, the fabric covered control surfaces were left in a lighter shade. At some point, I was satisfied with the effect as it was now, and removed the masks. Luckily this time things had worked for me.
So I now sprayed the quite prominent exhaust stains using thinned black paint.
| FINAL CONSTRUCTION |
I now had to decided whether to glosscoat and decal the wings separately from the fuselage, or first add them and then proceed. As I felt the need to do some light filling, I decided to add the stabilizers and wings now, and glosscoat and decal the model in toto. Some applications of white glue sufficed to fill the small seams. After curing, they were sprayed over, and I was ready for the next step.
That was adding the red panels to the paint scheme, which worked surprisingly well, glitch-free. I then started with the glosscoat. But now I realized an annoying glitch. I had marked frame spaces with a black marker prior to riveting, and had omitted removing the black with white spirit. Now I realized that despite priming and various coats of paint and glosscoat, the black dots bled through with a vengeance. It actually got more pronounced the more I did.
So I bit the bullet and sanded off those areas down to the plastic, re-primed, re-sanded and then resprayed them. I could very easily have avoided that.
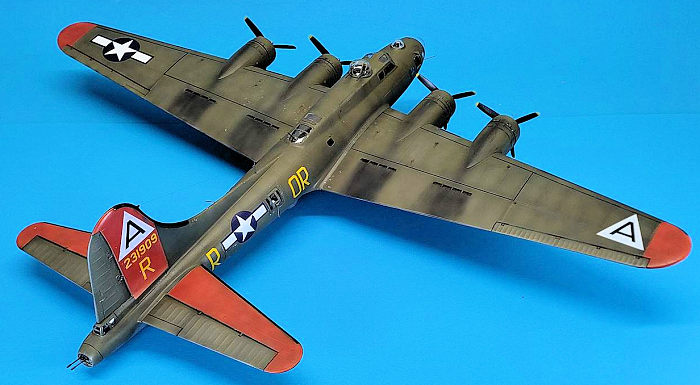
Now it was time for the decals. I started with the National Insignia and Stencil decals by Kitsworld, and on the model´s underside. That went well, even though the placement guide for the nacelles wasn´t really conclusive. The decals performed well.
Things changed when I
worked with the second sheet, the one with the individual markings. These dec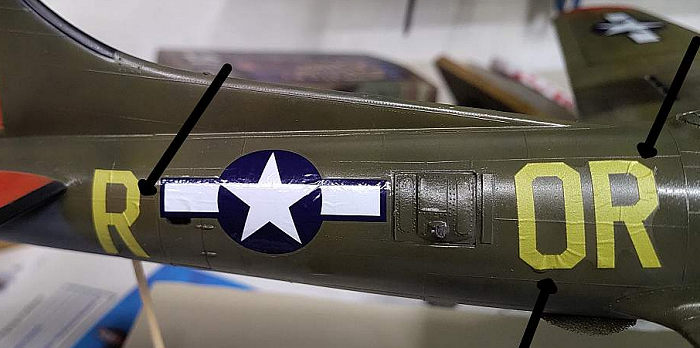 als
were very thin, but also stretchy/rubbery/elastic in a most unhelpful manner.
They would distort when moved, and – worst of all – they had a strong tendency
to roll themselves up, and it was nigh on impossible to remedy that. Plus I
ended up with wrinkles that would not be cured by the techniques I´ve used over
the past few decades. I was really very annoyed with that decal sheet.
als
were very thin, but also stretchy/rubbery/elastic in a most unhelpful manner.
They would distort when moved, and – worst of all – they had a strong tendency
to roll themselves up, and it was nigh on impossible to remedy that. Plus I
ended up with wrinkles that would not be cured by the techniques I´ve used over
the past few decades. I was really very annoyed with that decal sheet.
What followed now was a disturbed night, with me fretting about how to remedy the situation and end up with a reasonably presentable model yet. I have to admit I wasn´t really comfortable with my options. Until the next morning I happened to look on the previously discarded Superscale decal sheet from the 1990s. Lo and behold, it had Nine-o-nine´s markings on it! So I checked with an unneeded decal whether they would still work, and they did! The only thing missing from the sheet were the three swastikas, cut out most probably by the German retailer to make the sheet comply with German anti-extremism laws. But those I would be able to retain from the Kitsworld sheet.
I had already realized that the Kitsworld decals would be easily removable using MicroSol, which I did. Sadly, the solvent attacked the gloss coat and made it white and flat. In previous models, this had been correctable by re-applying the acrylic glosscoat, which I did.
Well, I ultimately managed to cover it up, partly with more glosscoat, but there were areas where that didn´t work. I needed to carefully spray more Olive Drab or Neutral Grey. Curious. Anyway, at some point I was back where I had set out almost a week before, and applied the old decals, which went quick, hassle-free and with a satisfying result. Without any decal setting or softening solution.
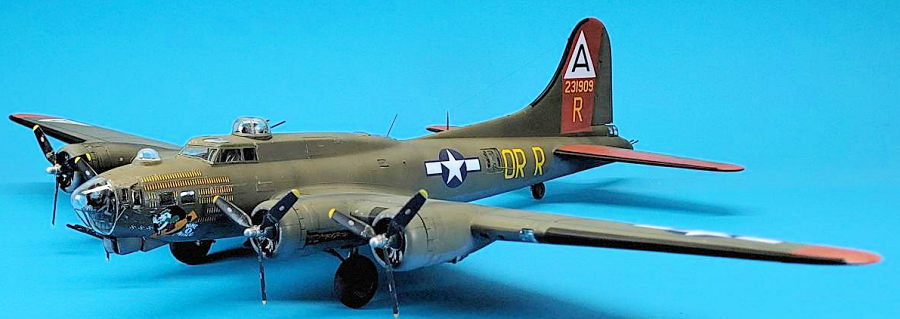
Having let it all cure a while, I added another glosscoat and then a flatcoat, preparatory to weathering. Which went tolerably well, using my usual artists oils, metalizers and pastel chalks. I may have overdone it a bit, but then I assume that an aircraft that had survived these harsh conditions for that long would look less than factory fresh. Not taking in account frequent repairs and replacements of surface panels. So I gave the model my all, until I thought it looked appropriate to me.
I then added the undercarriage, and when that was done, a final flat coat to blend things in. Now came the time to remove the masks, and they all had performed well. Then I added the final fiddly bits, as in gun turrets, metal tube gun barrels, pitot tube and antennae. Most went out without hassle, I just had to do some minor trimming to make the dorsal turret fit. The lone antenna wire was made from Caenis, very thin yet hopefully broadly in scale. With that, I called it quits.
| CONCLUSIONS |
This was a model I felt I had to build. I normally don´t care about bucket list stuff, but this one I wanted to have built once in my life. There is a new and much better kit around, I probably made a string of mistakes in the process, I find myself hard put where to place the completed model – you know what? I don´t care. I´ve done it, to the best of my abilities and as I liked it.
And I do like it. It´s an iconic aircraft, and I when I look at it, I hear Matthew Modine´s monologue to his aircraft on the night before his final mission. I´ve read up a lot on the 8th Air Force during the build, and despite having previously felt I was decently informed, now I´m on a different level. And mostly on the human side of things, having deepened my respect for the young men fighting this air war against the bleakest odds.
| REFERENCES |
Davis, Larry: B-17 in Action. Carrolton 1984
Bowman, Martin: Spirits in the Sky. German edition Erlangen, 1994.
Crosby, Harry H.: A Wing and a Prayer. The "Bloody 100th" Bomb Group of the US Eighth Air Force in Action Over Europe in World War II. New York 1994.
https://en.wikipedia.org/wiki/Twelve_O%27Clock_High
https://en.wikipedia.org/wiki/Boeing_B-17_Flying_Fortress
https://www.iwm.org.uk/memorials/item/memorial/8393
Back to the Previews Index Page
Back to the Previews Index Page