
Monogram 1/48 B-25J Mitchell
| KIT #: | 5512 |
| PRICE: | Around $35 in 2005 |
| DECALS: | Two options |
| REVIEWER: | Spiros Pendedekas |
| NOTES: | Revell boxing |
| HISTORY |
The 498th
Bombardment Squadron was first organized at Columbia Army Air Base,
South Carolina, in September 1942, as one of the four original squadrons
of the 345th Bombardment Group. Upon finishing training with B-25
Mitchells, the squadron departed for the Southwest Pacific Theater in
April 1943, reaching its combat station near Port Moresby, New Guinea in
early June.
Starting flying combat missions at the end of June, the squadron
operated from New Guinea until July 1944. Missions included bombing and
strafing Japanese installations in New Guinea and the Bismarck
Archipelago, attacking enemy shipping in sealanes within their B-25s
range, performing air support (including airdropping supplies) for
ground units in the Admiralty Islands and, finally carrying out courier
and aerial reconnaissance missions. The Mitchells themselves were
field-modified, including, among others, installation of additional
fixed machine guns to boost their strafing efficiency.
 On 2
November 1943, the squadron flew a series of unescorted attacks on flak
positions, coastal defenses and barracks at Rabaul IJN base, earning a
Distinguished Unit Citation. In July 1944 it moved to Biak Island in the
Netherlands East Indies. From its new base, it attacked airfields and
shipping in the Philippines and Celebes. It continued moving forward
with Douglas MacArthur's forces, occupying a base in the Philippines in
November 1944, which enabled it to strike military targets throughout
the island nation and strike industrial targets as far north as Formosa.
On 2
November 1943, the squadron flew a series of unescorted attacks on flak
positions, coastal defenses and barracks at Rabaul IJN base, earning a
Distinguished Unit Citation. In July 1944 it moved to Biak Island in the
Netherlands East Indies. From its new base, it attacked airfields and
shipping in the Philippines and Celebes. It continued moving forward
with Douglas MacArthur's forces, occupying a base in the Philippines in
November 1944, which enabled it to strike military targets throughout
the island nation and strike industrial targets as far north as Formosa.
In July 1945, the squadron moved to Ie Shima Airfield in the Ryuku
Islands, from which it was able to attack shipping in the Sea of Japan
and carry out a few raids on Kyushu. Following V-J Day, it remained at
Ie Shima until December, when it returned to the United States and was
inactivated at the port of embarkation on 19 December 1945, to be
reactivated again from 1954 till 1959.
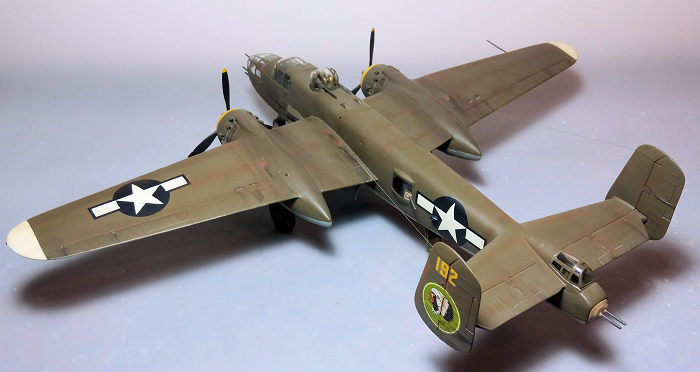
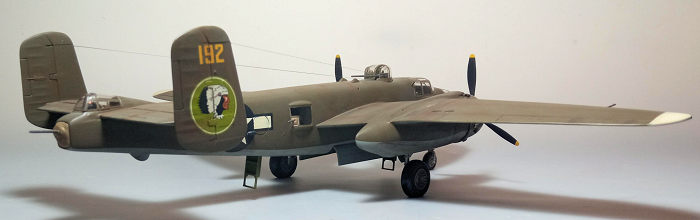
On May 26, 1945, sixteen of its Mitchells took off for a raid on the
important Byoritsu Refinery, located in the northwestern Taiwanese city
of Miaoli, with the legendary “Jaunty Jo”, s/n 43-36192, being among
them, piloted by Robert J. Knauf and with a total crew of five.
The formation approached the target, nearly skimming the treetops,
because of the parachute-fitted “Paraflag” bombs they carried, as they
had to be precisely dropped from low altitudes, before detonating and
breaking into smaller fragments, with the parachute delaying the crash
long enough for the plane to escape unscathed.
Upon its bomb load release, fragments severely damaged the left side of
Jaunty Jo’s cockpit, which crashed seconds later, killing everyone on
board. Whereas the official cause of the crash was flak, the chances
that Jaunty Jo was hit by Paraflag fragments are not zero. A devastating
photo depicting the fateful bomber prior to hitting the ground exists.
May the crew rest in peace.
As for the charismatic B-25 itself, little can be said that has not been
said before, particularly through the numerous reviews found at the MM
archives: rugged and versatile, seeing action to practically every
front, it is unsurprisingly considered to be one of the finer twin
engine combat aircraft of World War II.
| THE KIT |
Monogram came in
1977 with their then new tool B-25H, followed (with the addition of new
parts) by the B-25J in 1981, then regularly reboxed till 2013. My specific
copy is the Revell 1999 edition, bought in 2005 from an Athens hobby shop at
what seemed to be a fair price.
The kit came in the usual medium sized, Monogram style, relatively flimsy
top opening box, carrying a very attractive box art of Jaunty Jo during
happier times, performing a successful shipping attack. Jaunty Jo’s wingtips
are not depicted in white in this drawing, which might or might not be
correct for that time frame, as its wing tips were, at least from a point
onwards, definitely white.
Upon opening the box, I was greeted with around 130 gray styrene parts,
arranged in four sprues. Molding was not bad, with the parts featuring a
good amount of details but also some flash, the latter somehow expected from
the tooling’s era and mold age. Panel lines are mostly raised and well done.
Cockpit is quite well appointed, featuring a good amount of stuff found at
the real thing (including sidewalls with molded-on details), the same being
true for the rest of the interior and the bomb bay. The bomb bay bulkheads
feature nicely molded extensions which, when inserted through the fuselage
halves, will serve as wing-to-fuselage joint bracings, so no worries for
those heavy wings sagging over tim e,
even if you decide to add weight to the engines. Engines themselves are one
piece and look good, as do the props. Landing gear and bays are, typically
for Monogram, very well represented, with the weighted tires providing a
natural stance to the completed model.
e,
even if you decide to add weight to the engines. Engines themselves are one
piece and look good, as do the props. Landing gear and bays are, typically
for Monogram, very well represented, with the weighted tires providing a
natural stance to the completed model.
Clear parts are sufficiently done considering the molds’ age, not overly
thick and relatively clear. Instructions are, typically for Monogram, great,
coming in the form of a 12-page b/w booklet, including a short history of
the type, a color chart and a parts list (which is really nice, as it names
every part!). The construction itself is spread in 6 main steps, each
divided in a number of substeps, all done in a logical, concise way,
including full color callouts, useful explanatory notes and head on
drawings, in order to align the aerodynamic surfaces and landing gear:
instructions really shine!
Two very nice schemes are provided, for the legendary Jaunty Jo in Olive
Drab over Neutral Gray and for the equally famous 12th Air Force’s “Finito
Benito - Next Hirohito” bird in Natural Metal Finish. Decals are glossy and
look well printed, expected to work well. The two versions basically differ
in the existence of side gun packs and the amount of nose mounted guns.
Instructions want you to first decide which of the two versions you will
build, then assemble the cockpit (which includes the nose bay underneath),
attach all interior bits to the fuselage halves and finally join them with
everything trapped in. The main wings are then to be assembled and attached
(where you will find the head-on drawing very useful), followed by the tail
planes, engines, props, and guns. Landing gear is supposed to be attached
immediately after attachment of the main wings, but a number of us will
prefer attaching it at end stages, in order to avoid handling mishaps. The
transparencies and the top turret are finally attached, ending a build that,
while not totally uncomplex, does not look too complicated, especially for a
twin engine bomber.
The model is a prime candidate for tail sitting, so quite some serious
amount of weight should be attached at suitable places. In any case, if your
attempts fail, you might glue the rear entry hatch “open” and let it (and
the complete model) “rest” onto a small step ladder provided: if you do not
tell, nobody will notice!
Let’s see how this classic yet promising kit builds!
| CONSTRUCTION |
Having decided to
build the “Jaunty Jo”, the first thing I did was drill out the holes at the
fore fuselage sides, in order to mount the gun packs and continued by
assembling the cockpit, which, in essence, forms one subassembly with the
nose bay inner wall. After attaching it at the starboard fuselage half, I
glued all other interior parts (bulkheads, bomb racks, ammo magazines and
the like), then joined the fuselage halves, which mated quite well.
Basic interior color was Hu226 Interior Green, the instrument panel, yokes
and side consoles were black and seat cushions were "leather" with the
molded-on seat belts painted khaki with silver buckles. The raised
instrument faces were dry brushed with silver and various "knobs" were
replicated by tiny red, yellow and white blobs of paint.
Moving more or less along with the instructions, I went on and assembled the
main wings (4-piece affairs, including the main bays) and attached them to
the fuselage. The 6-piece tail was also assembled and attached to the rear,
with the provided head on view being very helpful in alignment. Fit, though
presenting some gaps, was positive, definitely within the average modeler's
abilities and I was really pleased with the positioning/embracing spars
which secure the main wings to the fuselage.
 The
engines were then trapped between the front cowling and the rear firewall
and attached to the wings. Since the model is a prime candidate for tai
sitting, and, additionally, being somewhat challenging to add weight to the
front fuselage with all this glazing, I filled the invisible areas aft of
the engine blocks with suitably cut fishing weights. This weight proved
sufficient to keep the front wheel to the ground. Engines were painted
black, then heavily dry brushed with silver, whereas cowling innards were
painted Hu226 Interior Green.
The
engines were then trapped between the front cowling and the rear firewall
and attached to the wings. Since the model is a prime candidate for tai
sitting, and, additionally, being somewhat challenging to add weight to the
front fuselage with all this glazing, I filled the invisible areas aft of
the engine blocks with suitably cut fishing weights. This weight proved
sufficient to keep the front wheel to the ground. Engines were painted
black, then heavily dry brushed with silver, whereas cowling innards were
painted Hu226 Interior Green.
I then went on attaching the nose lower part , followed by the floor
section, the gun mounts and ammo boxes. Again, everything was painted
interior green (though, in the ProModeler instructions aluminum is
recommended for the ammo boxes). The front underside gun gas extractor, the
side gun packs and the mid-fuselage top mounted gun pockets were attached at
this time, as well. I neither installed the delicate front guns and their
ammo chutes, nor the top turret, planning to attach them at end stages.
Overall fit, while certainly not “Tamiya”, was quite acceptable towards
good, with the required attention certainly being within the average
modeler’s skills. After a filling and sanding round, I blanked the many
openings with wet tissue as best as I could and took “Jaunty Jo” to the
paint shop!
| COLORS & MARKINGS |
Jaunty Jo featured
yellow cowling lips and white wing tips, which were the first thing I
painted, using Hu154 Insignia Yellow and Hu130 Satin White respectively.
After masking them, I gave all undersides, including all doors, a coat of
Hu64 Light Gray, which was also masked off, in order to spray the topsides
Olive Drab, for which I used Hu155. A coat of Future prepared the bird for
decaling.
I used the kit decals, which, despite their age, performed very well, helped
by decal softening solution to conform where needed. A coat of Future sealed
them.
| FINAL CONSTRUCTION |
All landing gear
parts were attached in position, with the heavy bird proudly and securely
standing on her feet (Monogram has to be praised for the landing gear
sturdiness). The bomb bay and crew doors were attached “open” at this time,
as well. Bays and all door innards were painted the same Hu226 Interior
Green, gear legs, struts and wheel rims were painted “steel”, tires were
black, whereas oleos were highlighted with a fine tip silver pen.
 The
props had steel hubs and black blades with yellow tips. After having their
stencils applied, they were attached in position. The two distinctive air
scoops located at the aft fuselage sides, had their openings drilled out for
extra realism and attached in position. Since their attachment points were
onto the blue section of the already applied fuselage Star and Bars
insignia, I took as much care as I could, in order to not compromise the
decals. Upon a more or less successful result, I carefully hand painted the
scoops with a matching blue. The DF loop aerial was attached at this time,
as well, painted underside color (though black is also a good candidate for
“correctness”).
The
props had steel hubs and black blades with yellow tips. After having their
stencils applied, they were attached in position. The two distinctive air
scoops located at the aft fuselage sides, had their openings drilled out for
extra realism and attached in position. Since their attachment points were
onto the blue section of the already applied fuselage Star and Bars
insignia, I took as much care as I could, in order to not compromise the
decals. Upon a more or less successful result, I carefully hand painted the
scoops with a matching blue. The DF loop aerial was attached at this time,
as well, painted underside color (though black is also a good candidate for
“correctness”).
Jaunty Jo was a real workhorse, so I did not retain myself in weathering,
starting with a black wash in order to bring out any recessed detail (like
the aerodynamic surfaces hinges) or giving a used, oily look at susceptible
areas (bays, engines or landing gear). I then went on and applied dark brown
and black dry pastels, in order to simulate dirt, grime, engine staining and
the like at all areas that would accumulate. Silver dry-brushing was applied
at blade leading edges and, to a lesser extent, at areas where the paint
might present dings or rub-offs (from personnel walking or leaving their
toolboxes and the like). A final almost matt coat sealed everything.
The canopy was attached in position. The nose guns were then attached in the
front, followed by the top nose glazing and the forward transparent piece
(the latter after having the front gun carefully attached with white glue).
The top turret was then assembled and attached, followed by the side windows
(which had their corresponding guns similarly secured with white glue), the
rear gunners glazing and the rear canvas boot, with the twin gun attached
into it. The leading edge mounted landing lights were attached at this time,
as well.
 All guns
were painted gunmetal with brass ammo chutes and khaki spent shell bags. All
gun-boots were painted also khaki, while all transparencies had their well
defined frames hand painted with a very fine brush. Fit of the
transparencies was more or less good (not perfect), with the tiny gaps
faired with white glue.
All guns
were painted gunmetal with brass ammo chutes and khaki spent shell bags. All
gun-boots were painted also khaki, while all transparencies had their well
defined frames hand painted with a very fine brush. Fit of the
transparencies was more or less good (not perfect), with the tiny gaps
faired with white glue.
In order to replicate the aerial wires, I did some net research and
concluded that (at least typically, so no accuracy claims here), a short
aerial wire was run through two masts located at the fore undersides
(vaguely depicted at the instructions - no masts are nevertheless provided),
while two longer one were run from the fins towards small masts, bilaterally
located just aft of the canopy framing. All masts were fabricated from
suitably thick stretched sprue and attached, while thinner stretched prue
was accordingly run and tightened with my wife’s hair dryer.
Tiny blobs of red and green and amber clear paint (applied with a toothpick)
were used to represent the wingtip and underwing formation lights before
calling the iconic bomber with the devastatingly sad story done!
| CONCLUSIONS |
Your other option for a “J” Mitchell is the superb HK kit. Following their superlative 1/32 offering which hit the shelves in 2012, HK decided to treat us with an equally superlative 1/48 B-25J smaller sister in 2022. Though not exactly cheap, this is adamantly the way to go if you want the best quarter scale B-25J, yielding a superb result as you can see by looking at the many builds found at the MM archives.
The fact that the HK
offering leaves the elderly 1977 Monogram “J” at the second place, by no means
deems the latter obsolete: it is a really fine kit, acceptably molded, with
adequate detail at key areas and equally adequate transparencies, nice decals,
offering an uncomplex construction (for a twin engine bomber) with generally
positive fit, easily tackled by anybody but the novice. Costing less than one
third of the HK kit, there is really nothing wrong with this classic,
unpretentious kit that promises to offer a great modeling time to the potential
builder, who will come up with an imposing result.
Happy Modeling!
Spiros Pendedekas
Copyright ModelingMadness.com. All rights reserved. No reproduction in part or in whole without express permission from the editor.
If you would like your product reviewed fairly and fairly quickly, please contact the editor or see other details in the Note to Contributors.