| KIT #: | 04529 |
| PRICE: | €50 when new |
| DECALS: | Two options |
| REVIEWER: | Spiros Pendedekas |
| NOTES: | Monogram tooling |
| HISTORY |
The Liberator originated from a United States Army Air Corps (USAAC) request in 1938 for Consolidated to produce the B-17 under license, where Consolidated decided instead to submit a more advanced design of its own.
The resulting Model 32 combined designer David R. Davis's high-efficiency airfoil wing, with the twin tail configuration from the Consolidated Model 31 flying boat, together on a new fuselage designed around twin bomb bays, each one being the same size and capacity of the B-17 bomb bays.
The 1939 USAAC Specification C-212 for an intercontinental bomber essentially favored the Model 32, which would be the winning design, the resulting program running under the umbrella group "Project A". Whereas the emerging B-24 did not finally meet Project A goals, it was a positive step in that direction, with the program finally leading to Boeing B-29 and Consolidated B-32 and B-36.
Compared to the B-17, the B-24 had a 6-foot larger wingspan, but a lower wing area, giving it a 35% higher wing loading. The shoulder-mounted high aspect ratio Davis wing allowed a relatively high airspeed and long range. The relatively thick wing held the promise of increased tankage while delivering increased lift and speed, but became unpleasant to fly when committed to heavier loadings as experienced at high altitude and in bad weather.
 The Davis
wing was also more susceptible to ice formation than contemporary designs,
causing distortions of the aerofoil section and resulting in the loss of lift,
leading to unpleasant experiences drawing such comments as 'The Davis wing won't
hold enough ice to chill your drink'.The wing was also more susceptible to
damage than the B-17's wing, making the aircraft less able to absorb battle
damage.
The Davis
wing was also more susceptible to ice formation than contemporary designs,
causing distortions of the aerofoil section and resulting in the loss of lift,
leading to unpleasant experiences drawing such comments as 'The Davis wing won't
hold enough ice to chill your drink'.The wing was also more susceptible to
damage than the B-17's wing, making the aircraft less able to absorb battle
damage.
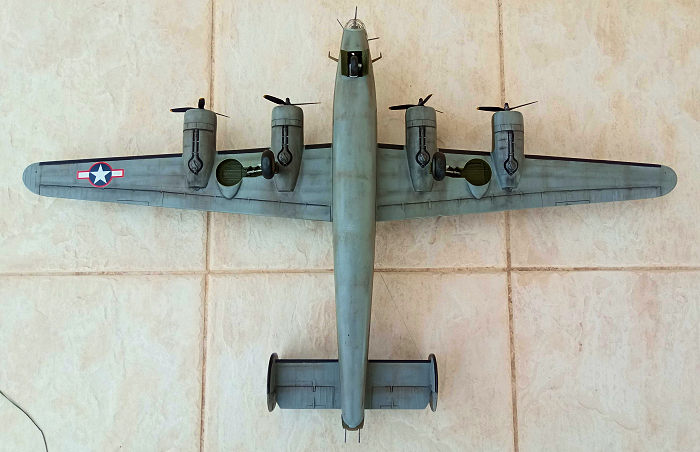
The plane featured four supercharged radial engines
mounted in cowlings borrowed from the PBY Catalina (except being oval in
cross-section, with oil coolers mounted on each side of the engine), turning
3-bladed variable-pitch propellers.
The tailplane featured two large oval vertical stabilizers mounted at the ends
of a rectangular horizontal stabilizer, but was very soon recognized that
handling and stability could be improved by the use of a single vertical fin.
Though the resulting B-24N orders were canceled due to the end of the war, the
single fin configuration saw active service with the PB4Y Privateer Naval
derivative.
 Albeit its
bomb bays could accommodate a good 8,000 pounds (3,600 kg) of ordnance, they
rarely did, as this decreased range and altitude. Another innovation was the
tricycle undercarriage, the first American bomber to do so. It carried a crew of
up to ten.
Albeit its
bomb bays could accommodate a good 8,000 pounds (3,600 kg) of ordnance, they
rarely did, as this decreased range and altitude. Another innovation was the
tricycle undercarriage, the first American bomber to do so. It carried a crew of
up to ten.
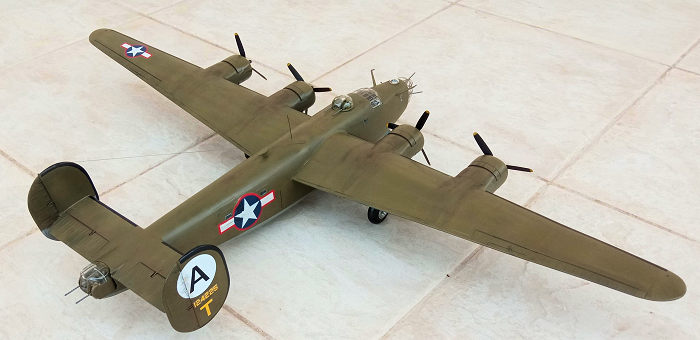
Demanding to fly, with poor low-speed performance, lower ceiling and less robust than the Boeing B-17, it is no surprise that aircrews tended to prefer the latter in the European theater. However, in the Pacific theater where speed was important and ceiling was not that much of a consideration, the B-24 was more at home. General Staff favored the B-24 and procured it in huge numbers (more than 18,00 units) for a wide variety of roles, making it the world's most produced bomber, heavy bomber, multi-engine aircraft, and American military aircraft in history.
The B-24 was used extensively in WWII, with one of its distinctive missions being the well known second attack on Ploiești (Operation Tidal Wave) on 1 August 1943. This was the B-24's most costly mission in terms of aircraft and crew perishing and, combined with the fact that damage to the targets was limited, it is considered a strategic failure.
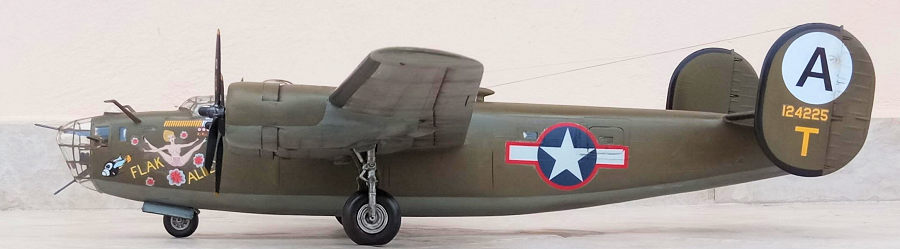
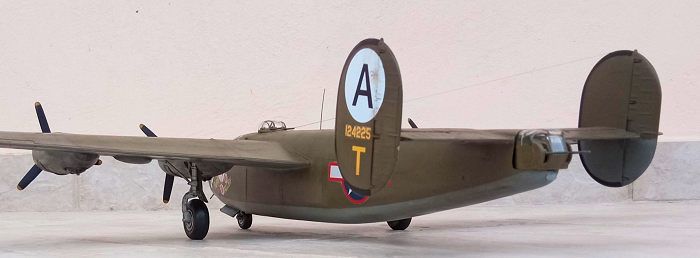
B-24D-25-CO, s/n 4124225, nicknamed “FLAK ALLEY”, was one of the participating aircraft in Operation Tidal Wave that made it home. She was lost on 24 Feb 44 on her 42nd mission, crashing in a small village south of Gotha, after falling out of formation due to being hit by prop wash, with enemy aircraft finding the chance to concentrate their attacks on it. Of the crew, 6 were killed and 4 were taken POW.
| THE KIT |
 This is the
Revell 2003 reboxing of the venerable 1976 Monogram mold. An old school kit for
sure, but a satisfactory one, offered at a good price, with the excellently
printed Revell decals being the icing on the cake. The plastic itself has become
brittle over the years and one of the decal options (for the “FLAK ALLEY”)
features only port nose art, whereas pictorial evidence shows nose art on both
sides (chances of that plane featuring only port side nose art at “earlier”
times are thin…). For a more detailed look at the kit contents, you may read the
preview here.
This is the
Revell 2003 reboxing of the venerable 1976 Monogram mold. An old school kit for
sure, but a satisfactory one, offered at a good price, with the excellently
printed Revell decals being the icing on the cake. The plastic itself has become
brittle over the years and one of the decal options (for the “FLAK ALLEY”)
features only port nose art, whereas pictorial evidence shows nose art on both
sides (chances of that plane featuring only port side nose art at “earlier”
times are thin…). For a more detailed look at the kit contents, you may read the
preview here.
This kit had been quietly residing in my Shelf of Doom for almost 20 years. When
a fellow modeler was looking for the second decal option of the kit (that of
“The Squaw/Sleepy”), which I happily separated from the sheet and sent to him,
motivation arose and I began building my B-24!
| CONSTRUCTION |
I started by affixing
the cockpit floor, rear bulkhead and nose bay rear “half” wall into the
starboard fuselage half. Since I decided to go for a “gear down” configuration
but with all the rest closed (bomb bays, gunner side windows, crew entry hatch
and rear skid), I attached the bomb bay doors and gunner side window frames
“closed”, then affixed all side window transparencies from the insides otf the
fuselage. Though given as an option by the instructions, the kit is not really
designed for the above items “closed”, with fit being less than perfect and the
resulting gaps initially treated with liquefied styrene which double acted as
bonding agent.
I continued by adding the cockpit deck, followed by the fore, aft and nose gear
bulkheads, with the nose strut support added at the latter. A good 100 grams of
fishing weights were secured with styrene pieces in the “in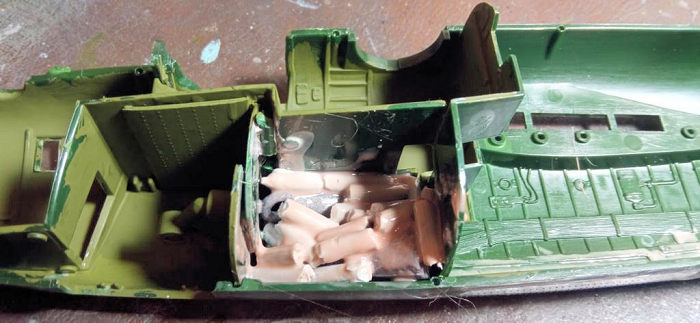 visible”
area aft of the nose gear bulkhead, hoping that this vast amount of added weight
would prevent this prime candidate from tail sitting! After painting all visible
interiors with Hu226 interior green, the fuselage halves were joined, followed
by attaching of the underside blanking plate (the bottom ball turret is attached
at the “J” version in that area) and crew entry door.
visible”
area aft of the nose gear bulkhead, hoping that this vast amount of added weight
would prevent this prime candidate from tail sitting! After painting all visible
interiors with Hu226 interior green, the fuselage halves were joined, followed
by attaching of the underside blanking plate (the bottom ball turret is attached
at the “J” version in that area) and crew entry door.
I then went on subassembly-ing, in order to transform the chaotic multi-sprue
view into something that would look more manageable. I thus assembled the
stabilizer, the two rudders and the three wheels, all 2-piece affairs. The good
looking engines were painted black, heavily dry brushed with silver and attached
at the bottom wing halves with the prop shafts trapped and secured in position,
through cleverly designed stoppers molded onto the wing halves.
The wings were then assembled, followed by the cowl rings. The starboard wing
top half exhibited severe warpage. I was not lucky this time, as my attempts on
straightening it using brute force resulted in a crack appearing, which was
immediately treated with some liquefied styrene.The turbochargers had their
exits drilled out for extra realism. Cowling interiors were painted Hu226
interior green.
After attaching the stabilizer, I went on and treated all gaps of all above
subassemblies with liquefied styrene and coarse sanded them, before attaching
the wings and rudders. Fit was good there, with only minimal gaps arising. The
wing-fuselage joints not only were positive, but also extremely strong and
Monogram has to be congratulated here.
As a note, the kit provides two pitot-like mini heads to be attached at equal
top wing slots aft of the inner engines. By net research, I found no evidence of
them whatsoever and decided to leave them off, filling the wing holes.
After a couple of general filling and sanding rounds, I masked the windows,
blanked all opened areas with wet tissue and took the Liberator to the paint
shop!
| COLORS & MARKINGS |
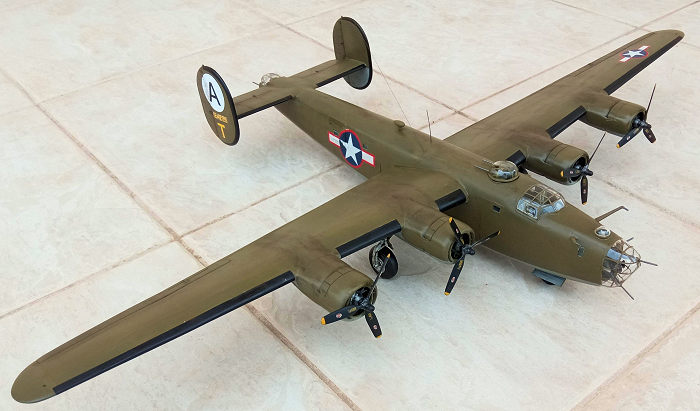 I sprayed all
undersides with a leftover Molak 1126 medium gray, with a repetitive session
after correcting a couple of discrepancies found, then masked the underside area
off. The gear doors’ external sides, as well as the main wheels' outer faces
received the same color. Next I sprayed all upper sides with Hu155 olive drab,
followed by painting all anti-ice boots black, after careful masking with 1mm
masking tape. The turbochargers were painted Testors burned metal, followed by
the landing gear bays and doors innards, which were painted Hu226 interior
green. The whole model then received a coat of Future, in order to proceed to
decaling.
I sprayed all
undersides with a leftover Molak 1126 medium gray, with a repetitive session
after correcting a couple of discrepancies found, then masked the underside area
off. The gear doors’ external sides, as well as the main wheels' outer faces
received the same color. Next I sprayed all upper sides with Hu155 olive drab,
followed by painting all anti-ice boots black, after careful masking with 1mm
masking tape. The turbochargers were painted Testors burned metal, followed by
the landing gear bays and doors innards, which were painted Hu226 interior
green. The whole model then received a coat of Future, in order to proceed to
decaling.
I used the kit decals, in order to represent the well known 44th Bomber Group’s
“FLAK ALLEY”. Decals behaved well and, apart from some light silvering (which
might have likely been operator error) gave me no issues. A few sessions of
decal softener application took place at difficult places like the side gunners’
windows, the wing deflector plates or the rudder/fin borders, in order for the
decals to conform, where I was at times lightly pressing them onto the
"difficult" spots with a cotton bud moistened with decal softener (crossing my
fingers, of course, as the slightest mishandling would ruin the moistened
decal...). The decals did not tend to shatter at all, a good thing, with some “milkyness”
appearing at a few spots where I persisted with the decal softener, which had to
be touched up. A coat of Future sealed the decals.
| CONSTRUCTION CONTINUES |
I installed both
seats and yokes in the cockpit and the bombsight, togther with the small
bomber’s table at the front. Basic interior color was Hu226 interior green with
leather seat cushions and black instrument panel, yokes, side panels (with their
nicely molded running cables) and bombsight. All raised instruments and switches
were dry brushed with silver, whereas some red “knobs” were added with a very
fine brush. The bombsight lens was replicated with a drop of clearfix on top of
a silver "pin" done with my silver pen. Seat belts were added from masking tape.
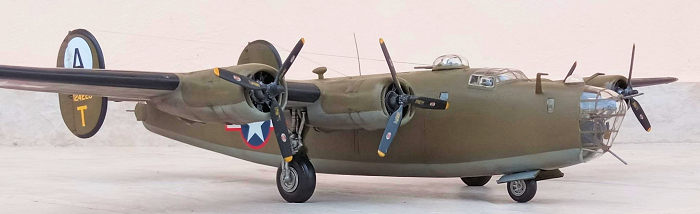
Landing gear legs were next attached, which, to my pleasure, fitted positively
and supported the beast’s weight more than adequately. Again, kudos to Monogram.
The wheels were then attached. All legs and struts were painted Testors steel
with silver oleos. The nose wheel had steel rim, whereas the main wheels rims
had steel inner and underside gray outer faces. The main legs received
simplified brake lines made from stretched sprue painted black, with the same
color used for all tires.
 The props
were also painted black with yellow tips. Their hubs were heavily dry brushed
with silver. I used the kit supplied “Hamilton Standard” decal logos and some
leftover data labels from a Monogram B-17.
The props
were also painted black with yellow tips. Their hubs were heavily dry brushed
with silver. I used the kit supplied “Hamilton Standard” decal logos and some
leftover data labels from a Monogram B-17.
A black wash was applied at areas like the wheel bays, landing gear parts,
cowling flaps and movable surfaces hinges, in order to bring out their detail
and display a “used”, greasy look, whereas dry pastels of various dark brown and
black shades were generously applied at all areas susceptible to
weathering/dirtying. The same method was used to simulate engine exhaust
staining. A coat of satin gave the model its final finish.
It was then transparencies time: after hand painting all framings, first the
canopy was attached, followed by its side windows and the astrodome. Fit was
more or less good. The nose transparency had the guns attached from the inside
with some clearfix to hold them in position and attached. Fit presented a gap at
the undersides (very likely operator error) which was faired with white glue.
The top turret transparency was attached onto its circular base with the twin
gun trapped in between and then twist-locked into position (a very clever
arrangement).
The rear turret consisted of two transparent halves that were also joined, with
the twin gun also trapped in. Due to the parts design, a vertical seam runs
along the turet’s top glazing, which you either live with, or go aftermarket
with a seamless vacform glazing. Per my usual habit, I went for the former.
After hand painting the rear turret framing, I attempted attaching it in
position. The only way to fit into place would be to shave off its base. I was
ready to add a floor from thin sheet styrene but did not do so, as nothing could
be seen anyway. All guns were painted gunmetal with brass belted bullets.
Regarding the antennas arrangement, a few configurations seem to exist,
supposedly having to do with the variant, the belonging squadron or even the
specific bird. After viewing some pic evidence, I decided to add the kit
provided DF loop, with a whip antenna just in front and two pairs of aerial
wires running from each fin and vertical stabilizer to the fuselage. Apart from
the DF, all the rest were made from stretched sprue.
The two pitot heads were attached bilaterally and tad aft of the astrodome area.
They were painted fuselage color with gunmetal tips. Blobs of red and green
clear paint on top of silver “pins” (made with a fine tip silver pen)
represented the wingtip lights, before calling the “FLAK ALLEY” done!
| CONCLUSIONS |
This is still a good
kit of the venerable bomber with correct general shape, sufficient details and,
despite the age of the molds, still manageable fit. Taking into account the
complexity of a four engined WWII bomber, the kit is not overly complicated,
keeping the modeler constantly motivated to press on with it. The provision of
the nice crew figures and the (even at areas simplified, but sufficiently
shaped) Cletrac is also a nice touch. Out of the box, a good looking model can
emerge, whereas the multitudinous aftermarket stuff will satisfy the demanding
super detailer.
Regarding the specific Revell reboxing, which comes with really nice decals
depicting two famous Liberators, one of the two schemes, the “FLAK ALLEY”, which
was my chosen one, has some chances to be deficient, as evidence shows “FLAK
ALLEY” carrying nose art at both sides. Of course, it is possible that the nose
art was first applied at one side and later on at the other one.
Monogram has to be congratulated for coming up in 1976 with such a good kit of
the famous bomber. Whereas the kit can still hold its own, we live in the 2020
decade, so a “modern” quarter scale Liberator is highly desirable. Till then,
the “oldie but goodie”, regularly reboxed and very sensibly priced Monogram will
be our only choice, promising a straightforward uncomplicated build and
delivering a nice, imposing Liberator.
Happy modeling!
Spiros Pendedekas
7 November 2022
Copyright ModelingMadness.com. All rights reserved. No reproduction in part or in whole without express permission.
If you would like your product reviewed fairly and fairly quickly, please contact the editor or see other details in the Note to Contributors.