| KIT #: | 04569 |
| PRICE: | $50.00 in 2004 |
| DECALS: | Two options |
| REVIEWER: | Spiros Pendedekas |
| NOTES: | Monogram tooling |
| HISTORY |
The Boeing B-17 Flying Fortress is a four-engined heavy bomber developed in the 1930s for the USAAC. Competing against Douglas and Martin for a contract to build 200 bombers, the Boeing entry, in the form of the prototype Model 299/XB-17, outperformed both competitors and exceeded the Air Corps' performance specifications. Unfortunately, due to the prototype's crash, Boeing lost the contract to the Douglas B-18 Bolo, but the project survived, due to the Air Corps’ appreciation of its bold design, ordering 13 more examples for further evaluation, which finally led to the plane's mass production.
Promoted as a strategic
weapon, the Fortress was primarily employed by the USAAF in the daylight
strategic bombing against German industrial, military and civilian targets. The
United States Eighth Air Force, based at many airfields in central, eastern and
southern England and the Fifteenth Air Force, based in Italy, complemented the
RAF Bomber Command's night-time area bombing in t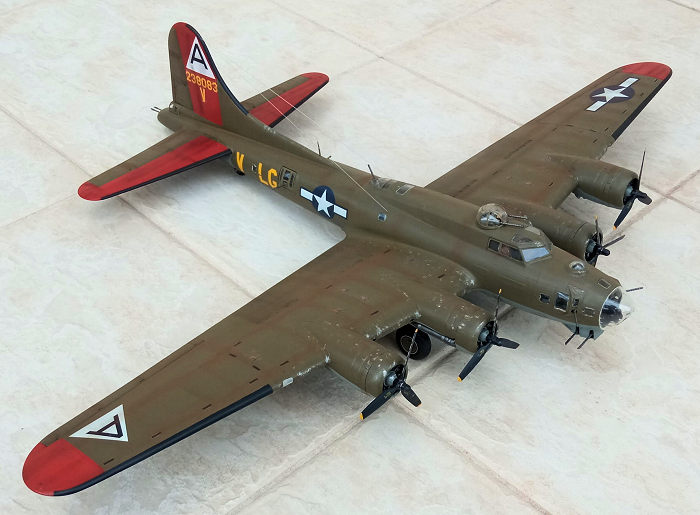 he
Combined Bomber Offensive to help secure air superiority over the cities,
factories and battlefields of Western Europe, in preparation for the invasion of
France in 1944. The type also participated to a lesser extent during the early
stages of the Pacific War, where it conducted raids against Japanese shipping
and airfields.
he
Combined Bomber Offensive to help secure air superiority over the cities,
factories and battlefields of Western Europe, in preparation for the invasion of
France in 1944. The type also participated to a lesser extent during the early
stages of the Pacific War, where it conducted raids against Japanese shipping
and airfields.
Relatively fast and high-flying, with long range and heavy defensive armament at the expense of bombload, it developed a reputation for toughness, based upon stories and photos of badly damaged examples safely returning to base. It was also employed for the transport, antisubmarine, drone control, and search-and-rescue roles.
From its introduction in 1938, this successful plane evolved through numerous design advances. With 12,731 built, it became the third-most produced bomber of all time, behind the B-24 and the Ju88, whereas it dropped more bombs than any other U.S. aircraft in World War II.
As of November 2022 (sadly, after the tragic loss of Texas Raider), nine aircraft remain airworthy, with none of them ever flown in combat. Dozens more are in storage or on static display, the oldest being a D-series flown in combat in the Pacific on the first day of the United States' involvement in World War II.
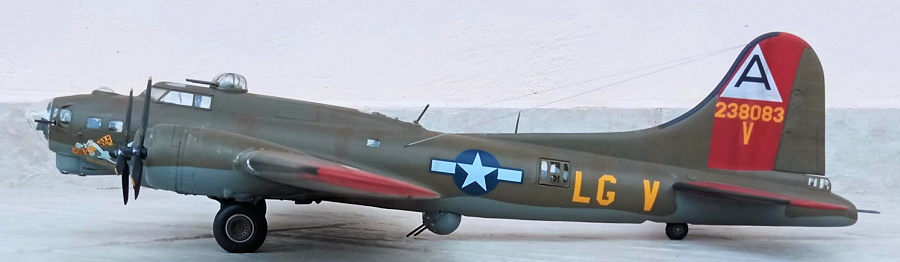
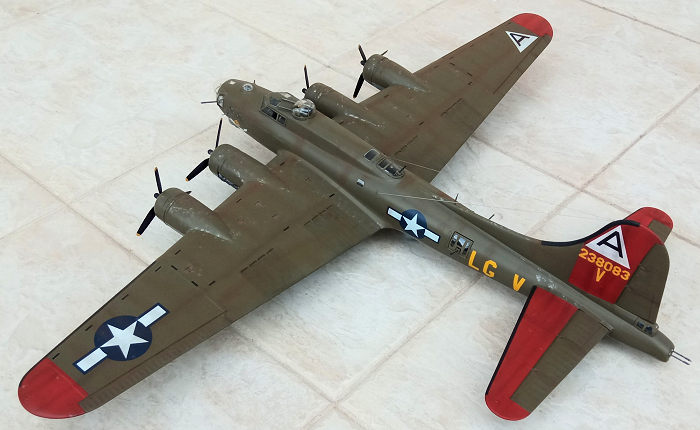
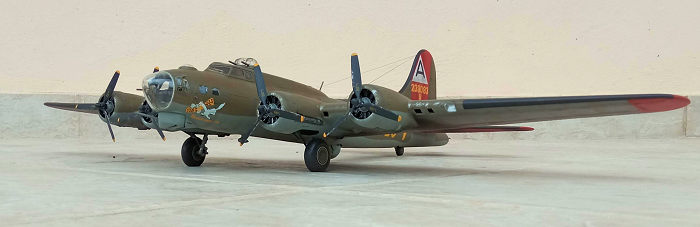
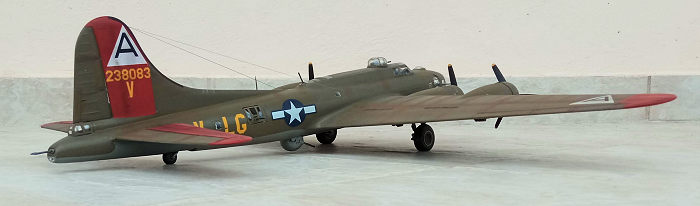
S/n 42-38033 was a “G” series Fortress, delivered 6/12/43. In 1/2/44 she was assigned to 322BS/91BG, Bassingbourn as “LG-V”, carrying the name MAN ‘O WAR II – HORSEPOWER LTD. According to Air Crew Report 10144 she went Missing in Action, Merseburg 2/11/44 (5 Killed in Action), “riddled by formation of enemy aircraft, tailplane broke away and ship crashed”.
| THE KIT |
This is the 2001 Revell rebox of the classic Monogram kit. With the original mold appearing as back as 1975, this very successful kit has been reboxed another 18 times, including a “visible” and a Pro Modeler edition, with three of the reboxings done by Hasegawa. Interestingly, the tooling is not the same as the equally classic Revell B-17 “F” version that appeared in 1978 (three years after the Monogram “G”), though it has been reported that many parts between the two kits are practically interchangeable, let alone the fact that Monogram had been by that time not too happy upon finding out that the Revell molds had “too many similarities” with their tooling.
The subject kit comes in the usual big and nice looking, but relatively flimsy Revell top opening box, carrying an attractive box art of 359th Bomb Squadron’s “Scorchy II”, seemingly on a bombing mission. Upon opening the box, I was greeted with 119 dark green styrene pieces, arranged in four big sprues. Despite their age, the molds seem to hold on well through the years with neither too much flash nor notable warping. Panel lines are raised all over (something not too “wrong”, considering the “overlapping panels” appearance of the real thing), looking quite convincing.'The Interior, though not incomprehensive (all basic elements are there), will definitely benefit from some extra detail, but, truth be told, little can be seen once the fuselage is closed. A more serious remark might be that the bomb bay doors are molded “closed” and will need to somehow be separated if you decide to expose the bomb bay.
 Landing gear
is adequately represented with the bays partly boxed. The wheels are provided
with “weighted” tires that match real looks. The one-piece engines look
convincing, as do the props and the molded-on superchargers. Four bombs are
supplied, together with a good looking bomb cart to place them onto. This and
the five very nice figures provided (two pilots, two mechanics and a crew chief)
can be placed near the completed model and add a diorama flavor.
Landing gear
is adequately represented with the bays partly boxed. The wheels are provided
with “weighted” tires that match real looks. The one-piece engines look
convincing, as do the props and the molded-on superchargers. Four bombs are
supplied, together with a good looking bomb cart to place them onto. This and
the five very nice figures provided (two pilots, two mechanics and a crew chief)
can be placed near the completed model and add a diorama flavor.
Transparencies (an
essential aspect for a WWII multi-engine/multi-glaze bomber kit) are reasonably
well molded and clear. Instructions are nicely done in typical Revell style,
provided to the form of an A4 booklet, containing a short history of the type, a
sprue diagram, with the construction well spread in 60 clear and concise steps,
along with color callouts given throughout the build sequence.
Two very nice schemes are provided: the box art’s “Scorchy II” in natural metal
and the “Man O’ War II” in OD over neutral gray. Decals are superbly done by
Cartograf and still look usable.
Instructions want you to first assemble the interior, the front and belly turrets and the rear wheel housing, then trap them between the fuselage halves. The bombs are to be assembled at this time and can be optionally attached in the bomb bay, but, unless you cut out the bomb bay doors (something not indicated at the instructions, but feasible with some effort), the area will be practically invisible.
Once the fuselage halves are joined, you are instructed to assemble the main landing gear legs and attach them onto the top bay walls, which subsequently have to be trapped between the massive wing halves, with the assembled wings then attached to the fuselage. The tailplanes are next assembled and attached, followed by the top turret and the rest of the side gunners stations. Finally the engines with their props are to be attached to the cowlings and the completed sub-assemblies to the wings.
The last three steps are optional and deal with assembly of the bomb cart and painting of the nice figures, ending a build that looks less complex than possibly expected, on par with the relatively low parts count for a quarter scale four engined bomber.
| CONSTRUCTION |
I started by putting together the fore interior, including pilot, copilot, navigator , bombardier and engineer/gunner positions, basically assembling and adding all interior elements onto the front floor (seats, yokes, Instruments, bulkheads and so on). Main interior color was Hu226 Interior Green with black instrument panel, consoles, yokes, bombsight and various boxes. A silver dry brushing brought out all molded-on details and various “switches” were replicated with white and red paint and a very fine brush.
The seats had “olive”
seat belts and “leather” cushions, the latter color also used for the control
columns’ boots. The navigator’s desk received a “wood” top paint and the
various fire extinguishers, oxygen bottles and the like, painted according to
instructions. Though stated in the instructions, I refrained from attaching
neither the front nor the belly ball turret at that time, in order to protect
them from my not necessarily tender construction practices, only hoping to be
able to attach them at end stages...
 Moving to the
fuselage halves, I first affixed all side windows but the waist gunners’ ones
(the latter can be attached from the outside at later stages), then attached all
interior elements (consoles, ammo magazines and so on). The rear wheel bulkhead
support was also glued at this time, as was the rear gunner’s area tail
supporting frame. Interior painting was similar to the front section.
Moving to the
fuselage halves, I first affixed all side windows but the waist gunners’ ones
(the latter can be attached from the outside at later stages), then attached all
interior elements (consoles, ammo magazines and so on). The rear wheel bulkhead
support was also glued at this time, as was the rear gunner’s area tail
supporting frame. Interior painting was similar to the front section.
The fuselage halves were then joined together with the front compartment trapped between them. The distinctive oval shaped gun mount was also attached to the rear. Since, per my usual lazy style, I would go for closed bomb bay doors, I did not bother to neither add bombs nor detailing the bomb bay, as nothing is visible once the fuselage is assembled.
Onto the wings construction, I first attached the top main wheel bay walls to the lower wing halves, then joined the massive wing halves and attached the completed wings to the fuselage, with the tail planes also assembled and attached. Deviating from the instructions, I did not attach the sensitive main legs before mating the wing halves, only hoping that I will be able to attach them at end stages. The nice one piece engines were painted black, then heavily dry brushed with silver and attached to the cowlings, with the complete assemblies glued to the wings. Cowling innards were painted interior green.
Overall fit was pleasantly positive, with not too many seams or gaps arising, everything easily manageable: not so bad for a 2001 copy of a 1975 mold. Well done, Monogram!
Having a basic model complete, I went on filling all above areas of attention, my biggest problem being handling the sizable model! After blanking all openings with wet tissue and masking all transparencies, I took the voluptuous beast to the paint shop!
| COLORS & MARKINGS |
 I first gave
the areas that are supposed to be red (fin, wingtips and horizontal
stabilizers) a coat of Hu60 Scarlet, then masked it off and continued by
spraying Hu64 gray at all undersides, again masking it off afterwards. For the
top coat I sprayed Hu155 Olive Drab. After masking the borders of all
deicer boot areas, I hand painted them black. Upon drying, all masks were
removed, with a coat of Future preparing the bird for decals.
I first gave
the areas that are supposed to be red (fin, wingtips and horizontal
stabilizers) a coat of Hu60 Scarlet, then masked it off and continued by
spraying Hu64 gray at all undersides, again masking it off afterwards. For the
top coat I sprayed Hu155 Olive Drab. After masking the borders of all
deicer boot areas, I hand painted them black. Upon drying, all masks were
removed, with a coat of Future preparing the bird for decals.
I used the kit decals, in order to represent the aforementioned MAN ‘O WAR II – HORSEPOWER LTD. The Cartograf decals behaved excellently, no remarks whatsoever, with a coat of Future sealing them.
| FINAL CONSTRUCTION |
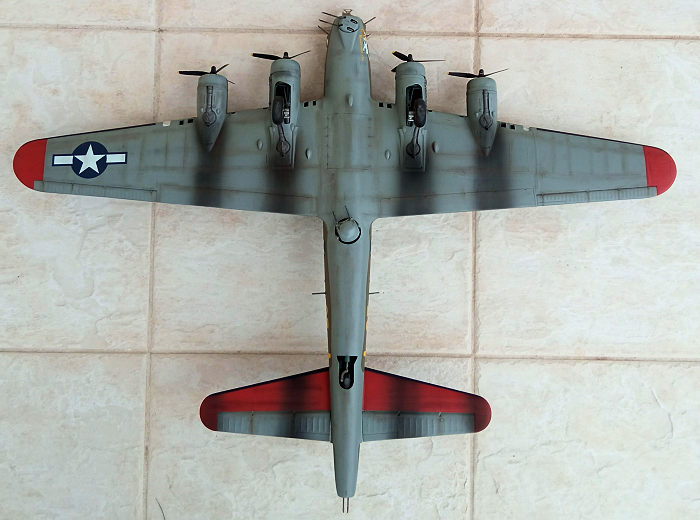
The main landing gear struts, together with their retraction links, were attached in position (with some tweaking, but no real drama), followed by the rear wheel. The two piece main wheels were then attached, with the bird proudly and securely standing on its legs. All struts were painted underside gray, oleos were silver, whereas bays innards were painted interior green. The wheel covers were painted OD with steel outer lips and tires were painted black.
The good looking props
had black hubs, blades and yellow tips and were affixed in position. The
exhausts were also attached, painted Testors Burned Metal, together with the
molded-on superchargers.
 It was then
time for some weathering. Since the kit subject would represent a bird flying
long range missions, I did not hesitate to airbrush some black exhaust staining
at the undersides to the direction of the airflow. Various brown and black dry
pastels were then used to replicate grime and dirt wherever it would likely
accumulate. Some silver dry brushing was applied at the props’ leading edges and
at other areas where personnel would walk or leave their tool boxes. Some black
wash gave the bays innards a more used, realistic look, with an almost matt coat
sealing everything and giving the bird its final finish.
It was then
time for some weathering. Since the kit subject would represent a bird flying
long range missions, I did not hesitate to airbrush some black exhaust staining
at the undersides to the direction of the airflow. Various brown and black dry
pastels were then used to replicate grime and dirt wherever it would likely
accumulate. Some silver dry brushing was applied at the props’ leading edges and
at other areas where personnel would walk or leave their tool boxes. Some black
wash gave the bays innards a more used, realistic look, with an almost matt coat
sealing everything and giving the bird its final finish.
The top and the belly ball turrets, as well as the front remote controlled one,
were assembled and attached in position. The nose glazing, the waist gunners’
and the top radio operator’s windows had their guns secured with Clearfix and
also attached, followed by the windscreen, the astrodome, the small window at
the front, as well as the rear gunner’s and the radio operator’s windows. The
two landing light lenses were attached at this time,, their fit being average,
presumably due to Yours Truly error. All transparencies had their frames hand
painted, whereas guns were painted gunmetal with brass ammo belts.
The top antenna mast, the side mounted DF loop and the pitot were attached and
accordingly painted. Two aerial wires made from stretched sprue were run from
the fin front to the fuselage, per the Revell diagram. The wing tip lights were
replicated with tiny blobs of red and green clear paint, before calling this
beautiful bomber done!
| CONCLUSIONS |
Though clearly
superseded by the 2019 HK offering, this is still a decent kit of the iconic
Flying Fortress. General shape is correct, parts count is relatively low, fit is
pleasantly uneventful, transparencies are clear and well fitting, instructions
are very good and the decal sheet is superb.
Exterior detail at key areas (engines, landing gear and so on), though not
plentiful, is sufficient and the same can be said for the interior details (as
little will be visible once the fuselage halves are joined). Out of the box, a
very nice representation of the Fortress can occur, with the “cursed” raised
panel lines this kit possesses looking not too departing from the actual
“overlapping panel” posture of the real thing.
Life moves forward and so does modeling, with the HK kit being the latest and
greatest, a clearly superior kit in practically every respect but the price
offered, with its fresh, crisp molds reassuring a bright future. However, the
venerable Monogram can still hold its own even nowadays: priced at practically
one third of the HK, it represents an older, simpler, less detailed alternative
that can still yield a very attractive result with not too much effort. The
amount of aftermarket offered for the Monogram kit is, understandably due to the
kit’s long heritage, tremendous and will definitely improve the final looks,
with the decision of spending extra money on aftermarket or going for the more
expensive but more comprehensive HK left to the modeler.
Regularly reissued by Revell, with the last reboxing in 2018, I will not be
surprised to see this classic beauty reissued in the future till the molds can
hold no more. If you are on a budget and look for an uncomplicated build of the
iconic B-17, or if you even own one of these kits, go on and build it! An
imposing Fortress will emerge, only asking for a sizable space to be placed!
Happy modeling!
23 March 2023
Copyright ModelingMadness.com. All rights reserved. No reproduction in part or in whole without express permission from the editor.
If you would like your product reviewed fairly and fairly quickly, please contact the editor or see other details in the Note to Contributors.