Revell 1/72 B-24D Liberator
| KIT #: | 4403 |
| PRICE: | AUD$10.00 'Used' |
| DECALS: | Two options |
| REVIEWER: | George Oh |
| NOTES: | A typical early Revell kit with working features (+) and lots of large rivets. 1985 release. |
| HISTORY |
The Consolidated B.24 was a WWII American four-engined heavy bomber designed in 1938. It was the 'other brother' to the (in the opinion of a lot of people) more-famous, more-elegant Boeing B.17 Flying Fortress. The first B.24s had a short glass-fronted nose, but that was lengthened ('cos it 'looked wrong'), and later it sprouted a gun turret. B.24s commenced combat operations in 1941 with the British RAF, who gave it it's name, the Liberator.
It was unkindly referred-to
as 'the box that the B.17 came-in' because of its more-portly form.
Unfortunately, the B.24's high (aka shoulder-mounted) wing (vs the B.17's low
wing) made it fragile in forced landings - especially in water (vs the B.17's
robustness). Throughout its life, the
 Liberator
retained its four engines, its high aspect ratio (ie, long & narrow) Davis wings
and its roller-shutter (in-lieu of every other bomber's conventional) bomb bay
doors. On the ground, the doors were often left open to vent the fuselage of any
possible petrol vapour, so preventing a possible explosion when the aircraft was
started.
Liberator
retained its four engines, its high aspect ratio (ie, long & narrow) Davis wings
and its roller-shutter (in-lieu of every other bomber's conventional) bomb bay
doors. On the ground, the doors were often left open to vent the fuselage of any
possible petrol vapour, so preventing a possible explosion when the aircraft was
started.
However, compared to the B.17, the B.24 was faster, could fly further and was a more-versatile airframe, so it also fought as a long-range anti-submarine patrol bomber, a fuel, cargo or passenger transporter, as an aircrew trainer, and some war-weary hacks were converted into remote-controlled, unmanned/drone flying bombs.
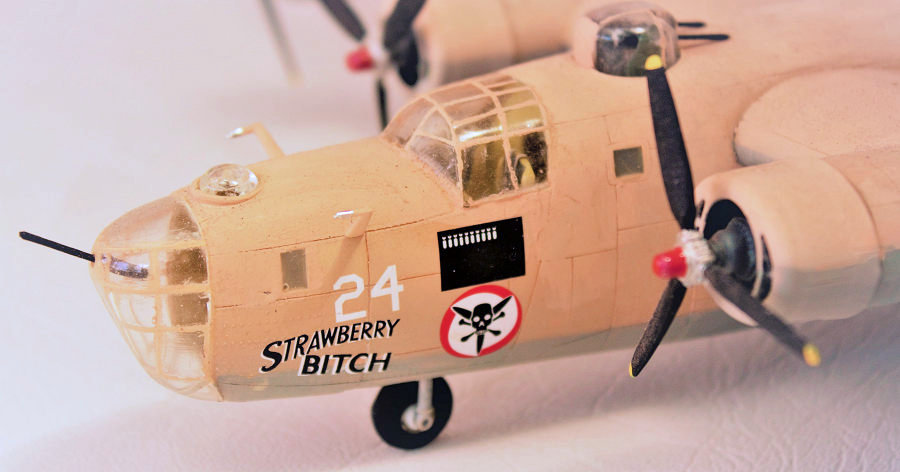
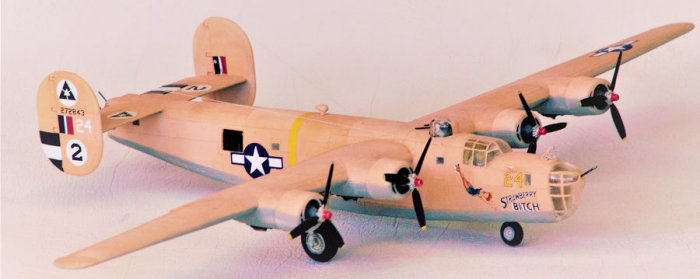
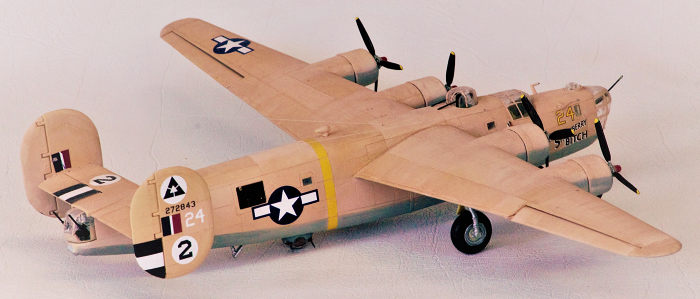
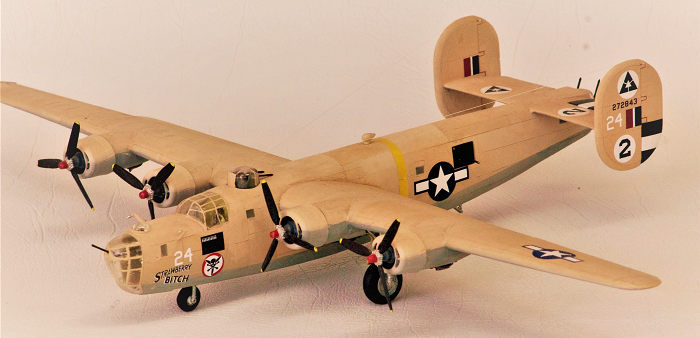
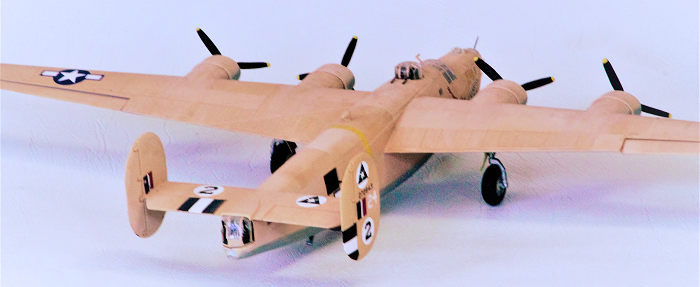
In Aug, 1943, B.24D SN 42-72843 was assembled at the Consolidated plant in San Diego, ferried overseas, and delivered to the 512th Bombing Squadron, 376th Heavy Bombardment Group, 9th Air Force in Egypt, where her crew named her "Strawberry Bitch". Each aircraft of the 376th was assigned a Recall Code (RCL), that got painted on its nose and vertical tail. "Strawberry Bitch" was assigned RCL 24. She then flew over 50 combat missions from North Africa during September 1943 to June of 1944.
After World War II, she was returned back to the USA and stored at the Davis-Monthan Army Air Force Base boneyard in Tucson, Arizona along with many others. In 1946 she was selected for preservation and, after the interesting bits of her nose-art were covered-up (they had PC back then too?), she was flown to Dayton for restoration and display in the Air Force museum. Once there, her belly turret was transplanted into a B.17 (so she don't got one now). But she is still wearing the camouflage of her time in North Africa. Officially, the paint was desert tan, but under the intense sunlight, it gradually faded to a pinkish hue that the USAAF personnel liked to call 'nipple pink' (they didn't have PC in the desert war). Because it faded gradually over time, there cannot be a 'definitive' shade of 'nipple pink', can there?
| THE KIT |
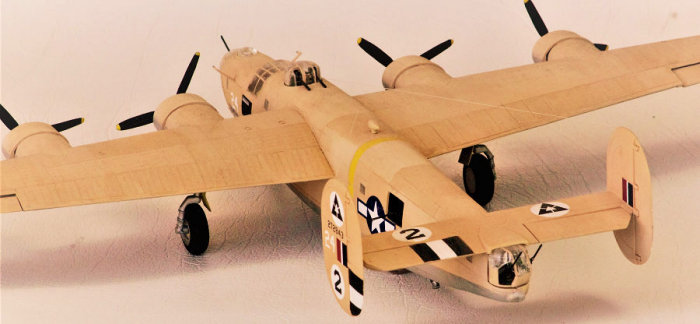
This kit hales from 1976, and has been re-released multiple times with different decals. It has features that were all the rage back then - covered externally with scores of huge rivets, turning wheels, spinning propellers, rotatable turrets with elevating guns, retractable undercarriage (UC) and movable control surfaces. This kit went the extra mile by having closable nose UC doors, movable flaps, and tail elevators that moved together because they were linked.
 There are 86
parts moulded in hard, brittle plastic, and 16 transparent (but not necessarily
clear) parts that are also brittle. The framing on the clear parts is quite
bold, but the internal detail is basic (in the cockpit) or non-existent (in the
waist-gun area). The engines are moulded as a single bank inside the cowlings
and so will be difficult to paint in detail. By looking through the front
bubble, the whole inside of the fuselage should be visible, right back to the
rear turret position.
There are 86
parts moulded in hard, brittle plastic, and 16 transparent (but not necessarily
clear) parts that are also brittle. The framing on the clear parts is quite
bold, but the internal detail is basic (in the cockpit) or non-existent (in the
waist-gun area). The engines are moulded as a single bank inside the cowlings
and so will be difficult to paint in detail. By looking through the front
bubble, the whole inside of the fuselage should be visible, right back to the
rear turret position.
I bought this B.24 because I prefer the D-version over the later turret-nosed versions - and because it was cheap. I started building it because I've always wanted to build the preserved B.24D "Strawberry Bitch", because I (and my youngest son) love the name, and because a looming competition had 'Pink' as its Special Theme category. For reference material, I took a virtual tour through Strawberry Bitch as she appears in her preserved state. There were quite a few differences, especially with the number and location of machineguns in the nose - the kit provides one mounted high one vs the aircraft's two cheek guns (in larger windows) and a chin gun.
| CONSTRUCTION |
I resolved to tackle a few minor improvements. I'd be using a Terry Dean nose weight (a first for me), and I had some white metal Browning 50Cal HMGs that I could sub-in for some of the kit ones (which aren't all the same size). I'd be building Strawberry Bitch with the UC and the control surfaces glued in-place, but the propellers, turrets and guns would move. And as I'm NOT an advocate of trying to replicate an aircraft as she appears in every single photo taken of her during her life in service, I picked one reference, and built my model that way.
I started this model by dry-fitting parts and building sub-assemblies. I painted and built the UC, the tailplane assembly, fins & rudders, the cockpit and the gun-turrets (without any of the crew figures). I'd do the belly turret later. At the same time, I painted the insides of the fuselage.
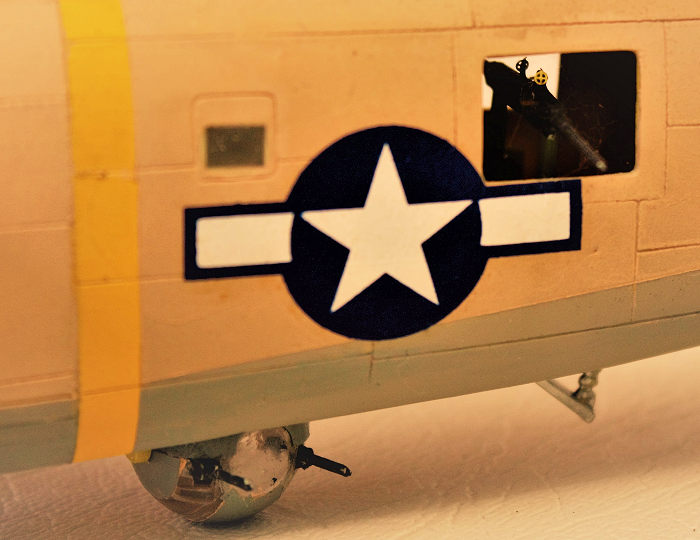
 The waist
gunners poked their 50Cal Browning HMG out through a large square(ish) gun port
that was closed by an equally-large panel with a small window in it. Because I
didn't want to break-off the waist guns during the build, I elected to keep the
waist-gunner ports open so that I could install the guns near the end of the
build. But then, the belly seam would be clearly visible through those large
ports, so naturally, I wanted to conceal it. I fitted a strip of plastic card
into the rear fuselage to serve as the floor for the gunners, and painted it in
a few browns to represent wood. The panels that closed the gun ports were hinged
at the top. The gunner lifted the bottom edge of his panel and clipped it to the
roof (then hoped that it didn't come crashing down as he fired his gun). This
was easily replicated by gluing the panels inside (after painting them).
The waist
gunners poked their 50Cal Browning HMG out through a large square(ish) gun port
that was closed by an equally-large panel with a small window in it. Because I
didn't want to break-off the waist guns during the build, I elected to keep the
waist-gunner ports open so that I could install the guns near the end of the
build. But then, the belly seam would be clearly visible through those large
ports, so naturally, I wanted to conceal it. I fitted a strip of plastic card
into the rear fuselage to serve as the floor for the gunners, and painted it in
a few browns to represent wood. The panels that closed the gun ports were hinged
at the top. The gunner lifted the bottom edge of his panel and clipped it to the
roof (then hoped that it didn't come crashing down as he fired his gun). This
was easily replicated by gluing the panels inside (after painting them).
Terry Dean's nose weight is a lump of lead purposely-moulded to fill the nose of this aircraft. It even has an east/west grove that accommodates the kit's alignment pin and socket, so the fit is perfect. I attached it to one side with 5-minute epoxy glue, then painted it interior green When the fuselage is closed, the cockpit, nose wheel housing, three gun turrets (rear, belly and top) and the nose weight, have to be trapped between the two halves. Then, the turrets would cause problems during the painting stage. Like the others, the belly turret is to be completely movable. Revell does this by suspending the two-piece ball of the turret between the arms of a (roughly Y-shaped) yoke, then hanging the stem of the yoke through an arched bracket. The bracket attached above a plate that forms part of the external fuselage. To avoid future filling and painting problems, I glued the arch with its moving parts (but without the turret ball) to the belly plate, then the plate into position as I closed the fuselage.
To retract the nose wheel, Revell devised a clever method for the nose wheel housing to rotate up and back into the fuselage. Unfortunately, the nose wheel housing can't be locked in a down position, so the model might suddenly drop down onto its belly. To avoid this problem, I elected to forego the kits 'retracting UC' option. An inaccuracy of the model is that the two nose wheel doors hang down from the fuselage so that they can be closed when the nose wheel is stowed. In fact, on the D's, the doors slide up into the fuselage and lined the nose-wheel bay. So I just left-off the nose wheel doors were as though they were already up in the nose wheel bay. Easy!!! Yay me!!!
 The wings
were assembled next. I hacked-out elements of their insides so that I could
insert the UC legs at a later date (to avoid future masking problems. OK - I'm
lazy!! So sue me.) The flaps and ailerons were glued firmly in-place because,
having built other old Revell kits, I know that their retaining pins, which also
serve as their hinges, are slim and brittle, and will soon break. The engine
cowlings were tacked in-place so that they could be painted with the rest of the
airframe. I now attached the fins and rudders. Squeezing them gently between the
jaws of a clamp ensured a firm bond and that they were parallel & vertical.
Next, the wings were attached - with repeated checks of their alignment to the
tail.
The wings
were assembled next. I hacked-out elements of their insides so that I could
insert the UC legs at a later date (to avoid future masking problems. OK - I'm
lazy!! So sue me.) The flaps and ailerons were glued firmly in-place because,
having built other old Revell kits, I know that their retaining pins, which also
serve as their hinges, are slim and brittle, and will soon break. The engine
cowlings were tacked in-place so that they could be painted with the rest of the
airframe. I now attached the fins and rudders. Squeezing them gently between the
jaws of a clamp ensured a firm bond and that they were parallel & vertical.
Next, the wings were attached - with repeated checks of their alignment to the
tail.
All small windows appertures were sealed with Krystal Kleer. And the cockpit canopy was glued in-place. Filler was needed almost everywhere, especially round the belly turret's plate. The whole model was carefully wet-sanded to knock-back all of those rivets.
| COLORS & MARKINGS |
Masking the canopy was tedious. Masking the top & tail turrets (with plastic wrap and paper) was difficult, so a LOT of care was needed so as NOT to break-off the guns. Plugging the gun ports, bomb aimer's position, wheel wells and belly turret socket with bits of sponge, was easy.
In her current preserved state, "Strawberry Bitch" has a pinkish flesh-coloured paint scheme over a light grey belly, with a narrow yellow band around the fuselage. So I sprayed-on the yellow first, then masked it with a strip of tape. Next, I sprayed-on the light grey because it was easier to lay masking tape on the curved undersides of the wings beside the fuselage, than to follow the aerofoil shape of the wing on the sides of the fuselage. I even remembered the main UC doors. For the desert tan/nipple pink, I sprayed-on the last of my Polyscale sand (F414302) because it looks about right. But the coat was too uniform, and there wasn't anything I could do about it.
 But now I had
a touch of serendipity (= a lucky accident). I brush-on some Future in
preparation for the decals, and it changed the hue of the colour. This served to
break-up the uniformity of the coat. And after unmasking the model, I had to
touch-up the paint. I did this with the same paint applied with a brush, and
this too, added another hue to the original coat. So, at a stroke (actually,
quite a few), I had my panelling. While I had the brushes out, I did the red
propeller spinners. I didn't paint-on the de-icer boots because they aren't on
the real aircraft.
But now I had
a touch of serendipity (= a lucky accident). I brush-on some Future in
preparation for the decals, and it changed the hue of the colour. This served to
break-up the uniformity of the coat. And after unmasking the model, I had to
touch-up the paint. I did this with the same paint applied with a brush, and
this too, added another hue to the original coat. So, at a stroke (actually,
quite a few), I had my panelling. While I had the brushes out, I did the red
propeller spinners. I didn't paint-on the de-icer boots because they aren't on
the real aircraft.
I was fortunate because I had a partial decal sheet for "Strawberry Bitch", the kit decals, the Microscale B.24Bombers sheet (72-24) and the Mike Grant's decal sheet for 'The Bitch', but my model could replicate only an instant in her life. I followed the Mike Grant instructions. Naturally, I selected the best nose-art decal. It was a two-part decal - the first piece being a white silhouette. The rest went-on without protest. But then, spraying-on a sealing clear-flat coat blew-off one of the fin-flashes. Fortunately, I was able to pick-up from a dusty floor, clean it, and then to carefully put it back in place onto a drop of clear flat paint. Yay me (again)!!!
| FINAL CONSTRUCTION |
I completed the engines and propellers (including scratch-building three replacement propeller blades), then I swung the nose wheel housing into position and glued it down. The main UC legs came next. I wish I'd done it the wheels first, and the engines second, because, despite the TD nose-weight, she was still a tail-sitter. If I had known better, I would have stuffed some nuts and bolts into the engine nacelles, because they are the right shape - round and long
 Attaching
the bomb-aimer's seat and nose bubble (with its one gun) was easy. Attaching the
belly turret was not. The solid top part was to be glued to the clear bottom
part (with its two short guns). Instead, I attached them as left and right
halves (with the guns pointing downwards) to trap the pins of the Y-yoke between
them, so that the turret ball would roll into position as it was designed to do.
The last bits were the nose astrodome, the tail-bumper, and the DF football. The
kit instructions indicate that the two long pitot tubes should be placed
half-way up the nose and orientated horizontally. On the actual aircraft, they
are level with the top of the nose and angled upwards - so that's how I attached
them.
Attaching
the bomb-aimer's seat and nose bubble (with its one gun) was easy. Attaching the
belly turret was not. The solid top part was to be glued to the clear bottom
part (with its two short guns). Instead, I attached them as left and right
halves (with the guns pointing downwards) to trap the pins of the Y-yoke between
them, so that the turret ball would roll into position as it was designed to do.
The last bits were the nose astrodome, the tail-bumper, and the DF football. The
kit instructions indicate that the two long pitot tubes should be placed
half-way up the nose and orientated horizontally. On the actual aircraft, they
are level with the top of the nose and angled upwards - so that's how I attached
them.
The last two bits were the waist guns. I detailed them with cocking handles and PE ring-sights. As planned, they were easy to pushed into place through the opposite waist-gun window.
| CONCLUSIONS |
I've had three critics come up to me and declare that my model is totally wrong, because in THIS photo, or THAT photo, or on the preserved aircraft, she has de-icer boots, or that she certainly doesn't have red spinners or fin flashes or........ So my model must be wrong. My (sarcastic) answer is that in THIS photo, she does, so your photo, or the real aircraft, must be wrong. OK - I fully realise that ALL are correct because each depict her at different times in her life. I wish critics would realise that too.
Despite the differences between the my model, multiple photos of The Bitch during her lengthy wartime service, and The Bitch as she stands today, I am still pleased with my model. If I wasn't, then I would have kept working on it till I was. While I acknowledge that there are now better, more-modern kits of the B.24D available on the market (eg, the Academy kit with an open bomb bay option), this old kit is still buildable, so I recommend it to a less-discerning builder. I recommend that you take the virtual tour through The Bitch, because it is intensely interesting. If you are a superdetailer (Good on you), then it provides you with a brilliant reference. But for me, I'm just a model-builder who enjoys building models.
25 July 2022
Copyright ModelingMadness.com. All rights reserved. No reproduction in
part or in whole without express permission. If you would like your product reviewed fairly and fairly quickly, please contact the editor
or see other details in the
Note to
Contributors. Back to the Main Page
Back to the Review
Index Page
Back to the Previews Index Page